Lesson 20. Manage Advanced Network Settings
Goals
![]() Understand the macOS network configuration architecture
Understand the macOS network configuration architecture
![]() Manage multiple network locations and service interfaces
Manage multiple network locations and service interfaces
![]() Configure advanced network settings
Configure advanced network settings
A strong understanding of network fundamentals is required to properly configure advanced network settings without error. Consequently, this lesson builds on the network essentials topics covered in the previous lesson. This lesson focuses squarely on the unique and powerful macOS user interface for managing network configuration, Network preferences. First, this lesson presents an overview of the macOS network configuration architecture and supported network interfaces and protocols. You will then dive deeper into the more advanced network configuration options.
Reference 20.1 Manage Network Locations
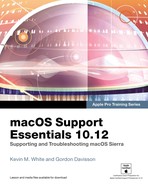
Similarly to how applications are designed to save information to any number of individual documents, macOS enables you to save network settings to any number of individual network configurations, known as network locations. A network location contains all network interface, service, and protocol settings, allowing you to configure as many unique network locations as you need for different situations. For example, you could create one network location for home and a different one for work. Each location would contain all the appropriate settings for that location’s network state.
A network location can contain numerous active network service interfaces. This allows you to define a single location with multiple network connections. The system automatically prioritizes multiple service interfaces based on a service order that you set. Details about using multiple network service interfaces are covered throughout this lesson.
It is not necessary to add new network locations to change network settings, but it is more convenient, because you can easily switch back to the previous network location if you make a mistake. Thus, creating additional network locations is an essential network troubleshooting technique. Also, because macOS always requires one active network location, if you ever want to temporarily turn off networking you have to create a new location with all the network service interfaces disabled.
Configure Network Locations
The default network location on macOS is called Automatic. Despite this, this first location is no more automatic than any other network location you create. The initial location is called Automatic to indicate that it attempts to automatically initialize any network service interface to establish a TCP/IP connection via DHCP—but all network locations, regardless of their name, attempt this as well.
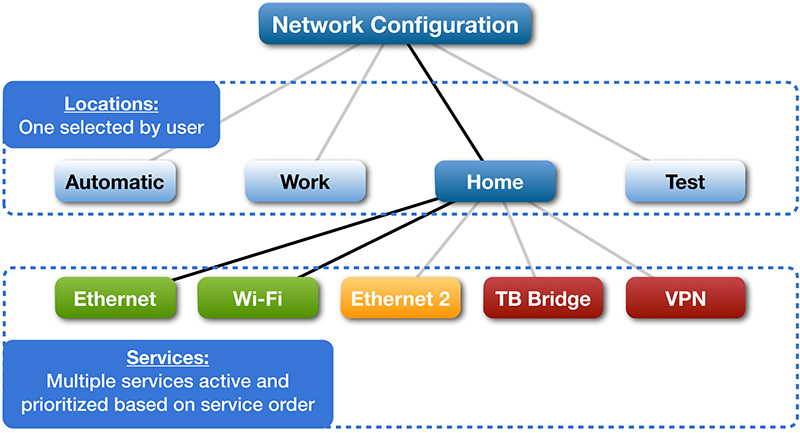
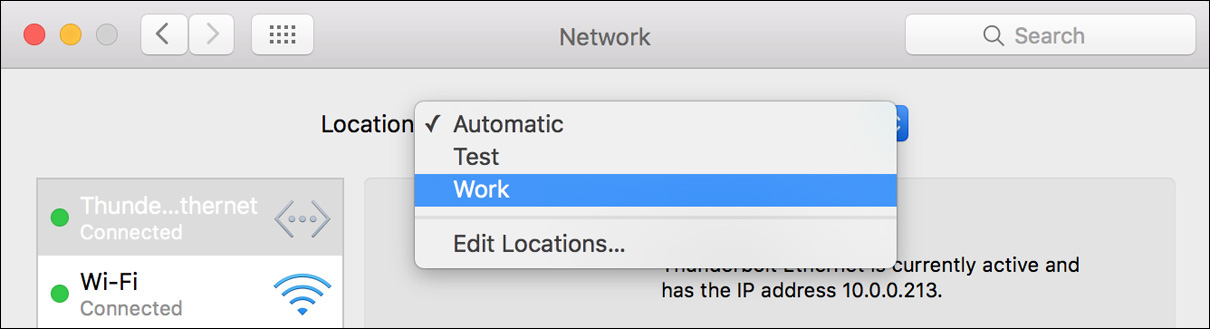
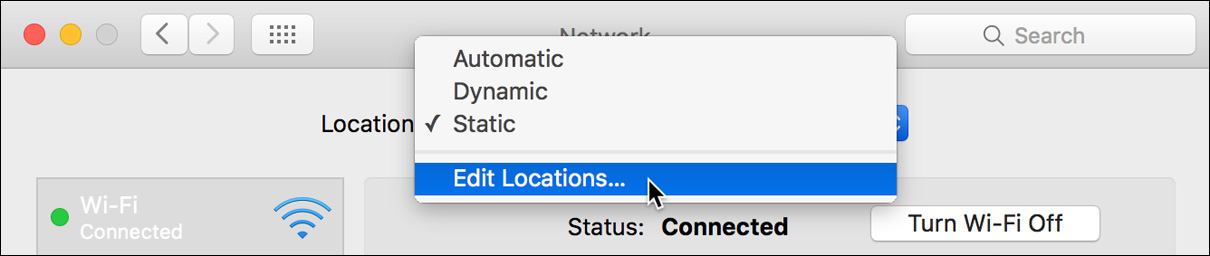
To configure network locations, open Network preferences by choosing Apple menu > System Preferences and then clicking the Network icon. You may have to click the lock icon in the lower-left corner and authenticate as an administrator user to unlock Network preferences. Choose Edit Locations from the Location pop-up menu to reveal the interface for editing network locations.
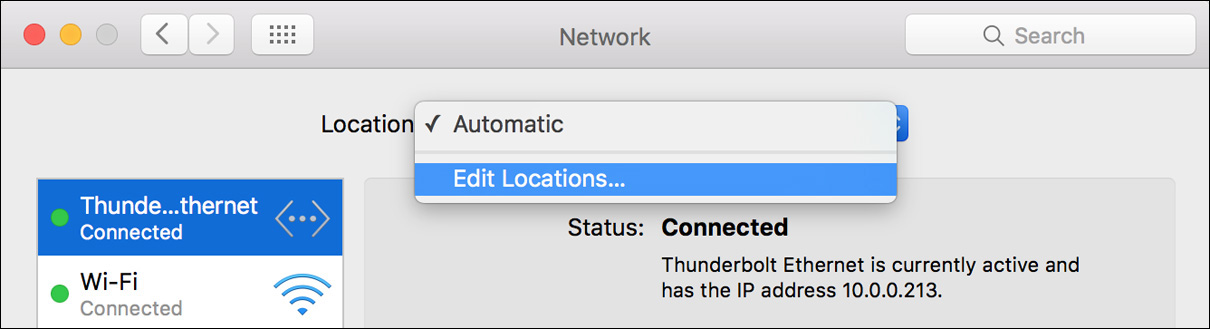
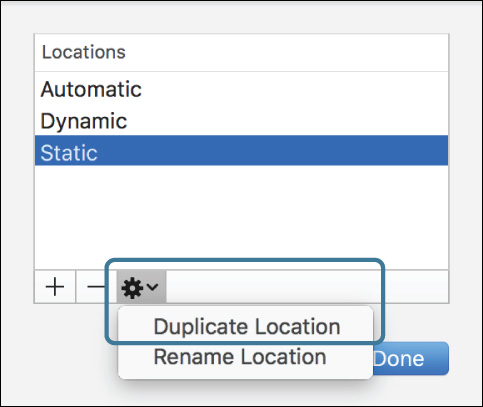
To add a new location with default settings, click the Add (+) button and then enter a new name for the location. Or you can duplicate an existing location by selecting its name from the Locations list, clicking the Action button (gear icon), and then choosing Duplicate Location from the pop-up menu. Finally, double-clicking a location name allows you to rename it.
When you are finished making location changes, click Done to return to Network preferences. Network preferences automatically loads the newly created location but won’t apply the location settings to the system. If you want to work with another location, choose it from the Location pop-up menu, and Network preferences loads it but won’t apply it to the system.
You may have noticed that the network settings are different from all the other system preferences in that you must click Apply to activate the new settings. This allows you to easily prepare new network locations and services without disrupting the current network configuration.
Tip
If you make a mistake at any time using Network preferences, click Revert to return to the current active network configuration.
Select a Network Location
Though you can certainly choose and apply a different network location from Network preferences, only administrator users have this ability, since normal users do not have access to Network preferences. Conversely, all users (including standard users) can quickly and easily change the network location by choosing Apple menu > Location > <location name>.
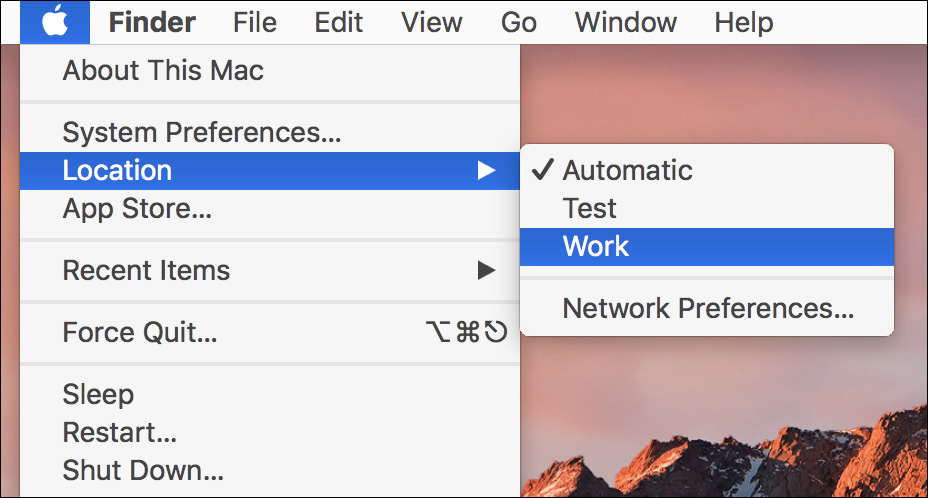
This applies the selected network location. Keep in mind that changing locations may interrupt network connections. Once a network location is selected, it remains active until another location is selected. Even if other users log in to the Mac or the Mac is restarted, the selected network location remains active.
The Location menu option does not appear in the Apple menu if only one network location exists. Thus, from an administrative perspective, if you want to configure the system so that standard users cannot change network locations, do not configure additional network locations.
Reference 20.2 About Network Interfaces and Protocols
Mac hardware has a long history of providing built-in network connectivity. Apple started including Ethernet on Mac computers as early as 1991, and it was the first manufacturer to have wireless as a built-in option when it introduced the iBook in 1999. Mac models have varied over the years as network technologies have grown increasingly faster and more affordable.
About Network Hardware Interfaces
You can identify the hardware network service interfaces available to your Mac from the /Applications/Utilities/System Information or /System/Library/CoreServices/Applications /Network Utility applications. Many of these interfaces automatically appear as a network service in Network preferences.
The newest hardware interface on Mac computers is Thunderbolt 3, a very high-speed connection technology. Thunderbolt, in all its versions, is also extremely flexible, allowing for a wide variety of adapters. For example, Apple offers a Thunderbolt-to–Gigabit Ethernet Adapter and a Thunderbolt-to-FireWire adapter. In the previous screenshot, note the awkward name truncation for the attached Thunderbolt adapters.
macOS includes built-in support for the following hardware network interfaces:
![]() Bluetooth—This relatively low-speed wireless interface has become popular as a short-range connectivity standard. Every recent Mac that includes Wi-Fi support also includes Bluetooth. macOS supports Bluetooth as a network bridge to some mobile phones and hotspots, like iPhones, that can provide Internet connectivity via a cellular network.
Bluetooth—This relatively low-speed wireless interface has become popular as a short-range connectivity standard. Every recent Mac that includes Wi-Fi support also includes Bluetooth. macOS supports Bluetooth as a network bridge to some mobile phones and hotspots, like iPhones, that can provide Internet connectivity via a cellular network.
![]() Ethernet—Ethernet is the family of IEEE 802.3 standards that define most modern wired LANs. Every Mac desktop since 1997 has included standard built-in Ethernet connectivity, with some models even featuring multiple Ethernet interfaces. Until recently most Mac portables also included standard built-in Ethernet connectivity. However, with the prevalence of Wi-Fi networks and the popularity of smaller portable devices, recent Mac portables are dropping standard Ethernet connectivity. For these systems Apple offers optional USB Ethernet (100baseT) and Thunderbolt-to–Gigabit Ethernet adapters.
Ethernet—Ethernet is the family of IEEE 802.3 standards that define most modern wired LANs. Every Mac desktop since 1997 has included standard built-in Ethernet connectivity, with some models even featuring multiple Ethernet interfaces. Until recently most Mac portables also included standard built-in Ethernet connectivity. However, with the prevalence of Wi-Fi networks and the popularity of smaller portable devices, recent Mac portables are dropping standard Ethernet connectivity. For these systems Apple offers optional USB Ethernet (100baseT) and Thunderbolt-to–Gigabit Ethernet adapters.
![]() FireWire—FireWire is the Apple marketing name for the IEEE 1394 connection standard. Though not a common network standard, macOS includes software that allows you to create small ad hoc networks using daisy-chained FireWire cables. FireWire is standard on many older Mac models.
FireWire—FireWire is the Apple marketing name for the IEEE 1394 connection standard. Though not a common network standard, macOS includes software that allows you to create small ad hoc networks using daisy-chained FireWire cables. FireWire is standard on many older Mac models.
![]() Thunderbolt Bridge—As with FireWire, you can create small ad hoc networks using daisy-chained Thunderbolt cables. Thunderbolt is standard on most newer Mac systems and offers higher performance than FireWire.
Thunderbolt Bridge—As with FireWire, you can create small ad hoc networks using daisy-chained Thunderbolt cables. Thunderbolt is standard on most newer Mac systems and offers higher performance than FireWire.
![]() USB—Although USB is not technically a network connectivity standard, macOS supports a variety of USB adapters that provide Internet access via cellular networks. Also, many modern phones feature a “tethering” service that provides Internet access via a USB connection to the phone. The iPhone is an example of a device that offers tethering connectivity.
USB—Although USB is not technically a network connectivity standard, macOS supports a variety of USB adapters that provide Internet access via cellular networks. Also, many modern phones feature a “tethering” service that provides Internet access via a USB connection to the phone. The iPhone is an example of a device that offers tethering connectivity.
![]() Wi-Fi—Previously referred to by the Apple marketing name AirPort, Wi-Fi is the more common name for the family of IEEE 802.11 wireless standards, which have become the default implementation for most wireless LANs. The AirPort name is still used in reference to the Apple family of Wi-Fi network base stations: AirPort Express and AirPort Extreme. Every desktop and portable Mac since 2006 has included standard built-in Wi-Fi connectivity. Wi-Fi was an option for older Mac Pro computers, but starting with the new smaller Mac Pro design in 2013, Wi-Fi is standard.
Wi-Fi—Previously referred to by the Apple marketing name AirPort, Wi-Fi is the more common name for the family of IEEE 802.11 wireless standards, which have become the default implementation for most wireless LANs. The AirPort name is still used in reference to the Apple family of Wi-Fi network base stations: AirPort Express and AirPort Extreme. Every desktop and portable Mac since 2006 has included standard built-in Wi-Fi connectivity. Wi-Fi was an option for older Mac Pro computers, but starting with the new smaller Mac Pro design in 2013, Wi-Fi is standard.
About Cellular Internet Connections
Internet access via cellular networks is nothing new, but in the last few years this type of connectivity has seen a huge growth in popularity. With most major carriers offering ever-faster near-broadband speeds and expanded geographical coverage, many people are relying on cellular networks as their primary Internet access. As a result, a variety of devices and methods are available for providing cellular Internet access for your Mac.
Note
The capabilities and configuration of cellular devices vary greatly. Check with your cellular device vendor about how to enable Internet access for your specific device.
macOS supports use of cellular Internet connections via:
![]() Bluetooth personal area network (PAN)—Many current cellular devices allow for Internet connectivity by acting as a small router providing a PAN available via Bluetooth wireless. For example, an iPhone can provide Internet access via Bluetooth PAN. As with any Bluetooth device, you must first pair your Mac with the mobile device, as covered in Lesson 24, “Troubleshoot Peripherals.” Once the two are paired, configuration should be automatic—the Mac should configure TCP/IP using DHCP hosted from the cellular device. You have to initiate the connection by clicking the Connect button in Network preferences or by choosing the device and clicking “Connect to Network” in the Bluetooth status menu.
Bluetooth personal area network (PAN)—Many current cellular devices allow for Internet connectivity by acting as a small router providing a PAN available via Bluetooth wireless. For example, an iPhone can provide Internet access via Bluetooth PAN. As with any Bluetooth device, you must first pair your Mac with the mobile device, as covered in Lesson 24, “Troubleshoot Peripherals.” Once the two are paired, configuration should be automatic—the Mac should configure TCP/IP using DHCP hosted from the cellular device. You have to initiate the connection by clicking the Connect button in Network preferences or by choosing the device and clicking “Connect to Network” in the Bluetooth status menu.
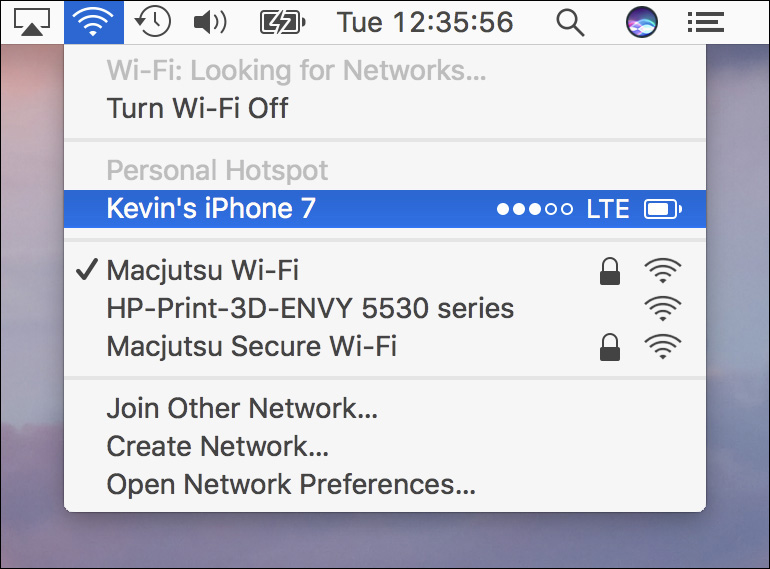
![]() USB cellular network adapters—Again, USB is not technically a network connectivity standard, but macOS supports a variety of USB adapters and tethered phones that provide cellular Internet access. The iPhone is an example of such a device, and in typical Apple fashion all configuration on the Mac is automatic. If tethering is available on your mobile phone data plan, plug an iPhone in via the USB adapter cable, and then on the iPhone turn on the Personal Hotspot feature. Conversely, third-party cellular Internet devices vary, and many require the installation and configuration of third-party drivers.
USB cellular network adapters—Again, USB is not technically a network connectivity standard, but macOS supports a variety of USB adapters and tethered phones that provide cellular Internet access. The iPhone is an example of such a device, and in typical Apple fashion all configuration on the Mac is automatic. If tethering is available on your mobile phone data plan, plug an iPhone in via the USB adapter cable, and then on the iPhone turn on the Personal Hotspot feature. Conversely, third-party cellular Internet devices vary, and many require the installation and configuration of third-party drivers.
![]() Wi-Fi PAN—As with Bluetooth, many cellular devices can act as a small Wi-Fi access point. Thus, any device that supports Wi-Fi can connect to the cellular device without any special software. On any iOS device that supports cellular connections, you can enable Personal Hotspot for Wi-Fi. Select the Wi-Fi network the iOS device is hosting and provide authentication, if necessary. iOS devices running iOS 8 or later and Mac computers running OS X Yosemite 10.10 or later can take advantage of Handoff to automatically authenticate to another iOS device acting as a personal hotspot. This automatic authentication requires that Handoff is enabled and that you are signed in to iCloud on both devices. Once you’re connected, inspecting the Wi-Fi connection in Network preferences reveals that the iOS device appears identical to a traditional Wi-Fi router.
Wi-Fi PAN—As with Bluetooth, many cellular devices can act as a small Wi-Fi access point. Thus, any device that supports Wi-Fi can connect to the cellular device without any special software. On any iOS device that supports cellular connections, you can enable Personal Hotspot for Wi-Fi. Select the Wi-Fi network the iOS device is hosting and provide authentication, if necessary. iOS devices running iOS 8 or later and Mac computers running OS X Yosemite 10.10 or later can take advantage of Handoff to automatically authenticate to another iOS device acting as a personal hotspot. This automatic authentication requires that Handoff is enabled and that you are signed in to iCloud on both devices. Once you’re connected, inspecting the Wi-Fi connection in Network preferences reveals that the iOS device appears identical to a traditional Wi-Fi router.
About Virtual Network Services
A virtual network service is a logical network within a hardware network interface. Think of a virtual network service as providing another unique network interface by carving out a section of an established network connection.
Some virtual network services are used to increase security by encrypting data before it travels across an IP network, and others are used to segregate or aggregate network traffic across LAN connections. macOS includes client software that enables you to connect to many common virtual network services and establish a virtual network service interface.
If necessary, you can define multiple separate virtual network service interfaces for each network location. Virtual network service interfaces are not always tied to a specific physical network interface; the system attempts to seek out the most appropriate route when multiple active connections are available. Likewise, any virtual network service interface that is not destined for a LAN connection is always routed to the primary active network service interface.
Note
Third-party virtualization tools, like Parallels Desktop and VMware Fusion, also use virtual network interfaces to provide networking for multiple simultaneous operating systems.
macOS includes built-in support for the following virtual network services:
![]() Point-to-Point Protocol over Ethernet (PPPoE)—This protocol is used by some service providers to directly connect your Mac to a modem providing a high-speed digital subscriber line (DSL) Internet connection.
Point-to-Point Protocol over Ethernet (PPPoE)—This protocol is used by some service providers to directly connect your Mac to a modem providing a high-speed digital subscriber line (DSL) Internet connection.
![]() Virtual private network (VPN)—By far the most commonly used virtual network service, VPNs are primarily used to create secure virtual connections to private LANs over the Internet. Configuring VPN connections is detailed later in this lesson.
Virtual private network (VPN)—By far the most commonly used virtual network service, VPNs are primarily used to create secure virtual connections to private LANs over the Internet. Configuring VPN connections is detailed later in this lesson.
![]() Virtual local area network (VLAN)—The macOS VLAN implementation allows you to define separate independent LAN services on a single physical network interface.
Virtual local area network (VLAN)—The macOS VLAN implementation allows you to define separate independent LAN services on a single physical network interface.
![]() Link aggregate—This service allows you to define a single virtual LAN service using multiple physical network interfaces. macOS uses the standard Link Aggregation Control Protocol (LACP), also known as IEEE 802.3ad.
Link aggregate—This service allows you to define a single virtual LAN service using multiple physical network interfaces. macOS uses the standard Link Aggregation Control Protocol (LACP), also known as IEEE 802.3ad.
![]() 6to4—This service creates a VPN, of sorts, to transfer IPv6 packets across an IPv4 network. There is no enhanced security when using a 6to4 connection, but your Mac will appear to be directly connected to a remote IPv6 LAN. The differences between IPv4 and IPv6 were covered in the previous lesson.
6to4—This service creates a VPN, of sorts, to transfer IPv6 packets across an IPv4 network. There is no enhanced security when using a 6to4 connection, but your Mac will appear to be directly connected to a remote IPv6 LAN. The differences between IPv4 and IPv6 were covered in the previous lesson.
About Network Protocols
Each network service interface provides connectivity for a number of standard networking protocols. Network preferences show primary protocol settings whenever you select a service from the services list, but many protocol configuration options are available only by clicking the Advanced button.
macOS includes built-in support for the following network protocols:
![]() TCP/IP configured via DHCP—As explained in Lesson 19, “Manage Basic Network Settings,” TCP/IP is the primary network protocol for LANs and WANs, and DHCP is a popular network service that automatically configures TCP/IP clients.
TCP/IP configured via DHCP—As explained in Lesson 19, “Manage Basic Network Settings,” TCP/IP is the primary network protocol for LANs and WANs, and DHCP is a popular network service that automatically configures TCP/IP clients.
![]() TCP/IP configured manually—If you do not have DHCP service on your local network, or if you want to ensure that the TCP/IP settings never change, you can manually configure TCP/IP settings.
TCP/IP configured manually—If you do not have DHCP service on your local network, or if you want to ensure that the TCP/IP settings never change, you can manually configure TCP/IP settings.
![]() DNS—As covered in the previous lesson, DNS provides host names for IP network devices. DNS settings are often configured alongside TCP/IP settings either by DHCP or manual configuration. macOS supports multiple DNS servers and search domains.
DNS—As covered in the previous lesson, DNS provides host names for IP network devices. DNS settings are often configured alongside TCP/IP settings either by DHCP or manual configuration. macOS supports multiple DNS servers and search domains.
![]() Wireless Ethernet (Wi-Fi) protocol options—The wireless nature of Wi-Fi often requires additional configuration to facilitate network selection and authentication.
Wireless Ethernet (Wi-Fi) protocol options—The wireless nature of Wi-Fi often requires additional configuration to facilitate network selection and authentication.
![]() Authenticated Ethernet via 802.1X—The 802.1X protocol is used to secure Ethernet networks (both wired and Wi-Fi) by allowing only properly authenticated network clients to join the LAN.
Authenticated Ethernet via 802.1X—The 802.1X protocol is used to secure Ethernet networks (both wired and Wi-Fi) by allowing only properly authenticated network clients to join the LAN.
![]() Network Basic Input/Output System (NetBIOS) and Windows Internet Naming Service (WINS)—NetBIOS and WINS are protocols most often used by older Windows-based computers to provide network identification and service discovery.
Network Basic Input/Output System (NetBIOS) and Windows Internet Naming Service (WINS)—NetBIOS and WINS are protocols most often used by older Windows-based computers to provide network identification and service discovery.
![]() IP proxies—Proxy servers act as intermediaries between a network client and a requested service and are used to enhance performance or provide an additional layer of security and content filtering.
IP proxies—Proxy servers act as intermediaries between a network client and a requested service and are used to enhance performance or provide an additional layer of security and content filtering.
![]() Ethernet hardware options—macOS supports both automatic and manual Ethernet hardware configuration, as covered later in this lesson.
Ethernet hardware options—macOS supports both automatic and manual Ethernet hardware configuration, as covered later in this lesson.
![]() External (analog) modem with PPP—For many years this was the only method for accomplishing any sort of digital computer-based communication. macOS still supports this method, but since it is so rarely used in this age of broadband Internet, analog modem configuration is not covered in this guide.
External (analog) modem with PPP—For many years this was the only method for accomplishing any sort of digital computer-based communication. macOS still supports this method, but since it is so rarely used in this age of broadband Internet, analog modem configuration is not covered in this guide.
![]() Point-to-Point Protocol (PPP)—PPP is an older protocol originally intended for use with analog modems. Again, macOS still supports PPP for analog modems, but it also supports PPP for Bluetooth dial-up networking and PPPoE connectivity. Again, the rarity of this protocol’s use today means that PPP configuration is not covered in this guide.
Point-to-Point Protocol (PPP)—PPP is an older protocol originally intended for use with analog modems. Again, macOS still supports PPP for analog modems, but it also supports PPP for Bluetooth dial-up networking and PPPoE connectivity. Again, the rarity of this protocol’s use today means that PPP configuration is not covered in this guide.
Reference 20.3 Manage Network Service Interfaces
Typically, having multiple active network service interfaces means you also have multiple active IP addresses. To handle multiple IP addresses, macOS also features IP network multihoming. In fact, macOS supports multiple IP addresses for each physical network interface. Thus, the network service list can contain multiple instances of the same physical network interface. Again, a network service in this context is a single configuration of a physical network interface.
About Using Multiple Simultaneous Interfaces
macOS supports multiple simultaneous network service interfaces. For example, you can have both an active wired Ethernet connection and an active Wi-Fi, or wireless Ethernet, connection at the same time. In other words, you can configure as many separate network service interfaces with as many unique IP addresses as you need. This may seem like overkill for most Mac clients, but remember that macOS acts as the foundation for macOS Server as well.
For some servers, multilink multihoming networking is a requirement, but Mac clients can also benefit from this technology. You may have a work environment where you have one insecure network for general Internet traffic and another network for secure internal transactions. With macOS, you can be on both of these networks at the same time. However, the first fully configured active service in the list is the primary network service interface.
In most cases the primary network service interface is used for all WAN connectivity, Internet connectivity, and DNS host name resolution. The exception to this is when the primary network interface is lacking a router configuration. In this case, the system treats the next fully configured active service as the primary network service interface.
When multiple IP addresses are available, the system can communicate via any of those network service interfaces, but it will attempt to pick the most appropriate route for every network connection. As described in the previous lesson, a network client uses the subnet mask to determine whether an outgoing transmission is on the LAN. macOS takes this a step further by examining all active LANs when determining a destination for outgoing transmission. Because a LAN connection is always faster than a WAN connection, macOS always routes outgoing transmissions to the most appropriate LAN.
Any network connections that are not destined for a LAN that your Mac is connected to are sent to the router address of the primary active network service interface, which should be the topmost service listed in Network preferences. Again, in most cases this means the primary active network service interface is responsible for all WAN connections, Internet connections, and DNS host name resolution. Any active network service interface with a valid TCP/IP setting is considered, but the primary active network service interface is automatically selected based on the network service order. You can manually configure the network service order, as outlined later in this lesson.
Using the previous example, in which you have a Mac active on both wired Ethernet and Wi-Fi, the default network service order prioritizes wired Ethernet over Wi-Fi because wired is almost always faster. Thus, in this example, even though you have two active valid network service interfaces, the primary active network service interface is the wired Ethernet connection.
Note
macOS features automatic source routing. This means that incoming connections to your Mac over a specific network service interface are always responded to on the same interface, regardless of the service order.
View the Network Services List
Every time you open Network preferences, the system identifies all available network service interfaces. Even if a physical network interface is not connected or properly configured, it creates a configuration for that interface, which shows up in the network services list. In Network preferences, each network interface is tied to one or more network services.
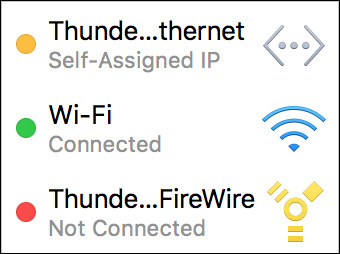
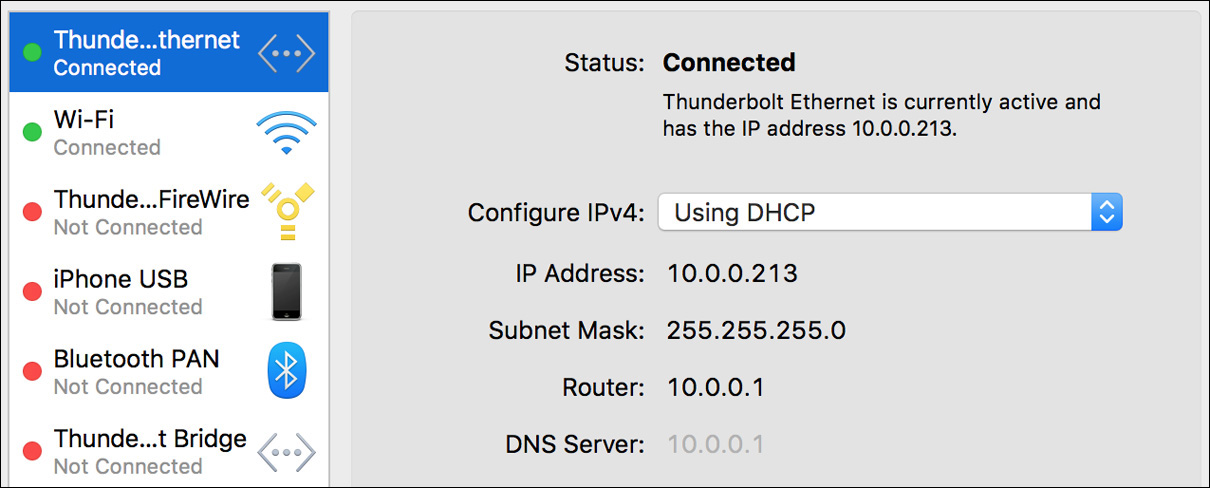
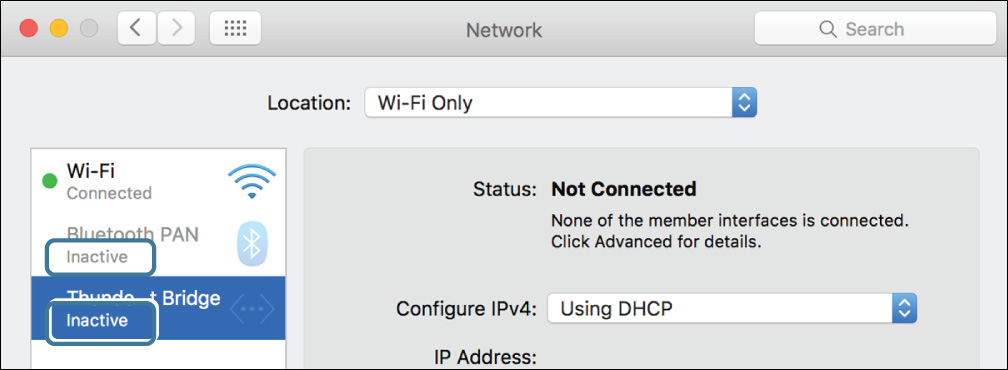
A quick glance at the network services list clearly shows the status of all network interfaces and their configured services. Network services with a red indicator are not connected, a yellow indicator shows services that are connected but not properly configured, and a green indicator shows connected and configured network services.
The active service at the top of this list is the primary network service interface, as defined by the network service order. This list updates dynamically as new services become active or as active services become disconnected, so it’s always the first place to check when attempting to troubleshoot a network issue.
Manage Network Services
To manage network interfaces and their configured services, open and (if necessary) unlock Network preferences. First, make sure the network location you want to edit is selected in the Location pop-up menu, or configure a new network location, as detailed earlier in this lesson.
To configure a specific network service, select it from the network services list. Remember that each network service has its own settings separate from the other services. The configuration area to the right of the list changes to reflect primary options available to the selected service. Clicking Advanced reveals all the advanced network protocol options available to the selected network service.

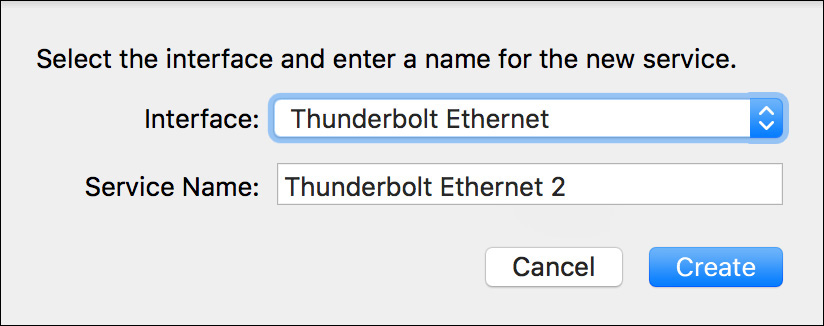
To create another configurable instance of a network interface, click the Add (+) button at the bottom of the network services list. This reveals a dialog that allows you to choose a new interface instance from the pop-up menu and then assign it a unique service name to identify it in the services list. Creating additional instances of a network service enables you to assign multiple IP addresses to a single network interface.
To make a service inactive, select it from the services list, click the Action button (gear icon), and then choose Make Service Inactive from the pop-up menu. An inactive service never activates, even if connected and properly configured. You can also delete an existing network service by selecting its name from the services list and then clicking the Delete (–) button at the bottom of the list. Deactivating or deleting a network service from this list is the only way to disable a hardware network interface in macOS.
You are not allowed to delete network service interfaces configured as part of a configuration profile. To delete these network services, you must delete their associated configuration profile from the Profiles system preferences.
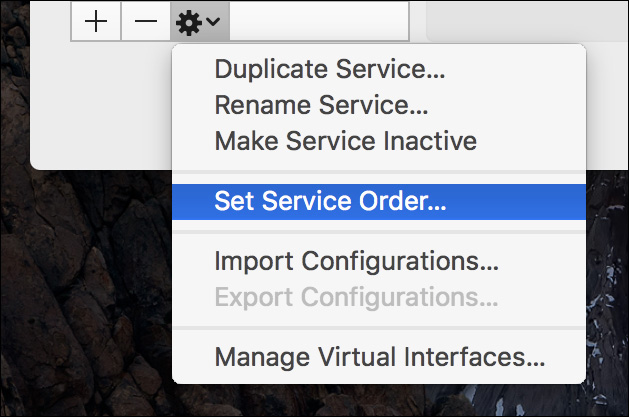
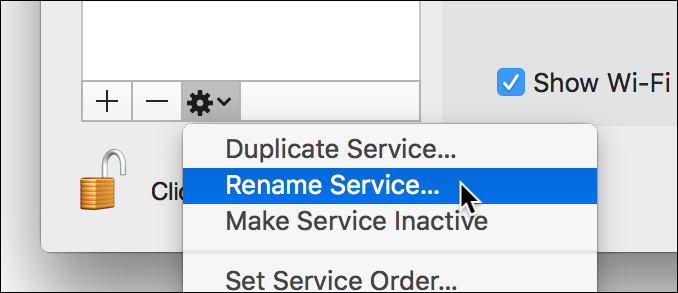
Clicking the Action button (gear icon) at the bottom of the network services list reveals a pop-up menu with several management options. For example, you can duplicate an existing network service by selecting its name from the services list and then choosing Duplicate Service from the pop-up menu. Using this menu, you can also rename an existing network service. Finally, you can modify the active network service interface order by choosing Set Service Order from the pop-up menu.
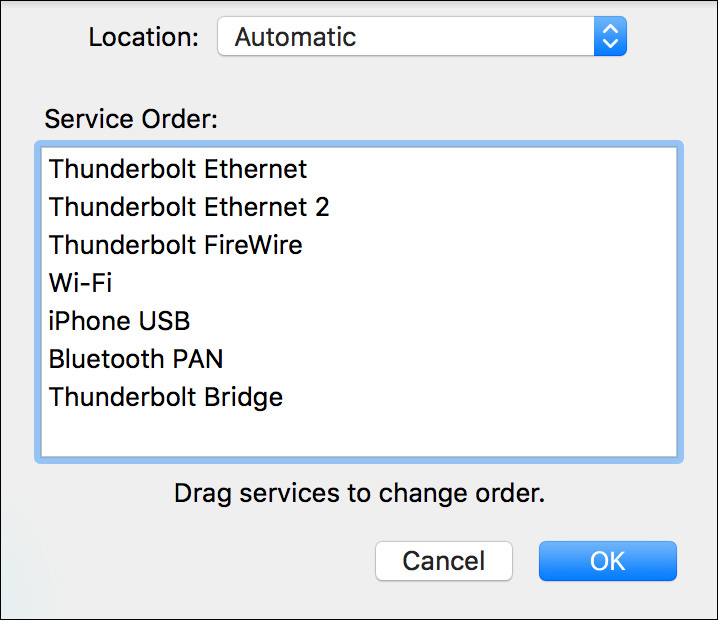
The Service Order dialog allows you to drag network services into your preferred order for selection as the primary network interface. Click OK when you have finished reordering, and the system automatically reevaluates the active network service interfaces based on the new order. Also, don’t forget that you must also click Apply in Network preferences to activate and save all the changes to the currently selected network location.
Tip
If you make a mistake at any time using Network preferences, click Revert to return to the currently active network configuration.
Reference 20.4 Configure VPN Settings
A VPN is an encrypted tunnel from your client to the network routing device providing the VPN service. Once it is established, your Mac will appear to have a direct connection to the LAN that the VPN device is sharing. So even if you’re on a wireless Internet connection thousands of miles away from your LAN, a VPN connection provides a virtual network interface as if your computer were directly attached to that LAN. macOS supports three common VPN protocols: the Layer 2 Tunneling Protocol over Internet Protocol Security (L2TP over IPSec), Cisco’s IPSec, and Internet Key Exchange version 2 (IKEv2).
Note
macOS Sierra doesn’t support the Point-to-Point Tunneling Protocol (PPTP) VPN standard. This older VPN protocol has long been considered an insecure option. For more information see Apple Support article HT206844, “Prepare for removal of PPTP VPN before you upgrade to iOS 10 and macOS Sierra.”
Note
Some VPN services require a third-party VPN client. Third-party VPN clients usually include a custom interface for managing the connection. Although you may see the virtual network interface provided by the third-party VPN client in Network preferences, it’s usually not configurable from there.
Use a VPN Configuration Profile
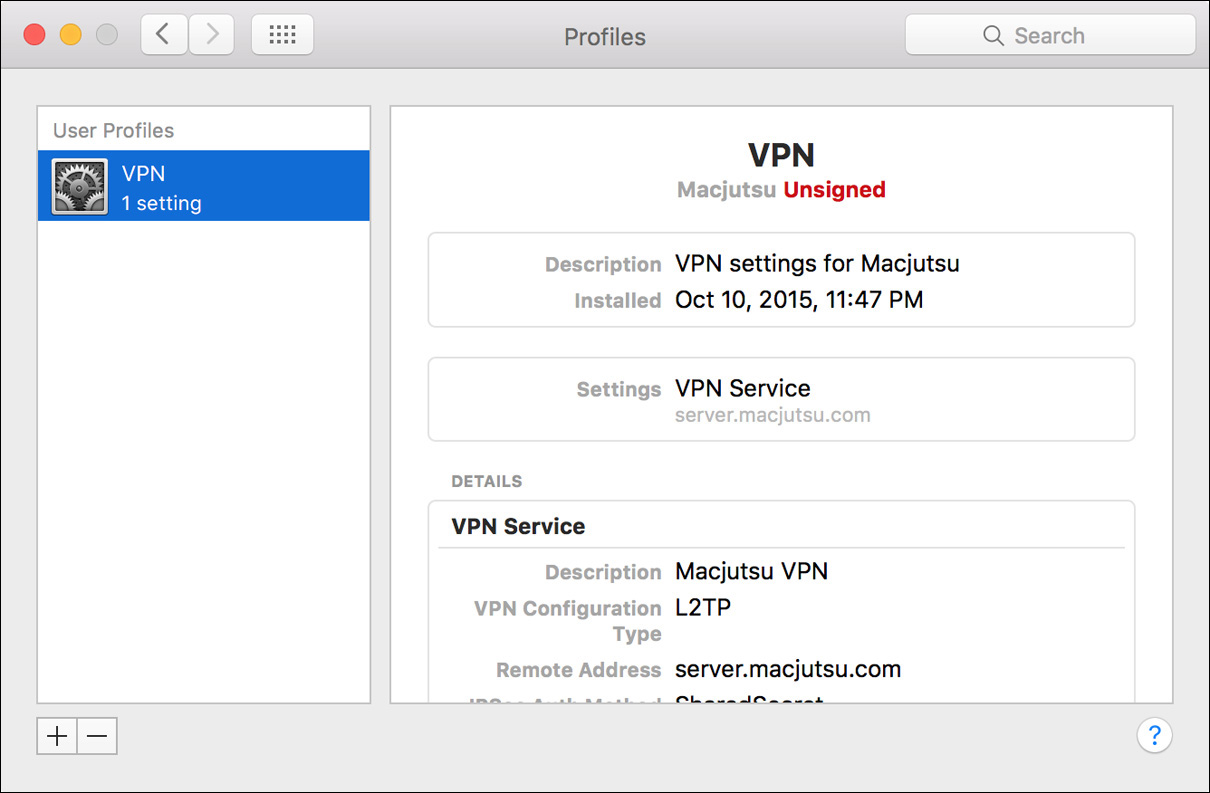
By far the easiest method for managing VPN configuration is to do so via a configuration profile. As detailed in Lesson 2, “Set Up and Configure macOS,” a configuration profile is a file that contains instructions for specific settings. The administrator of a VPN system can provide a VPN profile whose relevant settings can easily be configured by opening the profile on a Mac.
Installed configuration profiles can be verified from Profiles preferences. Once a configuration profile is installed, all the appropriate VPN settings should be configured for you. To establish the VPN tunnel, a user needs only to initiate the VPN connection, as covered later in this lesson.
Manually Configure VPN Settings
Even with a VPN configuration profile, you may find it necessary to verify or further manage VPN connections from Network preferences. Or if the administrator of the VPN service is unable to provide a configuration profile, you need to manually configure VPN services. To add a VPN interface, click the Add (+) button at the bottom of the network services list in Network preferences. This reveals a dialog where you can add a new network service interface.
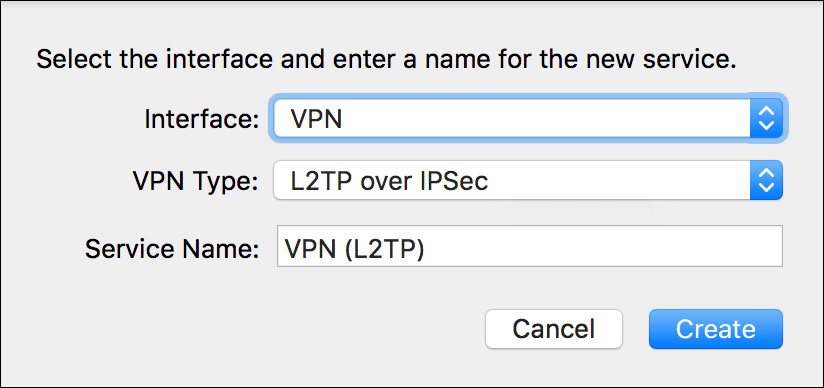
From the new network service interface dialog, you must choose the appropriate VPN protocol from the VPN Type pop-up menu. Again, macOS supports the L2TP over IPSec, Cisco IPSec VPN, and IKEv2 protocols. All three have similar configuration options, but for the purposes of this lesson L2TP is used because it has a few more authentication and advanced options. If you’re going to have more than one type of VPN protocol, you may want to enter a descriptive name for the service.
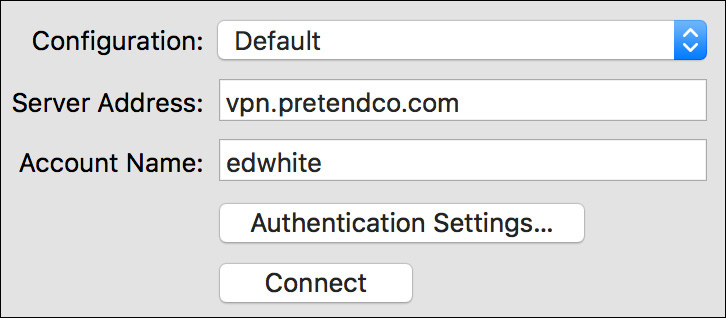
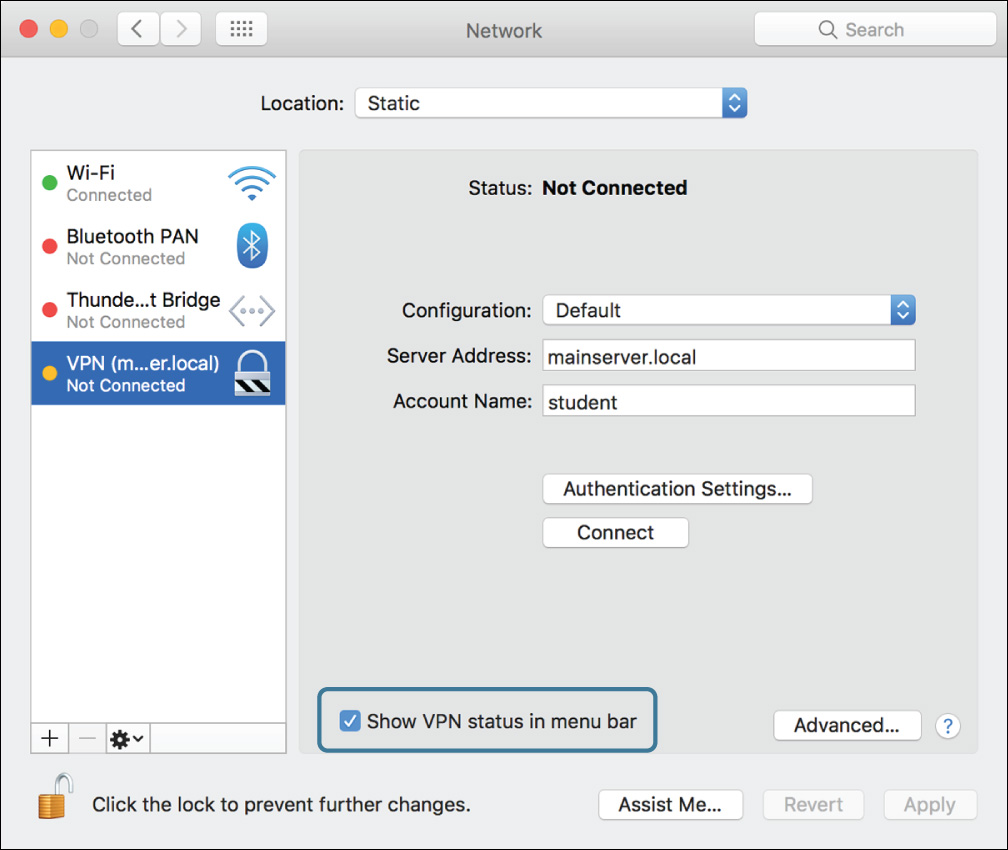
Once you create the new VPN interface, select it from the network services list, and basic VPN configuration settings appear to the right. To configure VPN settings, first enter the VPN server address and, if you use user-based authentication, an account name.
Tip
If you do want to set multiple VPN configurations, choose Add Configuration from the Configuration pop-up menu. In the dialog, provide a name for the new VPN configuration and click Create. You can also delete and rename your configuration from this pop-up menu.
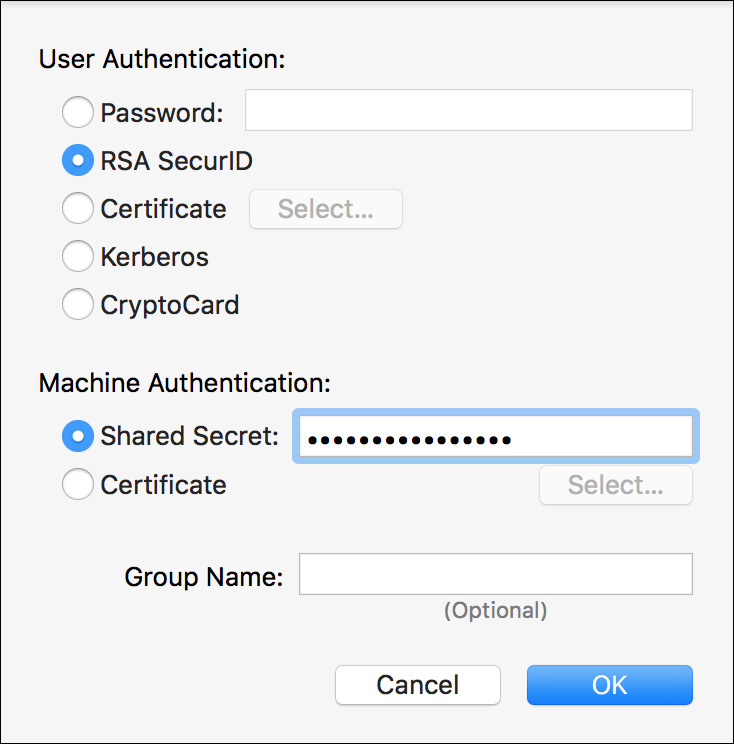
You must also define authentication methods by clicking the Authentication Settings button and then specifying user and computer authentication settings. The VPN administrator can provide you with the appropriate authentication settings. Supplying a password here adds it to the system keychain. If the field is left blank, the user is prompted for the password when connecting.
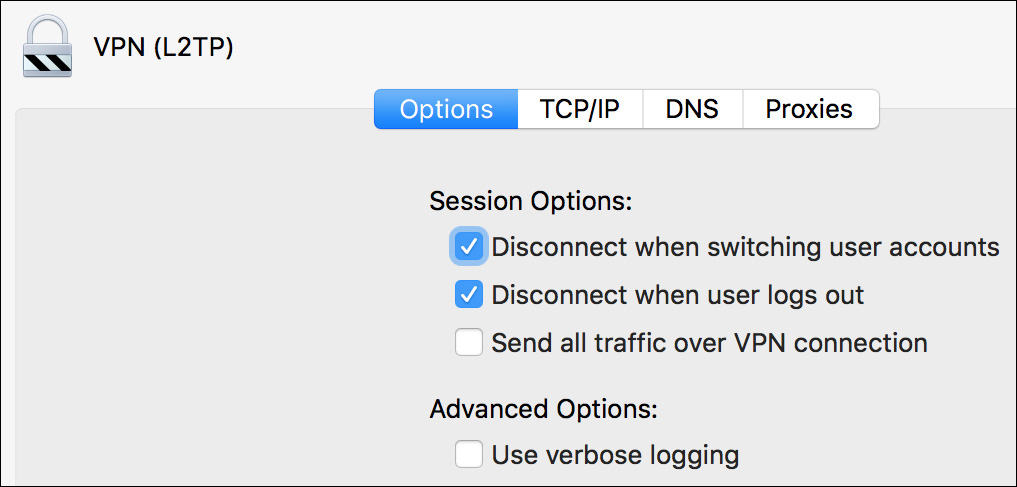
To configure advanced VPN settings, click the Advanced button in Network preferences. In the Advanced Settings dialog, click the Options tab to view general VPN options. The most important optional setting is to send all traffic over the VPN connection. By default, active VPN connections do not move to the top of the network services list. Thus, the system routes traffic to the VPN service only if the destination IP address is part of the LAN that the VPN service is providing or if the VPN server supplies special routing information.
macOS supports automatic VPN connections via certificate-based authentication and the VPN on Demand service. However, these VPN connections can be configured only through the use of configuration profiles.
Connect to a VPN
VPN connections are not typically always-on connections. macOS supports automatic VPN connections with the VPN on Demand feature, but many users may still manually enable VPN connections when necessary. You can make accessing VPN connectivity options much easier by selecting the “Show VPN status in menu bar” checkbox in Network preferences. The VPN menu bar item allows you to easily select VPN configurations and connect, disconnect, and monitor VPN connections. You can also manually connect and disconnect the VPN link from Network preferences.

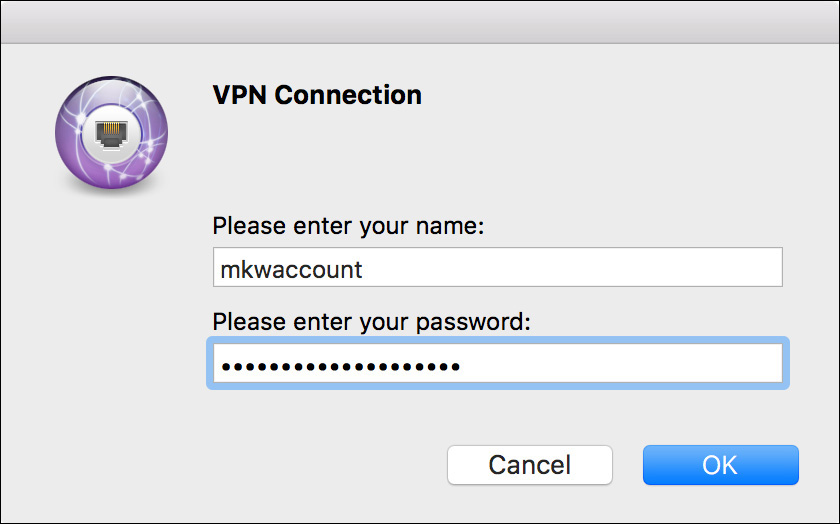
VPNs are usually implemented in situations where user authentication is required, so for many, initiating a VPN connection prompts an authentication dialog. Note that the VPN connection dialog does not offer to save the user’s authentication information to the keychain. This is an intentional design decision, as some VPN protocols require manual authentication every time a connection is established.
Once the connection is authenticated and established, the VPN process automatically configures TCP/IP and DNS settings using the PPP protocol. VPN interfaces are, by default, set at the bottom of the network service order, so they do not automatically become the primary network interface when activated. This behavior is overridden when the optional “Send all traffic over VPN connection” checkbox is selected in Network preferences. You can also manually reorder the network service order, as explained earlier in this lesson.
Tip
When troubleshooting VPN connections, it’s useful to view the connection log info in /var/log/system.log. From the /Application/Utilities/Console application, you can view the system log.
Reference 20.5 Configure Advanced Network Settings
The advanced network configuration techniques covered in this section are largely optional for many configurations. However, for those who are tasked with supporting macOS systems, it’s important to have a full understanding of all the configuration choices available in Network preferences.
Manually Configure TCP/IP
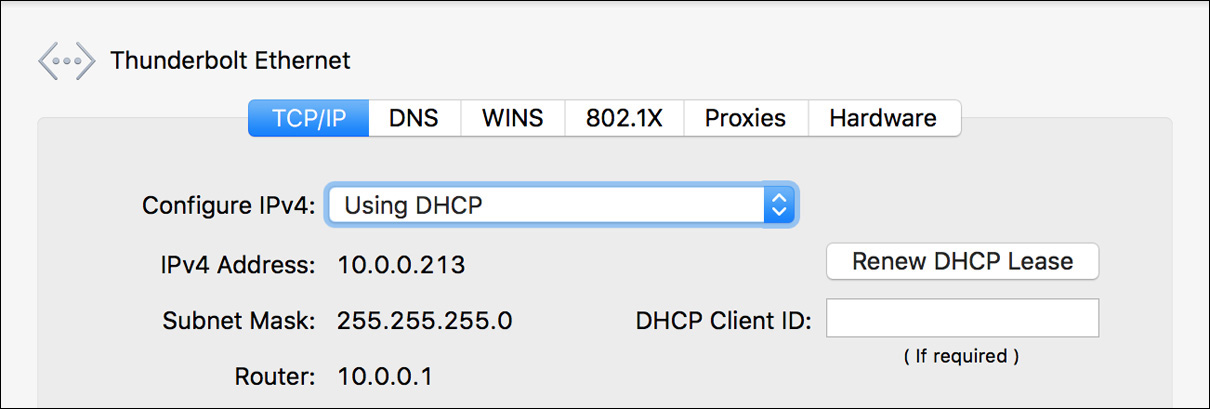
Many network situations do not require any manual intervention to configure TCP/IP and DNS, as the DHCP or PPP services automatically acquire these settings. The default configuration for all Ethernet and Wi-Fi services is to automatically engage the DHCP process as soon as the interface becomes active. To verify TCP/IP and DNS settings for hardware or virtual Ethernet services when using the DHCP service, select the service from Network preferences.
Note
IPv6 addressing information is automatically detected as well, if available. However, automatic IPv6 configuration is not provided by standard DHCP or PPP services.
Note
Automatically configured DNS settings show as gray text, which indicates that you can override these settings by manually entering DNS information, as covered later in this section.
Network service interfaces that may require a manual connection process, like Wi-Fi, VPN, and PPPoE interfaces, automatically engage the DHCP or PPP process to acquire TCP/IP and DNS settings. To verify TCP/IP and DNS settings when using these interfaces, select the service from the services list and then click Advanced in Network preferences. In the Advanced Settings dialog, you can click the TCP/IP or DNS tabs to view their respective settings. You can also verify network settings of any other interface this way.
Despite the convenience of automatic TCP/IP and DNS configuration, there may be times when manual configuration is required. For example, the network server providing the DHCP service requires a manual configuration. In fact, most network devices that provide services, like servers or printers, use manually entered network configuration information so that they don’t run the risk of changing to a different TCP/IP address should DHCP reset.
Note
In some DHCP configurations, a DHCP client ID must be set. You can access this setting by clicking Advanced and then selecting the TCP/IP tab.
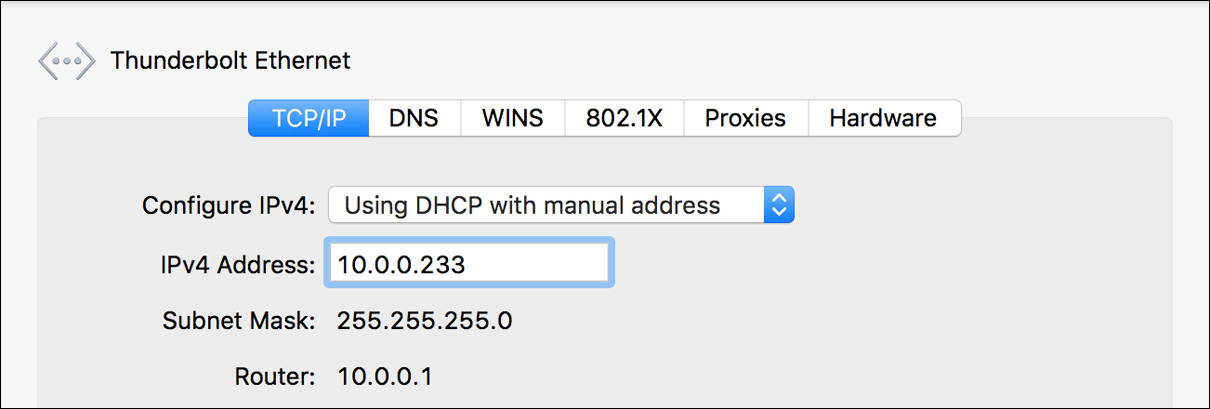
If you want to keep using DHCP but manually assign just the IP address, choose “Using DHCP with manual address” from the Configure IPv4 menu. You only have to manually enter an IPv4 address for the Mac, as the rest of the TCP/IP settings remain as populated by DHCP.
However, if you want to manually enter all TCP/IP settings, choose Manually from the Configure IPv4 menu. At a minimum you have to manually enter the IP address, the subnet mask (for this you can also use CIDR notation), and the router address. The user interface caches the TCP/IP settings from the DHCP service, so you may only have to enter a new IPv4 address.
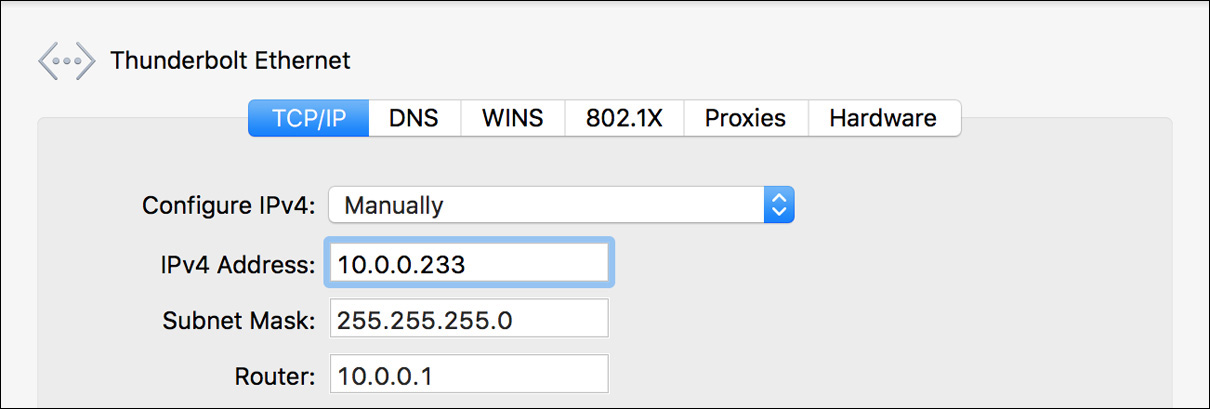
If you have to manually set up IPv6 settings as well, choose Manually from the Configure IPv6 menu. At a minimum you have to manually enter the IPv6 address, router address, and prefix length. The user interface caches any automatic IPv6 settings, so you may only have to enter a new IPv6 address.
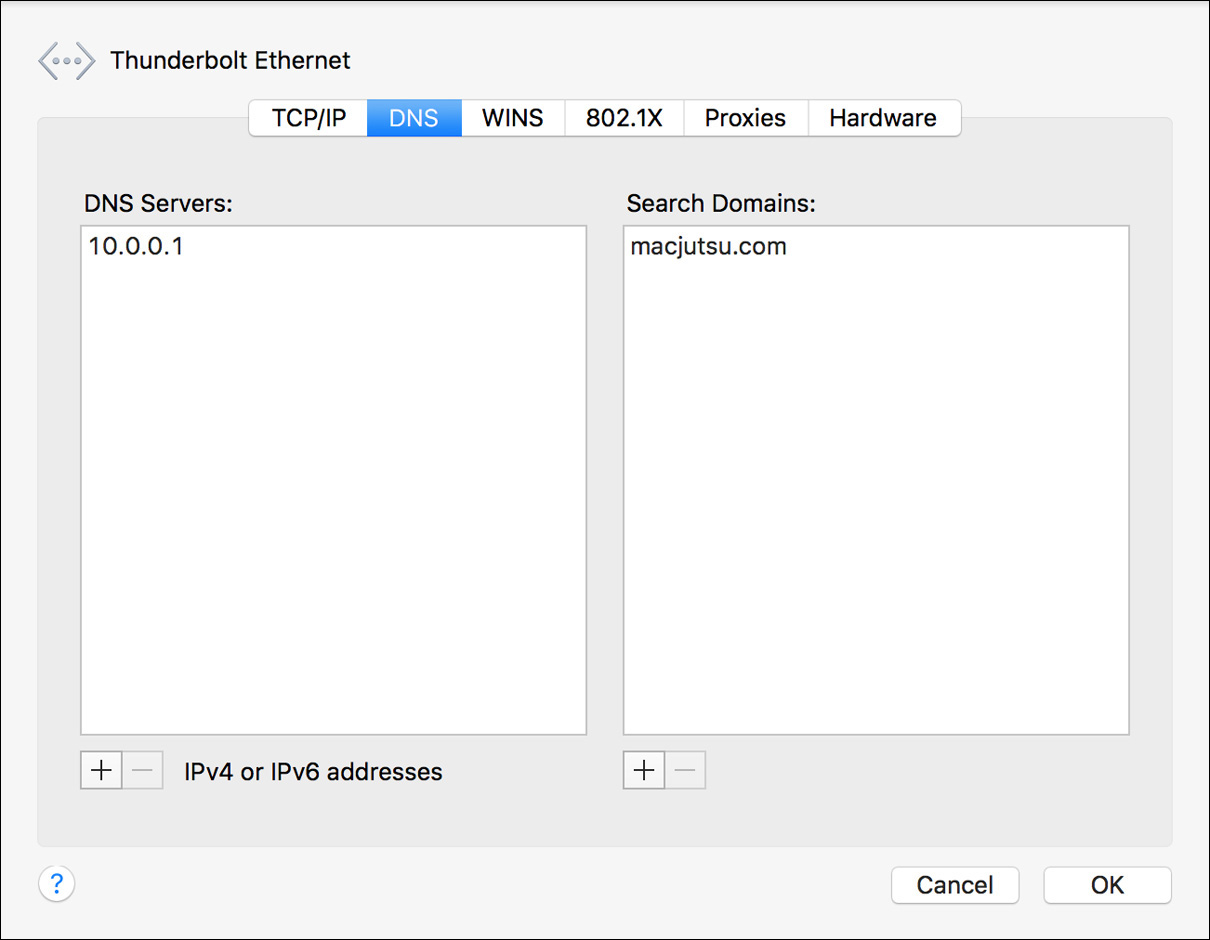
Whenever you choose to manually configure IPv4, you should also verify DNS server settings. To configure DNS, click the DNS tab to view the DNS settings. Again, the user interface caches the DNS settings from the DHCP service, so you may not have to enter any DNS settings at all.
Note
If the IP address of a DNS server is not specified, the Mac will not be able to resolve DNS host names.
If you are configuring manually, configure at least one DNS server. Click the Add (+) button at the bottom of the DNS server list to add a new server, and then enter the server’s IP address. Entering a search domain is optional. Click the Add button (+) at the bottom of the Search Domains list, and then enter the domain name.
If you configure multiple DNS servers or search domains, the system attempts to access those resources in the order in which they appear in the list. To edit an address, double-click its entry in the list. You can delete an entry by selecting it and clicking the Delete (–) button at the bottom of the list.
When you have entered all the appropriate IP and DNS settings, click OK to dismiss the Advanced Settings dialog, and then click Apply in Network preferences to save and activate the changes.
Whenever you manually configure TCP/IP or DNS settings, always test network connectivity to verify that you properly entered all information. Using standard applications to access network and Internet resources is one basic test, but you could also test more thoroughly using the included network diagnostic utilities, as covered in Lesson 21, “Troubleshoot Network Issues.”
Manually Configure Wi-Fi
Some administrators may find a need to restrict some of the wireless features. You may want to require that the Mac connect only to specific secure wireless networks, for example, or that the Mac always connect to one particular network. In these situations, you can use the advanced Wi-Fi configuration options in Network preferences.
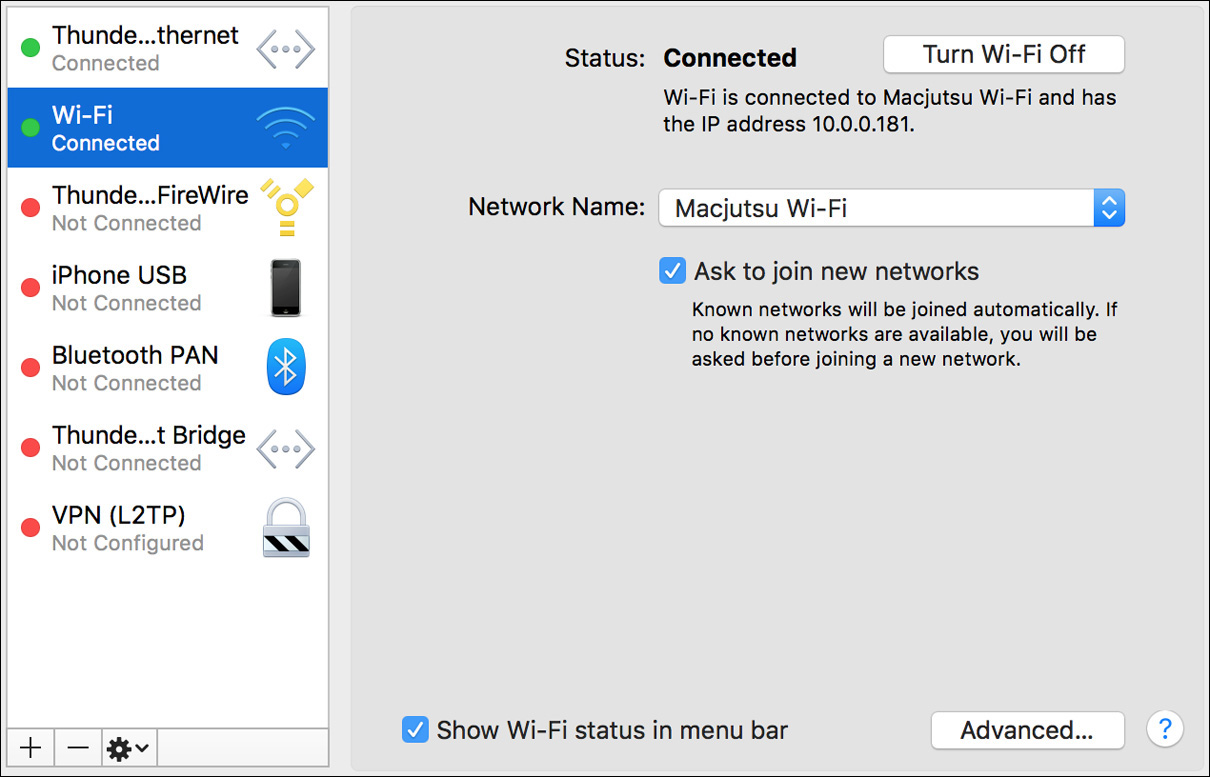
To manage advanced Wi-Fi options and connections, open and (if necessary) unlock Network preferences, and then select the Wi-Fi service from the services list. At this point you can configure basic Wi-Fi settings from the Network Name pop-up menu, in much the same way that you would do it from the Wi-Fi status menu, including the ability to join or create another wireless network.
At this point you can also manage the ability for nonadministrator users to select Wi-Fi networks:
![]() When optionally enabled, the “Ask to join new networks” checkbox will have the system prompt the user to select another Wi-Fi network in the area when the Mac can’t find a preconfigured wireless network.
When optionally enabled, the “Ask to join new networks” checkbox will have the system prompt the user to select another Wi-Fi network in the area when the Mac can’t find a preconfigured wireless network.
![]() Enabled as a default, the “Show Wi-Fi status in menu bar” checkbox will allow any user to select a wireless network from the Wi-Fi status menu. However, disabling this doesn’t prevent a user from choosing a wireless network if the Mac presents a wireless discovery dialog.
Enabled as a default, the “Show Wi-Fi status in menu bar” checkbox will allow any user to select a wireless network from the Wi-Fi status menu. However, disabling this doesn’t prevent a user from choosing a wireless network if the Mac presents a wireless discovery dialog.
Clicking the Advanced button reveals the Advanced Settings dialog. If the Wi-Fi tab at the top is not selected, click it to view the advanced Wi-Fi settings.
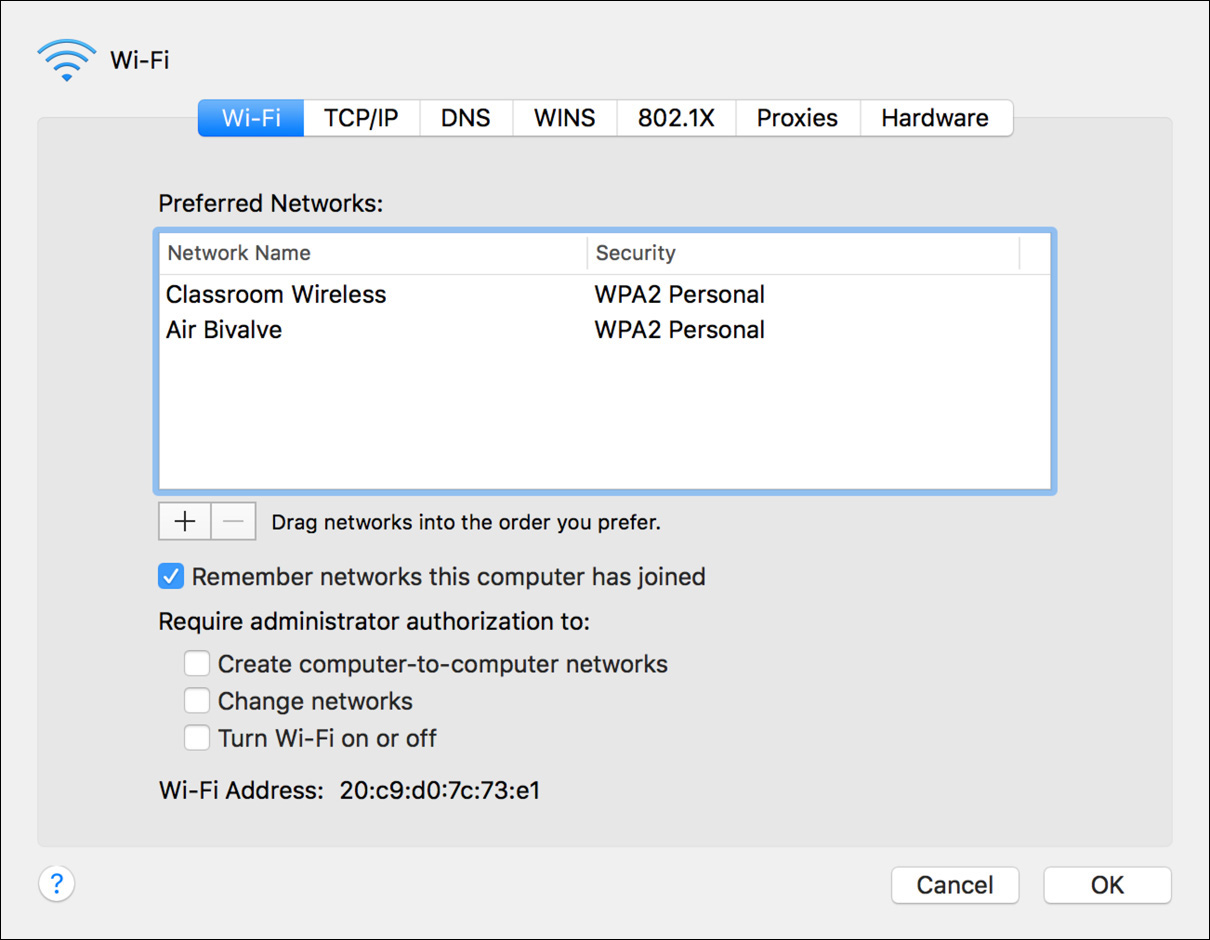
From the top half of the advanced Wi-Fi settings pane, you can manage a list of preferred wireless networks. By default, wireless networks that were added previously appear here as well. If you disable user access to Wi-Fi settings as just described, the system connects only to the preferred wireless networks in this list.
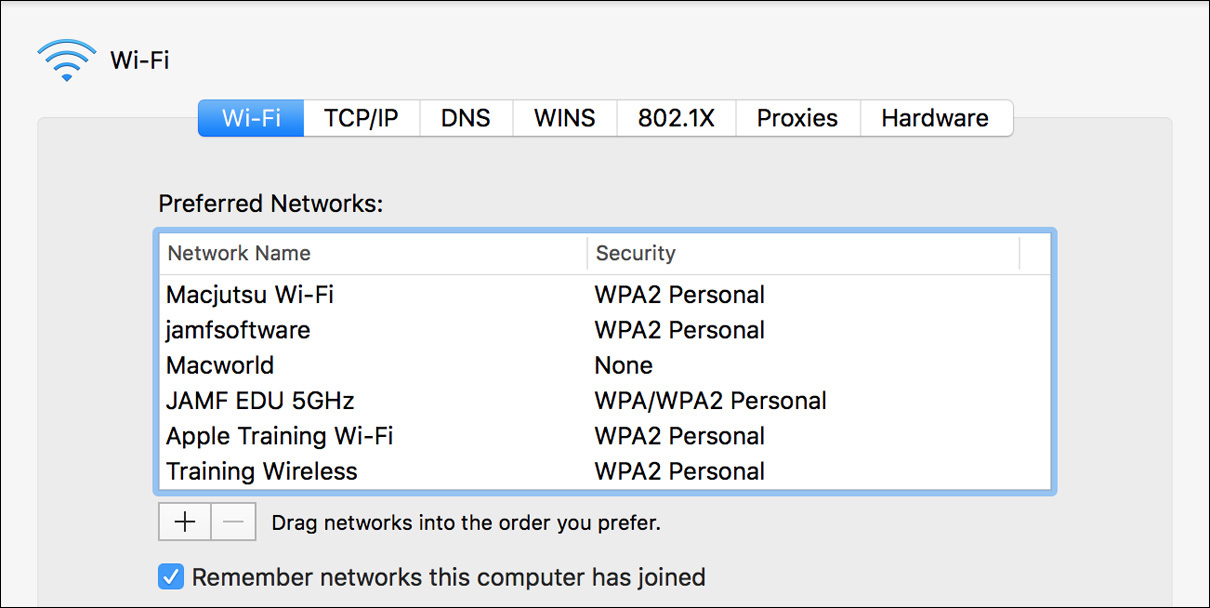
To add a new wireless network, click the Add (+) button at the bottom of the Preferred Networks list and then either join a wireless network in range or manually enter the information for a hidden or not-currently-in-range network. To edit a network, double-click its entry in the list, or you can delete a network by selecting it and clicking the Delete (–) button at the bottom of the list.
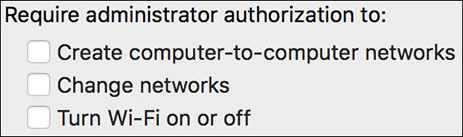
At the bottom of the advanced Wi-Fi settings pane, you have several settings that allow for more specific Wi-Fi administration options. Thus, if you choose to leave the Wi-Fi status menu available to regular users, you can restrict certain settings to only administrator users. Remember to close the Advanced dialog and then click Apply in Network preferences to save and activate the changes.
About 802.1X Configuration
The 802.1X protocol is used to secure both wired and wireless (Wi-Fi) Ethernet networks by allowing only properly authenticated network clients to join the LAN. Networks using 802.1X do not allow any traffic until the network client properly authenticates to the network.
To facilitate 802.1X authentication, macOS provides two methods for automatic configuration:
![]() User-selected Wi-Fi network with WPA or WPA2 Enterprise authentication—As covered in the previous lesson, if a Wi-Fi network is selected that uses WPA or WPA2 Enterprise authentication, the system automatically configures 802.1X. You can verify the 802.1X configuration by selecting Wi-Fi in Network preferences, though you cannot modify the connection details in any way.
User-selected Wi-Fi network with WPA or WPA2 Enterprise authentication—As covered in the previous lesson, if a Wi-Fi network is selected that uses WPA or WPA2 Enterprise authentication, the system automatically configures 802.1X. You can verify the 802.1X configuration by selecting Wi-Fi in Network preferences, though you cannot modify the connection details in any way.
![]() Administrator-provided 802.1X configuration profile—The 802.1X architecture often relies on shared secrets or certificates to validate client connections; thus, a network administrator must securely deploy these items to client computers. In macOS, the only way to set up non–Wi-Fi or managed 802.1X configurations is via a configuration profile. This profile can be deployed by double-clicking a local copy of a configuration profile or by having the Mac managed by a mobile device management (MDM) solution. From the local Mac, however, you can verify the 802.1X configuration by selecting the 802.1X tab from among the Advanced Configuration panes of Network preferences.
Administrator-provided 802.1X configuration profile—The 802.1X architecture often relies on shared secrets or certificates to validate client connections; thus, a network administrator must securely deploy these items to client computers. In macOS, the only way to set up non–Wi-Fi or managed 802.1X configurations is via a configuration profile. This profile can be deployed by double-clicking a local copy of a configuration profile or by having the Mac managed by a mobile device management (MDM) solution. From the local Mac, however, you can verify the 802.1X configuration by selecting the 802.1X tab from among the Advanced Configuration panes of Network preferences.
More Info
macOS Server can provide MDM services through Profile Manager. You can find out more about Profile Manager in macOS Server at www.apple.com/macos/server/.
Configure NetBIOS and WINS
NetBIOS and WINS run on top of TCP/IP to provide network identification and service discovery. NetBIOS and WINS are used primarily by legacy Windows-based systems to provide identification and service discovery on LANs, whereas WINS is used to identify and locate NetBIOS network devices on WANs. You can think of WINS as a form of DNS for NetBIOS network clients.
Current Windows networks now use Dynamic DNS as a solution for network client discovery, but macOS still supports NetBIOS and WINS to support legacy network configurations. Further, these discovery protocols are mainly used to provide naming for the Server Message Block (SMB) protocol commonly used to share files and printers. In other words, the NetBIOS name is there to provide support for SMB sharing services hosted from your Mac, as covered in Lesson 23, “Manage Host Sharing and Personal Firewall.”
Note
macOS supports NetBIOS and WINS on any active network interface except for VPN connections.
macOS automatically configures your computer’s NetBIOS name based on your Mac computer’s sharing name, and for many networks this should be sufficient. If your Mac is on a larger legacy Windows network and you want to share resources from your Mac with other network clients, you may want to manually select the NetBIOS workgroup. NetBIOS workgroups are used to make navigation easier on large networks by grouping devices into smaller collections. You may have to manually configure the WINS service to provide faster NetBIOS resolution.
Note
It’s not required that you configure NetBIOS and WINS to connect to Windows resources. For certain legacy Windows clients, however, it may help.
To manually configure NetBIOS and WINS settings, open and (if necessary) unlock Network preferences, select the network service you want to configure from the network services list, and then click Advanced. In the Advanced Settings dialog, click the WINS tab to view the NetBIOS and WINS settings.
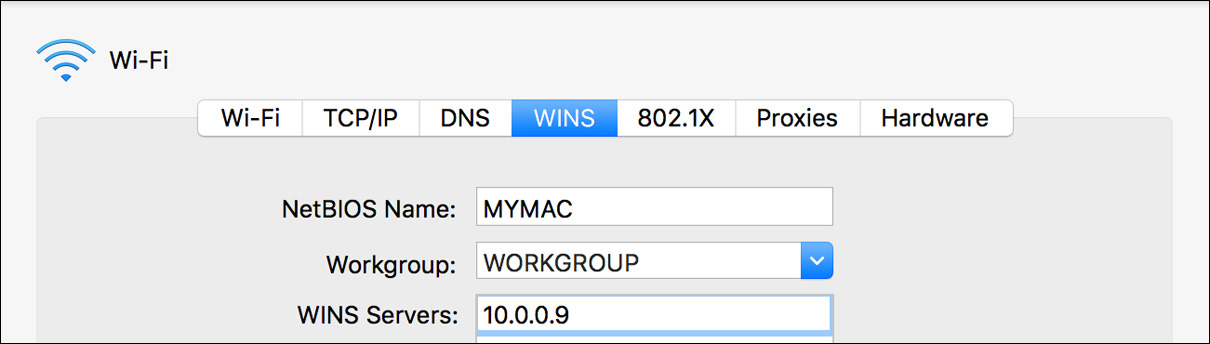
To manually configure NetBIOS, start by entering a unique name, and then choose a workgroup from the pop-up menu. It may take a while for the NetBIOS workgroup list to refresh, thus preventing you from selecting it from the pop-up menu. If you already know the name of the workgroup you want the Mac to be in, you can manually enter the workgroup name.
Note
NetBIOS names and workgroup names are in all capital letters and cannot contain any special characters or spaces.
To enable WINS, enter at least one WINS server IP address. Click the Add (+) button at the bottom of the WINS server list to add a new server, and then enter the server’s IP address. If you configure multiple WINS servers, the system attempts to access those resources in the order in which they appear in the list. To edit a server address, double-click its entry in the list; or you can delete a server by selecting it and clicking the Delete (–) button at the bottom of the list.
When you have entered all the appropriate NetBIOS and WINS settings, remember to close the Advanced dialog and then click Apply in Network preferences to save and activate the changes.
Configure Network Proxies
Proxy servers act as intermediaries between a network client and a requested service. Proxy servers are often used to enhance the performance of slow WAN or Internet connections by caching recently requested data so that future connections appear faster to local network clients. Primarily, though, proxy servers are implemented so that network administrators can limit network connections to unauthorized servers or resources. Administrators can manage lists of approved resources, having the proxy servers allow access to those resources only.
macOS supports proxy services for File Transfer Protocol (FTP), web protocols (HTTP and HTTPS), streaming (RTSP), SOCKS, and Gopher. For proxy configuration, macOS supports manual configurations, automatic proxy configuration using local or network-hosted proxy autoconfiguration (PAC) files, and fully automatic proxy discovery via the Web Proxy Autodiscovery Protocol (WPAD).
Note
It’s highly likely that you will have to acquire specific proxy configuration instructions from a network administrator.
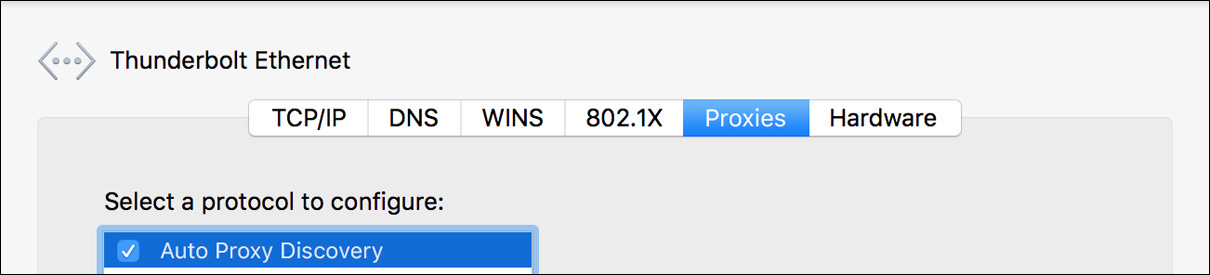
To enable and configure proxy settings, open and (if necessary) unlock Network preferences, select the network service you want to configure from the network services list, and then click Advanced. Click the Proxies tab at the top to view the proxy settings.
At this point you will perform one of three routines, depending on your network’s proxy implementation:
![]() If your proxy service supports WPAD, enable the Auto Proxy Discovery checkbox.
If your proxy service supports WPAD, enable the Auto Proxy Discovery checkbox.
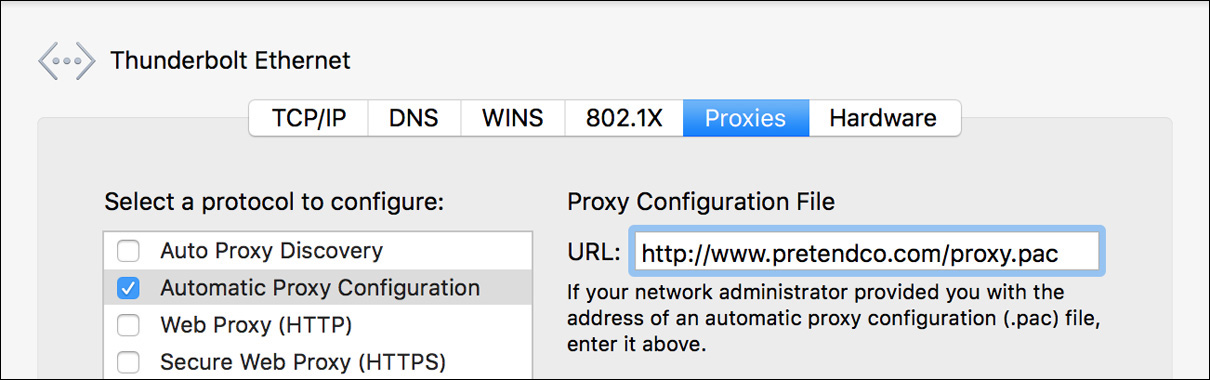
![]() If you have access to a PAC file, select the Automatic Proxy Configuration checkbox at the bottom of the proxy protocols list. You must then specify a network-hosted PAC file by entering the full network path to the file in the URL field.
If you have access to a PAC file, select the Automatic Proxy Configuration checkbox at the bottom of the proxy protocols list. You must then specify a network-hosted PAC file by entering the full network path to the file in the URL field.
![]() To manually configure proxy settings, select the checkboxes next to each protocol you want to send through the proxy servers. Select each protocol individually to enter the proxy connection information provided by the network administrator. At the bottom you can also elect to bypass the proxy for specific additional hosts and domains.
To manually configure proxy settings, select the checkboxes next to each protocol you want to send through the proxy servers. Select each protocol individually to enter the proxy connection information provided by the network administrator. At the bottom you can also elect to bypass the proxy for specific additional hosts and domains.

When you have entered all the appropriate proxy information, remember to close the Advanced dialog and then click Apply in Network preferences to save and activate the changes.
Manually Configure Ethernet
Ethernet connections are designed to establish connection settings automatically. Yet macOS allows you to manually configure Ethernet options from Network preferences should the automatic selections prove problematic.
The most common case for this is when you have an environment with Gigabit Ethernet switches and old or substandard wired infrastructure. In this case it’s common for the Mac to attempt to automatically establish a gigabit connection but ultimately fail because the wired infrastructure doesn’t support the high speeds. The most common symptom is that even with the Ethernet switch showing that the Mac has an active connection, Network preferences on the Mac shows Ethernet as disconnected.
To manually configure Ethernet settings, open and (if necessary) unlock Network preferences, select the Ethernet service you want to configure from the network services list, and then click Advanced. Click the Hardware tab at the top to view the current automatically configured Ethernet hardware settings.
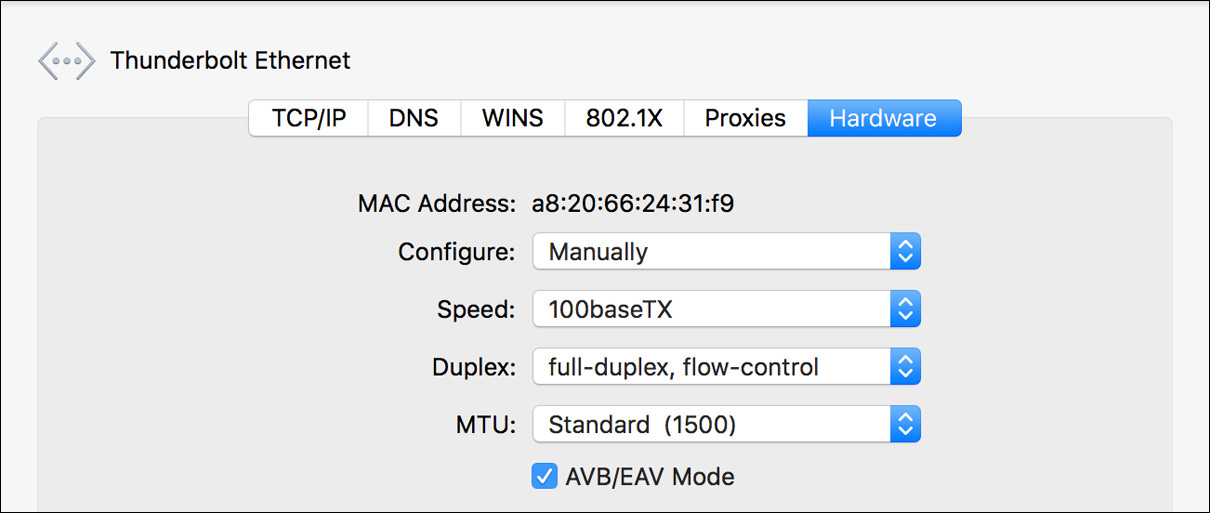
To manually configure Ethernet options, choose Manually from the Configure menu. The system caches the current automatically configured Ethernet settings, so you do not have to change all the settings. The system also populates the Speed, Duplex, and MTU options based on your Mac computer’s network hardware. Make your custom selections from these pop-up menus.
When you have selected all the appropriate Ethernet hardware settings, remember to close the Advanced dialog and then click Apply in Network preferences to save and activate the changes.
Exercise 20.1 Configure Network Locations
![]() Prerequisites
Prerequisites
![]() You must have created the Local Admin (Exercise 2.1, “Configure a New macOS System for Exercises,” or Exercise 2.2, “Configure an Existing macOS System for Exercises”) and Chris Johnson (Exercise 5.1, “Create a Standard User Account”) accounts.
You must have created the Local Admin (Exercise 2.1, “Configure a New macOS System for Exercises,” or Exercise 2.2, “Configure an Existing macOS System for Exercises”) and Chris Johnson (Exercise 5.1, “Create a Standard User Account”) accounts.
![]() This exercise requires a specific network configuration; it can be performed only in a classroom with the proper network setup or after you have configured your network according to the Optional Network Setup Instructions (available after you register your copy of this guide at www.peachpit.com/register).
This exercise requires a specific network configuration; it can be performed only in a classroom with the proper network setup or after you have configured your network according to the Optional Network Setup Instructions (available after you register your copy of this guide at www.peachpit.com/register).
Some network configurations do not have a Dynamic Host Configuration Protocol (DHCP) server, or there may be times when the DHCP server fails. In these instances, to establish and maintain network access, a macOS computer configured to obtain an IP address via DHCP self-assigns an IP address.
Turn Off the DHCP Service
If you are performing these exercises in a class, the instructor will turn off the classroom DHCP service.
If you are performing these exercises on your own, follow the instructions in the “Turn Off DHCP for Exercise 20.1” section of the Optional Network Setup Instructions.
Examine Your DHCP-Supplied Configuration
1 If necessary, log in as Chris Johnson.
2 If necessary, open System Preferences, and select the Network pane.
3 If necessary, click the padlock, and authenticate as Local Admin.
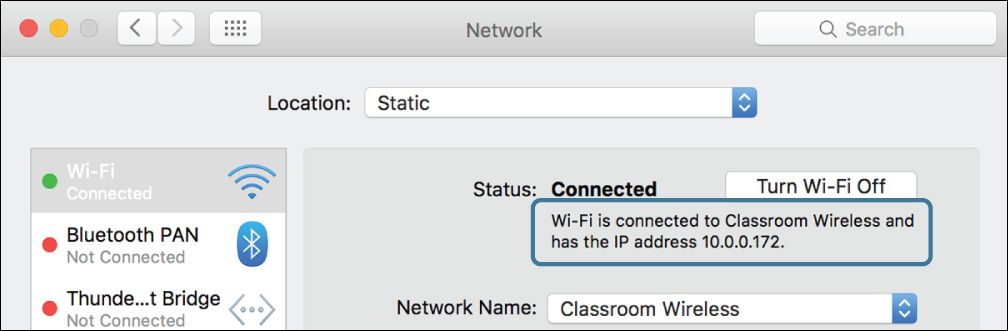
4 Select the primary network service.
Even though the DHCP service has been turned off, the service still indicates that it is configured using DHCP and has valid network settings. This is because the DHCP service gave it the configuration information before it shut down, and the information is still valid.
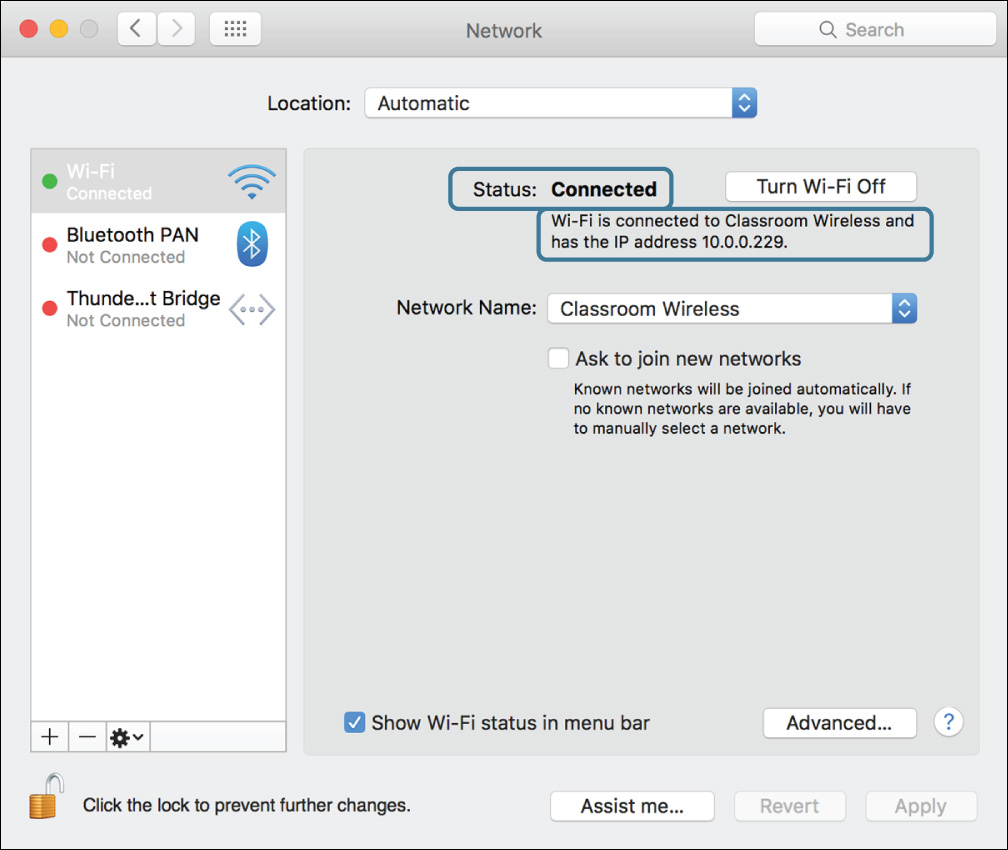
Note that your display probably appears different from this screenshot, especially if you have different network services connected.
Create a DHCP-Based Network Location
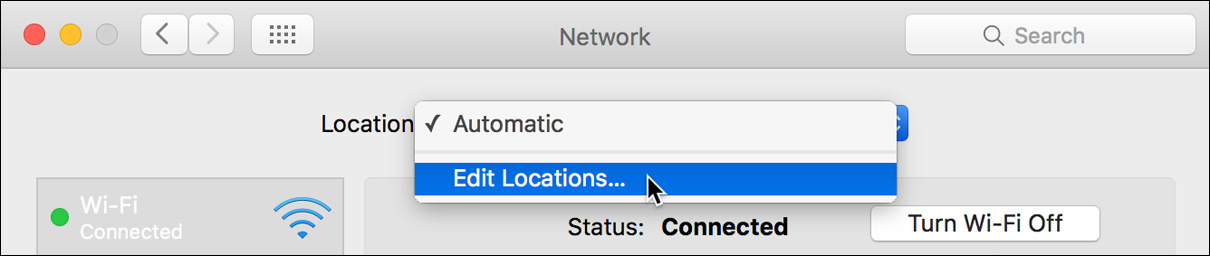
1 From the Location pop-up menu, choose Edit Locations.
2 Click the Add (+) button under the Locations list to create a new location.
3 Enter Dynamic as the name of the new location.
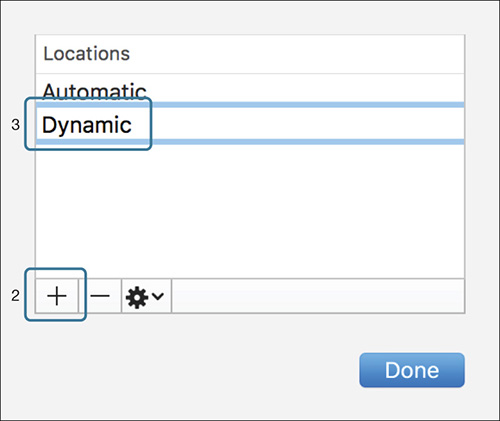
4 Click Done.
5 If necessary, choose the new Dynamic location from the Location pop-up menu.
6 Click Apply.
Network preferences is one of a few places in macOS where you must click Apply before your settings take effect.
7 If necessary, select the network service that is set up for these exercises (that is, the one that DHCP was just turned off for). If it is a wireless network, you may need to rejoin it.
The network service enters a Not Connected state with no IP address while it tries to acquire new DHCP configuration information. After a few seconds, it gives up and selects a “self-assigned” IP address beginning with 169.254.
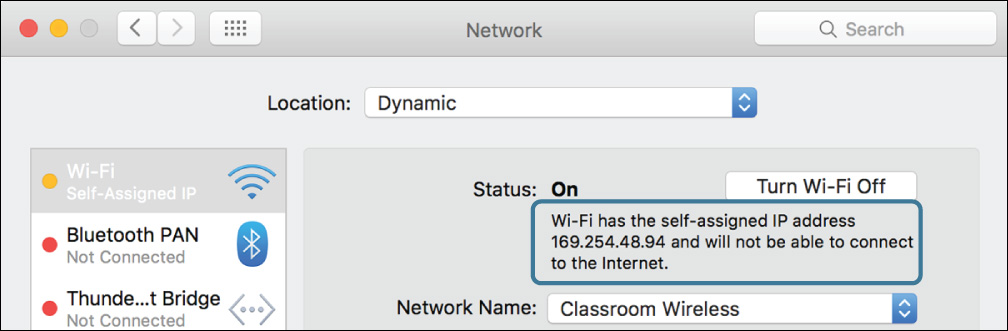
The status indicator for the service will be yellow, indicating that it is connected but not properly configured.
Note that with this “self-assigned” configuration, there is no router or DNS server for that service. Therefore, this network service cannot be used to reach the Internet over IP version 4.
8 Open Safari, and try to browse the web.
If you have another active network service with a valid Internet connection, you can still reach the Internet. macOS uses the router and DNS from lower-priority network services if the primary service does not have a router configured. It will also use IPv6 (version 6 of the internet protocol) if that is available and the web servers you are connecting to support it.
If you do not have another active network service, you cannot reach the Internet. Internet connectivity is available on the network you are connected to, but you cannot use it without proper IP settings.
9 If you have a server set up to support these exercises (either in a classroom or because you set one up according to the Mainserver Setup Instructions), try to browse to mainserver.local.
As long as you are on the same network as Mainserver, this works. Even though you have a self-assigned IP address, you can still communicate with other computers on your network. Bonjour allows you to look up .local names using multicast DNS (mDNS), giving you an easy way of connecting to local resources.
10 Quit Safari.
11 In Network preferences, check for any other active network services (other than the network set up for these exercises). If there are any, disable them by selecting them one by one and choosing Make Service Inactive from the Action (gear icon) pop-up menu below the service list.
12 If necessary, click Apply.
Create a Static Network Location
You will configure a new location called Static with a static IP address. The IP address you will use for your computer will be in the form 10.0.0.n2.
If you are performing these exercises in a class, your instructor will provide you with a student number you should use as n. For example, student #3 would use 10.0.0.32, and student #17 would use 10.0.0.172.
If you are performing these exercises on your own, use the address 10.0.0.12.
1 From the Location pop-up menu, choose Edit Locations.
2 From the Action (gear icon) pop-up menu, choose Duplicate Location.
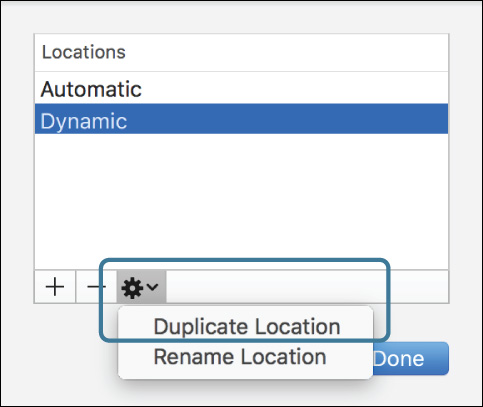
3 Name the new location Static, and click Done.
4 Use the Location pop-up menu to switch to the new Static location, if it is not already selected.
5 Click Apply.
6 Select the network service that is set up for these exercises from the service list on the left. It will most likely be either Ethernet or Wi-Fi.
7 Click Advanced.
8 If necessary, click the TCP/IP tab.
9 From the Configure IPv4 pop-up menu, choose Manually.
10 In the IPv4 Address field, enter 10.0.0.n2/24 (where n is either your student number if you are in class or 1 if you are on your own).
In other words, if you are on your own, you enter 10.0.0.12/24; if you are student #17 in a class, you enter 10.0.0.172/24.
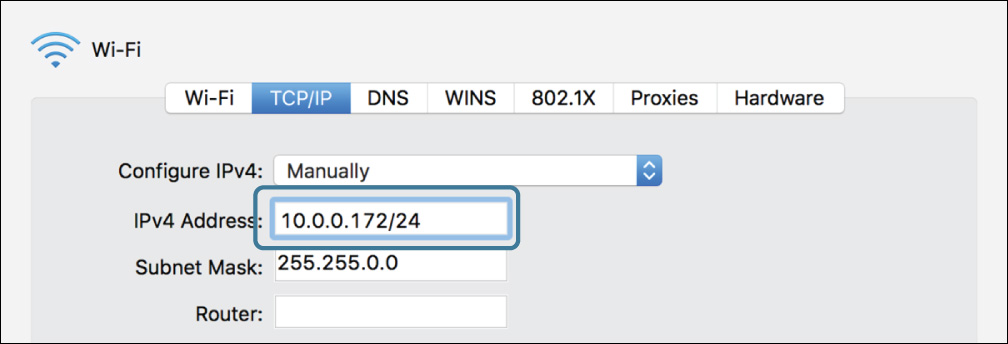
11 Press Tab.
The “/24” is a shorthand (called CIDR notation) corresponding to the subnet mask 255.255.255.0, so that field will be automatically filled in as soon as you press Tab. macOS will also guess that the router is at 10.0.0.1 (which is correct for this network). See https://en.wikipedia.org/wiki/Classless_Inter-Domain_Routing for more information.
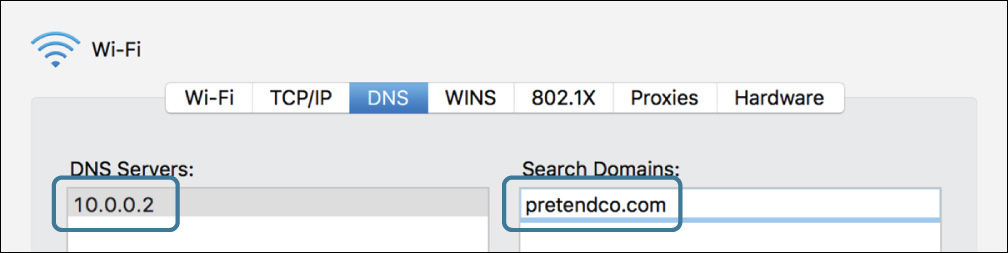
12 Click DNS.
13 Click the Add (+) button under the DNS Servers list, and enter the appropriate address:
![]() If you are performing these exercises in a classroom or have a macOS server configured to support the exercises, enter 10.0.0.2.
If you are performing these exercises in a classroom or have a macOS server configured to support the exercises, enter 10.0.0.2.
![]() If you are performing these exercises without a macOS server, enter 10.0.0.1.
If you are performing these exercises without a macOS server, enter 10.0.0.1.
14 Click the Add (+) button under the Search Domains list, and enter pretendco.com.
15 Click OK to dismiss the advanced settings dialog.
16 Click Apply.
The service’s status indicator changes to green to indicate that it is connected and fully configured.
17 Quit System Preferences.
Test Web Access
At this point you have correctly configured your computer to work on the network. Now, use Safari to verify that you can access the Apple website.
1 Open Safari.
You will use Safari to test network access throughout this exercise. But to make sure you are testing actual network connections rather than just loading pages from Safari’s caches, you will need to empty its caches first.
2 Choose Safari menu > Preferences (Command-Comma).
3 Click the Advanced tab in the preferences toolbar.
4 Select “Show Develop menu in menu bar,” and then close the preferences window.
5 Choose Develop menu > Empty Caches (Command-Option-E).
6 In the address bar, type www.apple.com, and press Return.
If Safari is already trying to load a page from the Internet, you don’t need to wait for it to finish or time out. If everything is working, the Apple website appears.
If the Apple website does not load, there is something wrong with your network settings or connection, and you should troubleshoot it before proceeding. First, verify your network settings match the previous instructions. If they are correct, consult Lesson 21, “Troubleshoot Network Issues.”
7 Quit Safari.
Exercise 20.2 Configure Network Service Order
![]() Prerequisites
Prerequisites
![]() You must have created the Local Admin (Exercise 2.1, “Configure a New macOS System for Exercises,” or Exercise 2.2, “Configure an Existing macOS System for Exercises”) and Chris Johnson (Exercise 5.1, “Create a Standard User Account”) accounts.
You must have created the Local Admin (Exercise 2.1, “Configure a New macOS System for Exercises,” or Exercise 2.2, “Configure an Existing macOS System for Exercises”) and Chris Johnson (Exercise 5.1, “Create a Standard User Account”) accounts.
![]() You must have performed Exercise 20.1, “Configure Network Locations.”
You must have performed Exercise 20.1, “Configure Network Locations.”
The network service order determines which service is used to reach the Internet. Because of this, it is important to understand how network service order is determined and what its effects are.
Create a Multihomed Location
1 If necessary, open the Network pane in System Preferences, and authenticate as Local Admin.
2 From the Location pop-up menu, choose Edit Locations.
3 Select the Static location, and then choose Duplicate Location from the Action (gear icon) pop-menu below the locations list.
4 Name the new location Multihomed, and click Done.
5 Switch to the Multihomed location, if necessary.
6 Click Apply.
7 Select the primary network service (the one at the top of the list on the left).
8 From the Action (gear icon) pop-up menu below the service list, choose Rename Service.
9 Enter With DNS in the New Name field, and click Rename.
10 Click Apply.
11 From the Action (gear icon) pop-up menu, choose Duplicate Service.
12 Enter Without DNS in the Name field, and click Duplicate.
You now have two network services using the same interface. Essentially, this means you have two sets of network configurations (IP address, subnet mask, and so on) running through the same connector (or wireless network).
13 Select the Without DNS service, and click Advanced.
14 Click TCP/IP.
15 Increase the last number of the IPv4 address by 1 (for example, if it was 10.0.0.172, change it to 10.0.0.173).
16 Click DNS.
17 Select the entry in the DNS Servers list, and click the Delete (–) button below the list to remove it.
The DNS Servers list is now empty.
18 Click OK to dismiss the advanced settings.
19 Click Apply.
At this point, both the With DNS and Without DNS services have a green status indicator, and the With DNS service is at the top of the list.
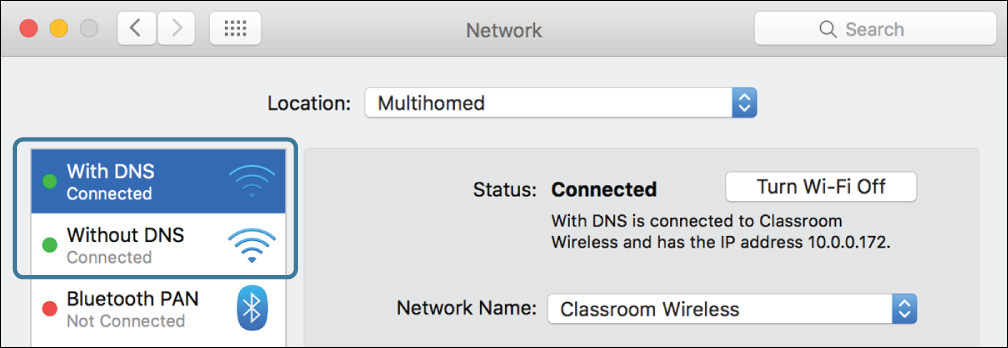
20 Open Safari, and attempt to browse the web.
You can now browse the web normally. If it does not work, check the setup you have done.
Change the Service Order
1 Switch to Network preferences.
2 From the Action (gear icon) pop-up menu, choose Set Service Order.
This list controls the normal order of the services. The system always reprioritizes the services based on their status (active services always bubble up to the top), but among the active services, this controls which is the primary.
3 Drag the Without DNS service to the top of the list, and then click OK.
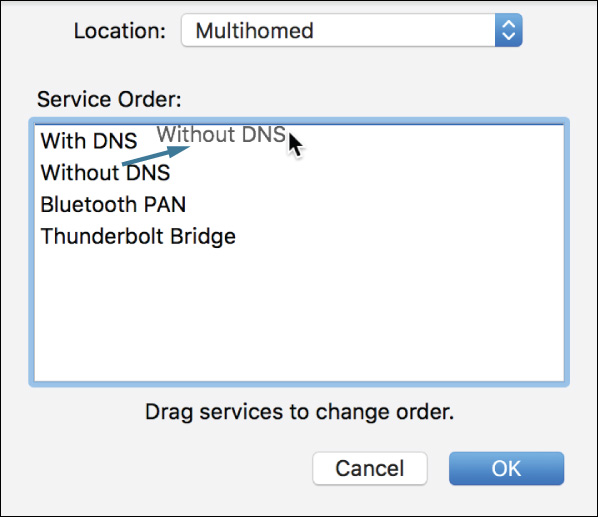
The Without DNS service now moves to the top of the service list, but it is not actually used as the primary service until you apply the change.
4 Click Apply.
5 Quit and reopen Safari.
6 Choose Develop menu > Empty Caches (Command-Option-E).
7 Again, try to browse the web.
You are presented with a page that tells you that “Safari Can’t Find the Server” or “You Are Not Connected to the Internet.” Specifically, what this means is that it cannot find a name server to resolve the name.
The Without DNS service now has priority over the With DNS service (it is higher on the list). Because Without DNS is not configured with any name servers, it cannot look up any websites by name and so fails with this message.
8 From the Apple menu, choose Location > Static.
This submenu allows you to switch locations without having to open Network preferences.
9 Reload the page in Safari (note that it may reload automatically after a short delay). This time it works because the Static location has DNS settings associated with its highest-priority (and only) service.
10 If you are not going on to the next exercise, quit Safari and System Preferences.
Exercise 20.3 Configure VPN Settings
![]() Prerequisites
Prerequisites
![]() You must have created the Local Admin (Exercise 2.1, “Configure a New macOS System for Exercises,” or Exercise 2.2, “Configure an Existing macOS System for Exercises”) and Chris Johnson (Exercise 5.1, “Create a Standard User Account”) accounts.
You must have created the Local Admin (Exercise 2.1, “Configure a New macOS System for Exercises,” or Exercise 2.2, “Configure an Existing macOS System for Exercises”) and Chris Johnson (Exercise 5.1, “Create a Standard User Account”) accounts.
![]() You must be performing these exercises in a class or have set up your own server configured as described in the Mainserver Setup Instructions.
You must be performing these exercises in a class or have set up your own server configured as described in the Mainserver Setup Instructions.
Virtual private networks (VPNs) are commonly used to securely access a remote network. With a VPN connection you establish an encrypted tunnel over the public Internet to the remote network. The encryption protects your data while it is transmitted. macOS supports three types of VPNs: Layer 2 Tunneling Protocol over IPSec (L2TP), Cisco IPSec, and Internet Key Exchange version 2 (IKEv2). You can configure a VPN service manually in macOS, but the preferred way to set one up is with a configuration profile.
In this exercise, you will use a configuration profile to set up a VPN connection from your computer to Mainserver’s private network.
Try to Connect to a Private Service
1 If necessary, log in as Chris Johnson.
2 If necessary, open Safari.
3 Use the address bar to access internal.pretendco.com.
Safari may try to reach the site for a while, but it will eventually fail to connect. The site internal.pretendco.com is accessible only from the private network, and you have not yet joined that.
4 Leave Safari open in the background.
Configure a VPN Service
1 Open the file StudentMaterials/Lesson20/VPN.mobileconfig.
The profile opens in the Profiles pane of System Preferences.
2 Click Show Profile.
The profile contains the settings to connect to mainserver.local using the L2TP protocol. You can scroll down to see more details.
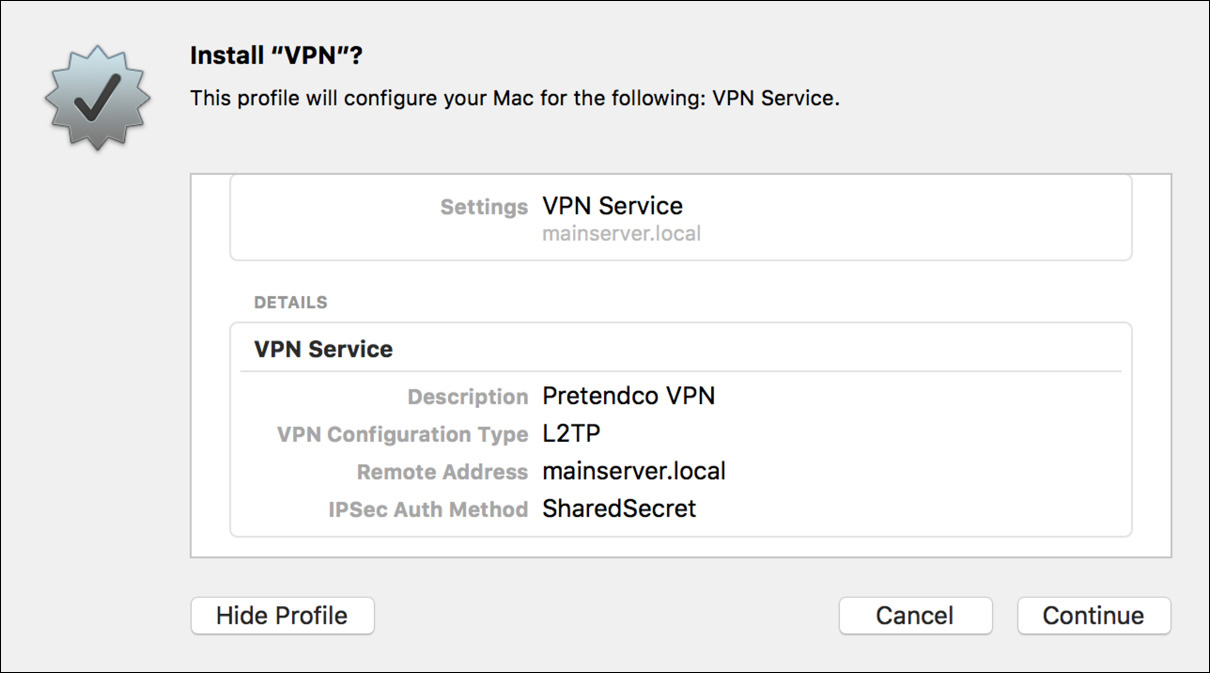
3 Click Continue, and then click Continue again to install the profile.
The profile does not specify a username to authenticate to the VPN server, so you need to enter one.
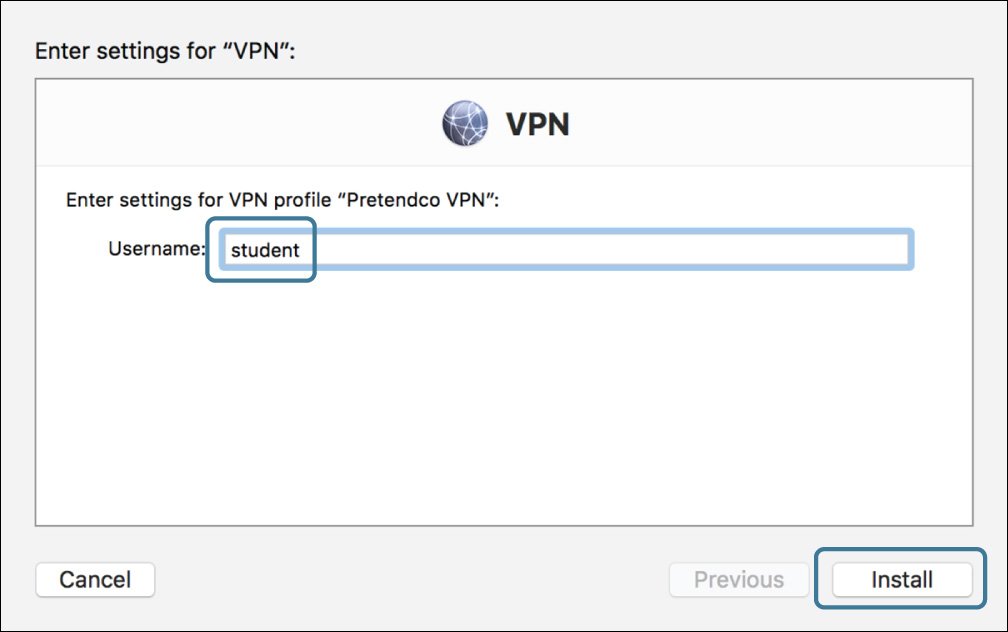
4 Enter the username student, and click Install.
5 When you are prompted, authenticate as Local Admin.
Profile preferences now lists the VPN profile as installed on this computer.
6 Switch to Network preferences.
7 Select the VPN service that has been added to your current location.
All the settings in the profile have been applied, along with the username you entered.
8 Select “Show VPN status in menu bar.”
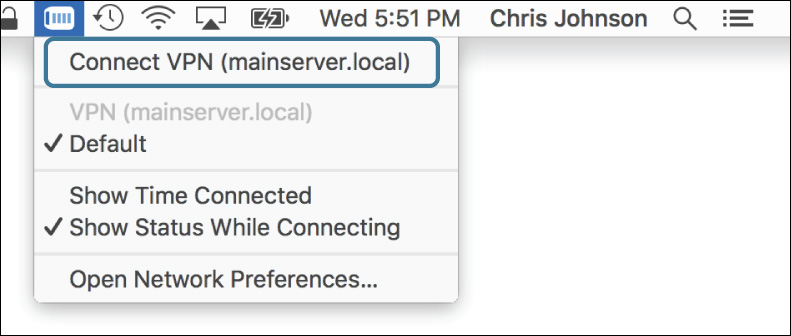
The Connect button in Network preferences may be dimmed, but you can still use the menu item to connect.
9 From the VPN menu item, choose “Connect VPN (mainserver.local).”
10 When you are prompted to authenticate to the VPN server, enter the password student (the user name is already filled in), and click OK.
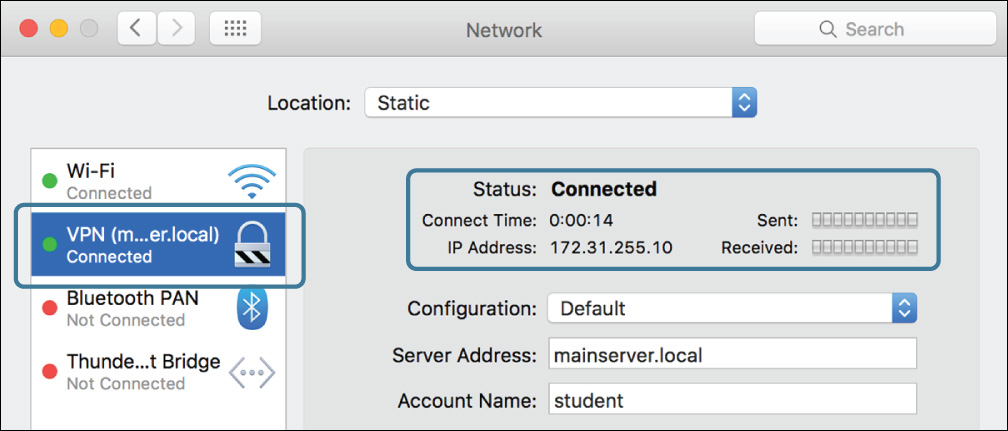
It may take a few seconds to connect. When it does, the VPN service’s status changes.
Check Your VPN Connectivity
Now that you are connected to the classroom network via VPN, you will access a network resource that was previously unreachable.
1 Switch to Safari.
2 If the internal website didn’t load automatically, use the address bar to access internal.pretendco.com.
3 If you receive a warning that Safari can’t verify the identity of the website, click Continue.
The page loads successfully this time. Since you are now connected to the private network, you have access to internal services and resources.
4 From the VPN menu item, choose “Disconnect VPN (mainserver.local).”
5 In Safari, press Command-R to reload the internal website.
Safari may continue to display the page while it attempts to reload it, but the progress bar under the address bar shows that it does not get far.

After a delay, you are informed that Safari can’t open the page.
6 Quit Safari.
Exercise 20.4 Advanced Wi-Fi Configuration
![]() Prerequisites
Prerequisites
![]() You must have created the Local Admin (Exercise 2.1, “Configure a New macOS System for Exercises,” or Exercise 2.2, “Configure an Existing macOS System for Exercises”) and Chris Johnson (Exercise 5.1, “Create a Standard User Account”) accounts.
You must have created the Local Admin (Exercise 2.1, “Configure a New macOS System for Exercises,” or Exercise 2.2, “Configure an Existing macOS System for Exercises”) and Chris Johnson (Exercise 5.1, “Create a Standard User Account”) accounts.
![]() Your computer must have a Wi-Fi interface, and you must have access to at least two Wi-Fi networks (at least one of which is visible).
Your computer must have a Wi-Fi interface, and you must have access to at least two Wi-Fi networks (at least one of which is visible).
In this exercise, you will learn to use the Preferred Networks list to control how your computer joins Wi-Fi networks.
Create a Wi-Fi-Only Location
1 If necessary, log in as Chris Johnson, open Network preferences, and authenticate as Local Admin.
2 Make a mental note of the currently selected location so that you can return to it at the end of the exercise.
3 From the Location pop-up menu, choose Edit Locations.
4 Click the Add (+) button under the Locations list to create a new location.
5 Enter Wi-Fi Only as the name of the new location.
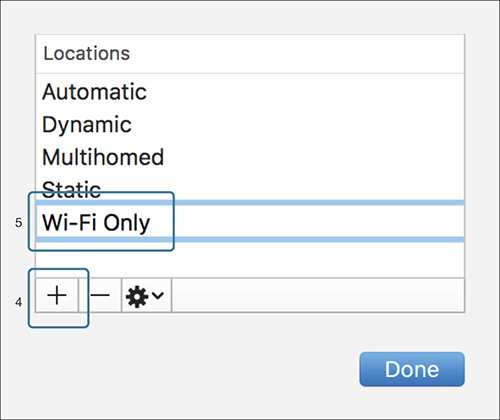
6 Click Done.
7 If necessary, choose the new Wi-Fi location from the Location pop-up menu.
8 Click Apply.
9 In the network service list, make the services other than Wi-Fi inactive. Do this one by one by selecting a service and then, from the Action (gear icon) pop-up menu below the service list, choosing Make Service Inactive.
When you are done, all services except Wi-Fi are listed as Inactive.
10 Click Apply.
11 Select the Wi-Fi service.
12 If necessary, click Turn Wi-Fi On.
13 If necessary, deselect “Ask to join new networks.”
This prevents your computer from suggesting networks to you when it can’t find any of your preferred networks.
14 If necessary, select “Show Wi-Fi status in menu bar.”
15 If your computer has not already joined a wireless network, join one by following the instructions in Exercise 19.1, “Connect to a Wi-Fi Network.”
Clear the Preferred Networks List
1 Click Advanced.
2 Examine the Preferred Networks list.
This is the list of wireless networks that your computer will join automatically any time it is in range of them. If there is more than one in range, it joins the one that is highest on the list.
Warning
Removing wireless networks from this list will remove their passwords from your keychain, so you will need to reenter their passwords the next time you join them. If there are any remembered networks that you do not know the passwords for, you can use Keychain Access to view their passwords and record them before removing them from this list. See Reference 7.2, “Manage Secrets in Keychain,” for the details of this process.
3 Clear the list by selecting each entry and clicking the Delete (–) button at the bottom of the list.
4 Make sure “Remember networks this computer has joined” is selected.
5 When the list is empty, click OK and then click Apply. If prompted, authenticate as Local Admin.
6 Click Turn Wi-Fi Off.
7 Wait ten seconds, and then click Turn Wi-Fi On.
The wireless interface turns on but does not connect to any network.
Add a Network to the Preferred List Manually
1 Click Advanced.
2 Click the Add (+) button under the Preferred Networks list.
3 Enter the network name and security information for another network you have access to.
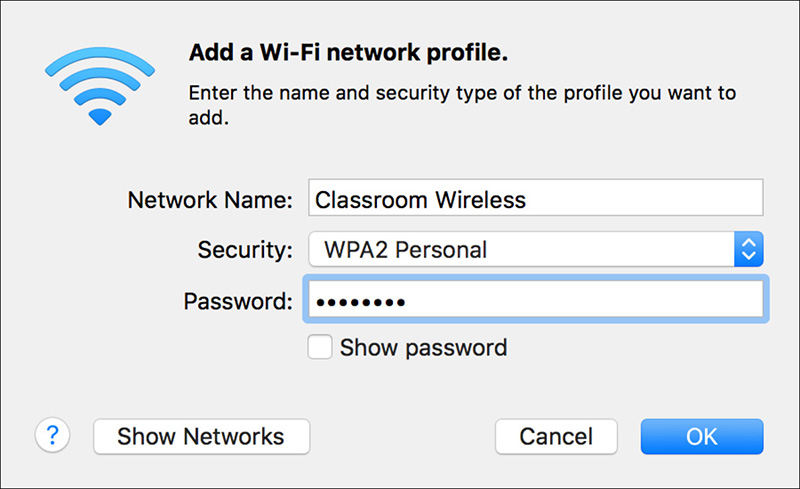
4 Click OK to add the entry.
5 Click OK to dismiss the advanced settings, and then click Apply. If prompted, authenticate as Local Admin.
Your computer should automatically join the wireless network. If it does not, there may be a problem with the manual entry, such as a typo in the name or password or an incorrect security mode. In this case, you could remove it from the list and then try adding it back in.
Note
If you performed Exercise 20.1, “Configure Network Locations,” using this wireless network, you will need to turn the DHCP service back on by reversing the process described in the “Turn Off DHCP for Exercise 20.1” section of the Optional Network Setup Instructions.
Add a Network to the Preferred List by Joining It
1 From the Network Name pop-up menu, choose another of the wireless networks you have access to.
2 If necessary, enter the network password to join it.
3 Click Advanced.
The network you joined has been added to the bottom of the preferred list. This is because the “Remember networks this computer has joined” option is selected.
4 Click OK to dismiss the advanced settings dialog.
Test the Preferred Network Order
1 Click Turn Wi-Fi Off. Wait ten seconds, and then click Turn Wi-Fi On.
After a short delay, your computer rejoins the network you added manually.
2 Click Advanced.
3 Change the Preferred Networks order by dragging the current wireless network to the bottom of the list.
4 Click OK, and then click Apply.
5 Click Turn Wi-Fi Off. Wait ten seconds, and then click Turn Wi-Fi On.
This time, your computer joins the network you added by joining because it is now first in the Preferred Networks list.
6 Switch back to the network location you were in at the beginning of the exercise (generally the Static location, if you have one), and click Apply.