Lesson 21. Troubleshoot Network Issues
Goals
![]() Identify and resolve network configuration issues
Identify and resolve network configuration issues
![]() Verify network configuration via Network preferences
Verify network configuration via Network preferences
![]() Describe how to use Network Utility to aid in troubleshooting
Describe how to use Network Utility to aid in troubleshooting
This lesson builds on the network topics covered in Lesson 19, “Manage Basic Network Settings,” and Lesson 20, “Manage Advanced Network Settings.” A solid understanding of general network technologies and the macOS network configuration architecture is necessary to effectively troubleshoot network issues from a Mac. This lesson first covers general network troubleshooting and common network issues. Then, digging deeper, you will learn how to use the built-in macOS network troubleshooting tools, including the Network Diagnostics and Network Utility applications.
Reference 21.1 Troubleshoot General Network Issues
The most important thing to remember about troubleshooting network issues is that it is often not the computer’s fault. You should consider many other points of failure when dealing with LAN and Internet connection issues. So the second most important thing to remember about troubleshooting network issues is that you need to isolate the cause of the problem before attempting generic resolutions.
To help isolate network issues, you can categorize them into three general areas:
![]() Local issues—These are usually related to either improperly configured network settings or disconnected network connections.
Local issues—These are usually related to either improperly configured network settings or disconnected network connections.
![]() Network issues—These are by far the hardest to pinpoint—literally hundreds of points of failure could be involved. It always helps to be familiar with the physical topology of your network. Start by checking the devices that provide network access closest to your Mac. Something as simple as a bad Ethernet port on a network switch can cause problems. As you move on to investigating devices farther away from your Mac, you will find that it’s often easiest to start your investigation using the network diagnostic utilities included with macOS.
Network issues—These are by far the hardest to pinpoint—literally hundreds of points of failure could be involved. It always helps to be familiar with the physical topology of your network. Start by checking the devices that provide network access closest to your Mac. Something as simple as a bad Ethernet port on a network switch can cause problems. As you move on to investigating devices farther away from your Mac, you will find that it’s often easiest to start your investigation using the network diagnostic utilities included with macOS.
![]() Service issues—These issues are related to the actual network device or service you are trying to access. For example, the devices providing DHCP or DNS services could be temporarily down or improperly configured. It’s often easy to determine whether the problem is with the service alone by testing other network services. If the other network services work, you’re probably not dealing with network or local issues. Again, macOS provides some useful diagnostic tools for testing service availability. Troubleshooting network services is also covered in Lesson 22, “Manage Network Services.”
Service issues—These issues are related to the actual network device or service you are trying to access. For example, the devices providing DHCP or DNS services could be temporarily down or improperly configured. It’s often easy to determine whether the problem is with the service alone by testing other network services. If the other network services work, you’re probably not dealing with network or local issues. Again, macOS provides some useful diagnostic tools for testing service availability. Troubleshooting network services is also covered in Lesson 22, “Manage Network Services.”
You will be using three main tools for diagnosing network issues in macOS: Network preferences, Network Diagnostics, and Network Utility.
Verify Network Preferences Status
One of the diagnostic tools you should always check first is Network preferences. Network preferences features a dynamically updating list that shows you the current status of any network interface. If a network connection is not working, you will find out about it here first.
Network status indicators are as follows:
![]() Green—The connection is active and configured with TCP/IP settings. This, however, does not guarantee that the service is using the proper TCP/IP settings.
Green—The connection is active and configured with TCP/IP settings. This, however, does not guarantee that the service is using the proper TCP/IP settings.
![]() Yellow—The connection is active but the TCP/IP settings are not properly configured. If you are still experiencing problems with this service, double-check the network settings. If the settings appear sound, move on to the other diagnostic utilities.
Yellow—The connection is active but the TCP/IP settings are not properly configured. If you are still experiencing problems with this service, double-check the network settings. If the settings appear sound, move on to the other diagnostic utilities.
![]() Red—This status usually indicates either improperly configured network settings or disconnected network interfaces. If this is an always-on interface, check for proper physical connectivity. If this is a virtual or Point-to-Point Protocol connection, double-check the settings and attempt to reconnect.
Red—This status usually indicates either improperly configured network settings or disconnected network interfaces. If this is an always-on interface, check for proper physical connectivity. If this is a virtual or Point-to-Point Protocol connection, double-check the settings and attempt to reconnect.
About Common Network Issues
A good starting point for resolving network issues is to quickly verify some of the most common causes. You can think of this list as items you should check every time you’re having an issue. To put it another way, verify common issues before hunting down exotic ones. This includes verifying Ethernet connectivity, Wi-Fi connectivity, DHCP services, and DNS services.
Ethernet Connectivity Issues
For well over a century, those supporting any electronic device have heeded these words: “Check the cable first!” If you’re using an Ethernet connection, always verify the physical connection to the Mac, and if possible verify the entire Ethernet run back to the switch. If that’s not possible, try swapping your local Ethernet cable or use a different Ethernet port.
You should also verify the Ethernet status from Network preferences, as detailed in the next section. Also, keep an eye out for substandard Ethernet cabling or problematic switching hardware. A symptom of these issues would be a large number of packet errors, which you can verify with Network Utility, as covered later in this lesson.
You may also find that while the Ethernet switch registers a link, Network preferences still shows the link as down. This issue may be resolved by manually setting a slower speed in the advanced hardware settings of Network preferences, as covered in Lesson 20, “Manage Advanced Network Settings.”
More Info
Built-in network hardware can sometimes become unresponsive and may benefit from resetting the Mac’s NVRAM or SMC. You can find out more about resetting these items from Apple Support articles HT204063, “How to Reset NVRAM on your Mac,” and HT201295, “Reset the System Management Controller (SMC) on your Mac.”
Wi-Fi Connectivity Issues
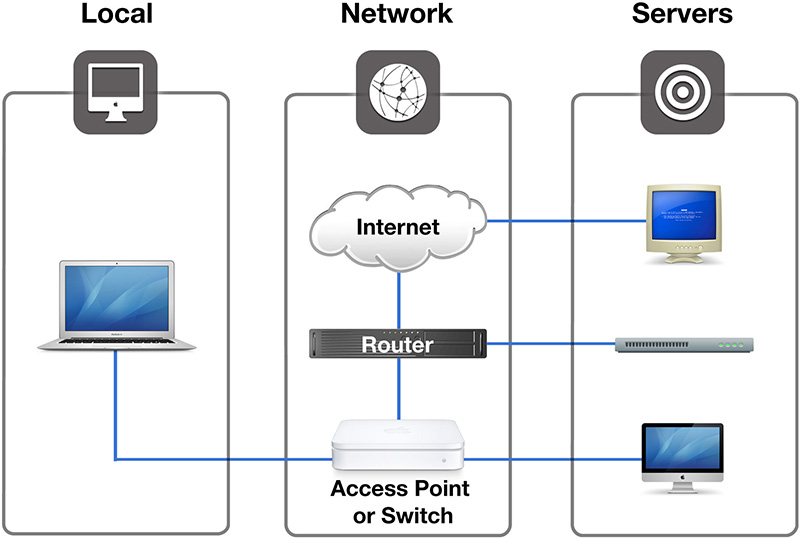
A modern version of “Check the cable first!” would certainly be “Check the Wi-Fi first!” After all, when you’re using Wi-Fi networking, the wireless signal represents the “physical” network connection. Start by verifying that you are connected to the correct SSID from the Wi-Fi status menu or Network preferences. Often, if the Mac detects a problem the Wi-Fi status menu shows an exclamation point (!), indicating that there is a problem with the wireless network.
The Wi-Fi status menu can also serve as a diagnostic tool if you hold down the Option key when choosing this menu item. This view shows connection statistics for the currently selected Wi-Fi network. Of particular note is the Tx Rate entry, which shows (in megabits per second) the current data rate for the selected Wi-Fi network. The Wi-Fi status menu is capable of other diagnostic tricks, including helping you quickly identify network issues and opening the Wireless Diagnostics application.
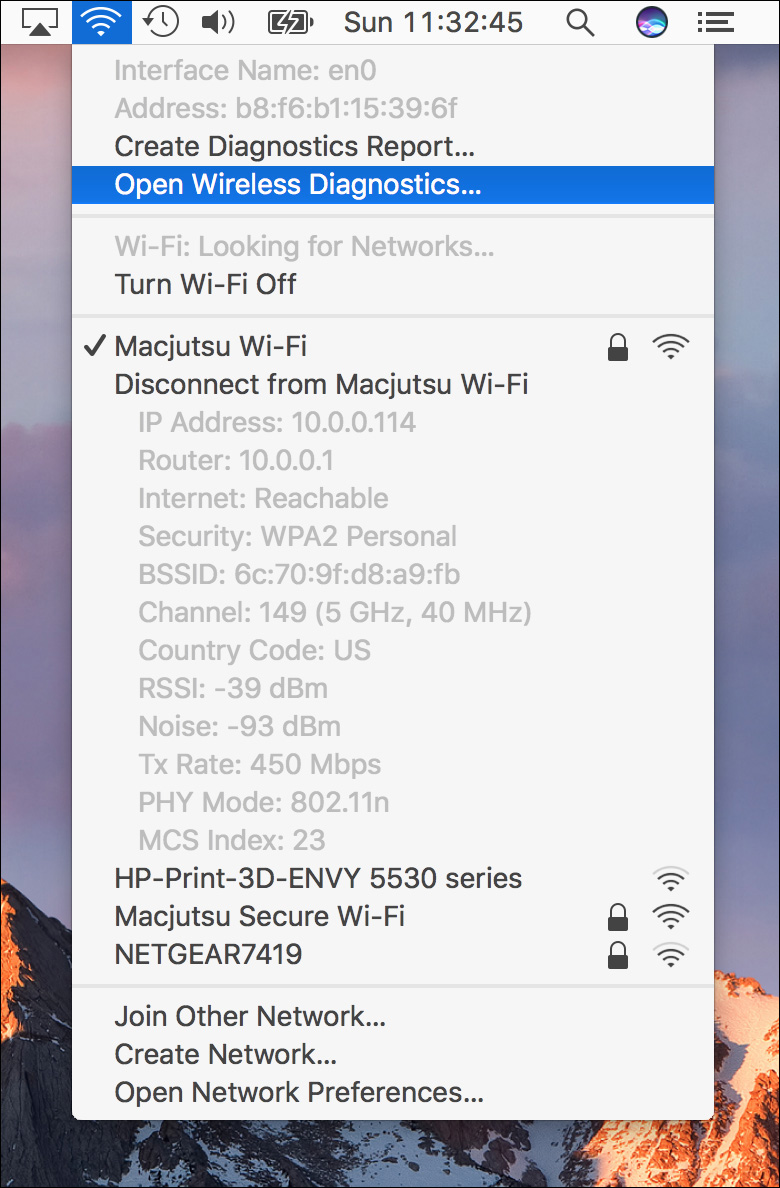
Opening the Wireless Diagnostics application reveals an assistant interface. The first feature of the Wireless Diagnostics application is to create and save a diagnostic report archive. The creation of the diagnostic report requires administrator authentication, but it will collect a huge amount of information about the Mac computer’s wireless and network configuration. The resulting compressed archive will automatically appear only in the /var/tmp folder.
Note
When you select the option Create Diagnostics Report from the Wi-Fi menu, it will send the diagnostic report directly to Apple, bypassing your ability to inspect the report’s content.
The wireless diagnostics archive contains relevant files that would help experienced technical support staff diagnose a tricky connection issue. Of course, you can certainly expand the archive generated by the Wireless Diagnostics application and explore the contents on your own. However, the details of the collected items are beyond the scope of this guide.
Despite the potential complexity of the diagnostic reports, in the Wireless Diagnostics application you’ll also find a variety of additional advanced wireless network utilities. Whenever you have the application open, you can reveal these additional utilities from the Window menu.
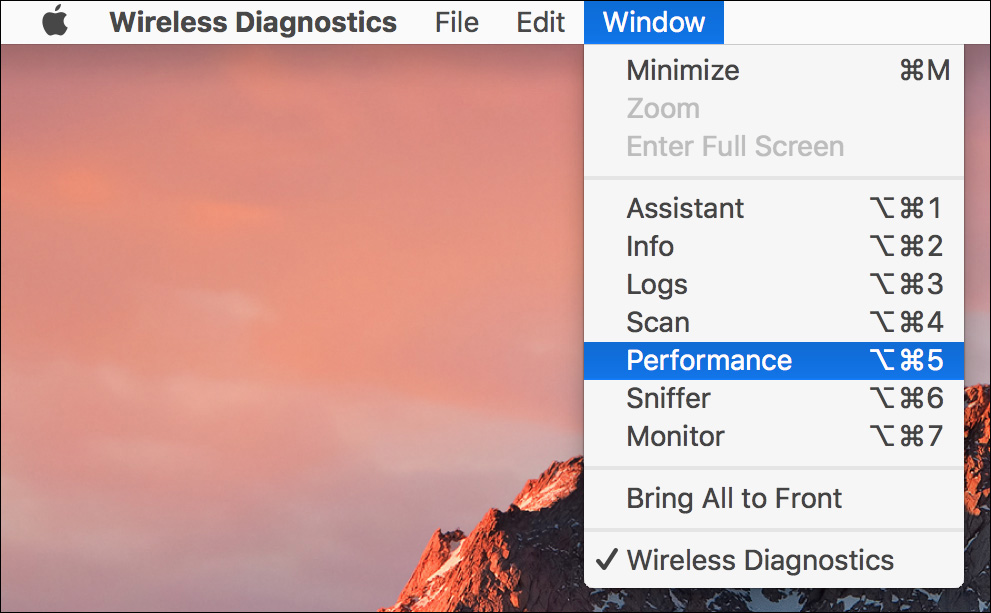
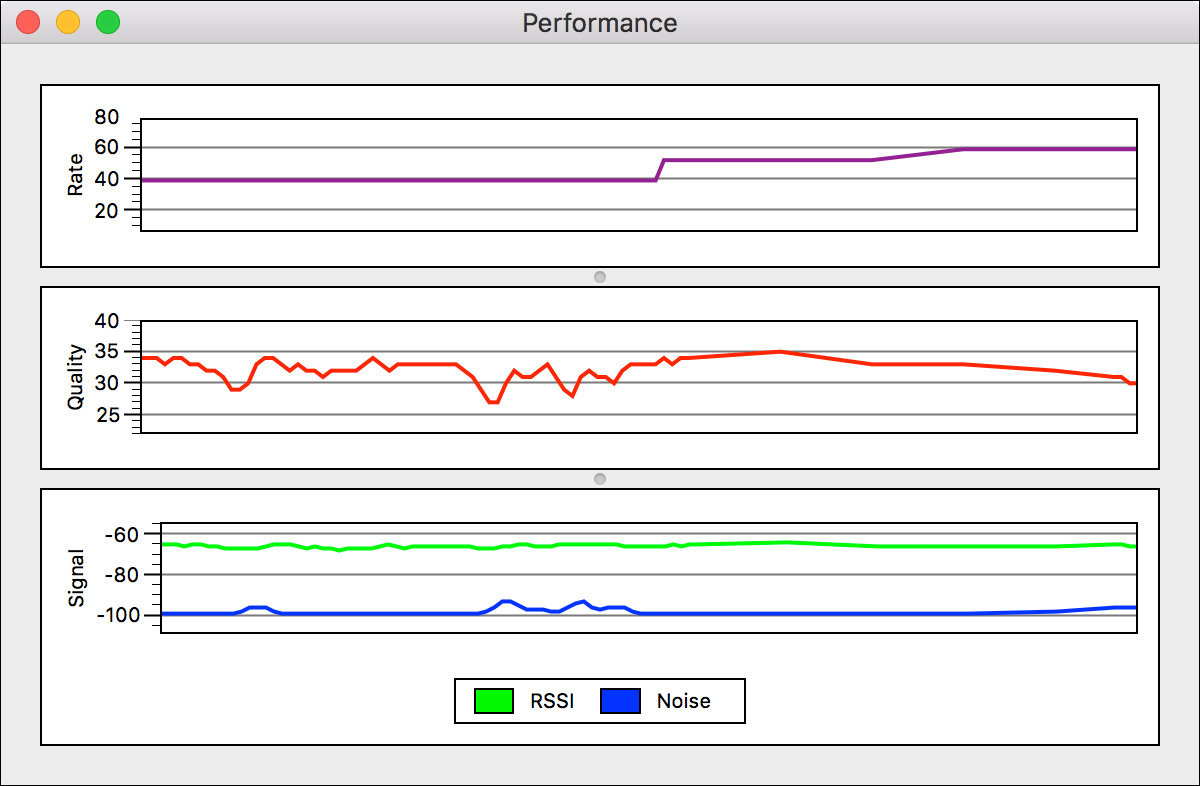
Again, descriptions of detailed use of these advanced wireless tools are beyond the scope of this guide. However, when working with wireless vendors or support specialists in trying to resolve tricky wireless issues, you will find that these wireless utilities are extremely valuable. For example, the Performance window provides a real-time view of the radio signal quality. With the wireless performance utility open, you can physically move a Mac portable device around an area to identify wireless “dead zones.”
You can find out more about Apple Wireless Diagnostics from Apple Support article HT202663, “Check for Wi-Fi issues using your Mac.”
DHCP Service Issues
Most client network connections are configured automatically via DHCP. If the DHCP server has run out of available network addresses—or if no DHCP service is available, as is the case with small ad hoc networks—the client automatically generates a self-assigned address. Sometimes this automatic assignment of addressing is referred to as “link-local addressing,” but Network preferences shows it as Self-Assigned.
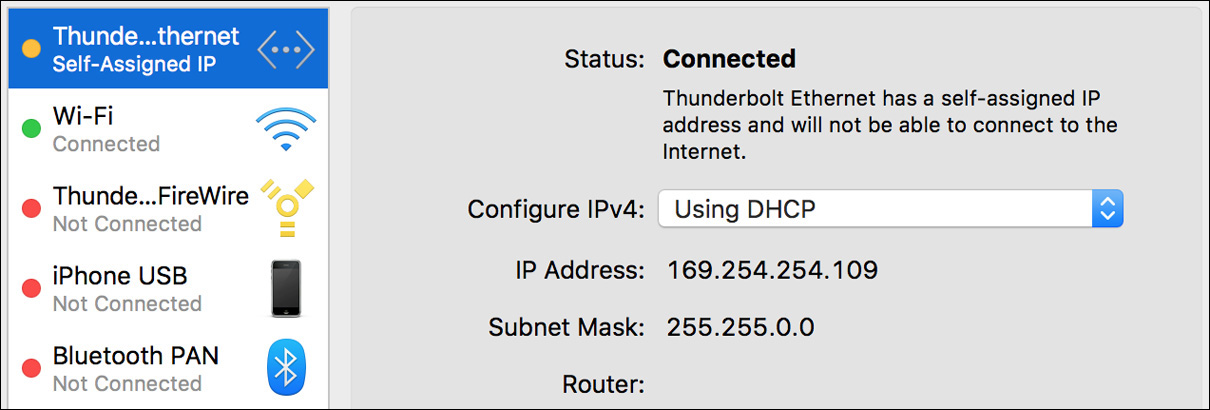
Self-assigned address configuration is always in the IP address range of 169.254.xxx.xxx, with a subnet mask of 255.255.0.0 and lacking a router address. The network client automatically generates a random self-assigned address and then checks the local network to make sure no other network device is using that address.
Once a unique self-assigned address is established, the network client can establish connections only with other network devices on the local network. Consequently, a client configured with a self-assigned address may be able to communicate with other devices on the LAN, but it doesn’t have access to WAN or Internet resources.
DNS Service Issues
Aside from TCP/IP settings, DNS is a requirement for most network services. As always, you should start by verifying the DNS server configuration in Network preferences. Remember that in most cases the topmost network service interface is the primary one, and as such is used for all DNS resolution. The exception is if the primary network service is lacking a router configuration, in which case DNS resolution falls to the next fully configured network service interface.
Though it’s rare, the macOS DNS resolution services can sometimes cache out-of-date DNS information and return inaccurate results. If you suspect your DNS issues are due to old information, you can either restart the Mac or flush the DNS service caches. You can find out more about this process from Apple Support article HT202516, “Reset the DNS cache in OS X.”
Use Network Diagnostics
macOS includes Network Diagnostics Assistant to help you troubleshoot common network issues. Some networking applications automatically open this assistant when they encounter a network issue. You can also open it manually by clicking Assist Me at the bottom of Network preferences and then clicking the Diagnostics button.
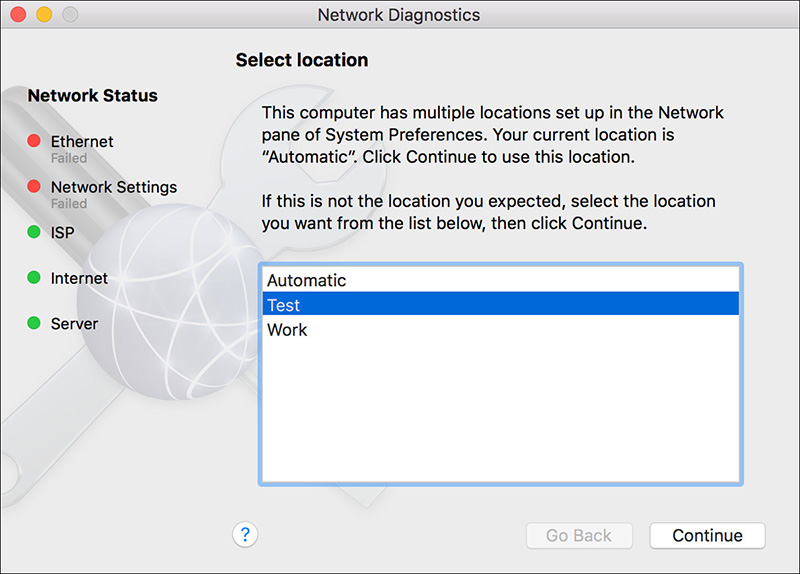
Network Diagnostics Assistant asks you a few simple questions about your network setup, and then, based on your answers, it runs a battery of tests to determine where the problem might be occurring. Test results are displayed using colored indicators on the left side of the window. If there are problems, the assistant makes suggestions for resolution.
Reference 21.2 Troubleshoot Using Network Utility
Network preferences and Network Diagnostics Assistant are good places to start troubleshooting network issues, but the most powerful application in macOS for diagnosing network issues is Network Utility. In macOS, this application is buried in the /System/Library/CoreServices/Applications folder. The quickest way to find it, or really anything on the Mac, is to use Spotlight.
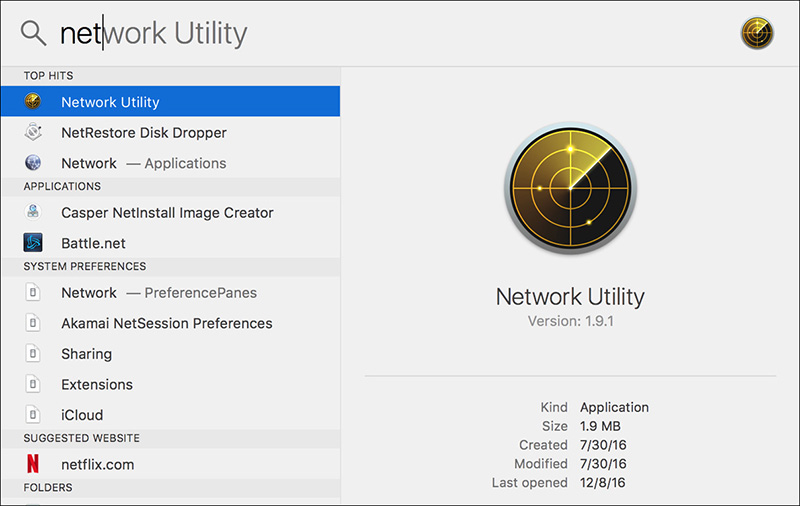
Tip
You can also use Spotlight to search for and open the Wireless Diagnostics application, or any other useful application found in /System/Library/CoreServices/Applications.
Network Utility provides a selection of popular network identification and diagnostic tools. In fact, most of the tools in Network Utility are based on UNIX command-line network utilities that have been used by network administrators for years.
Network Utility is broken up into the following sections:
![]() Info—Allows you to inspect details regarding hardware network interfaces
Info—Allows you to inspect details regarding hardware network interfaces
![]() Netstat—Shows routing information and network statistics
Netstat—Shows routing information and network statistics
![]() Ping—A fundamental network troubleshooting tool that lets you test network connectivity and latency
Ping—A fundamental network troubleshooting tool that lets you test network connectivity and latency
![]() Lookup—Lets you test DNS resolution
Lookup—Lets you test DNS resolution
![]() Traceroute—Helps you analyze how your network connections are routed to their destination
Traceroute—Helps you analyze how your network connections are routed to their destination
![]() Whois—Lets you query whois database servers and find the owner of a DNS domain name or IP address of registered hosts
Whois—Lets you query whois database servers and find the owner of a DNS domain name or IP address of registered hosts
![]() Finger—Enables you to gather information based on a user account name from a network service
Finger—Enables you to gather information based on a user account name from a network service
![]() Port Scan—A handy tool for determining whether a network device has services available
Port Scan—A handy tool for determining whether a network device has services available
Network Utility can also be opened when your Mac is started from macOS Recovery, as covered in Lesson 3, “Use macOS Recovery.” Whenever the Mac is started from macOS Recovery, you can open Network Utility by choosing it from the Utilities menu. However, when running from a macOS Recovery system, you do not have access to Network preferences. This means the Mac does not automatically activate built-in wired Ethernet connections and attempt to acquire configuration via DHCP. Alternatively, the Wi-Fi status menu is available, allowing you to temporarily connect to wireless networks.
Network Utility: Interface Information
When you open Network Utility, you first see the Info section. This section lets you view the detailed status of any hardware network interface. Even if you’ve opened Network Utility to use another section, always take a few moments to verify that the network interface is properly activated.
Start by selecting the specific interface you’re having issues with from the pop-up menu. You’ll notice that the selections here do not necessarily match the service names given in Network preferences. Instead, this menu shows the interfaces using their interface type and UNIX-given names.
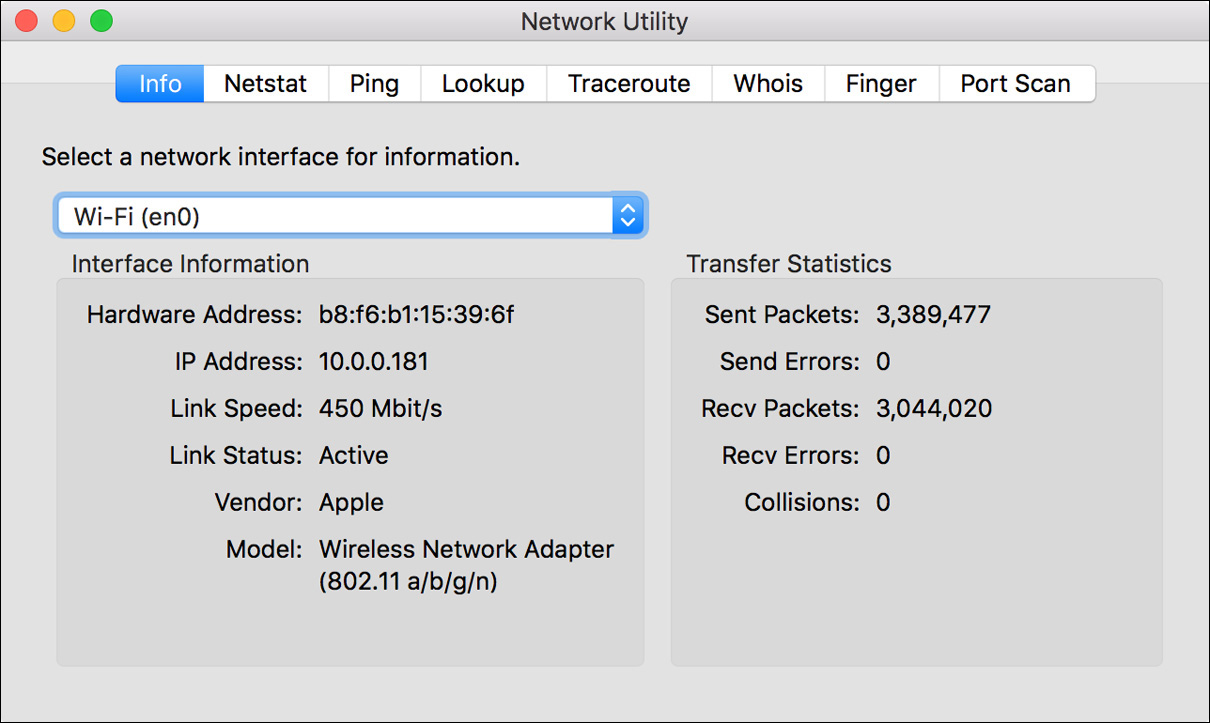
Once you have selected an interface, you can view general interface information to the left and transfer statistics to the right. The primary pieces of information you’re looking for here are link status, link speed, and IP address(es). Only active hardware network interfaces show as such, and the link speed indicates whether the interface is establishing a proper connection. Obviously, a proper IP address is required to establish a TCP/IP connection. You can also identify the selected interface’s MAC address, which is used to identify this particular interface on the LAN.
As a final validation of the selected network interface, you can view recent transfer statistics. If you open other network applications to stir up some network traffic, you can verify that packets are being sent and received from this interface. If you are seeing activity here but still experiencing problems, the issue is most likely due to a network or service problem and not the actual network interface. Or, if this interface is experiencing transfer errors, a local network hardware connectivity issue may be the root of your problem.
To resolve hardware network interface issues, always start by checking the physical connection. With wired networks, try different network ports or cabling to rule out physical connection issues. With wireless networks, double-check the Wi-Fi settings and the configuration of any wireless base stations. On rare occasions, you may find that the Mac computer’s network hardware is somehow no longer working properly, in which case you should take your Mac to an Apple Authorized Service Provider.
Network Utility: Ping
If you have determined that your network settings are properly configured and the hardware network interface appears to be working correctly but you are still experiencing network issues, your next step is to test network connectivity using the ping tool. The ping tool is the most fundamental network test to determine whether your Mac can successfully send and receive data to another network device. Your Mac sends a ping data packet to the destination IP address, and the other device returns the ping packet to indicate connectivity.
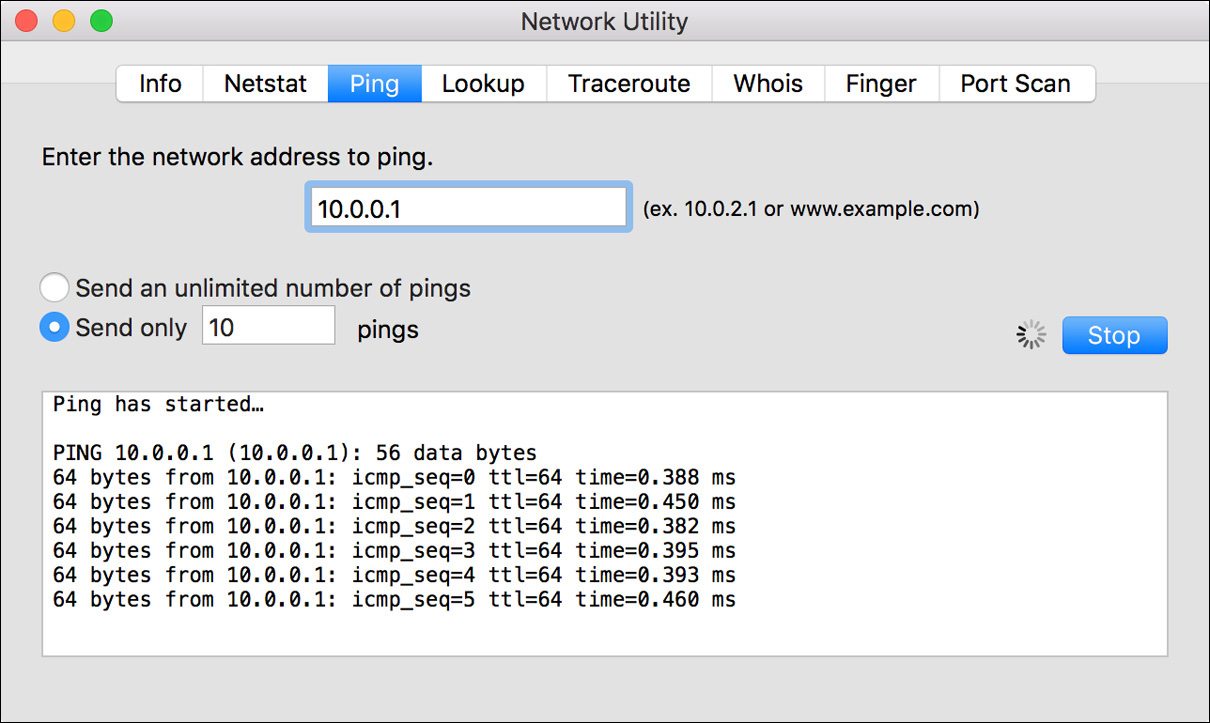
To use ping, open Network Utility and then click the Ping tab. Start by entering an IP address to a device on the LAN that should always be accessible, like the network router. Remember that using a domain name assumes that your Mac is properly communicating with a DNS server, which might not be the case if you’re troubleshooting connectivity issues.
Click the Ping button to initiate the ping process. If the ping is successful, it returns the amount of time it took for the ping to travel to the network device and back. This is typically within milliseconds; experiencing ping times any longer than a full second is unusual.
Note
Some network administrators view excessive pinging as a threat, so many configure their firewalls to block pings or set up their network devices not to respond to any network pings.
Once you have established successful pings to local devices, you can branch out to WAN or Internet addresses. Using the ping tool, you may find that everything works except for the one service you were looking for that prompted you to start troubleshooting the network.
Network Utility: Lookup
If you are able to successfully ping other network devices by their IP address but attempting to connect to another device by its host name doesn’t work, you are experiencing issues related to DNS. The network lookup process allows you to test name resolution against your DNS server.
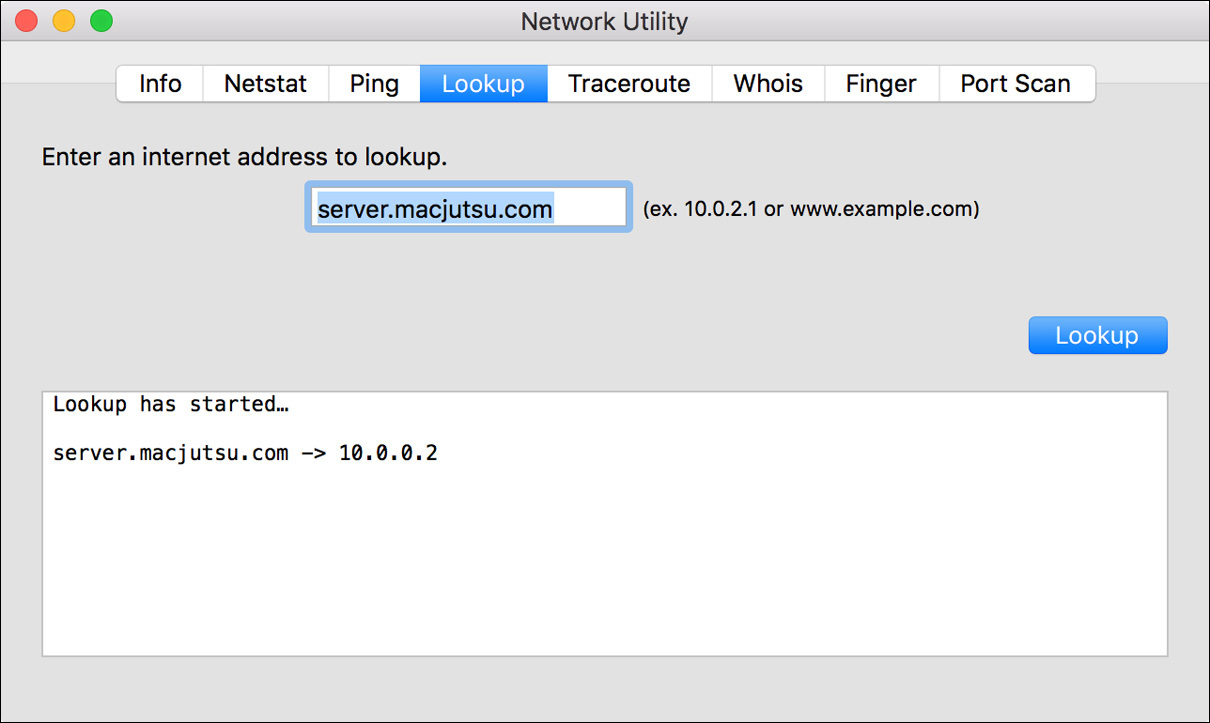
To verify DNS lookup, open Network Utility and then click the Lookup tab. Start by entering the host name of a device or service in your local domain. If you can resolve local host names but not Internet host names, this indicates that your local DNS server is resolving local names but is not properly connecting to the worldwide DNS network. If you don’t have a local domain, you can use any Internet host name.
Note
The DNS results in the Lookup feature of Network Utility are considerably briefer than in previous versions of macOS. This simplified output shows only those IP addresses the Mac will attempt to connect with given the host name specified.
Click the Lookup button to initiate the network lookup process. A successful forward lookup returns the IP address of the host name you entered. A successful reverse lookup returns the host name of the IP address you entered. If you are unable to successfully return any lookups, your Mac is not connecting to the DNS server. You can verify this by pinging the DNS server IP address to test for basic connectivity.
Network Utility: Traceroute
If you are able to connect to some network resources but not others, use the network traceroute utility to determine where the connection is breaking down. Remember that WAN and Internet connections require the data to travel through many network routers to find their destination. The traceroute tool examines every network hop between routers using the ping tool to determine where connections fail or slow down.
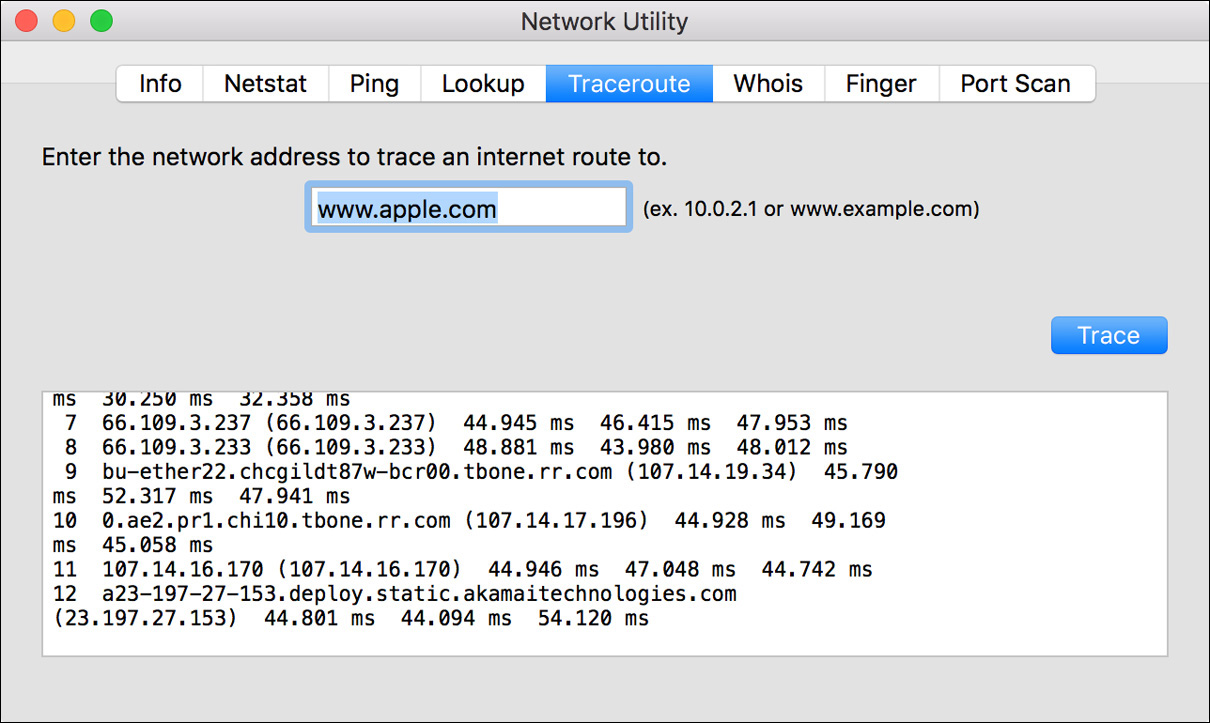
To verify a network TCP/IP route, open Network Utility and then click the Traceroute tab. Start by entering an IP address to a device on the LAN that should always be accessible, like the network router. Remember that using a domain name assumes that your Mac is properly communicating with a DNS server, which might not be the case if you’re troubleshooting connectivity issues.
Click the Trace button to initiate the traceroute process. If traceroute is successful, it returns with the list of routers required to complete the connection and the amount of time it took for the ping to travel to each network router. It sends three probes at each distance, so three times are listed for each hop. Again, the delay is typically measured in milliseconds; experiencing delay times of any longer than a full second is unusual.
Note
If traceroute doesn’t get a reply from any router along the way, it shows an asterisk instead of listing the router address.
Note
Again, some network administrators view excessive pinging as a threat, so many configure their firewalls to block pings or set up network devices not to respond to any network pings.
Once you have established successful routes to local devices, you can branch out to WAN or Internet addresses. Using the traceroute tool, you may find that a specific network router is the cause of the problem.
Exercise 21.1 Troubleshoot Network Connectivity
![]() Prerequisite
Prerequisite
![]() You must have created the Local Admin (Exercise 2.1, “Configure a New macOS System for Exercises,” or Exercise 2.2, “Configure an Existing macOS System for Exercises”) and Chris Johnson (Exercise 5.1, “Create a Standard User Account”) accounts.
You must have created the Local Admin (Exercise 2.1, “Configure a New macOS System for Exercises,” or Exercise 2.2, “Configure an Existing macOS System for Exercises”) and Chris Johnson (Exercise 5.1, “Create a Standard User Account”) accounts.
Network connectivity issues can be complex, but familiarity with the arsenal of tools included in macOS will help you develop a solid plan of attack for their resolution. In this exercise, you will misconfigure your network settings and then use the built-in troubleshooting tools in macOS to see how they show the symptoms of the problem and allow you to isolate the problem.
Break Your Network Settings
1 If necessary, log in as Chris Johnson.
2 If necessary, open the Network pane in System Preferences, and authenticate as Local Admin.
3 Note the currently selected location so that you can return to it at the end of the exercise.
4 From the Location pop-up menu, choose Edit Locations.
5 Select the current location, and then choose Duplicate Location from the Action (gear icon) pop-up menu below the location list.
6 Name the new location Broken DNS, and then click Done.
7 Switch to the Broken DNS location, if necessary.
8 Click Apply.
9 Select the primary network service (the one at the top of the list on the left), and click Advanced.
10 Click DNS.
11 Click the Add (+) button under the DNS Servers list, and add the server address 127.0.0.55.
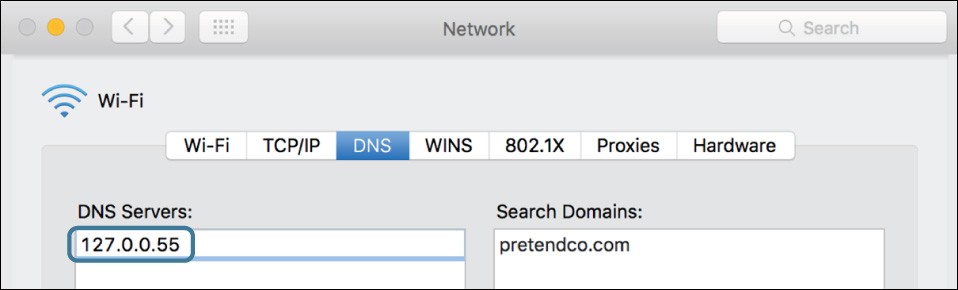
No DNS server is available at this address. The 127.0.0 prefix is reserved for computers to talk to themselves (known as local loopback addresses), but macOS uses only 127.0.0.1 for this. As a result, this is effectively an invalid address.
12 If there are any other entries in the DNS Servers list, make a note of them so you can add them back later, and then use the Delete (–) button to remove them.
14 From the Configure IPv6 pop-up menu, choose “Link-local only.”
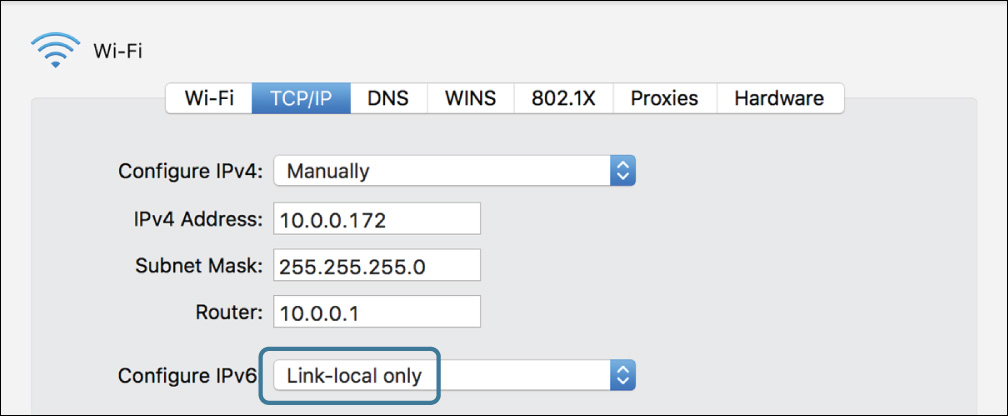
This will prevent IPv6 from acting as an alternate Internet connection.
15 Click OK, and then click Apply.
Observe the Problem
1 Open Safari.
2 Enter www.apple.com in the address bar, and press Return.

Safari attempts to load the webpage, but its progress bar does not get far because it is not able to reach anything. If you leave it long enough, it will eventually give up and display an error, but you do not need to wait for this.
3 Quit Safari.
Check the Network Status in Network Preferences
When you are experiencing a network problem, one of the first things to check is the network service status in Network preferences. This allows you to spot simple problems without having to go into more detailed diagnostics.
1 If necessary, open System Preferences, and select the Network pane.
2 Examine the status indicators next to the network services, as well as the order in which they appear in the list.
If the network service you expected to be active were not showing a green status indicator, it would immediately tell you that something was wrong with the connection (loose cable, not joined to wireless network, and so on) or that critical settings were missing (no IP address, and so on).
If the wrong service were at the top of the list, it would indicate either that the service order was set incorrectly or that unexpected services were active.
In this case, the expected service is green and at the top of the list, so more detailed troubleshooting is necessary.
Use Network Diagnostics
Network Diagnostics helps users diagnose and fix basic network problems. You will use it to gather more information about the problem.
1 In Network preferences, click Assist Me near the bottom of the window.
A dialog asks if you want assistance setting up a new network configuration or solving a network problem.
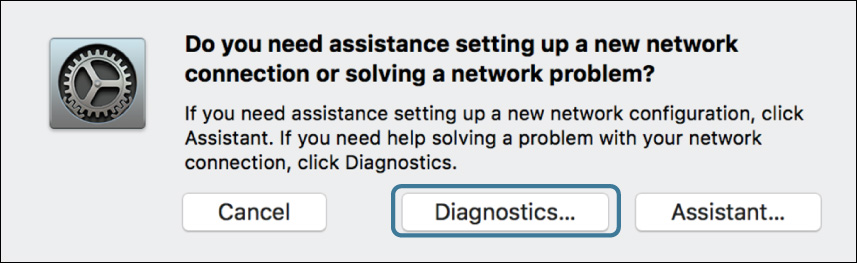
2 Click Diagnostics.
Network Diagnostics opens and automatically runs a series of automated tests. Several status indicators show the results.
In the following example, the Wi-Fi, Wi-Fi Settings, Network Settings, and ISP tests passed (that is, there is a live Wi-Fi connection, it has network settings associated with it, and it can reach as far as your Internet provider), but the Internet and Server tests failed. Your results may differ depending on what type of connection you have.
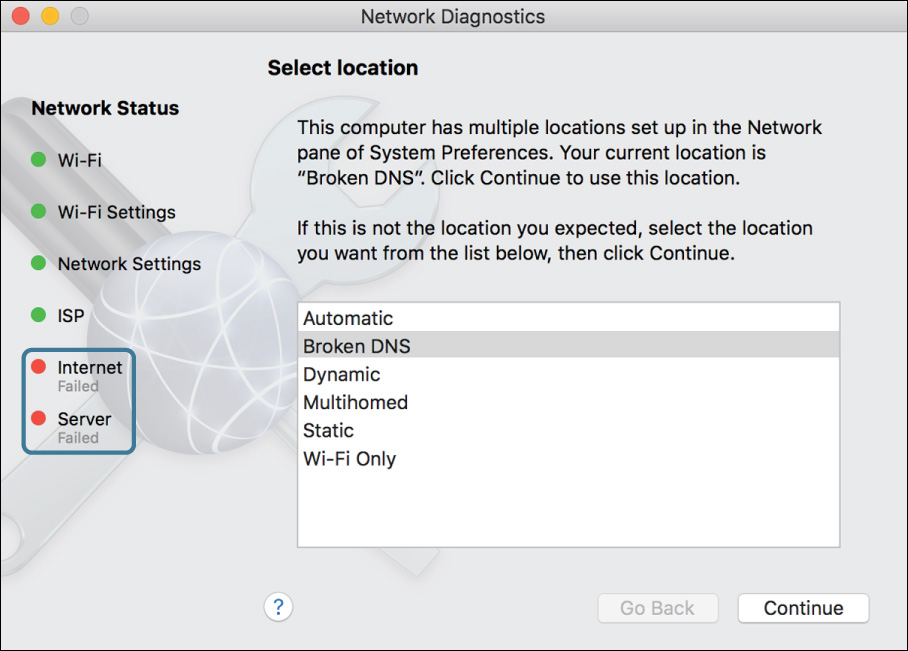
The Network Diagnostics tool gives a little more information about what parts of your network connection are working and which aren’t, and may even identify the cause of the problem. You could use Network Diagnostics to troubleshoot and repair this, but instead you will take this opportunity to see what Network Utility can show.
3 Quit Network Diagnostics.
Use Ping to Test Connectivity
In this section, you will use Network Utility’s ping tool. Ping’s primary purpose is to test network connectivity, but as you will see it can also test DNS resolution.
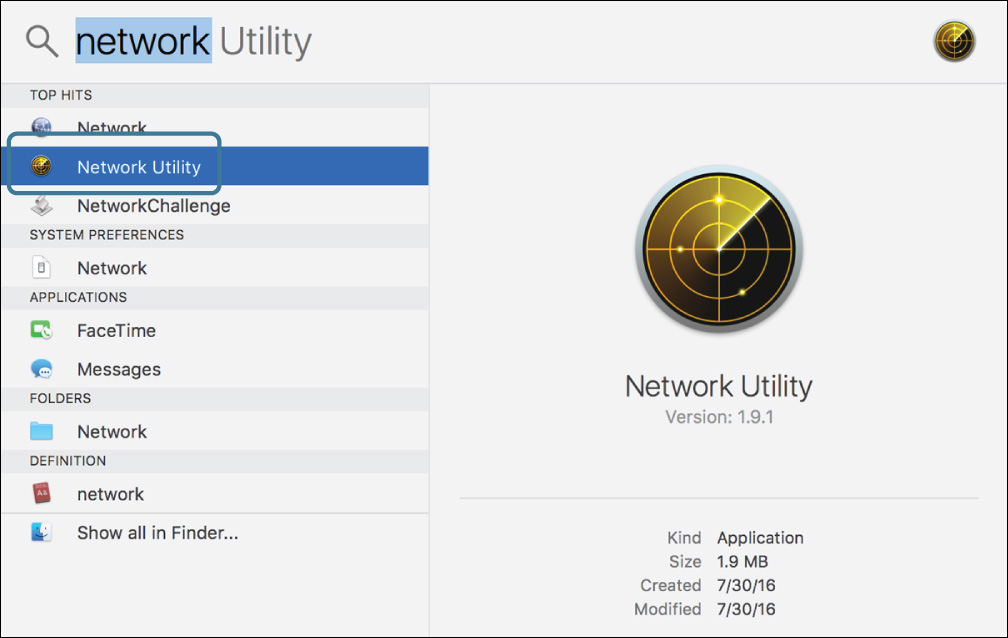
Network Utility is in /System/Library/CoreServices/Applications, but you can launch it easily with Spotlight.
1 Press Command-Space bar to activate Spotlight.
2 Enter network, and then click Network Utility in the search results. Note that it may not be the first result.
3 In Network Utility, click the Ping tab.
4 In the “Enter the network address to ping” field, type the domain name of the server you are trying to reach (www.apple.com).
5 Enter 5 in the “Send only” field, and make sure it is selected.
6 Click the Ping button.
After about 30 seconds, you receive a message telling you that it could not resolve www.apple.com. This message indicates that the ping tool was not able to use DNS to look up, or resolve, the name www.apple.com and match it to an IP address to send the ping to. In this case, you know that the name www.apple.com is valid because you have used it before, so this indicates that something is wrong with DNS.
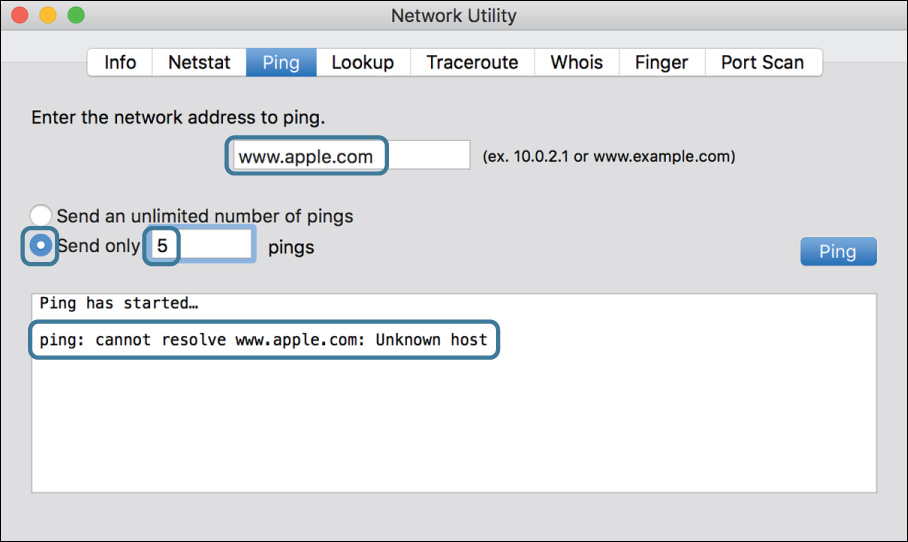
Although this gives you some more information about the problem, it still does not tell you where the problem is. It can be hard to tell the difference between a DNS problem and a complete network failure. If DNS resolution is the only thing failing, it can mimic a complete failure because almost all network access starts with (and depends on) a DNS lookup. On the other hand, if the network is completely disconnected, most attempts to use the network fail at the DNS step, so the only visible symptoms will be DNS errors.
One good way to distinguish between a DNS-only problem and a complete network failure is to try to reach a server by its numeric IP address. This bypasses the usual DNS lookup and hence works even if DNS is broken.
7 In the “Enter the network address to ping” field, enter the numeric IP address 8.8.8.8. This is an easy-to-remember address of a public server maintained by Google.
8 Click Ping.
This time, ping reaches the remote computer successfully and shows statistics for its five test pings.
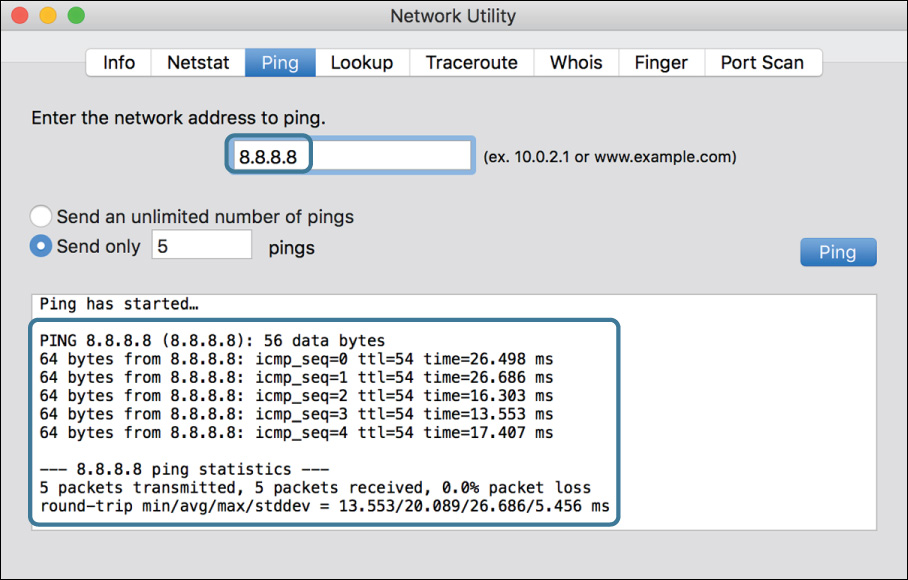
This tells you that your basic network connectivity is OK; it is likely just DNS that is not working.
Note
If ping is unable to reach the server at 8.8.8.8, it may indicate that your computer is behind a tightly locked-down firewall. Ping probes are sometimes used in network attacks, and as a result some firewalls are configured to block them. Firewalls increase network security, but they can also complicate troubleshooting considerably.
Tip
If ping was unable to reach the remote server, you could use the traceroute tool to test connectivity in more detail. Traceroute attempts to find out what network routers your packets go through on their way to the remote computer. If your packets are not making it all the way to the remote computer, traceroute can often tell you how far they are getting, which tells you more about where the problem is.
Use Lookup to Test DNS
Although the ping tool’s error (“cannot resolve”) already indicates a DNS problem, it is worth trying the lookup tool to see if it gives a more specific error.
1 In Network Utility, click the Lookup tab.
2 In the “Enter an internet address to lookup” field, enter the address www.apple.com.
After about 30 seconds, you receive a message that the operation couldn’t be completed. This is essentially the same result you got with the ping tool.

Switch to Working Network Settings
1 From Apple menu > Locations submenu, choose the location you were using at the beginning of this exercise.
Unlike the Broken DNS location, this one has valid settings, so your Internet connectivity should be back to normal.
2 In the Network Utility, click Lookup again.
This time the lookup tool reaches a DNS server and finds the IP address corresponding to the domain name www.apple.com.
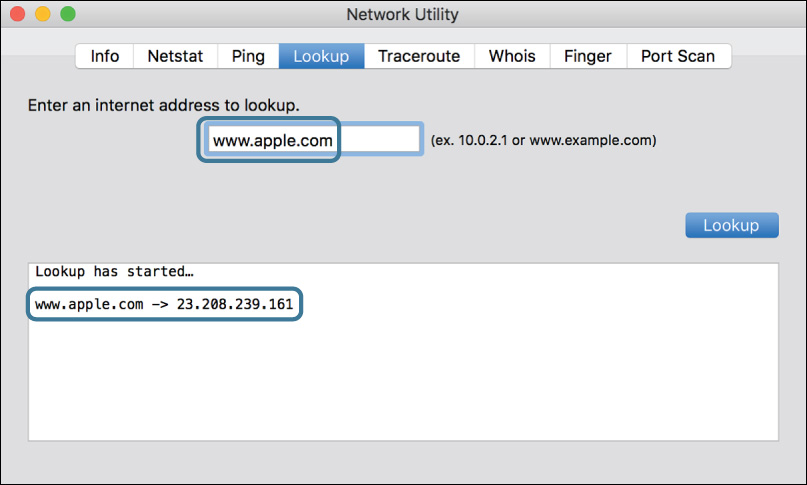
Note that the address you see may be different from the one shown here because the Apple website is served by a number of servers scattered around the Internet and uses DNS to direct you to a server near your network location for faster access.
If you knew what specific address the name should resolve to, you could verify that, but the fact that it resolved to an IP address at all is a good indication that DNS is working.
3 Open Safari, and try browsing a website.
This time, Safari is able to successfully load webpages from the Internet.
Monitor Network Traffic
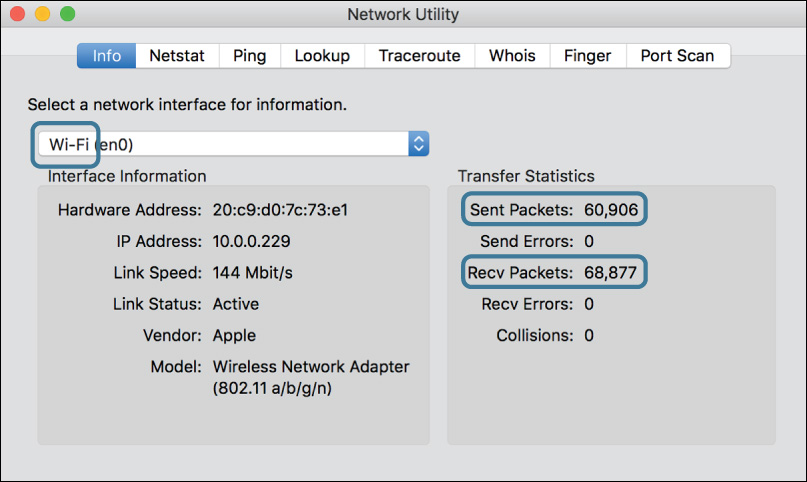
You can use the Network Utility Info pane to view low-level network interface settings and to monitor network throughput on a per-interface basis.
1 Switch to Network Utility, and click the Info tab.
2 Select your computer’s primary network interface from the pop-up menu.
The left side of the pane shows information about the active network connection, and the right side shows statistics about the network packets sent and received through this interface.
3 Arrange the Safari and Network Utility windows so that Safari is in front but not blocking the Transfer Statistics section of the Network Utility window.
4 In Safari, press Command-R to reload the current page.
The Sent Packets and Recv Packets entries increase while Safari reloads the current page.
5 In Network Utility, select another network interface from the pop-up menu.
6 Switch to Safari, and reload the current page.
The packet counts for this interface might increase slightly because of miscellaneous network chatter but should not respond specifically to refreshing in Safari.
You can use this feature of Network Utility to see which network interface your connections are actually running through.
7 Quit Safari, Network Utility, and System Preferences.