Lesson 11. Manage Permissions and Sharing
Goals
![]() Describe file ownership and permissions
Describe file ownership and permissions
![]() Explore the default shared folders in macOS
Explore the default shared folders in macOS
![]() Securely manage file and folder access
Securely manage file and folder access
The technologies collectively known as file system permissions are used to control file and folder authorization for macOS. File system permissions work alongside the user account technologies, which control user identification and authentication, to provide the secure multiuser environment of the Mac. File system permissions—just like user accounts—permeate every level of macOS. A thorough investigation of file system ownership and permissions is required to fully understand macOS.
In this lesson, you will learn how file-system ownership and permissions allow for controlled access to protect local files and folders. You will also explore macOS default permission settings that provide secure access to shared files. Finally, you will use the Finder to make ownership and permissions changes.
Reference 11.1 About File System Permissions
Every item on the system volume has permission rules applied to it by macOS. These rules are used to define file and folder access for every standard, administrator, guest, and sharing user. Only users and processes with root account access can ignore file-system permissions rules.
Note
The macOS interface sometimes displays the word privileges in place of permissions. In general, the meaning of these two terms is similar.
View File System Permissions
Any user can easily identify a file’s or folder’s permissions via the Info window in the Finder. First, select the file or folder whose permissions you want to identify. You can select multiple items to open multiple Info windows.
There are several ways to access the Finder Info window:
![]() Press Command-I.
Press Command-I.
![]() Choose File > Get Info.
Choose File > Get Info.
![]() Use secondary-click or Control-click on the selected item, and then choose Get Info from the shortcut menu (also called a contextual menu).
Use secondary-click or Control-click on the selected item, and then choose Get Info from the shortcut menu (also called a contextual menu).
![]() In a Finder window toolbar, click the Action pop-up menu (the gear icon), and then choose Get Info.
In a Finder window toolbar, click the Action pop-up menu (the gear icon), and then choose Get Info.
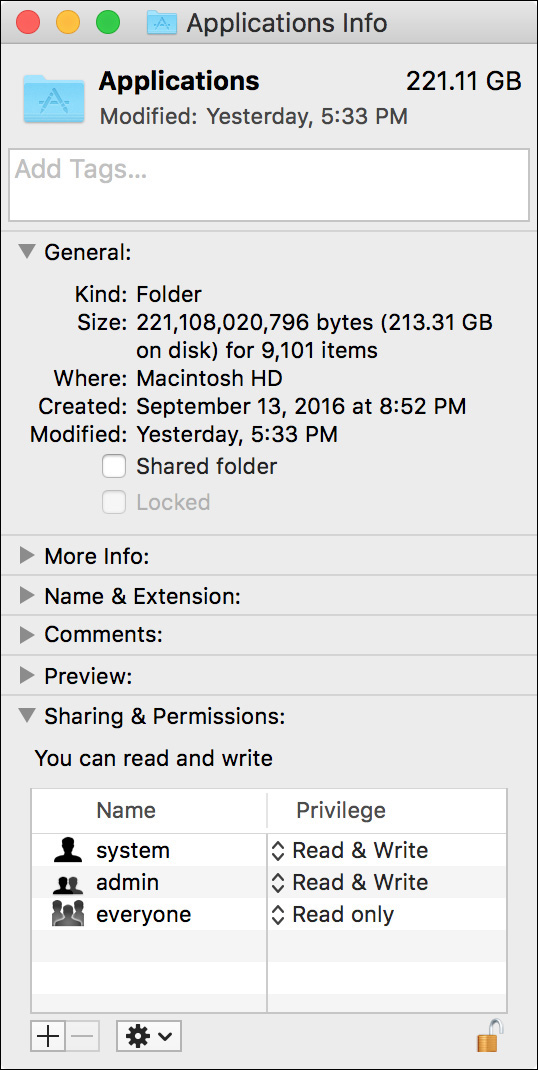
Once you open an Info window, click the Sharing & Permissions disclosure triangle to reveal the item’s permissions. The permissions list is broken into two columns. To the left is a list of users or groups with access to this item, and to the right is the associated privilege assigned by user or group. Modifying these settings is covered in Reference 11.3, “Manage Permissions.”
You can also identify ownership and permissions from the dynamic Inspector window in the Finder. This is a single floating window that automatically refreshes as you select different items in the Finder. To open the Inspector, press Command-Option-I in the Finder.
About Ownership for Permissions
Every file and folder belongs to at least one owner and one group and also has an ownership setting for everyone else. This three-tiered ownership structure provides the basis for file system permissions:
![]() Owner—By default, the owner of an item is the user who created or copied the item to the Mac. For example, users own most of the items in their home folder. The system or root user almost always owns system software items, including system resources and applications. Traditionally, only the owner can change the item’s ownership or permissions. Despite this, macOS makes management easier by giving every administrator user the ability to change ownership and permissions regardless of who owns the item.
Owner—By default, the owner of an item is the user who created or copied the item to the Mac. For example, users own most of the items in their home folder. The system or root user almost always owns system software items, including system resources and applications. Traditionally, only the owner can change the item’s ownership or permissions. Despite this, macOS makes management easier by giving every administrator user the ability to change ownership and permissions regardless of who owns the item.
![]() Group—By default, the group of an item is inherited from the folder it was created in. Thus, most items belong to the staff (the primary group for local users), wheel (the primary group for the root system account), or admin groups. Group ownership is designated to allow users other than the owner access to an item. For instance, even though root owns the /Applications folder, the group is set to admin so administrator users can add and remove applications in this folder.
Group—By default, the group of an item is inherited from the folder it was created in. Thus, most items belong to the staff (the primary group for local users), wheel (the primary group for the root system account), or admin groups. Group ownership is designated to allow users other than the owner access to an item. For instance, even though root owns the /Applications folder, the group is set to admin so administrator users can add and remove applications in this folder.
![]() Everyone—The Everyone setting is used to define access for anyone who isn’t the owner and isn’t part of the item’s group. In other words, this means everyone else. This includes local, sharing, and guest users.
Everyone—The Everyone setting is used to define access for anyone who isn’t the owner and isn’t part of the item’s group. In other words, this means everyone else. This includes local, sharing, and guest users.
The three-tiered ownership structure presented here has been part of traditional UNIX operating systems for decades. However, with only three levels of permissions to choose from, it is quite difficult to define appropriate access settings for a computer with many user accounts and shared files, as is the case with many servers. Fortunately, as you’ll see later, access control lists were developed to allow for nearly limitless ownership and permissions configurations.
About Standard UNIX Permissions
The standard file system permissions structure of macOS is based on standard UNIX-style permissions. This system is also sometimes referred to as POSIX-style permissions. The system may be old, but for most Mac users it is quite adequate, because you can define privilege rules separately at each ownership tier. In other words, the owner, the group, and everyone else have individually specified access to each file or folder. Further, because of the inherent hierarchy built into the file system, where folders can reside inside other folders, you can easily create a complex file structure that allows varying levels of sharing and security.
Apple has streamlined the Finder to allow for the most common permissions options. Alternatively, the full range of UNIX privilege combinations is available from Terminal, but that topic is beyond the scope of this guide.
More Info
Wikipedia has an excellent overview of UNIX-style permissions: http://en.wikipedia.org/wiki/Filesystem_permissions.
File-level permissions options available in the Finder are:
![]() Read & Write—The user or group members can open the file and save changes.
Read & Write—The user or group members can open the file and save changes.
![]() Read Only—The user or group members can open the file but cannot save any changes.
Read Only—The user or group members can open the file but cannot save any changes.
![]() No Access—The user or group members have no access to the file at all.
No Access—The user or group members have no access to the file at all.
Folder-level permissions options available in the Finder are:
![]() Read & Write—The user or group members can browse and make changes to the contents of the folder.
Read & Write—The user or group members can browse and make changes to the contents of the folder.
![]() Read Only—The user or group members can browse the contents of the folder but cannot make changes to the contents of the folder.
Read Only—The user or group members can browse the contents of the folder but cannot make changes to the contents of the folder.
![]() Write Only (Drop Box)—The user or group members cannot browse the Drop Box folder but can copy or move items into it.
Write Only (Drop Box)—The user or group members cannot browse the Drop Box folder but can copy or move items into it.
![]() No Access—The user or group members have no access to the contents of the folder.
No Access—The user or group members have no access to the contents of the folder.
Note
Although the Finder doesn’t show or allow changes to the UNIX execute permission, it automatically assigns this permission when read access is granted for folders.
About Access Control Lists
Access control lists (ACLs) were developed to expand the standard UNIX permissions architecture to allow more control of file and folder access. macOS adopted a style of ACLs similar to that available on Windows-based NTFS file systems and UNIX systems that support NFSv4. This ACL implementation is extremely flexible but increases complexity by adding more than a dozen unique privilege and inheritance attribute types.
Further, the macOS implementation of ACLs supports an essentially unlimited number of access control entries (ACEs). An ACE is a set of permissions defined for a specific user or group. In other words, ACLs provide a nearly unlimited list of permission rules or ACEs for every file or folder—hence the list in access control list.
Finally, if an ACL rule applies to a user or group, this rule trumps standard UNIX permissions. However, any users or groups that don’t apply to a specific ACL are still bound by the standard permissions currently in place.
Apple does not expect average users to navigate through all the options available using ACLs, so once again the Finder has been streamlined to allow only the most common ACL configurations. In fact, the Finder allows you to assign only ACL attributes that match the most common standard UNIX permissions configurations (previously listed in this lesson). The only feature of ACLs that the Finder actually implements is the ability to have an unlimited number of user or group privilege rules. In other words, the Finder uses the ACL architecture to let you configure unique privileges for an essentially unlimited number of users or groups.

Permissions in a Hierarchical Context
Permissions do not exist in isolation; rather, they are applied in the context of a folder hierarchy. In other words, your access to an item is based on an item’s permissions in combination with the permissions of the folder in which it resides. If you’re still confused, it’s easiest to think of permissions as defining access to an item’s content, not to the item itself. Remember the word content as you consider the following three simplified examples.
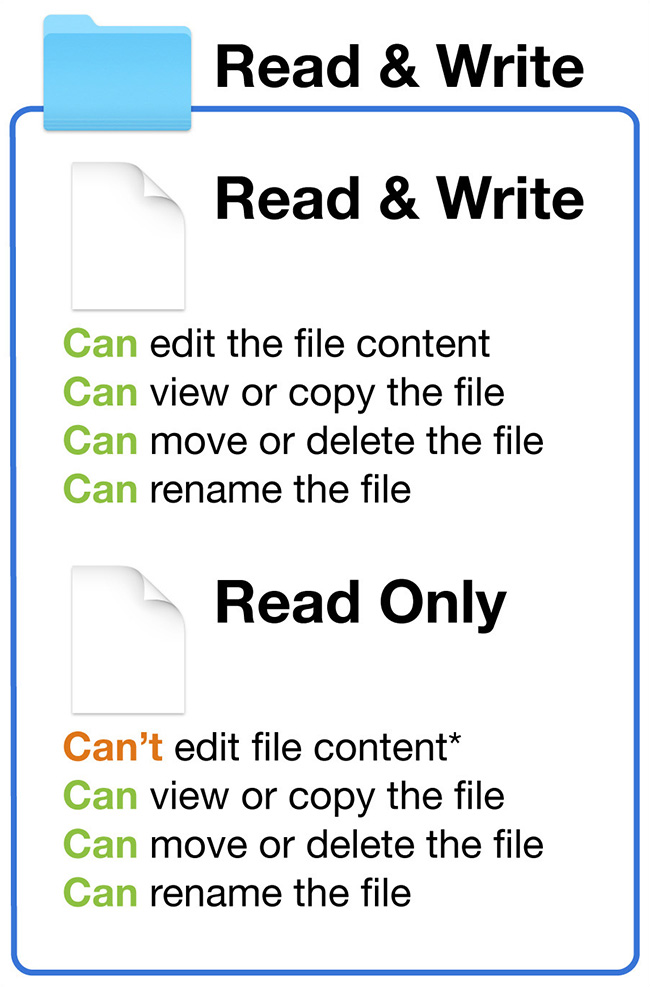
Example 1: You have both read and write permissions to the folder. It’s obvious that you should have full access to the first file, as your permissions here are read-and-write as well. You can also view and copy the second file, but you can’t make changes to the file’s content because your permissions are read-only. Yet you can still move, delete, or rename the second file because you have read-and-write access to the folder’s contents. Thus, the second file isn’t secure in this example, because you can make a copy of the original file, change the copied file’s content, delete the original file, and finally replace it with the modified copy. This is how many applications actually save document changes; thus, the file can in fact be edited.
Note
The “*” in these examples indicates that actual editing behavior varies based on the application’s design. For some applications, you may need read-and-write access to both the file and the folder it’s inside to save changes to the file.
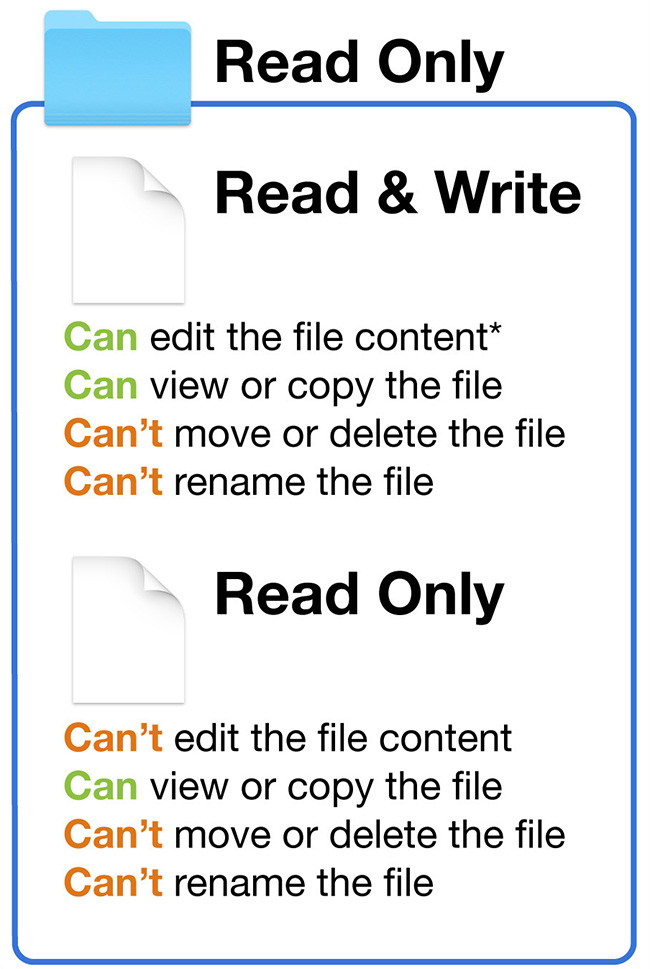
Example 2: You have read-only permission to the folder. You can edit the content of the first file because you have read-and-write access to it, but you can’t move, delete, or rename it because you have read-only access to the folder’s contents. On the other hand, you can effectively delete the file by erasing its contents. The second file here is the only truly secure file, because you’re only allowed to view or copy the file. Granted, you can make changes to the contents of a copied file, but you still can’t replace the original.
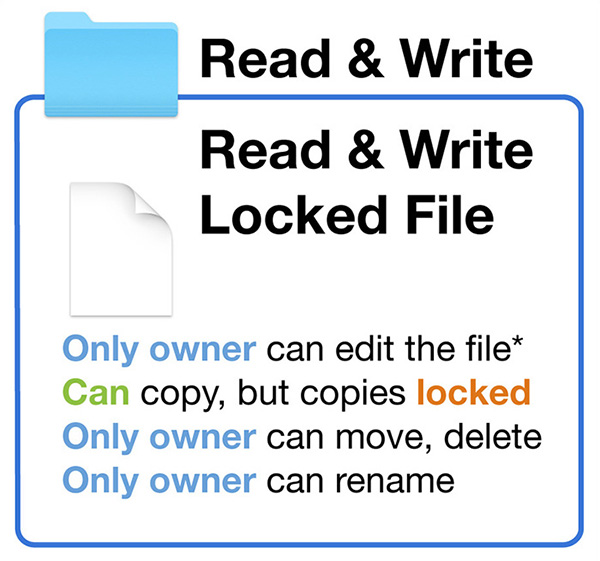
Example 3: Your permissions are identical to the first document in the first example, with one significant change. The owner of this file has enabled the locked attribute, perhaps through the new macOS version’s document control feature. Even though you have read-and-write access to the example folder and file, the locked attribute prevents all users who aren’t the file’s owner from modifying, moving, deleting, or renaming the file. From most applications, only the owner is allowed to change the file’s content or delete it, but the owner can also disable the locked attribute to return the file to normal. You can still make a copy of the locked file, but the copy will be locked as well. However, you will own the copy, so you can disable the locked attribute on the copy, but you still can’t delete the original locked file unless you’re the owner.
More Info
With System Integrity Protection (SIP) enabled by default in macOS, no user or process can make any changes to items required by the system. You can find out more about SIP in Lesson 13, “Manage System Resources.”
Reference 11.2 Examine Permissions for Sharing
Once you have an understanding of the available permissions options in macOS, you should explore how the local file system is set up by default to provide a secure environment that still allows users to share files.
If you don’t have fast user switching enabled, as outlined in Lesson 5, “Manage User Accounts,” enable it now to make it easy to test file system permissions as different users. Further, to aid in your exploration of the file system, use the Finder Inspector window. This single floating window, which automatically refreshes as you select different items in the Finder, allows you to quickly explore the default permissions settings without having to open multiple Finder Info windows. Open the Inspector from the Finder by pressing Command-Option-I, and then click the disclosure triangle to reveal the Sharing & Permissions section.
The Inspector window sports a slightly different title bar than the Info window. Also, the Inspector always floats on top of all other windows in the Finder.
About Home Folder Permissions
The default home folder permissions protect the user’s files and also allow them to be shared easily when needed. This starts with the user’s home folder. Users are allowed read-and-write access to their home folder, whereas the staff group and everyone else are allowed only read access.
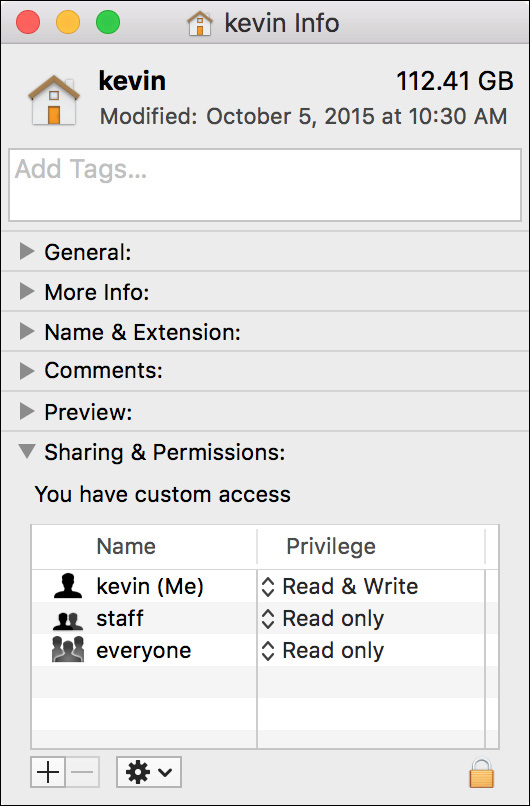
This means that every local user or guest can view the first level of every other user’s home folder. (Remember that guests are allowed access to your computer without a password. This is why you can disable guest access in Users & Groups preferences.)
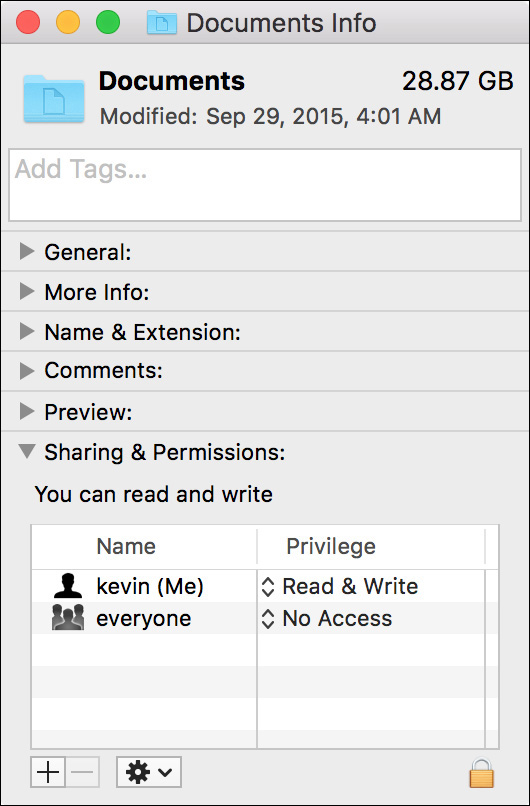
The default home folder permissions may seem insecure until you look at the permissions in context. Most user data is actually stored inside a subfolder in the user’s home folder, and if you inspect those subfolders, you’ll notice that other users are not allowed to access most of them.
A few subfolders in a user’s home folder, however, are specifically designed for sharing. The Public folder and legacy Sites folder remain readable to everyone. A user can easily share files without having to fuss with permissions by simply moving the files into those two folders. Others are able to read those files, but they still cannot make any changes to them.
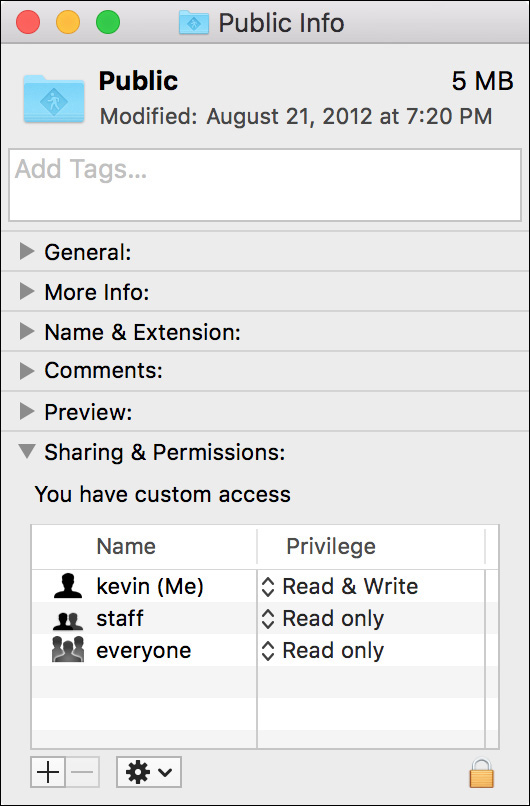
By default, user-created files and folders at the root of the home folder have permissions like those of the Public folder. To secure new items at the root of the home folder, change the permissions, as outlined in Reference 11.3, “Manage Permissions.”
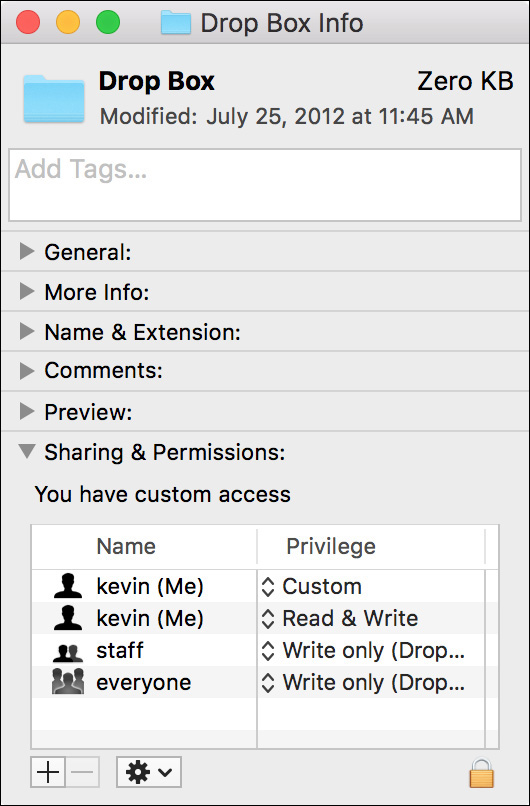
Looking deeper, you’ll notice that one subfolder of the Public folder is Drop Box. This folder’s permissions allow all other users to copy files into the folder, even though they cannot see the other files in that folder. This allows other users to discreetly transfer files to a specific user without others knowing.
When items are created or copied, they are owned by the user who performed the create or copy action. This would normally present a problem for a folder like Drop Box, since other users still own the items they have placed in your Drop Box folder. However, there is a custom ACE set for the Drop Box folder that ensures that users are also granted full access to the items in their Drop Box.
About the Shared Folder
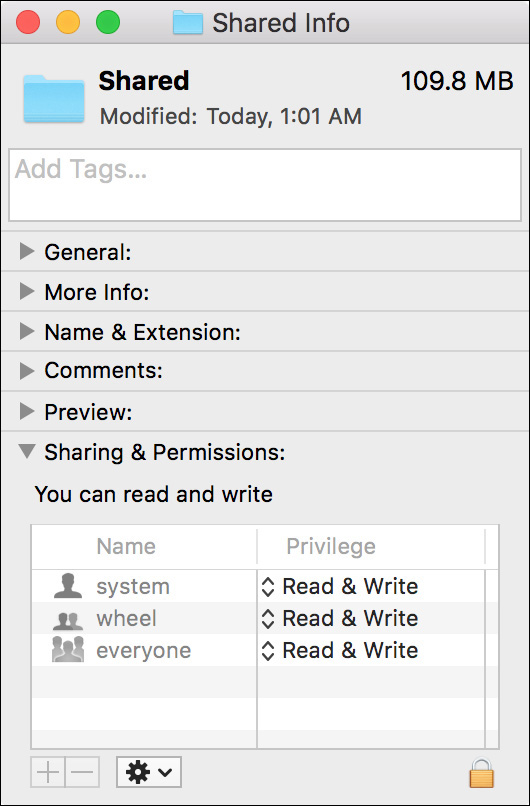
An additional folder set aside for local file sharing is the /Users/Shared folder. Notice that this is a general sharing location that allows all local users to read and write items to the folder. Normally this permissions setting would also allow any user to delete another user’s item in this folder.
Yet the Inspector window is not showing you the full permissions picture here. A unique permissions setting on the Shared folder prevents other users from being able to delete items they don’t own. This permissions setting, known as the “sticky bit,” can be viewed and managed only from Terminal.
Secure New Items
Once you understand how the macOS file system security architecture works with the folder hierarchy, it’s time to consider how this technology is used to secure new items. In this lesson you’ve already learned that macOS is preconfigured for secure file and folder sharing; however, new items are created with unrestricted read access.
For example, when users create a new file or folder at the root of their home folder, by default, all other users, including guest users, are allowed to view this item’s contents. The same is true for new items created by administrators in local areas, such as the root of the system volume and the local Library and Applications folders.
New items are created this way to facilitate sharing so that you do not have to change any permissions to share a new item. All you have to do is place the new item in a folder that other users can access, like the predefined sharing folders covered in the previous section. It’s assumed that if you want to secure a new item, you will place it inside a folder that no one else has access to, such as your home Desktop or Documents folder.
This default behavior is inconvenient if you want to safely store your items in an otherwise public area, like the root of the system volume. To store items in a public area so they are accessible only to the owner requires that you change the item’s permissions using either the Finder or Terminal, as outlined later in this lesson.
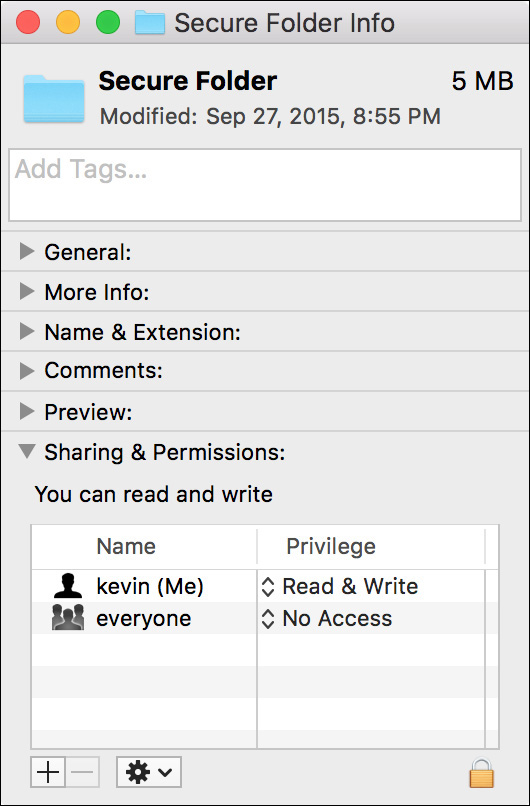
Specifically, from the Sharing & Permissions section of the Info window, you must remove all other users and all group accounts from the permissions list. You cannot remove the Everyone permission, so you have to set it to No Access. Once you have made these permissions changes, only the owner has access to the item.
Note
Despite appearances, in the preceding screenshot Secure Folder does indeed have a group assignment. This is because the Finder hides an item’s group permission if no access is granted. Thus, clicking the Delete (–) button to “delete” an item’s group permission disables access for the group, but it does not actually remove the group assignment.
Reference 11.3 Manage Permissions
You may find that although the Finder makes permissions management simple, it does so through a form of obfuscation. In other words, the Finder hides the complexity of full UNIX and ACL permissions by showing a simplified view of an item’s permissions.
Thus, if you’re more comfortable with standard UNIX permissions, or you simply require full access to an item’s permissions, you’re best served by managing permissions via Terminal. This is, however, beyond the scope of this guide. For the most common permissions settings, the simplified Finder permissions interface is still the quickest and easiest solution.
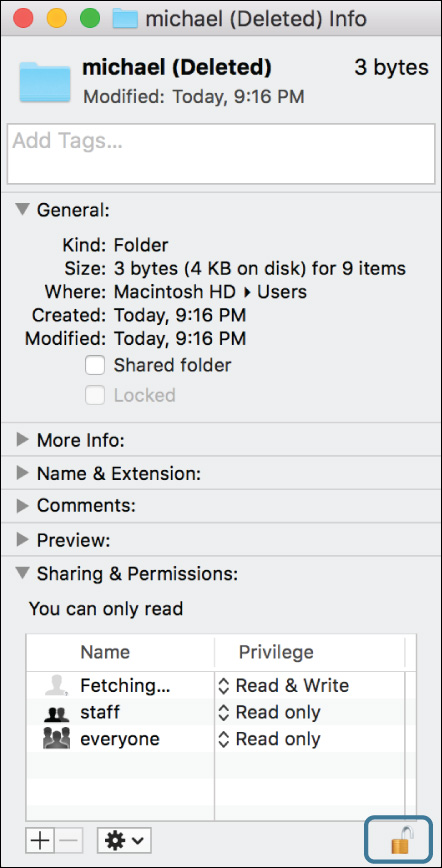
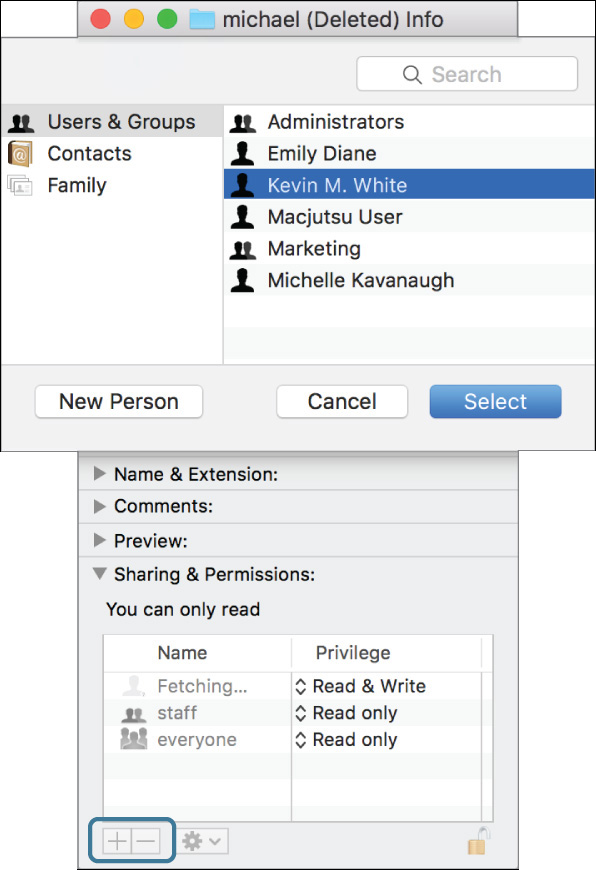
An example situation you might encounter that requires changing permissions is when you delete a user’s account but retain the user’s home folder. The system renames that folder “Username (Deleted),” but otherwise leaves it alone. This presents a management problem, as even administrator users won’t have full access to the folder’s content in the Finder. This section explores the permissions changes an admin would make to get full access to a deleted user’s home folder.
Manage Permissions via the Finder
As covered previously in this lesson, you can view and manage permissions in the Sharing & Permissions section of the Info window. To do so, if you aren’t the owner of the item, you must click the small lock icon in the lower-right corner of the Info window and authenticate as an administrator user.
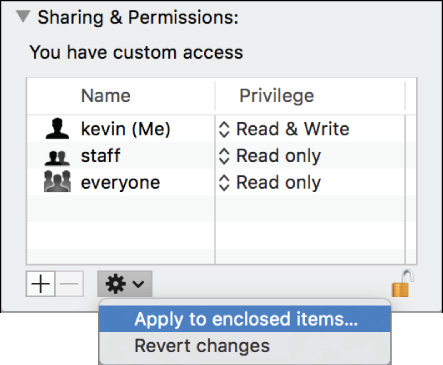
Changes made using the Info window are applied immediately. However, as long as you keep the Info window open, the Finder also remembers the original permissions setting for the item. This is useful for testing different permissions configurations, since you can always revert to the original permissions setting. To do that, click the Action pop-up menu (gear icon) at the bottom of the Info window and then choose “Revert changes.”
Add a Permissions Entry
To add a new permissions entry for a user or group, click the Add (+) button in the lower-left corner of the Info window. A dialog appears, allowing you to search for and select a user or group. Alternatively, you can create a new Sharing user account by clicking the New Person button or selecting a contact from your Address Book. Creating a new Sharing account requires that you enter a new password for the account.
More Info
Details about creating Sharing user accounts and how to create additional groups are covered in Lesson 5, “Manage User Accounts.”
Change Ownership
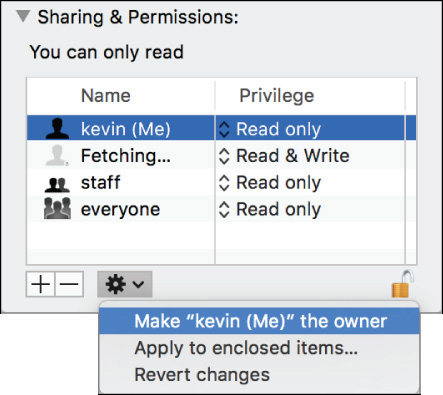
Even though ACLs allow you to define multiple user permissions for an item, only the user closest to the bottom in the permissions list is the owner of the item. Again, an item’s owner who is not an administrator user is allowed to change the privileges of an item. However, only administrator users can change both the ownership and the privileges of an item.
To assign a new owner using the Finder Info window, you must first add that user as an additional permissions entry. Once the user is added, select the user from the permissions list, and then choose “Make <username> the owner” from the Action pop-up menu, where <username> is the selected user.
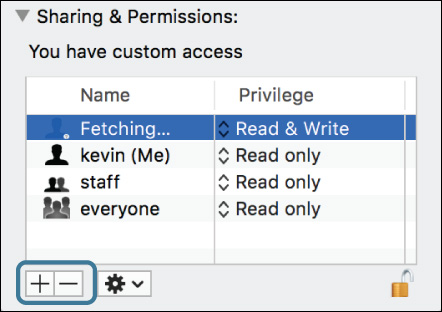
Delete a Permissions Entry
To delete a user or group permissions entry, select the account from the permissions list and click the Delete (–) button in the lower-left corner of the Info window. The Info window doesn’t allow you to delete or change the original owner or delete the Everyone privilege of an item. You can use this window to seemingly delete all group privileges, but this isn’t truly deleting the group privilege. Instead, it’s simply removing all the privileges for the item’s original group.
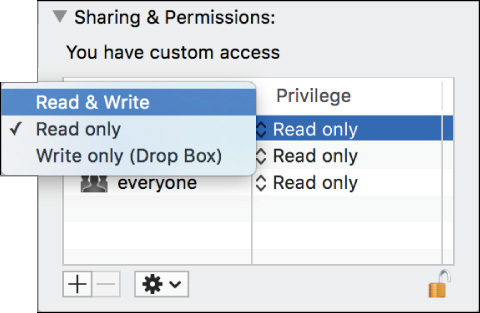
Modify a Permissions Entry
To assign different permissions to an entry, simply click any privilege and then choose another access option for that user or group from the pop-up menu that appears.
Propagate Folder Permissions
If you are changing a folder’s permissions, by default, the Finder does not change the permissions of any items inside the folder. In many cases, you may want to apply the same permissions to the items inside the folder. This task is sometimes known as propagating permissions. You can accomplish this quickly by choosing “Apply to enclosed items” from the Action pop-up menu.
Note
Even if you are the owner of a folder, applying permissions to the enclosed folder items may require administrator authentication.
Note
Applying permissions to the enclosed folder items applies all permissions settings to all enclosed items, not just the changes you recently made. Further, these changes cannot be easily reverted. The exception to this is that any locked items inside the folder remain in their original state.
About Permissions for Nonsystem Volumes
Portable external disks are useful tools for transferring files and folders from one computer to another. A downside to this technology, though, is that computers can’t properly interpret file ownership, because they don’t share the same user account database. In other words, most Mac computers don’t have the exact same user accounts, so when a disk is moved from one Mac to another, the file ownership from one Mac is meaningless to another.
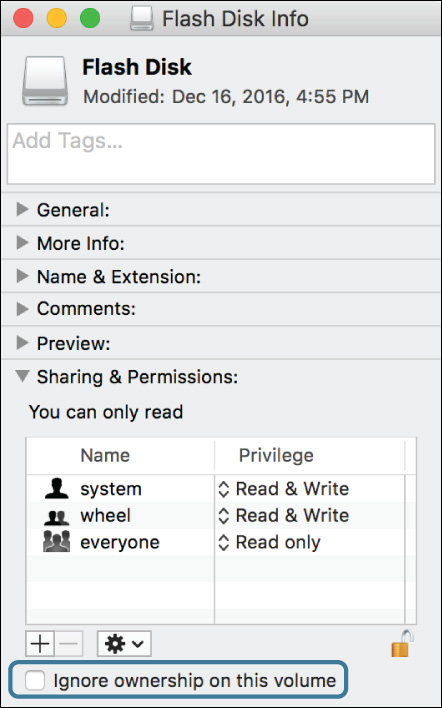
Unless you plan to implement a centralized network user database so that all your Mac computers do share the same user account database, ownership on nonsystem volumes, like those found on external disks, will have to be ignored to prevent access issues. This is the default behavior in macOS for all nonsystem volumes on both internal and external disks. However, this approach introduces the security risk that all local users will have full access to the contents of any nonsystem volumes, including other partitions of a system disk. If you find this an unacceptable risk, you can disable the default behavior and force macOS to honor ownership on nonsystem volumes.
To do this in the Finder, select the nonsystem volume for which you want the system to honor the ownership, and then open the Info window. In the Sharing & Permissions section, click the small lock icon in the lower-right corner, and authenticate as an administrator user to unlock the Sharing & Permissions section. Finally, deselect the “Ignore ownership on this volume” checkbox.
Exercise 11.1 Create Items with Default Permissions
![]() Prerequisite
Prerequisite
![]() You must have created the Local Admin (Exercise 2.1, “Configure a New macOS System for Exercises,” or Exercise 2.2, “Configure an Existing macOS System for Exercises”), Chris Johnson (Exercise 5.1, “Create a Standard User Account”), and Mayta Mishtuk (Exercise 6.1, “Restore a Deleted User Account”) accounts.
You must have created the Local Admin (Exercise 2.1, “Configure a New macOS System for Exercises,” or Exercise 2.2, “Configure an Existing macOS System for Exercises”), Chris Johnson (Exercise 5.1, “Create a Standard User Account”), and Mayta Mishtuk (Exercise 6.1, “Restore a Deleted User Account”) accounts.
A thorough understanding of ownership and permissions is essential to supporting and troubleshooting macOS. Permissions control the access to files and folders by users and system services such as the printing system. This exercise introduces permissions in a user’s home folder.
Store Files and Folders in Chris Johnson’s Home Folder
To see the effects of the macOS default permissions, you will create some items with which to experiment.
1 If necessary, log in as Chris Johnson (password: chris, or whatever you chose when you created the account).
2 Open TextEdit. There should be a shortcut to it in your Dock.
3 If a new “Untitled” document doesn’t open, choose File menu > New (or press Command-N).
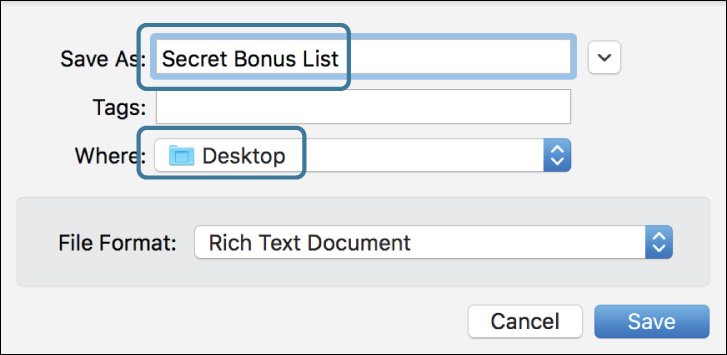
4 Choose File menu > Save (or press Command-S), name the new file Secret Bonus List, and save it to the desktop. (Note that in a save dialog you can use the shortcut Command-Shift-D to select the desktop.)
5 Quit TextEdit.
6 In the Finder, navigate to your home folder by choosing Go menu > Home (or pressing Command-Shift-H).
7 Create a new folder by choosing File menu > New Folder (or pressing Command-Shift-N).
8 Name the new folder Payroll Reports, and be sure it is located in your home folder, along with the default user folders.
9 Drag the Secret Bonus List.rtf file from your desktop into the Payroll Reports folder.
As you will see shortly, this is not a good place to store confidential documents.
Examine Permissions as Another User
Now that Chris Johnson has created a test folder and file, experiment to see what Mayta Mishtuk can do with them.
1 Use the fast user switching menu item (near the right side of the menu bar) to switch to the Mayta Mishtuk account (password: mayta, or whatever you chose when you created the account).
2 In the Finder, navigate to Chris Johnson’s home folder.
Mayta’s Finder preferences have not been customized to allow easy access outside her home folder; however, you can reach Chris’s home folder by choosing Go menu > Computer (Command-Shift-C) and then opening the Macintosh HD > Users > chris folder.
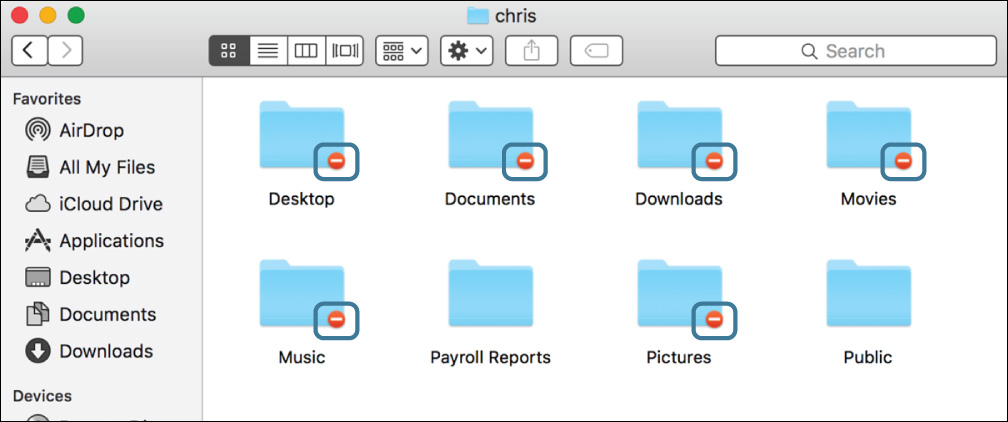
Note that most of the folders in Chris’s home folder have red minus-sign indicators, showing that you are not allowed access to their contents.
3 Hold the Option key while choosing File menu > Show Inspector (or press Command-Option-I).
The inspector is a variant of the Finder Info window; what makes it different is that it follows your selection in the Finder, allowing you to inspect many items quickly.
4 If necessary, expand the “Sharing & Permissions” section of the inspector window.
5 Select (single-click) the various folders in Chris’s home folder, and watch what the inspector shows about their permissions.
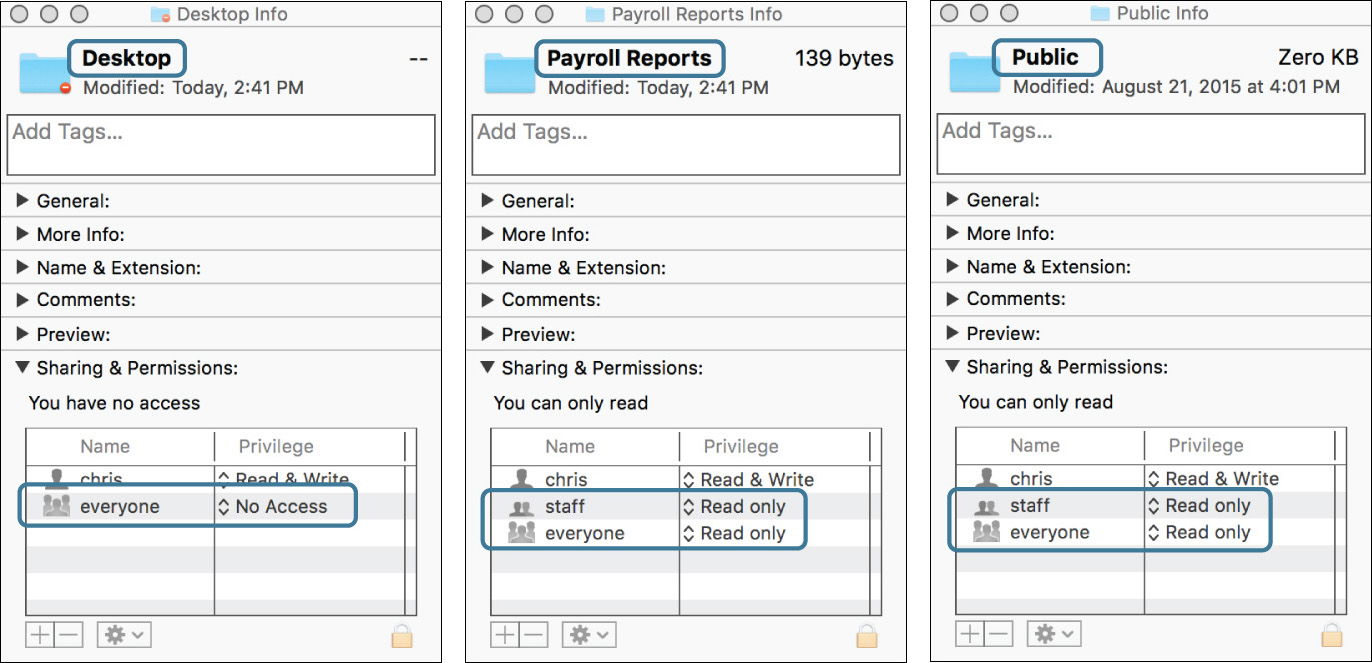
With the exception of Public, the folders that macOS creates by default in the home folder are protected from access by other users (the No Access permission). The Payroll Reports folder, however, was created with staff and everyone allowed read-only access.
6 Click in the background of Chris’s home folder.
The inspector shows that staff and everyone are also allowed read-only access to the top level of Chris’s home folder.
7 Open the Payroll Reports folder.
The folder opens, and the Secret Bonus List file is visible.
8 Select (single-click) the Secret Bonus List file.
The inspector shows that staff and everyone have read-only access to this as well.
This result may be contrary to what is expected by users. Be sure to guide your users to store their folders in appropriate places, based on the type of access they want to allow for other users. Although others cannot add or remove items stored in the Payroll Reports folder, they can open and read the contents.
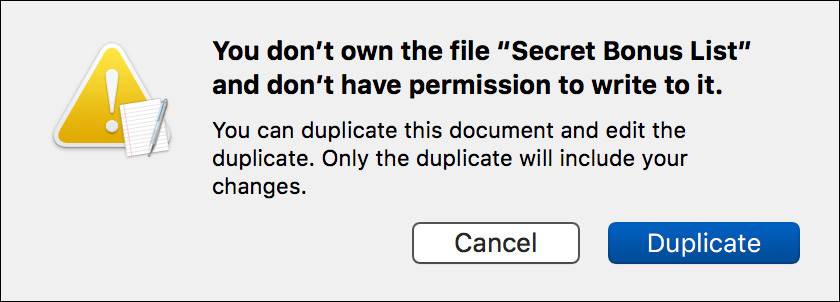
9 Open the Secret Bonus List file.
Since the file is readable by everyone but writable only by its owner, Chris Johnson, TextEdit shows that it is locked.

10 Try to enter some text into the file.
TextEdit asks if you would like to create a duplicate so that you can save your changes.
A duplicate document named Untitled (Secret Bonus List copy) opens and allows you to enter text.
12 Save the duplicate document to your desktop (leave the name “Secret Bonus List copy”).
13 Quit TextEdit.
14 In the Finder, navigate back to Chris’s home folder, and open Chris’s Public folder.
15 Select the Drop Box folder.
The inspector shows that staff and everyone have write-only access to this folder. Chris has full read and write access, as well as a Custom access control entry (ACE). “Custom” means that the ACE grants something other than normal read and/or write access; in this case, it’s an inheritable ACE that will grant Chris additional access to items dropped into this folder.
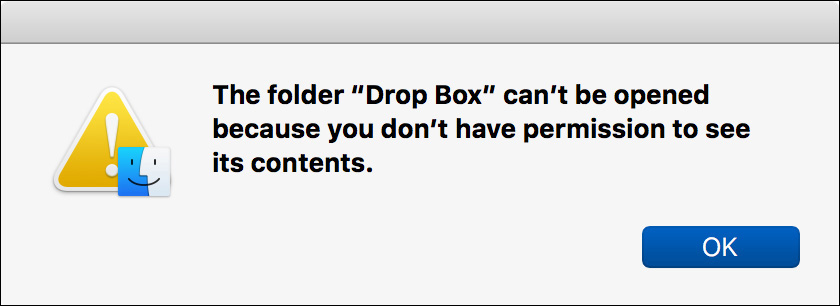
16 Try to open Chris’s Drop Box folder.
The write-only permission does not allow you to open another user’s Drop Box folder.
17 Try to copy the Secret Bonus List copy from your desktop into Chris Johnson’s Drop Box folder.
The Finder warns you that you will not be able to see the items you put into the Drop Box folder.
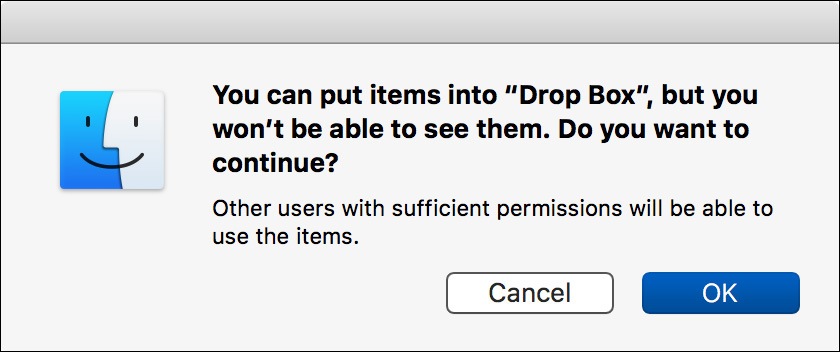
18 Click OK.
Proceed to Exercise 11.2, “Test Permissions Changes,” to see how to adjust the permissions on the Payroll Reports folder.
Exercise 11.2 Test Permissions Changes
Chris Johnson will now change the permissions on the Payroll Reports folder and test the results from Mayta Mishtuk’s account.
Change Permissions as Chris Johnson
1 Use fast user switching to switch back to Chris Johnson’s account.
2 Select the Payroll Reports folder that resides in Chris’s home folder, and then choose File menu > Get Info (Command-I).
3 If necessary, expand “Sharing & Permissions.”
4 Click the small lock in the Info window, and then authenticate as Local Admin.
5 Select the group (staff), and click the Delete (–) button below the permissions list.
6 Change the privilege level for everyone to No Access.
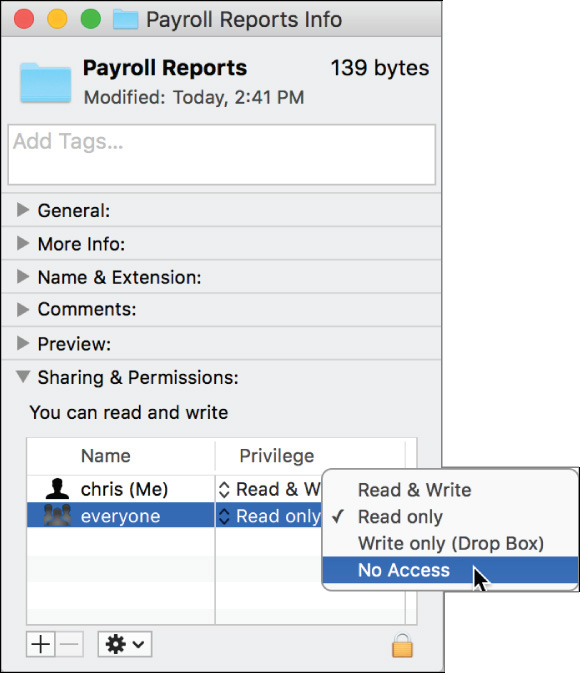
7 Close the Info window.
8 Navigate to Chris’s Drop Box folder (inside the Public folder).
9 Select the Secret Bonus List copy that Mayta placed in Chris’s Drop Box.
10 Choose File menu > Get Info. If necessary, expand the “Sharing & Permissions” section.
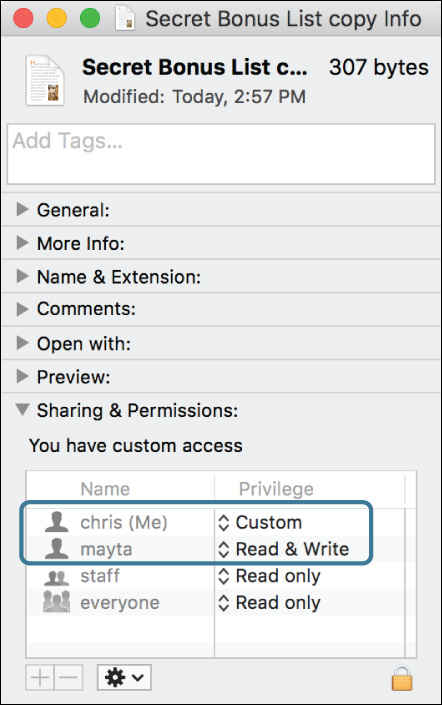
Since Mayta created this file, she is still its owner. However, when she copied it into Chris’s Drop Box folder, the inheritable custom access control entry on the Drop Box folder granted Chris full access to it as well.
11 Close the Info window.
12 Open the Secret Bonus List copy, and edit its contents.
The inherited access control allows Chris to edit the file, and the changes will be saved automatically.
13 Quit TextEdit.
Test the New Permissions as Mayta Mishtuk
1 Use fast user switching to switch back to Mayta’s account.
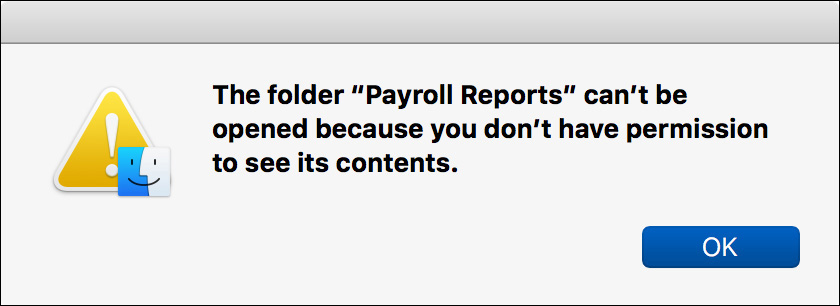
2 Try to open the Payroll Reports folder.
This time you cannot open the folder because the new permissions do not grant you read access.
The default permissions did not protect the Payroll Reports folder as Chris intended, but after changing the permissions, the folder is protected from access by other users.
3 Log out of Mayta’s account.
4 At the login window, switch to Chris Johnson.
5 Navigate back to Chris’s home folder (Go menu > Home or Command-Shift-H), and drag the Payroll Reports folder to the Trash.