Lesson 19. Manage Basic Network Settings
Goals
![]() Describe fundamental TCP/IP network concepts
Describe fundamental TCP/IP network concepts
![]() Configure and monitor basic network settings
Configure and monitor basic network settings
![]() Connect to a Wi-Fi network
Connect to a Wi-Fi network
The ability to share information between computers across a network has always been important. During the early years of personal computer development, vendors designed their own proprietary local network systems. Yet although these vendor-specific technologies were suitable for private networks, they didn’t allow for direct communication between dissimilar networks. Special hardware or software had to be put in place to translate from one vendor’s network to another.
Around the same time, researchers were working at the behest of various U.S. organizations to create a wide area network (WAN) standard for military and governmental use. From this research was born the Internet protocol suite known as TCP/IP. The marriage of the Transmission Control Protocol (TCP) and the Internet Protocol (IP) became the universal language that allows computers to communicate on the Internet. This standard became so pervasive that nearly every network today, from small local networks all the way up to the largest long-distance network on Earth, the Internet, is based on the TCP/IP suite.
It should come as no surprise, then, that macOS includes a robust TCP/IP implementation. In fact, the first computer systems to popularize the use of TCP/IP were UNIX systems. Thus, much of the TCP/IP software built into every version of macOS is based on open source UNIX software that was established long before macOS ever existed as a product from Apple.
In this lesson, you will configure basic settings for both Ethernet and Wi-Fi networks. Before that, though, you must have a fundamental understanding of core network concepts, to which the first part of this lesson is devoted.
Reference 19.1 About Network Terminology
Properly configuring and troubleshooting networking on any operating system requires a basic understanding of fundamental network concepts. Due to the widespread adoption of standardized network technology, the following network overview applies to nearly any operating system, macOS included. Basic network terminology is covered first, followed by an overview of the processes involved in actual data delivery across a network.
It’s best to explore networking from a layered perspective. In fact, an established seven-layer model is used to describe network technologies: the Open Systems Interconnection reference model (known as the OSI model). Exploring networking using the OSI model goes beyond the scope of this guide.
More Info
For more details on the OSI model for describing computer networks, refer to the Wikipedia entry http://en.wikipedia.org/wiki/OSI_model.
Consequently, networking concepts will be presented in a more simplistic abstraction of three basic elements:
![]() Network interface—The network interface is the medium through which network data flows. Network interfaces can be physical or virtual. The most common physical network interfaces for computers are Ethernet and 802.11 wireless networking, which is most commonly known as Wi-Fi. Virtual network interfaces are also available that can be used to increase the functionality of the physical interface: for example, a virtual private network (VPN) that uses the existing physical network interface to provide a secure connection without the need for a dedicated physical interface.
Network interface—The network interface is the medium through which network data flows. Network interfaces can be physical or virtual. The most common physical network interfaces for computers are Ethernet and 802.11 wireless networking, which is most commonly known as Wi-Fi. Virtual network interfaces are also available that can be used to increase the functionality of the physical interface: for example, a virtual private network (VPN) that uses the existing physical network interface to provide a secure connection without the need for a dedicated physical interface.
![]() Network protocol—A protocol defines a set of standard rules used for data representation, signaling, authentication, or error detection across network interfaces. Primarily, protocols are designed to ensure that all data is communicated properly and completely. Specific protocols have a narrow focus, so often multiple protocols are combined or layered to provide a complete network solution. For example, the combined TCP/IP protocol suite provides only for the addressing and end-to-end transport of data across the Internet; dozens of other protocols are required for something as simple as checking your email or browsing a website.
Network protocol—A protocol defines a set of standard rules used for data representation, signaling, authentication, or error detection across network interfaces. Primarily, protocols are designed to ensure that all data is communicated properly and completely. Specific protocols have a narrow focus, so often multiple protocols are combined or layered to provide a complete network solution. For example, the combined TCP/IP protocol suite provides only for the addressing and end-to-end transport of data across the Internet; dozens of other protocols are required for something as simple as checking your email or browsing a website.
![]() Network service—In the context of network preferences, the term network service describes a configuration assigned to a network interface. For example, in the Network preferences, you will see the Wi-Fi service listed; this represents the connection settings for the Wi-Fi network interface. A fundamental feature of macOS is the ability to support multiple network services, or connections, for each individual network interface, be it physical or virtual.
Network service—In the context of network preferences, the term network service describes a configuration assigned to a network interface. For example, in the Network preferences, you will see the Wi-Fi service listed; this represents the connection settings for the Wi-Fi network interface. A fundamental feature of macOS is the ability to support multiple network services, or connections, for each individual network interface, be it physical or virtual.
Note
A different definition of network service is used in Lesson 22, “Manage Network Services,” and Lesson 23, “Manage Host Sharing and Personal Firewall.” There, a network service is information provided on the network by a server for use by clients. Common examples in these lessons include file-sharing services, messaging services, and collaboration services. Often, a specific set of protocols is used to define how the particular service works.
Simplifying computer network technology to only three distinct elements does not provide a detailed abstraction, but it still shows clearly how each is related to the others. When a network interface, service, or protocol is created, it is often put through a review process before it’s deemed a network standard. Standards committees are formed with members from multiple network organizations and vendors to ensure that new network standards remain interoperable with existing network standards. Most networking technologies in use today have been ratified by a standards body, so you may often come across an interface, protocol, or service labeled as a “standard.”
About MAC Addresses
The Media Access Control (MAC) address is used to uniquely identify a physical network interface on a local network. Each physical network interface has at least one MAC address associated with it.
Because the most common network interface is Ethernet, people often refer to MAC addresses as Ethernet addresses. Still, nearly every other network interface type also uses some type of MAC address for unique identification. This includes, but isn’t limited to, Wi-Fi, Bluetooth, and FireWire.
A MAC address is usually a 48-bit number represented by six groups of two-digit hexadecimal numbers separated by colons. For example, a typical MAC address would look something like this: 00:1C:B3:D7:2F:99. The first three number groups make up the organizationally unique identifier (OUI), and the last three number groups identify the network device itself. In other words, you can use the first three number groups of a MAC address to identify who made the network device.
More Info
The Institute of Electrical and Electronics Engineers (IEEE) maintains a searchable database of publicly listed OUIs on its website: http://standards.ieee.org/develop/regauth/oui/public.html.
About IP Addresses
Communicating with computers on both local and remote networks requires an IP address. IP addresses, unlike MAC addresses, are not permanently tied to a network interface. Instead, they are assigned to the network interface based on the local network to which it’s connected. This means that if you have a portable computer, every new network you connect to will probably require a new IP address. If necessary, you can assign multiple IP addresses to each network interface, but this approach is often only used for computers that are providing network services.
Currently two standards exist for IP addresses: IPv4 and IPv6. IPv4 was the first widely used IP addressing scheme and is the most common today. An IPv4 address is a 32-bit number represented by four groups of three-digit numbers, also known as octets, separated by periods. Each octet has a value between 0 and 255. For example, a typical IPv4 address would look something like this: 10.1.45.186.
With IPv4, a little over 4 billon unique addresses exist. This may seem like a lot, but considering how many new network-ready devices come out, and the number of people who want to own multiple network-ready gadgets, this number isn’t really big enough. For the time being, the available IPv4 addresses are extended by using network routers that can share a single routable, or “real-world,” IPv4 address across a range of reusable private network addresses. This is how most home networks are configured, but it is only a temporary solution for what’s to come next.
The successor to IPv4 is IPv6, but because IPv4 is so much a part of the backbone of the Internet, the transition to IPv6 has been slow. The main advantage to IPv6 is a much larger address space—so large, in fact, that every person on Earth could have roughly 1.2 x 10¹⁹ copies of the entire IPv4 address range. This may appear to be a ridiculous number of IP addresses, but the design goal of IPv6 was to eliminate the need for private addressing and allow for easier address reassignment and changing to a new network.
An IPv6 address is a 128-bit number that is presented in eight groups of four-digit hexadecimal numbers separated by colons. Hexadecimal numbers use a base-16 digit system, so after the number 9 you use the letters A through F. For example, a typical IPv6 address would look something like this: 2C01:0EF9:0000:0000:0000:0000:142D:57AB. Long strings of zeros in an IPv6 address can be abbreviated using a double colon, resulting in an address more like this: 2C01:0EF9::142D:57AB.
About Subnet Masks
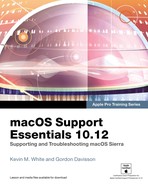
The computer uses the subnet mask to determine the IPv4 address range of the local network. Networks based on the IPv6 protocol do not require subnet masks. A subnet mask is similar to an IPv4 address in that it’s a 32-bit number arranged in four groups of octets. The computer applies the subnet mask to its own IP address to determine the local network’s address range. The nonzero bits in a subnet mask (typically 255) correspond to the portion of the IP address that determines which network the address is on. The zero bits correspond to the portion of the IP address that differs between hosts on the same network.
For example, assuming your computer has an IP address of 10.1.5.3 and a commonly used subnet mask of 255.255.255.0, the local network is defined as hosts that have IP addresses ranging from 10.1.5.1 to 10.1.5.254.
More Info
Another way of writing the subnet mask is known as Classless Inter-Domain Routing (CIDR) notation. This is written as the IP address, a slash, and then the number of 1 bits in the subnet mask. The previous subnet example would be 10.1.5.3/24. You can find out more about CIDR notation from Wikipedia: http://en.wikipedia.org/wiki/Classless_Inter-Domain_Routing.
Whenever the computer attempts to communicate with another network device, it applies the subnet mask to the destination IP address of the other device to determine whether it’s on the local network as well. If so, the computer attempts to directly access the other network device. If not, the other device is clearly on another network, and the computer sends all communications bound for that other device to the router address.
About Router Addresses
Routers are network devices that manage connections between separate networks; as their name implies, they route network traffic between the networks they bridge. Routing tables are maintained by routers to determine where network traffic goes. Even if a router is presented with traffic destined for a network that the router is unaware of, it still routes the traffic to another router that it thinks is closer to the final destination. Thus, routers literally are the brains of the Internet.
To reach computers beyond the local network, your computer needs to be configured with the IP address of the router that connects the local network with another network or, more commonly in residential situations, an Internet service provider. Typically, the router’s address is at the beginning of the local address range, and it’s always in the same subnet. Using the previous example, assuming your computer has an IP address of 10.1.5.3 and a commonly used subnet mask of 255.255.255.0, the local network IP address range would be 10.1.5.0 to 10.1.5.255, and the router address would most likely be 10.1.5.1.
About TCP
Transmission Control Protocol (TCP) is the primary protocol used to facilitate end-to-end data connectivity between two IP devices. TCP is the preferred transport mechanism for many Internet services because it guarantees reliable and in-order delivery of data. In other words, IP provides network addressing and data routing, and TCP ensures that the data arrives at its destination complete. The combination of these two protocols encompasses the TCP/IP suite, commonly known as the Internet protocol suite.
The TCP/IP protocol suite chops continuous data streams into many individual packets of information before they are sent across the network. This is because IP networks use packet-switching technology to route and transmit data. Almost all digital networking technologies are packet based, because this provides efficient transport for network connections that aren’t always reliable. Remember that the TCP/IP protocol was originally designed with the military in mind, so packet-based network technology is ideal because it’s designed to work around communications link failures. This is why sophisticated routing hardware was originally developed for TCP/IP networks—so that data could be literally rerouted and re-sent should a network link go down.
A lesser-used protocol known as User Datagram Protocol (UDP) is also attached to the TCP/IP suite. UDP is a simpler protocol that does not guarantee the reliability or ordering of data sent across networks. This may seem like a poor choice for networking, but in some cases UDP is preferred because it provides better performance than TCP. Examples of network services that use UDP include Domain Name System (DNS), media streaming, voice over IP (VoIP), and online gaming. These services have been designed to tolerate lost or out-of-order data so that they can benefit from UDP’s increased performance.
More Info
For more information on the Internet protocol suite, refer to this Wikipedia entry: http://en.wikipedia.org/wiki/internet_protocol_suite.
Reference 19.2 About Network Activity
Manually assigning an IP address, a subnet mask, and a router address is technically all that is needed to configure a computer to use TCP/IP-based networking on both local area networks (LANs) and WANs. Yet two other network services are almost always involved in basic network functionality: Dynamic Host Configuration Protocol (DHCP) and DNS. These two services, combined with TCP/IP, characterize core network functionality that provides the foundation for nearly any network service.
About LAN Traffic
Most LANs use some form of wired or wireless connection. Once the network interface has been established, TCP/IP networking must be configured, either manually or via DHCP. Once both these steps are complete, network communication can begin.
TCP/IP packets are encased inside Ethernet frames to travel across the local network. The TCP/IP packet includes the originating IP and destination IP addresses along with the data to be sent. The network device applies the subnet mask setting to determine whether the destination IP address is on the local network. If so, it consults its Address Resolution Protocol (ARP) table to see whether it knows the MAC address corresponding to the destination IP address. Each network host maintains and continuously updates an ARP table of known MAC addresses that correspond to IP addresses on the local network. If the MAC address is not listed yet, it broadcasts an ARP request to the local network asking the destination device to reply with its MAC address, and adds the reply to its ARP table for next time. Once the MAC address is determined, an outgoing Ethernet frame, encasing the TCP/IP packet, is sent using the destination MAC address.
The other network device likely returns some information as well, using the same technique of transferring TCP/IP packets inside MAC-addressed Ethernet frames. This goes on and on for thousands of packets every second to complete a data stream. For standard Ethernet the maximum frame size is only 1500 bytes (that’s roughly 1.5 kilobytes, or 0.0015 megabytes), so you can imagine how many Ethernet frames are necessary to transmit even a small file.
About WAN Traffic
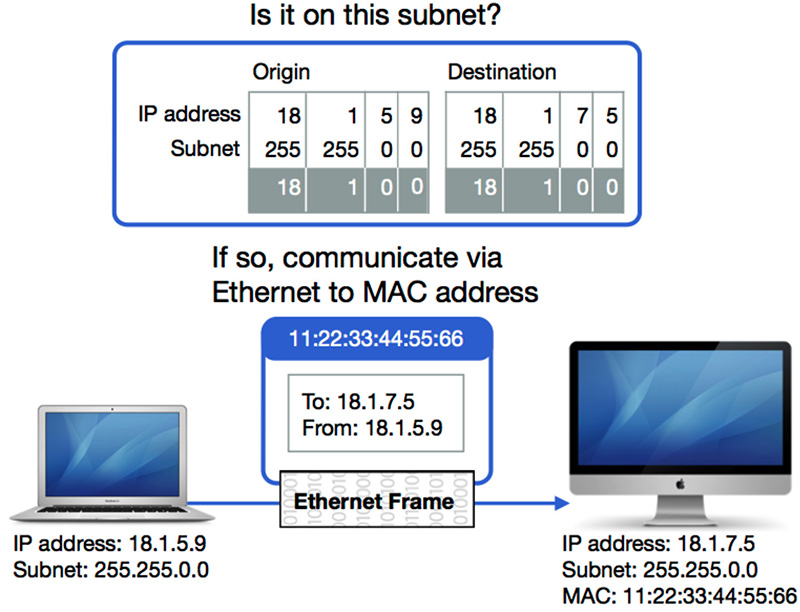
Sending data over a WAN differs only in that data is sent through one or more network routers to reach its intended destination. WANs exist in all shapes and sizes, from a small WAN perhaps used to connect separate LANs in a large building all the way up to the biggest and most popular WAN, the Internet.
Note
This WAN example is simplified for the purposes of easy explanation. It’s now very common to use a router with Network Address Translation (NAT). This allows you to use use one real-world IP address as the external interface for your router and then internally you can use as many private internal IP addresses as you want. Private IP address ranges are 10.0.0.0–10.255.255.255, 172.16.0.0–172.31.255.255, and 192.168.0.0–192.168.255.255.
Initially, transferring data across a WAN is similar to transferring data on a LAN. After all, the first stop for the data destined for the WAN is at the network router on the local network. The network device prepares the packets as before by encasing the TCP/IP packets inside Ethernet frames. Once again, the subnet mask is applied to the destination IP address to determine whether the address is on the local network. In this case, the network device determines that the destination is not on the local network, so it sends the data to the router. Because the router is on the local network, the transmission between the local network client and the router is identical to standard LAN traffic.
Once the router receives the Ethernet-encased TCP/IP packets, it examines the destination IP address and uses a routing table to determine the next closest destination for this packet. This almost always involves sending the packet to another router closer to the destination. In fact, only the last router in the path sends the data to the destination network device.
Network routers also often perform some sort of hardware interface conversion, as WAN network links are rarely standard copper Ethernet connections. The router strips the Ethernet container away from the original TCP/IP packet and then rewraps it in another container that is appropriate for the WAN connection. Obviously, the final router has to prepare the TCP/IP packet for the last leg of the journey on the destination device’s local network by rewrapping it in an Ethernet frame addressed to the destination’s MAC address.
In most cases, network data is transferred back and forth several times to establish a complete connection. Remember that these packet sizes are very small. The default packet size for Internet traffic is also 1500 bytes, with a maximum packet size of 65,535 bytes for most TCP/IP connections.
Network routers are highly optimized devices that can easily handle thousands of data packets every second, so for small amounts of data many WAN connections “feel” as fast as LAN connections. Conversely, a lot of latency is introduced from all the different routers and network connections involved in transferring data across a WAN, so sending large amounts of data across a WAN is often much slower than sending across a LAN. Thus, many users’ favorite time-wasting computer practice was born: waiting for an Internet download or upload.
About DNS
Most people are bad at remembering strings of seemingly arbitrary numbers used to define addresses, so additional technology is often implemented to help users find addresses. Even the simplest mobile phones feature a contact list so that users don’t have to remember phone numbers. For TCP/IP networks, the Domain Name System (DNS) makes network addressing much more approachable to normal humans.
In essence, DNS is a worldwide network of domain servers with the task of maintaining human-friendly host names used to easily locate specific network IP addresses. If you’ve spent any time at all on the Internet, you’re already familiar with the DNS naming convention. For example, the Apple website is located at www.apple.com. Any network device can have a host name, but only those network devices providing a service that needs to be easily located need to have host name entries on a DNS server. Devices providing shared services, such as printers and server computers, are the most common devices to have DNS entries.
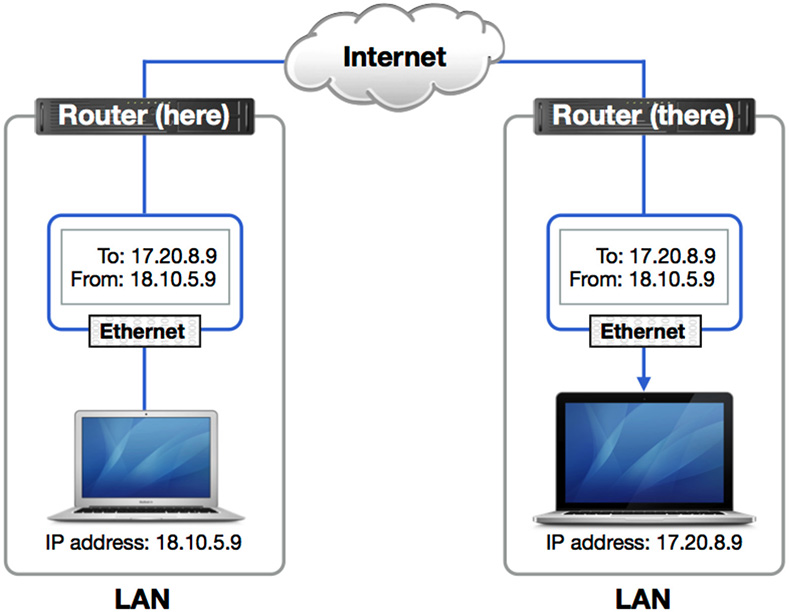
The hierarchical DNS naming convention relates directly to the hierarchical structure of the DNS domain architecture. As you know, DNS names are broken into labels separated by periods. Each label represents a different level, or domain, of the DNS hierarchy.
The top of the DNS hierarchy is the root or “.” domain. The names that are part of the root domain are the familiar abbreviations at the end of nearly every Internet resource. Common examples are .com, .edu, and .gov, among others, including various country codes. These top-level domains (TLDs) are hosted by a consortium of commercial and governmental organizations.
Below the TLDs, individual organizations or users host or rent their own DNS domains. For example, Apple hosts several DNS servers that are known by the TLD servers to maintain the apple.com domain. Apple can host an unlimited number of host names inside the apple.com domain. Apple can also create unlimited names in the domain by preceding “apple.com” with any text. Examples include www.apple.com, training.apple.com, and developer.apple.com.
When a local network device needs to resolve a DNS name into the corresponding IP address, it sends the name query to the IP address of a DNS server. The IP address for a DNS server is usually configured along with the other TCP/IP address information for the network device. The DNS server searches its local and cached name records first. If the requested name isn’t found locally, the server queries other domain servers in the DNS hierarchy.
This process may take a while, so DNS servers temporarily cache any names they have recently resolved to provide a quicker response for future requests. Querying a DNS server to resolve an IP address given a known host name is called a forward lookup, whereas querying a DNS server to resolve a host name from a known IP address is called a reverse lookup. When initially configured, network clients query the DNS server with a reverse lookup of its own IP address to determine whether the network client has its own DNS name.
More Info
For more information on DNS, refer to this Wikipedia entry: http://en.wikipedia.org/wiki/Domain_Name_System.
Bonjour is a name discovery service that uses a name space similar to DNS. Bonjour is covered in Lesson 22, “Manage Network Services.”
About DHCP
Although not required to provide network functionality, Dynamic Host Configuration Protocol (DHCP) is used by nearly all network clients to automatically acquire preliminary TCP/IP configuration. In some situations, an administrator user may still choose to manually enter TCP/IP networking configuration information. This is often the case with network devices that are providing network services. However, manually configuring multitudes of network clients is tedious work subject to human error. Thus, even on rigorously managed networks, DHCP is still widely used to configure network clients.
Note
DHCP is specifically designed to assign IPv4 addressing; IPv6 addressing is handled automatically via other mechanisms.
Note
A precursor to DHCP is Bootstrap Protocol (BOOTP). DHCP is backward compatible with BOOTP but provides greater functionality and reliability.
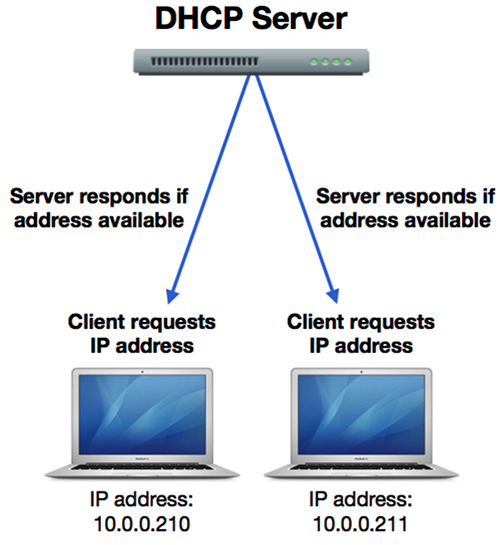
A DHCP server is required to provide the service. On many networks, the network routers provide the DHCP service, but in some cases a dedicated server or network appliance can be used for this purpose. When a network device becomes active on the network, it first negotiates a link with the hardware interface, and then sends out a broadcast to the local network requesting DHCP information. Because the new network client doesn’t yet have an IP address, it uses the network interface’s MAC address for identification.
If a DHCP server that is listening has available addresses, it sends back a reply to the client with TCP/IP configuration information. At a minimum, this information includes an IP address, a subnet mask, a router, and a DHCP lease time that defines how long the client can retain the address before it’s given away. Ancillary DHCP information often also includes DNS configuration.
More Info
For more information on DHCP, refer to this Wikipedia entry: http://en.wikipedia.org/wiki/Dhcp.
Reference 19.3 Configure Basic Network Settings
Initial networking configuration is handled by Setup Assistant, which runs the first time you start up a new Mac or a fresh macOS system installation. Setup Assistant makes it easy for even a novice user to configure network settings. Yet even if you choose not to set up networking during the initial system setup process, the Mac automatically enables any active network interface, including connecting to unrestricted wireless networks, and attempts to configure TCP/IP via DHCP. Consequently, for many users macOS does not require any initial network configuration at all.
More Info
Advanced network configuration techniques are covered in Lesson 20, “Manage Advanced Network Settings.”
About Network Preferences
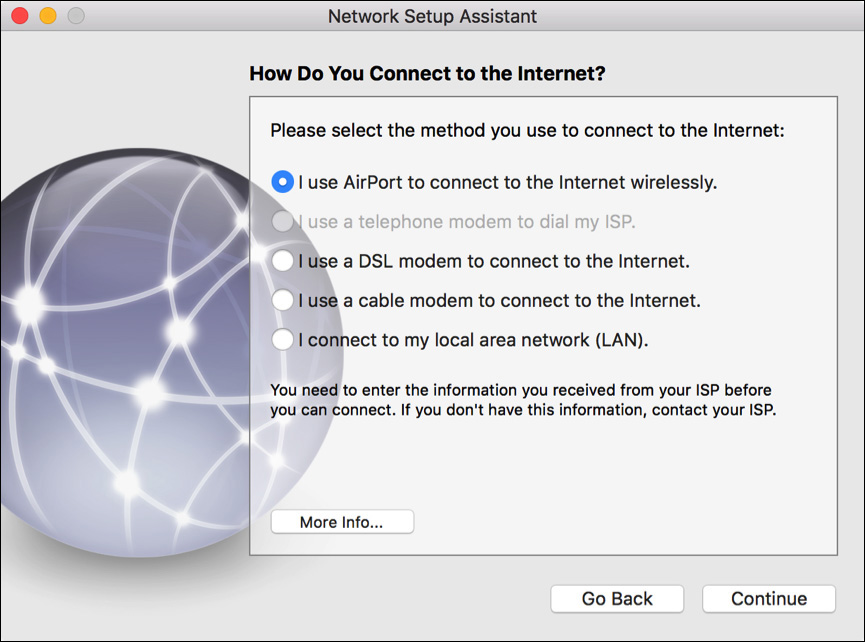
If network changes are required after initial setup, you can still use Network Setup Assistant to help guide you through the network configuration process. You can access Network Setup Assistant by first clicking the “Assist me” button at the bottom of Network preferences, and then click the Assistant button.
Although this tool is helpful for novice users, get familiar with all network configuration options so you’re prepared for any potential network situation or troubleshooting issue. All network preferences and configuration windows are consolidated into a unified interface. Thus, all network settings can be found in Network preferences. Note that Network preferences are available only to administrator users. A standard user attempting to open Network preferences will notice a lock in the lower-right corner. However, because DHCP is enabled by default for Ethernet and Wi-Fi interfaces, for most situations network configuration is automatic.
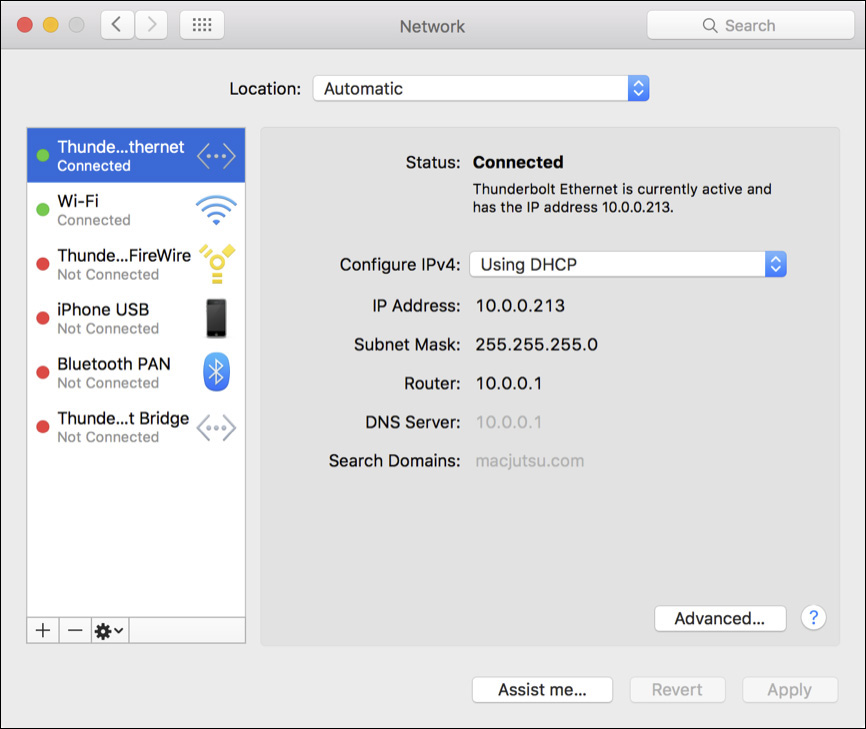
In the preceding screenshot, note that DHCP is also providing configuration for the DNS server. Recognize that if no DNS server IP address is configured, your Mac cannot resolve DNS host names. Thus, in most cases Internet connections will fail.
Select Wi-Fi Networks
Wireless networking, also known by the technical specification 802.11 or the more common “Wi-Fi,” has become the dominant local network connectivity standard. Ethernet is certainly still popular, but Wi-Fi has cut the cord by allowing easy network access for an ever-increasing number of portable devices. Apple made basic Wi-Fi network management a breeze with automatic Wi-Fi network discovery and the Wi-Fi status menu. These Wi-Fi setup mechanisms give nonadministrator users access to the most commonly needed Wi-Fi network settings.
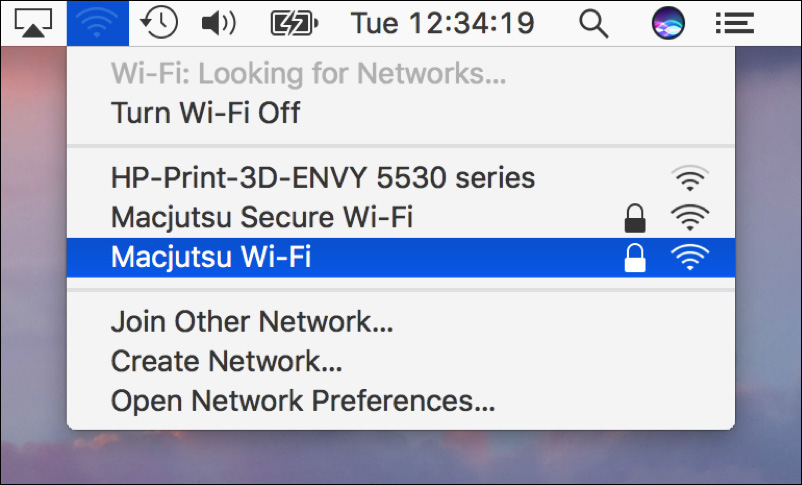
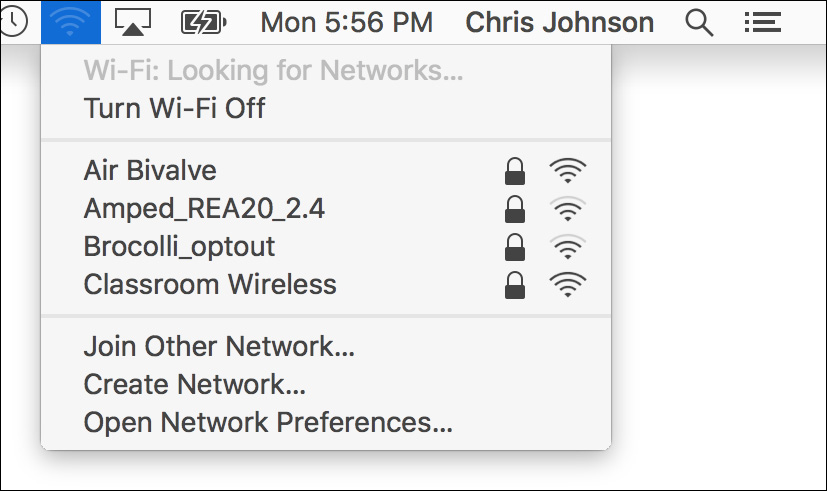
macOS always remembers Wi-Fi networks that were previously connected, by default. Thus, if you start up or wake a portable Mac, it will attempt to locate and reconnect to any previously connected Wi-Fi networks. If an appropriate Wi-Fi network isn’t found, you will need to manually select a new one from the Wi-Fi status menu near the upper-right corner of the display. When you select this menu, the Wi-Fi background process automatically scans for any advertised networks that are within range so you can choose among them.
A service set identifier (SSID) identifies a Wi-Fi network’s name and associated configuration information. An administrator of the devices providing Wi-Fi services sets the network’s name and configuration settings. macOS uses the information in the SSID configuration to automatically establish Wi-Fi network communications.
Aside from Wi-Fi network names, the most important indicator this menu shows is the relative strength of any Wi-Fi network, as indicated by the number of black bars compared to gray bars. The more black bars displayed, the greater the strength of the Wi-Fi signal.
Authenticate to Wi-Fi Networks
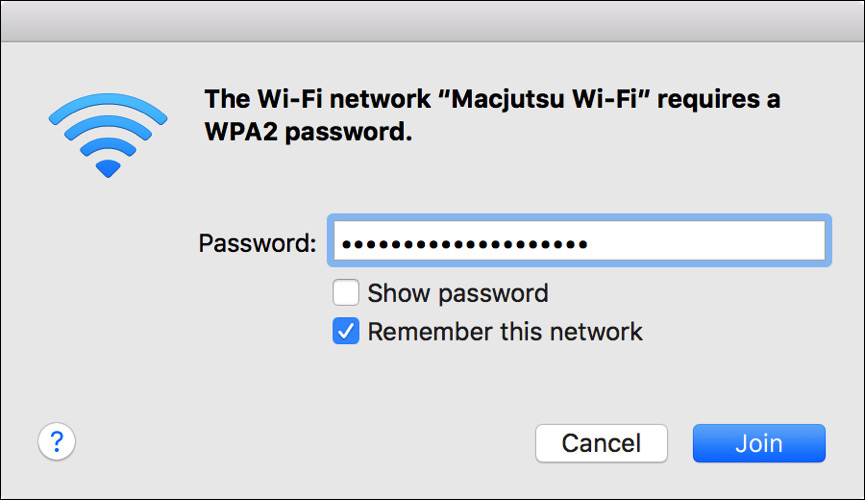
If you select an open wireless network, the Mac immediately connects, but if you select a secure wireless network, as indicated by the small lock icon, you have to enter the network password. When you select a secure network, in most cases the system automatically negotiates the authentication type, and for many networks you need only enter a common shared Wi-Fi password.
macOS supports the most common Wi-Fi authentication standards, including Wired Equivalent Privacy (WEP), Wi-Fi Protected Access (WPA), and Wi-Fi Protected Access II (WPA2). This includes support for WPA/WPA2 in both their personal and enterprise forms. Essentially, WPA/WPA2 Personal uses a common shared password for all users of the Wi-Fi network, whereas WPA/WPA2 Enterprise includes 802.1X authentication, which allows for per-user password access to the Wi-Fi network. WPA/WPA2 Enterprise authentication is covered in the next section of this lesson.
Note
It is well known that WEP is an easily compromised security protocol and should be avoided. Thus, WPA/WPA2 are preferred protocols.
If you join a WEP or WPA/WPA2 Personal Wi-Fi network, the system automatically saves the passwords to the System keychain. This is what allows the Mac to automatically reconnect to the Wi-Fi network immediately after startup or waking up. Also, because the password is saved to the System keychain, all users can access the wireless network without needing to reenter the password.
Authenticate to Automatic WPA Enterprise Networks
If you join and authenticate to a wireless network that uses WPA or WPA2 Enterprise, it’s implied that the authentication is handled via 802.1X. Thus, joining this type of network automatically creates an 802.1X service configuration.
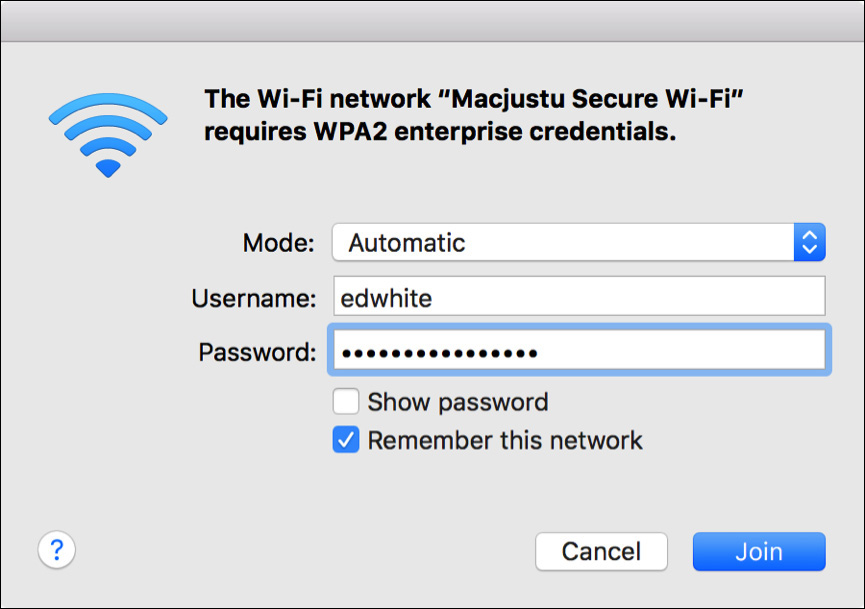
As you can see in this screenshot, when 802.1X is used, you must enter both a username and password to authenticate the connection. You may also be prompted with a server certificate verification dialog. You must accept this certificate to continue, but completing the configuration requires administrator authentication.
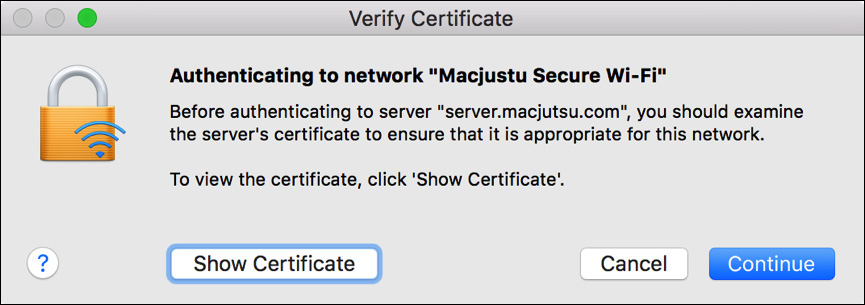
A user with administrator rights is required because this will add the wireless authentication server certificate to the System keychain. Assuming the server configuration doesn’t change, you will only have to accept this certificate once per system. Future connections to this wireless network will require only that users enter their normal authentication credentials.
Join Hidden Wi-Fi Networks
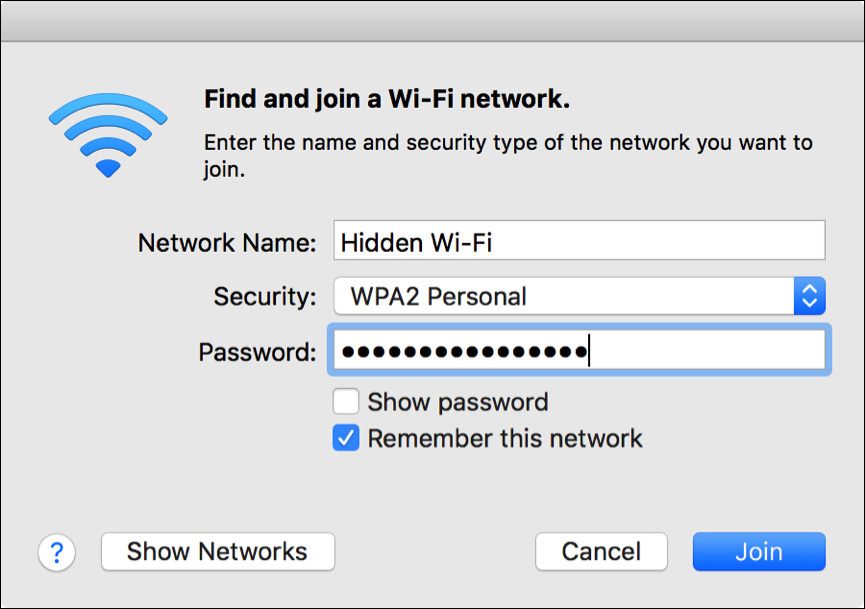
In some cases, wireless networks may not advertise their availability. You can connect to these hidden wireless networks (also called closed networks) as long as you know their network name (or SSID) by choosing Join Other Network from the Wi-Fi status menu. In the dialog, you can enter all the appropriate information to join the hidden wireless network.
Create an Ad Hoc Wi-Fi Network
If you are unable to connect to a standard wireless network, you can create an ad hoc wireless network using your Mac computer’s Wi-Fi connection to share files wirelessly with other computers. Choose Create Network from the Wi-Fi status menu and then enter the wireless network name that will be used to connect to your ad hoc network. Other devices will select this name to join your Mac computer’s Wi-Fi network.
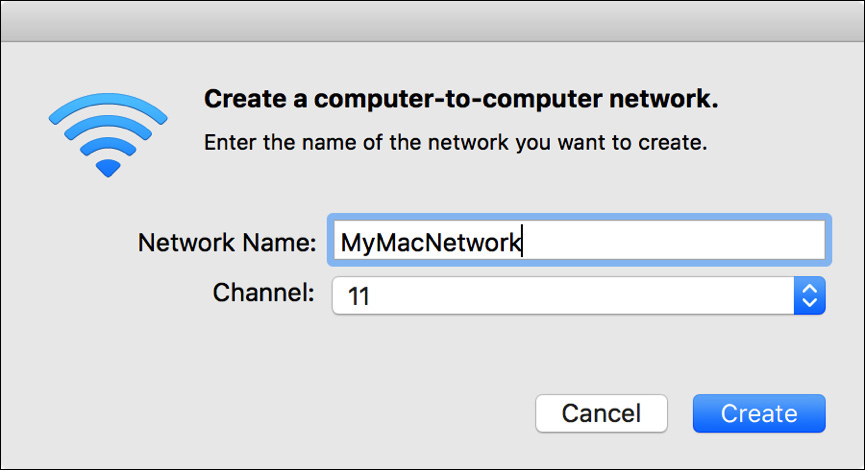
Leaving an ad hoc network enabled on your Mac is a potential security risk. Thus, you should only leave it enabled when you need to use it. To prevent other computers from connecting to the ad hoc network, turn off the Wi-Fi hardware or choose another wireless network from the Wi-Fi status menu.
More Info
Do not confuse the creation of an ad hoc Wi-Fi network with the macOS AirDrop Wi-Fi sharing feature. Creating a Wi-Fi network has permanence, and it can be used by other non–macOS systems. AirDrop allows for only temporary connections Mac computers. You can find out more about AirDrop in Lesson 23, “Manage Host Sharing and Personal Firewall.”
Exercise 19.1 Connect to a Wi-Fi Network
![]() Prerequisites
Prerequisites
![]() You must have created the Local Admin (Exercise 2.1, “Configure a New macOS System for Exercises,” or Exercise 2.2, “Configure an Existing macOS System for Exercises”) and Chris Johnson (Exercise 5.1, “Create a Standard User Account”) accounts.
You must have created the Local Admin (Exercise 2.1, “Configure a New macOS System for Exercises,” or Exercise 2.2, “Configure an Existing macOS System for Exercises”) and Chris Johnson (Exercise 5.1, “Create a Standard User Account”) accounts.
![]() Your computer must have a Wi-Fi interface, and you must have access to an available Wi-Fi network that you are not already connected to.
Your computer must have a Wi-Fi interface, and you must have access to an available Wi-Fi network that you are not already connected to.
macOS makes joining a wireless network simple. In this exercise, you will examine the process of finding and joining a wireless network.
2 Open System Preferences, and select the Network pane.
3 Click the padlock, and authenticate as Local Admin.
4 Select the Wi-Fi service from the sidebar. If you do not have Wi-Fi service, you cannot perform this exercise.
5 If necessary, click the Turn Wi-Fi On button.
6 If necessary, select “Show Wi-Fi status in menu bar.”
7 Click Advanced.
8 Examine the options available on the Wi-Fi tab.
The Preferred Networks list allows you to control which networks this computer joins automatically and includes an option to add networks to this list as your computer joins them. You can also control whether administrator authorization is required for certain operations.

10 If you made any changes, click Apply.
11 Click the Wi-Fi status menu.
A list of visible networks in your area is shown. Note that it may take a few seconds for your computer to discover all the local networks.
Note that this list is also available in Network preferences, in the Network Name pop-up menu.
If you are performing these exercises in a class, the instructor provides you with the name of the network to join (and, if necessary, security information for it).
If the network you want to join is shown in the list, follow the steps in the section “Option 1: Join a Visible Network.” If it is not shown, the network may be configured as invisible (or “SSID broadcast disabled”), in which case you need to follow the steps in the section “Option 2: Join an Invisible Network.”
Option 1: Join a Visible Network
1 Choose the network you want to join from the Wi-Fi status menu.
If the wireless network is encrypted, you are prompted for the network password. Selecting the “Remember this network” option allows your computer to automatically reconnect to this network whenever it is available.
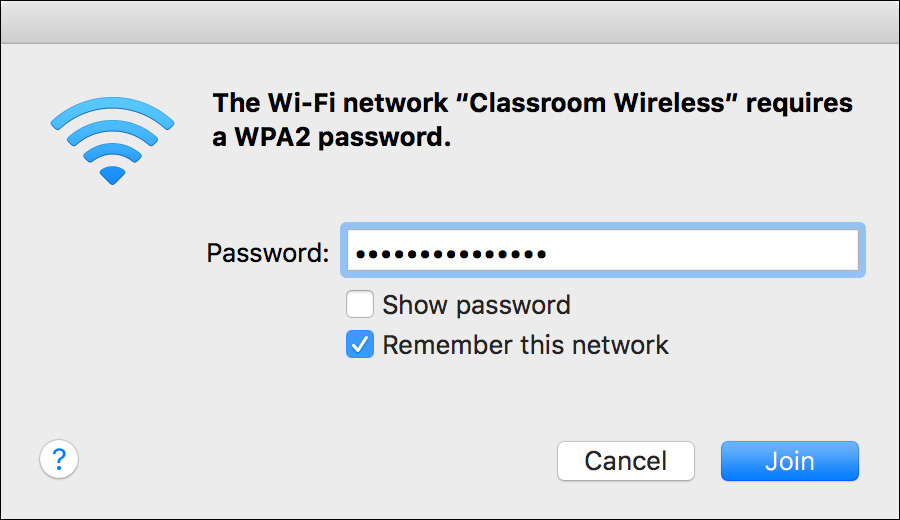
2 If you are prompted, enter the network password, and click Join.
Skip ahead to the “Verify Your Connection” section.
Option 2: Join an Invisible Network
1 Choose Join Other Network from the Wi-Fi status menu.
2 Enter the network’s name (SSID).
3 If the network is encrypted, you need to know its encryption type as well as the password. Choose the encryption type from the Security pop-up menu, and then enter the network password. Selecting the “Remember this network” option allows your computer to automatically reconnect to this network whenever it is available.

4 Enter the security information, and click Join.
Verify Your Connection
If macOS detects that the wireless network you have joined is connected to a captive portal, it opens a window showing the portal’s sign-in page.
1 If a captive portal window appears, follow its instructions to get full network access. A captive portal might require you to agree to its terms of service, authenticate, watch an advertisement, or meet other requirements before it allows you full network access.
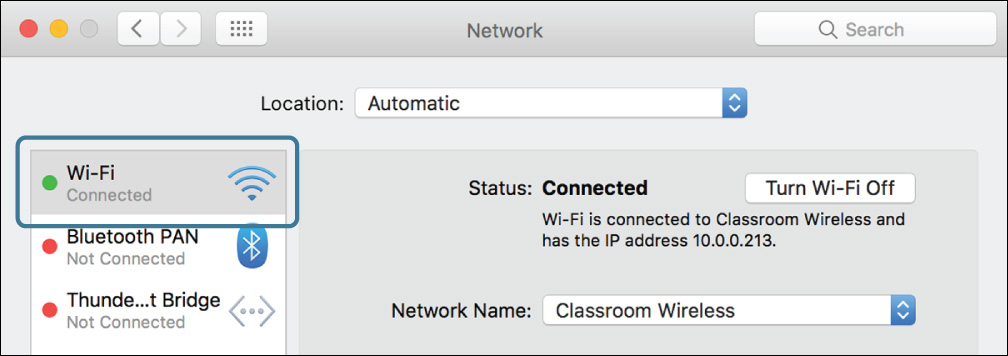
2 In Network preferences, look at the status indicator next to the Wi-Fi service.
The status indicator will be green if the computer is connected to a network and has address information configured. If the indicator is not green, you did not successfully join the network and may have to troubleshoot the connection.
3 Click the Wi-Fi status menu.
It shows a number of arcs to indicate the signal strength of the wireless network. If all the arcs are light gray, you are not joined to a wireless network or are receiving only a weak signal.
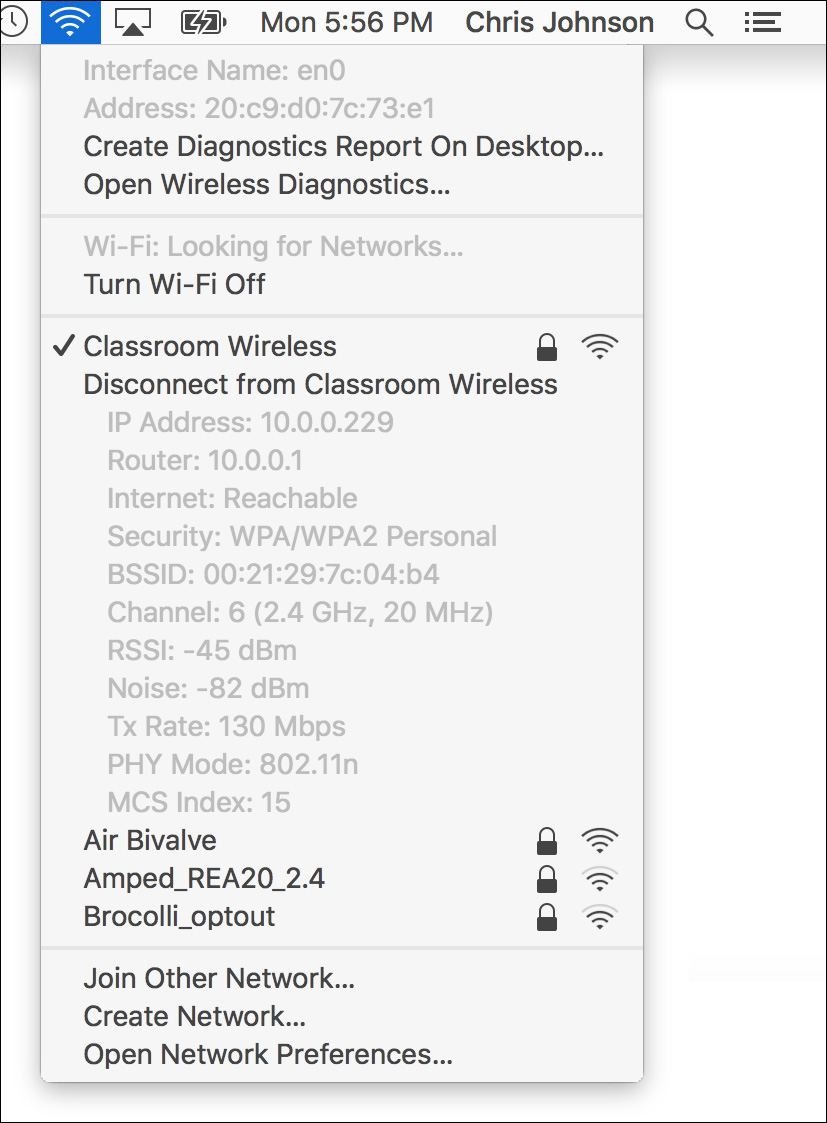
4 Option-click the Wi-Fi status menu.
The menu opens and displays additional information about your connection, including the current wireless speed (“Transmit rate”) and signal strength (RSSI; note that –50 is a strong signal, and –100 is a weak one).
Exercise 19.2 Monitor Network Connectivity
![]() Prerequisite
Prerequisite
![]() You must have created the Chris Johnson account (Exercise 5.1, “Create a Standard User Account”).
You must have created the Chris Johnson account (Exercise 5.1, “Create a Standard User Account”).
In this exercise, you will break your primary network connection and observe how that change is reflected in the Network pane of System Preferences. The Network pane dynamically updates as network connectivity changes, so it is a valuable tool for troubleshooting connectivity issues.
Monitor Connectivity via Network Preferences
The Network Status view of Network preferences shows the status of all active configured network interfaces. User-initiated connections such as PPP and VPN are also listed. Users can view the Network Status pane to verify their active connections in order of priority.
1 If necessary, log in as Chris Johnson.
2 If necessary, open System Preferences, and select the Network pane.
Notice the status of your network connections on the left side of the window. The green status indicators show which network services are active, and their order shows their priority. Whichever service is at the top of the list is your current “primary” service, and it is used for all Internet connectivity. Make a note of which service is currently the primary service.
If you do not have any services with green status indicators, you do not have a network connection and cannot perform this exercise.
3 Select the current primary service.
4 Watch the status indicators and service order as you disable the connection for your primary network service. How to do this depends on what type of service it is:
![]() If it is an Ethernet service, unplug the Ethernet cable from your computer.
If it is an Ethernet service, unplug the Ethernet cable from your computer.
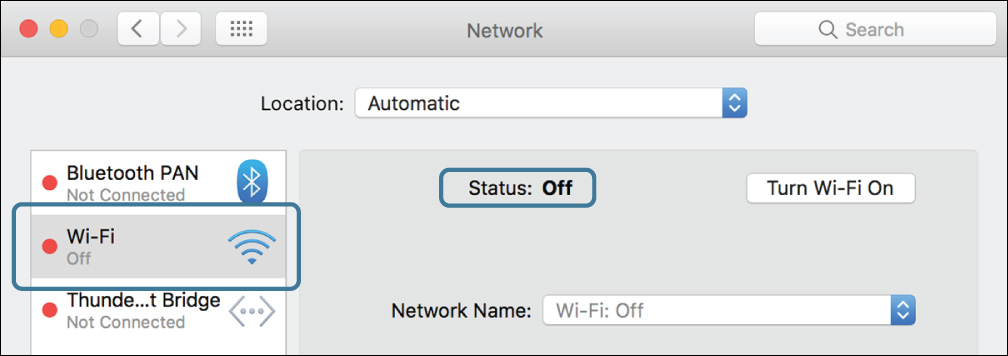
![]() If it is a Wi-Fi service, click the Turn Wi-Fi Off button.
If it is a Wi-Fi service, click the Turn Wi-Fi Off button.
![]() If it is a dial-in or mobile broadband service, click the Disconnect button.
If it is a dial-in or mobile broadband service, click the Disconnect button.
When the service is disabled, its status indicator turns red or yellow, and it drops down in the service order. If you have another active service, it becomes the new primary service.
The detailed view on the right also changes to indicate why the service is disabled.
5 Again, watch the status indicators and service order as you reenable the connection. How to do this depends on what type of service it is:
![]() If it is an Ethernet service, plug the Ethernet cable back into your computer.
If it is an Ethernet service, plug the Ethernet cable back into your computer.
![]() If it is a Wi-Fi service, click the Turn Wi-Fi On button, and if necessary, choose the network from the Network Name pop-up menu.
If it is a Wi-Fi service, click the Turn Wi-Fi On button, and if necessary, choose the network from the Network Name pop-up menu.
![]() If it is a dial-in or mobile broadband service, click the Connect button.
If it is a dial-in or mobile broadband service, click the Connect button.
It may take a few seconds for the network connection to appear and the service to reconfigure itself. When the service becomes fully active, its status indicator turns green, and it rises to the top of the service list.