Lesson 15. Manage Time Machine
Goals
![]() Describe Time Machine technology
Describe Time Machine technology
![]() Configure Time Machine to back up important data
Configure Time Machine to back up important data
![]() Restore data or an entire Mac operating system from a Time Machine backup
Restore data or an entire Mac operating system from a Time Machine backup
Several mature and relatively easy-to-use backup solutions are available for macOS, so you may be wondering why Apple chose to invent its own backup solution. A little research revealed that, before the introduction of Time Machine, only a small percentage of Mac users were backing up their data regularly. So Apple decided that the only way to convince users to back up their systems was to create a backup process that would be as easy to use as possible. The Apple solution was Time Machine.
In this lesson, you will learn how Time Machine enables users to easily browse the backup history of their entire file system. You will become familiar with the configuration of Time Machine. Finally, you will explore multiple methods for recovering data from Time Machine backups.
Reference 15.1 About Time Machine
Aside from being built into macOS, Time Machine has two features that make it fundamentally different from any other solution currently out there. First, configuring Time Machine is so easy it’s nearly automatic. The system practically begs you to set up Time Machine if you haven’t done so already, and with as little as one click, it’s configured.
The second, more significant feature is that Time Machine is so tightly integrated with macOS that users don’t even have to exit the application they are currently using to recover data. Applications, both built-in and third-party, can tie directly into Time Machine.
If your application supports Time Machine, you can open Time Machine to view saved versions of files and application data. If your application doesn’t support Time Machine, you can open Time Machine and use the Finder to browse the entire file system.
About Backup Disks
Time Machine can save backups to any locally connected Mac OS Extended volume that is not the startup volume. You are allowed to select a backup disk that resides as another partition on the system disk—but this is an incredibly bad idea: if the system disk dies, so does your backup. Consequently, many choose an external USB, FireWire, or Thunderbolt disk as their Time Machine backup disk.
However, external disks have the potential to be lost or stolen. Thus, macOS includes support for an encrypted local backup disk. This option automatically reformats the backup disk as Mac OS Extended (Journaled, Encrypted). Using this option requires setting a password, which is used to access the encrypted Time Machine backup disk.
Note
Remember that a Time Machine backup can contain a full copy of all your important files. Thus, it’s recommended that you choose the encrypted backup disk option, in case your backup disk is ever lost or stolen.
When configured, the encrypted Time Machine disk password is not initially saved. The next time the encrypted backup disk is connected, you will be prompted to enter the password and optionally save it to the secure keychain system for automatic retrieval. If the encrypted disk is connected to another system, you must enter the password to access the backup items. Further, if the original system is lost, you will need to manually enter the disk password to access the backup disk contents. In other words, it is critical that you store the backup disk password using a secure mechanism outside of the Mac.
Note
If you lose the password used to unlock an encrypted Time Machine backup disk, its contents are lost forever. Not even Apple can recover the data.
If you don’t have a local volume suitable for backup, you can select a shared network volume as your backup disk. Time Machine supports network shares by creating a disk image on the share to store the backups. Time Machine in macOS Sierra supports backing up to AFP or SMB network shares. Apple guarantees Time Machine compatibility with shares hosted from macOS Server and Time Capsule. However, support for Time Machine varies for third-party file sharing services. Before relying on a third-party file sharing solution as a Time Machine destination, you should verify support for this feature from the manufacturer.
You can find out more about configuring macOS Server as a Time Machine destination from the latest macOS Server help documentation, https://help.apple.com/serverapp/mac.
More Info
You can find out more about the Airport Time Capsule wireless base station at www.apple.com/airport-time-capsule/.
The storage on network shares used for Time Machine may not be encrypted, but access to a network share is probably configured to require authentication. Although an authentication requirement prevents unauthorized access over a network, it doesn’t offer security if the device providing the share is physically located in an insecure environment. Consider the physical aspects of security when placing a Time Machine server or Time Capsule.
For even greater backup protection, you can select more than one Time Machine backup disk. This is especially useful for those who are away from their primary Time Machine backup disk for extended periods. For example, you can choose to back up to a Time Capsule wireless base station at home and also use a portable external disk when traveling.
About Backup Schedule
Logistically, Time Machine uses a sophisticated background process, named backupd, to automatically create new backups of the entire file system every hour. This only works, though, if the backup disk is readily available. As more users go for portable Mac computers, it’s becoming increasingly possible that users may be away from their backup disks for quite a while.
Time Machine can also take local snapshots if the backup disk is unavailable. The idea is that even when away from the backup disk, the user at least has access to restore from the local snapshots. This feature is enabled only on Mac portables with Time Machine left in the On state. Once the Mac can locate the backup disk again, the local snapshots are converted to traditional backups and saved to the disk. Time Machine attempts to keep a history of local snapshots available as well, in case you need to restore when the backup disk is offline. To save space, though, this local snapshot history is not as deep as the full backup.
While the Time Machine local snapshots are a convenient new feature, they certainly aren’t true backups, because they are located on the same disk they are backing up. If the system disk fails, the local snapshots are lost as well. This is why, when a Mac is not backed up to the backup disk for ten consecutive days, the system warns the user on a regular basis to reconnect that disk. Train your users to ensure their Mac computers are connected to their Time Machine disks on a regular basis. Again, as long as the Mac can connect to the disk, Time Machine automatically handles the backup maintenance.
Another issue that may prevent Time Machine backups is system sleep. If the computer is asleep, it may not run the backup job. To rectify this situation, Time Machine can perform backups while the system is in Power Nap mode. For Mac systems that support Power Nap, even while the system is “sleeping” it still attempts to perform Time Machine backups or local snapshots every hour. Obviously, even with Power Nap enabled, the availability of the backup disk likewise affects the ability of a sleeping system to back up.
About Time Machine Backups
Time Machine uses several tricks to keep backups as small as possible so that you can maintain a deep history, but the backup starts out big. The initial Time Machine backup copies almost the entire contents of your file system to the specified backup volume.
To provide fast backups and convenient restores, Time Machine does not use a compressed archive format like many other backup systems. Instead, it copies the items as is to the backup disk. As you’ll see later, this permits easy access to those items.
The space-saving comes into play with each subsequent backup. Between backups, a background process similar to the one used by the Spotlight search service automatically tracks any changes to the original file system. When the next scheduled backup occurs, only the items that have changed are copied to the backup volume. Time Machine then combines this new content with hard-link file-system pointers (which occupy nearly zero disk space) to the previous backup content, and creates a simulated view of the entire file system at that point in time.
Time Machine also saves space by ignoring files that do not need to be backed up—ones that can be re-created after a restoration. Generally speaking, Time Machine ignores temporary files, Spotlight indexes, items in the Trash, and anything that can be considered a cache. Of particular note, Time Machine doesn’t back up system log files, which you could need for later troubleshooting. Software developers can also instruct Time Machine to ignore specific application data that does not need to be backed up. For example, Internet file storage providers, like Dropbox or OneDrive, can instruct Time Machine to ignore files saved to a cloud service.
Specifically, Time Machine always ignores files as defined by a configuration file that lives at /System/Library/CoreServices/backupd.bundle/Contents /Resources/StdExclusions.plist. Note that you will not see this list in the exclusions found in the Time Machine preferences.
Eventually, so as not to waste space on your backup volume with historical data that has outlived its usefulness, Time Machine starts “aging out” backups: it keeps hourly backups for only a day, daily backups for a week, and weekly backups until your backup volume is full. After your backup volume is full, Time Machine starts deleting the oldest items first. However, it always keeps at least one copy of every item that is still on your current file system.
Note
Do not confuse Time Machine with snapshot technology common on other operating systems. Although snapshots do create multiple instances of a file system through time, they do not provide you with a backup, because they don’t actually copy data to another storage device. In other words, if a disk containing file-system snapshots dies, those snapshots are just as lost as the current data on the dead disk.
About Time Machine Limitations
Although Apple has put a lot of work into Time Machine, it is not entirely without issues. The Time Machine backup architecture does not lend itself to handling large files that change often. For example, many database files appear as large, single files to the file system. The database application may be able to change just a few bytes of the large file as a user edits the database, but Time Machine doesn’t recognize this, so it creates another copy of the entire database file during the next backup. Obviously, this fills your backup volume much more quickly than if the database had been stored as many smaller files.
This leads to the next Time Machine issue: running out of backup space. Once Time Machine fills up the backup volume, it begins deleting older items to make room for newer ones. Therefore, the depth of your backup history varies based not only on the size of your backup volume but also on how often you change your files and how Time Machine recognizes those changes. Because you cannot change how Time Machine chooses to delete older items, you may discover that items you thought would still be on the backup volume have already been deleted.
Tip
By default, Time Machine lets you know if it needs to delete older items to make space for new backups.
One final issue is that Time Machine can only back up Legacy FileVault accounts when the user is logged out of the system. The solution to this problem is to stop using Legacy FileVault in favor of FileVault 2 system volume encryption, as covered in Lesson 10, “Manage FileVault.”
Reference 15.2 Configure Time Machine
Despite the rather complex process going on behind the scenes to make Time Machine possible, configuration couldn’t be easier. In fact, Time Machine is enabled by default and waiting for you to pick a backup disk. If you haven’t configured a Time Machine backup disk, the system automatically scans the network for a Time Machine network share or waits for you to attach an external disk. If the system locates either, you are prompted to select it as your backup disk. If you select your backup disk with this method, after you click the Use as Backup Disk button, Time Machine is fully configured. It’s just that easy.
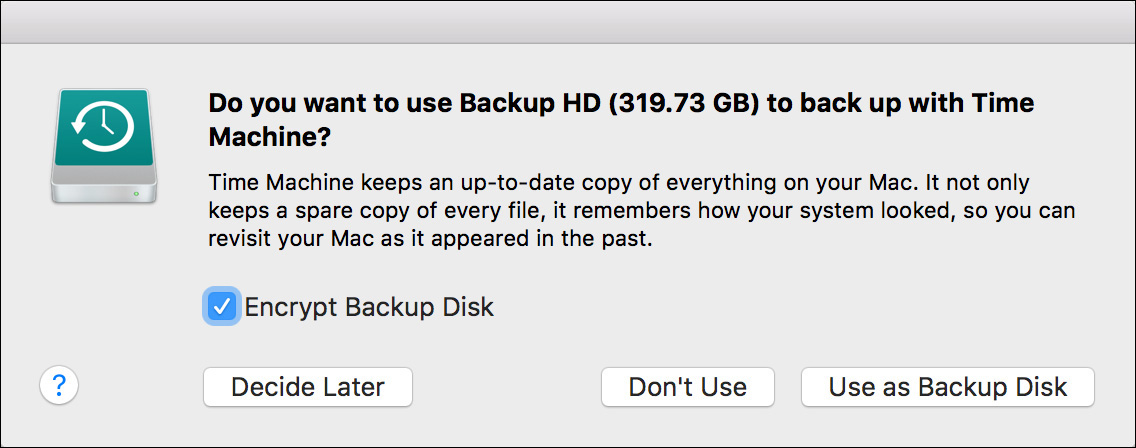
If you make the wise choice to encrypt backups, you need to specify a password to protect the encryption, along with a password hint. Again, initially the system will not automatically remember the encrypted disk’s password, but after reconnecting the disk, the user has the option to save the password in a local keychain to perform automated backups. However, also covered previously, if you ever need to access this encrypted disk from another computer, or even on the same Mac using a different system, you must enter the password to gain access to the disk’s contents.
Note
Again, if you lose the password used to unlock an encrypted Time Machine backup disk, its contents are lost forever. Not even Apple can recover the data.
Selecting the option to encrypt the Time Machine backup disk erases the disk’s current contents and will reformat the disk as Mac OS Extended (Journaled, Encrypted).
Depending on the amount of data that needs to be backed up and your choice of encryption format, it can take from minutes to hours for the initial backup to complete. The system can encrypt the disk and back up at the same time. Consequently, even if it takes only a few minutes to create the initial backup, the system may have to continue the disk encryption process, which could take several hours, depending on the size and speed of the disk.
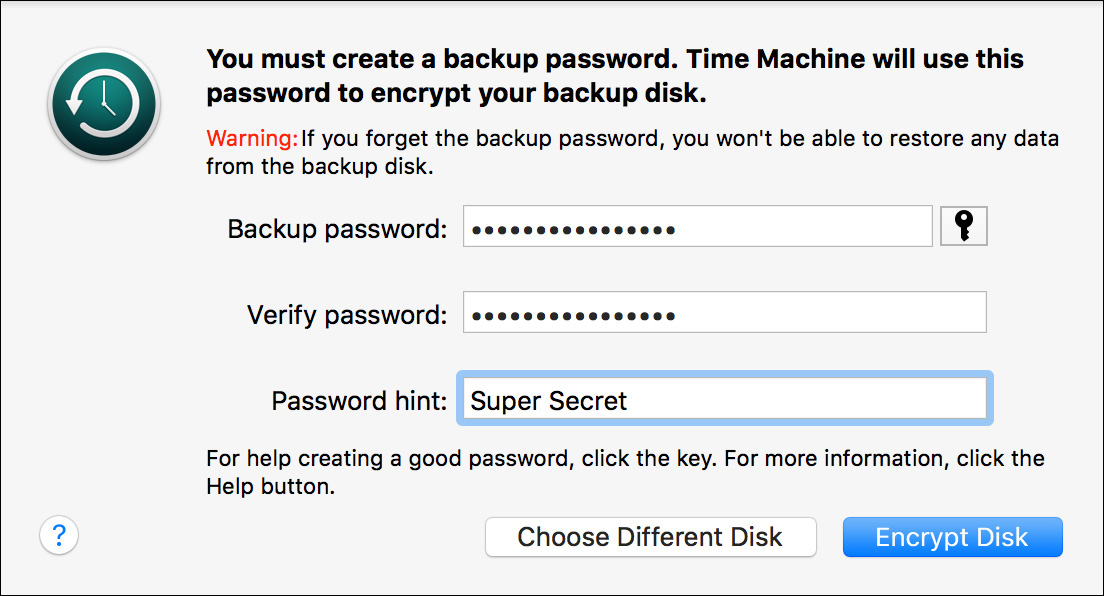
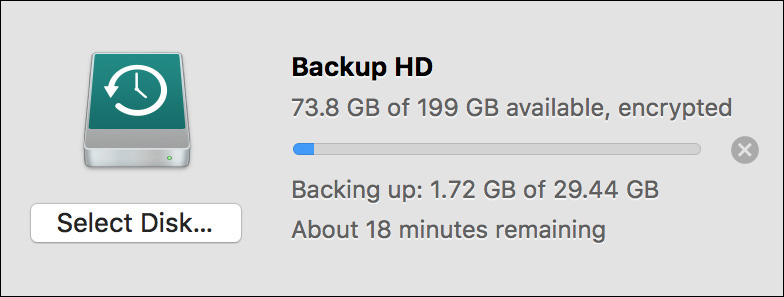
Time Machine lets you know when backup operations are complete. Subsequent backups occur automatically in the background. You can verify the last backup, or force an immediate backup, from the Time Machine menu near the clock in the menu bar. You can also open Time Machine preferences from this menu.
Note
If you do not see the Time Machine menu bar item, you can enable it from the Time Machine preferences.
You can also check the progress of any backup task from Time Machine preferences. From this interface, you can cancel the backup by clicking the small x button to the right of the progress bar.
Tip
If you need to eject the Time Machine disk during a backup, you can stop the backup and eject the disk from the Finder sidebar.
Manage Time Machine Preferences
If you need to select a network backup disk, verify the backup status, or manually configure backup settings to better suit your needs, you can do so in Time Machine preferences. You can open Time Machine preferences from System Preferences, from the Time Machine menu, or by secondary-clicking (Control-clicking) the Time Machine icon if it’s in the Dock.
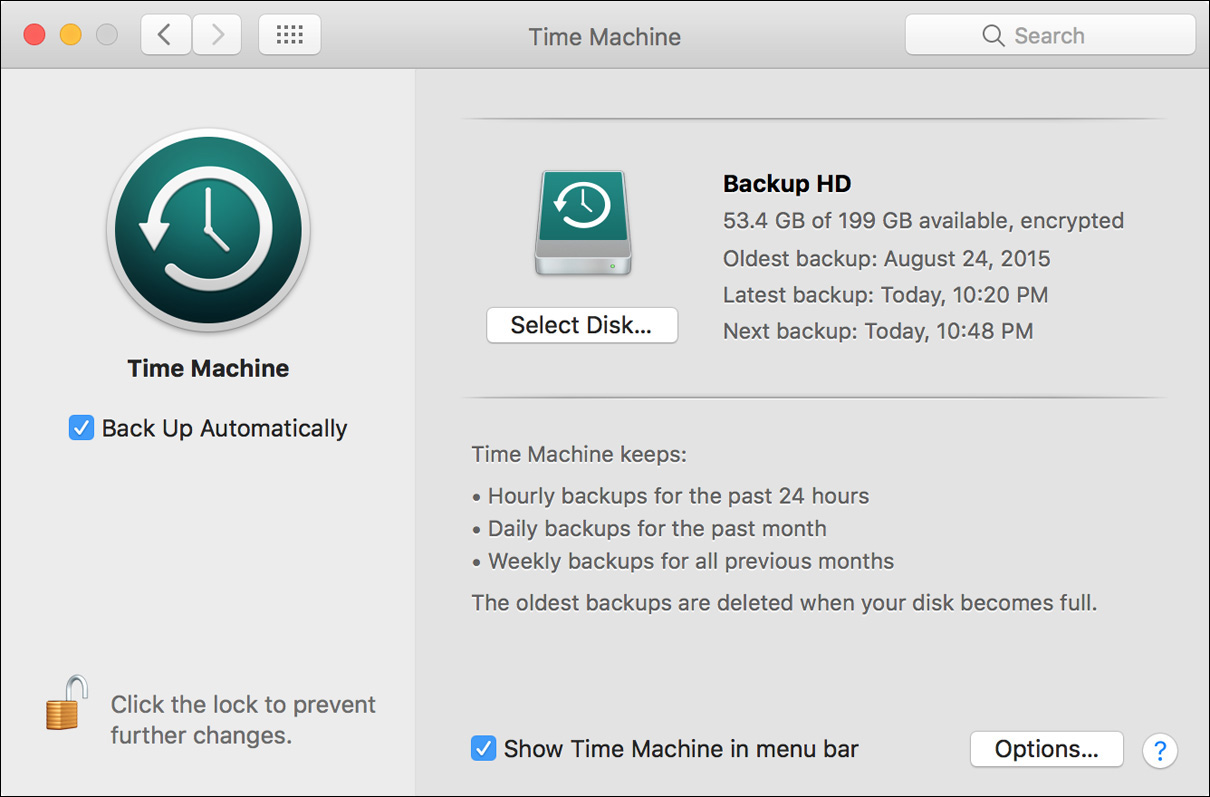
If you want Time Machine to back up only when you say so, deselect the Back Up Automatically checkbox in the Time Machine preferences, and then initiate manual backups from the Time Machine menu. You can also postpone backups by disconnecting from the backup disk, though this works only with locally attached backup disks.
Configure Backup Disks
Again, macOS can select multiple Time Machine backup disks. Depending on the number of backup disks currently configured, the Time Machine preferences will look a bit different.
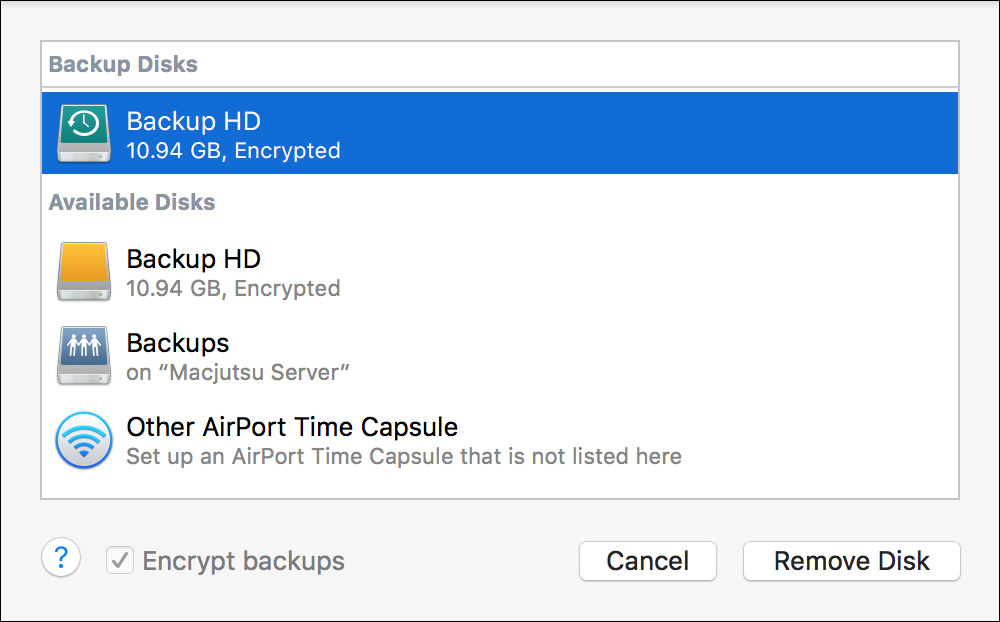
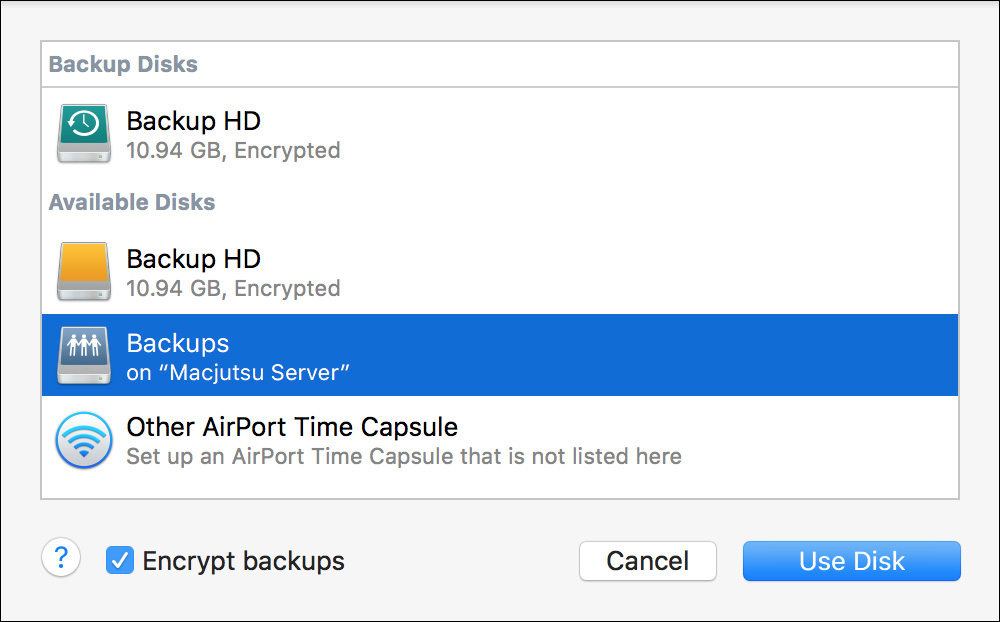
To add the first backup disk, click the Select Backup Disk button. If you want to modify the configuration of a single backup disk, click the Select Disk button. Finally, if you want to modify the configuration of multiple backup disks, click the text that reads “Add or Remove Backup Disk.” Any of these methods reveals the Time Machine backup disk management dialog, which allows you to both add and remove backup disks.
Note
If you reselect a disk with a previous backup of this computer, you will be asked if you want to use the existing backup. Alternatively, if you reselect a disk with a previous backup that was restored to this computer, you will be asked if you want to inherit the existing backup.
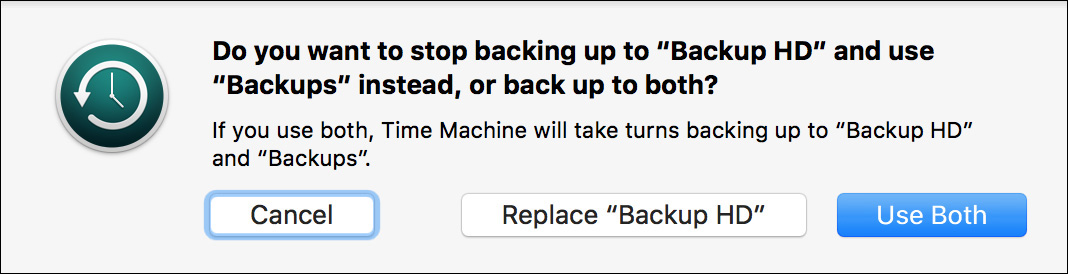
If you select an additional backup disk, you are prompted to choose whether to replace the originally selected backup disk or to use both disks. You can configure multiple backup disks; however, the system completes backups for each disk separately and will cycle through the disks attempting to back up at least once an hour. For example, if you have two backup disks configured, Time Machine will complete the backup for the first disk, and then in the next hour it will back up to the second disk.
Backups can be completed out of order if one of the disks is missing, but the system still runs only one backup at a time. The system tries to keep a complete backup on every backup disk, but if the backup disks are of different sizes, the system starts to delete older items from the backup. Thus, one backup disk may have a deeper history than another, smaller backup disk.
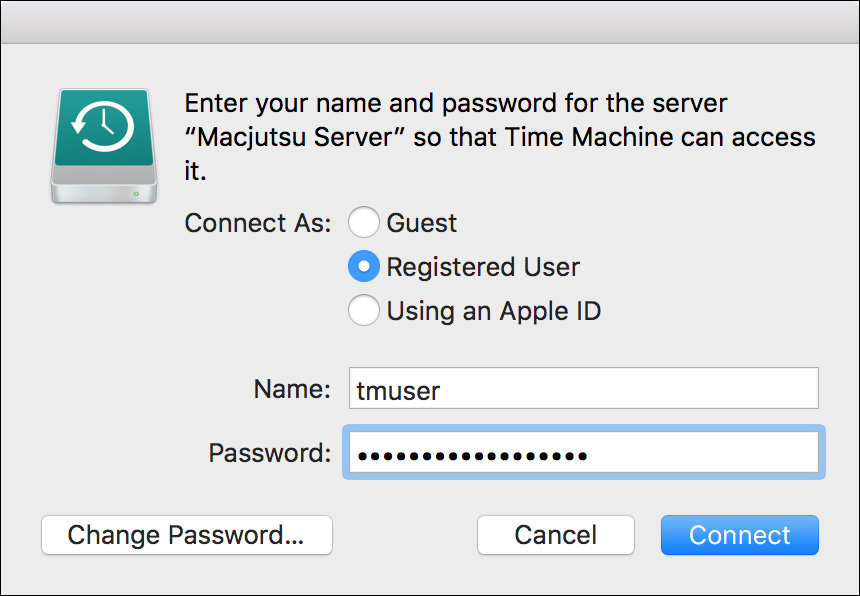
As covered previously, if you selected a locally connected external disk and the encryption option, you need to specify a password and password hint. If you selected a network share or Time Capsule as the disk, you need to specify an authentication that allows you to access the share. Further, if you elect to encrypt the backup on a network share or Time Capsule, you also need to specify a password and password hint for the encrypted backup. Note that the password used to access the shared storage doesn’t, and ideally shouldn’t, match the password you specify for the encrypted backup.
Again, all Time Machine authentication information is saved to the keychain system, so backups can occur unattended. Once again, though, it’s extremely important that you securely save any authentication information needed for Time Machine somewhere outside the system(s) you’re backing up.
If you configure a new backup disk, Time Machine waits two minutes, allowing you to make further configuration changes before it starts the backup. Again, you can always return to the Time Machine backup disk management dialog to add or remove backup disks.
If your portable Mac supports local backup snapshots, this feature is enabled automatically. More information about using local snapshots is covered later in this lesson.
Manage Time Machine Options
Clicking the Options button at the bottom of the Time Machine preferences reveals a dialog where you can adjust backup settings.
The most important configuration choice you can make with Time Machine is to exclude items from the backup. Obviously, excluding items reduces the amount of space needed for your backups. Note that the system automatically excludes any backup disk; this is to prevent multiple backup disks from backing up each other. It’s not uncommon to leave only the /Users folder as the single item to back up—after all, that’s where the important user items reside.
You can drag items into the list field, or you can click the Add (+) button at the bottom of the list to reveal a file browser, allowing you to select specific folders or volumes to exclude. Be sure to click Save to close this dialog, because backups will not be made until you have set the options here.
Note
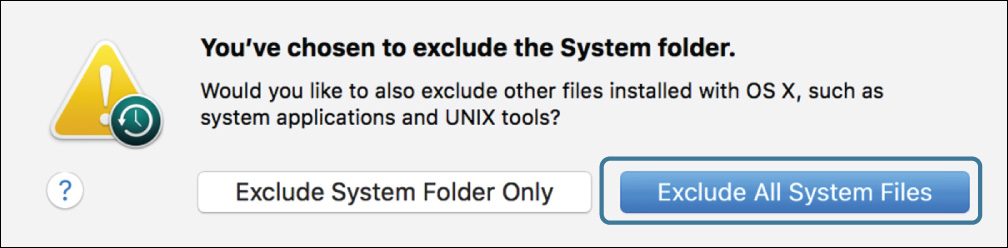
If you want to save space by excluding system items, add the /System folder to the exclude list; you will be prompted to exclude all system files or just the /System folder. When presented with this choice, it’s best to exclude all system files.
If you do not perform a full backup of your system volume, you won’t be able to perform a full restoration of it. Instead, you will have to install macOS first, and then you restore the remainder using Migration Assistant, as covered later in this lesson.
Reference 15.3 Restore from Time Machine
Ultimately, a backup solution is only as good as its ability to restore the user’s lost data. Time Machine delivers this ability in several different ways. First, you can easily restore individual items by entering the Time Machine interface. Second, you can restore user accounts and entire home folders with Migration Assistant. Third, you can restore an entire macOS system with macOS Recovery. Finally, advanced users can directly navigate through the Time Machine backup via the Finder and manually restore items.
Note
Legacy FileVault users cannot access their home folder backup via the standard Time Machine interface. They can, however, use any of the other methods to restore their home folder from a Time Machine backup.
Restore via Time Machine
The restore process for many backup solutions is geared for trained administrators, making user-initiated restoration a difficult proposition. macOS avoids this problem by providing an easy-to-use restore interface. The restore interface is considered by many to be Time Machine’s best feature, because of the dynamic interface Apple has created to “look through time.” This interface is available by opening the Time Machine application or using the Time Machine menu, which can be turned on via a check box at the bottom of the Time Machine preferences.
Tip
For quick access to Time Machine, you can also drag its icon to the Dock. From the Time Machine icon, you can secondary-click (or Control-click) to reveal a shortcut menu featuring additional Time Machine commands.
Few applications currently support the Time Machine restore interface, so in most cases you are presented with a historical view in the Finder. The Finder windows let you browse as usual, with one significant addition: you can use the navigation arrows to the right of the window, or the navigation timeline on the far right, to view Finder contents as they have changed over time.
Note
If you use an encrypted disk or network share for your backup disk and you are trying to restore from a different system, you will have to enter a password to access the backup data.
Note
It may take several moments for your complete Time Machine backup history to appear. You may notice the timeline to the far right “pulsing” between dim and bright coloring. This indicates the system is trying to connect to all available backup disks.
You may notice in the timeline to the right of the screen that the tick mark coloration varies between light and dark. Light coloring indicates the selected backup is unavailable until the backup disk is connected. If you don’t have the backup disk handy, you can still restore from local snapshots, as indicated by bright tick marks in the timeline. Obviously, if macOS is able to connect to all backup disks, all tick marks will display brightly, indicating that you can restore from any time.
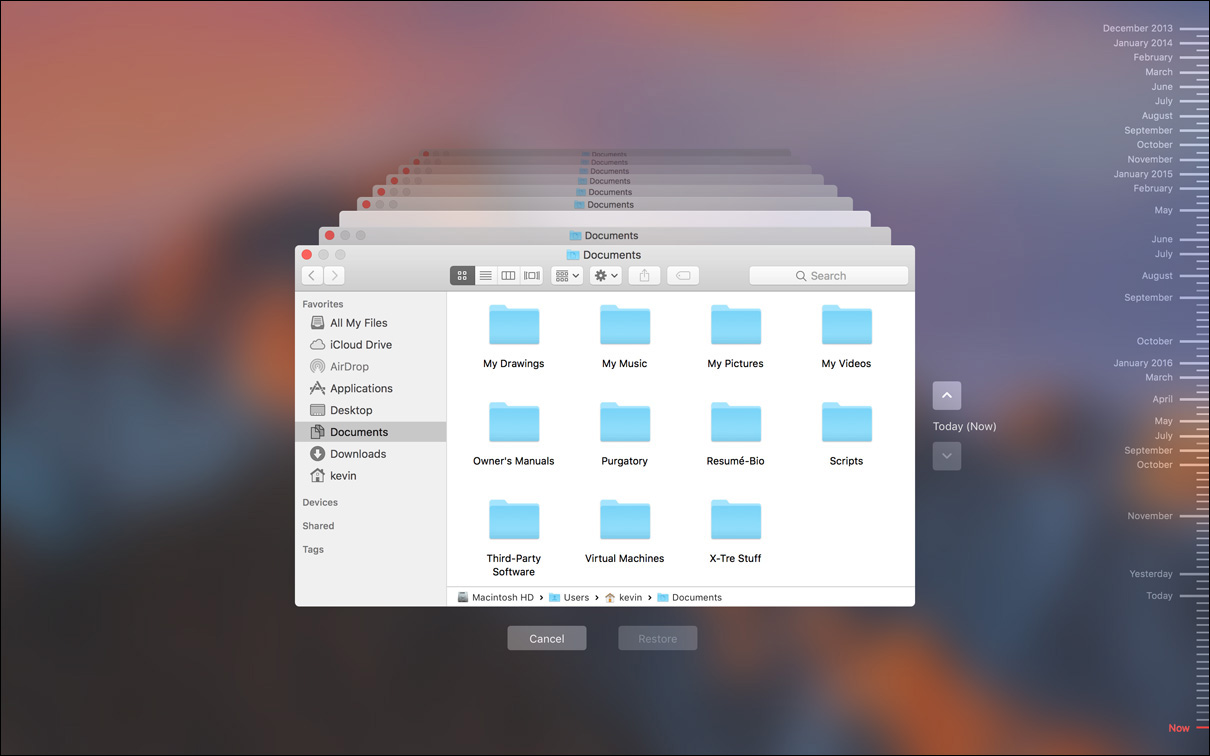
To aid in your search through time, the Spotlight search field remains active, and you can quickly preview any item by selecting it and then pressing the Space bar. Once you have found the item you are looking for, select it, and then click the Restore button. The Finder returns to “the present” with your recovered file intact where it once was.
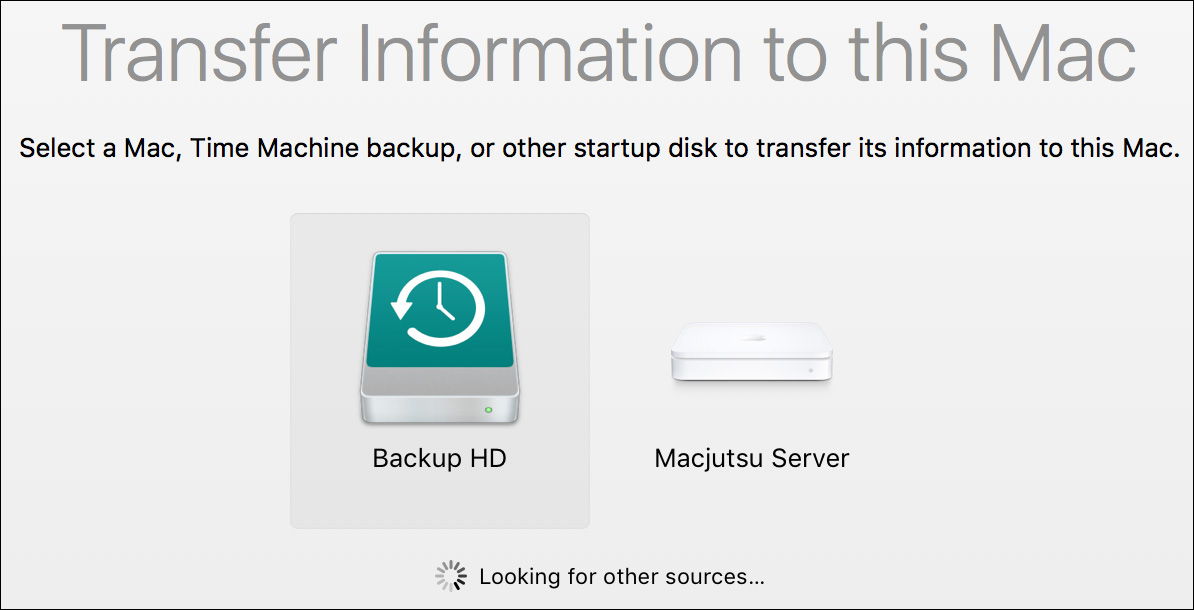
Restore via Migration Assistant
You can restore a complete user home folder or other nonsystem data from a Time Machine backup using Migration Assistant. You cannot, however, restore an entire system with Migration Assistant. Restoring an entire system is covered in the next section of this lesson.
When Migration Assistant opens, either during new system setup or when opened from /Applications/Utilities, choose to restore from a Time Machine backup. Once you have selected the backup disk and authenticated to access its content, the remainder of the Migration Assistant process is similar to the standard migration process covered in Lesson 2, “Set Up and Configure macOS,” for applications and settings, or in Lesson 6, “Manage User Home Folders,” for user-specific items.
Note
After completing the macOS Setup Assistant, only a user with administrator rights can initiate the Migration Assistant process. Starting the Migration Assistant process quits all running applications and logs out all user accounts.
Note
Legacy FileVault user accounts can be fully restored only by running Migration Assistant during the initial macOS system setup.
Restore an Entire System
You can restore an entire system volume when the Mac is started up from macOS Recovery. However, this technique assumes you did not exclude any items from your system volume; that is, you left the Time Machine defaults and backed up the entire system volume.
Also, restoring an entire system will erase the destination disk and replace all of its contents with that of the backup. This may be a problem if the backup disk has not been maintained and contains files older than the current system disk. In other words, if you have an older backup you should restore the entire system only as a last resort.
To restore an entire system, you will have to start up from macOS Recovery. You can start up the Mac using the normal macOS Recovery techniques, as covered in Lesson 3, “Use macOS Recovery,” or you can actually start up from the macOS Recovery system hidden on a local Time Machine backup disk. When a local Time Machine backup disk is configured, the system automatically copies a disk image of the hidden Recovery HD volume from the system disk to the backup disk. This hidden recovery system can be a lifesaver if the original system disk suffers a catastrophic failure.
To start from this system, first make sure the backup disk is connected locally to the Mac, and then start up the Mac while holding down the Option key. This allows you to select the Time Machine disk as the startup disk.
Note
If the Mac has a firmware password enabled, you must enter the password to start up from another system volume. You can find out more about firmware passwords in Lesson 8, “Manage Password Changes.”
Note
If the Time Machine backup disk is encrypted, you must enter the password to access its contents. This includes starting up from the backup disk’s macOS Recovery system.
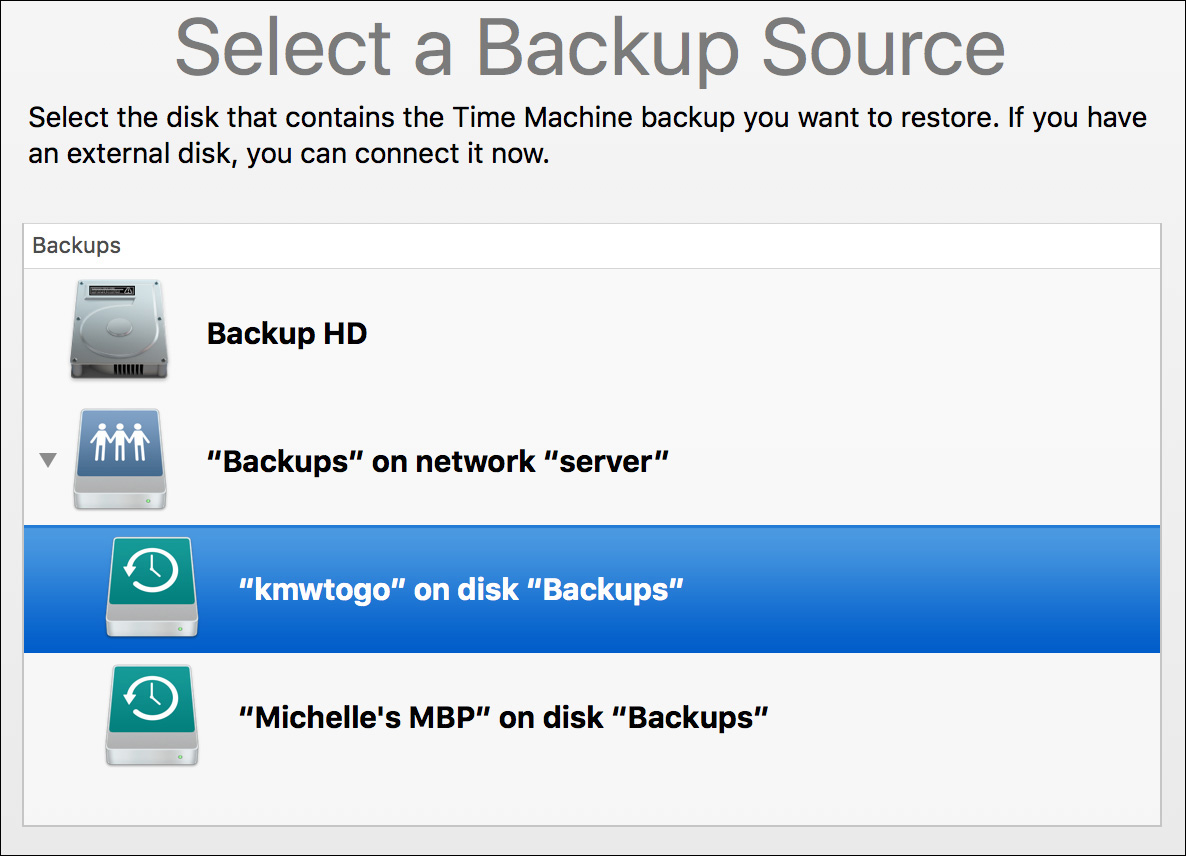
Once the system has started from macOS Recovery, select Restore From Time Machine Backup in the macOS Utilities window to open the Restore Your System assistant. The assistant first scans for local and network Time Machine backup volumes. Once you have selected the Time Machine volume, you can restore the entire system from any backup instance on that volume to your new system disk.
Manually Restore via the Finder
If you are experiencing problems using one of the other Time Machine restoration interfaces, you can always browse the backup from the Finder. The Time Machine backup technology uses file system features that are part of standard Mac OS Extended volumes, so no special software is needed to browse through backup contents.
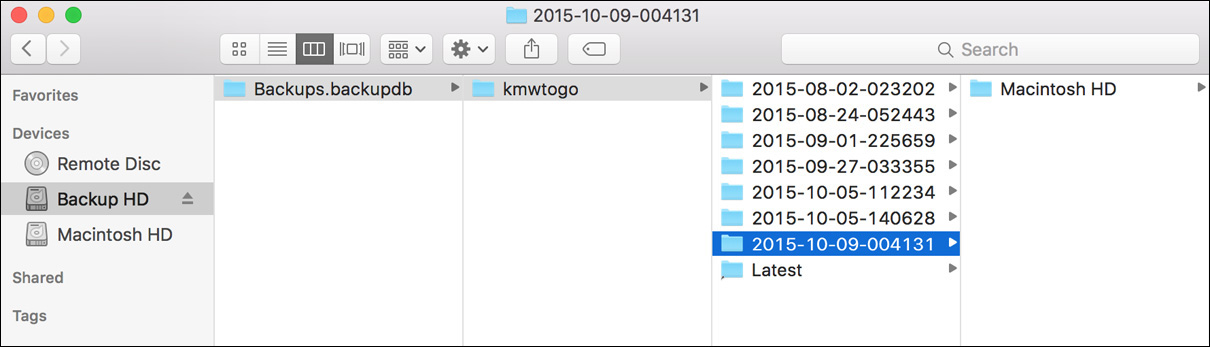
If you’re accessing a locally attached Time Machine backup disk, the backup files are located on the root of the backup disk in a folder named Backups.backupdb. Inside the backup database folder are folders with the name of each computer backed up to that disk. Inside each computer folder are folders named using the date and time of each backup. Finally, inside each dated folder are folders representing each backed-up volume.
There are several caveats when directly accessing Time Machine backups from the Finder:
![]() Do not directly modify the contents of a Time Machine backup, as doing so could damage the backup hierarchy. The default file system permissions do not give you write access to these items.
Do not directly modify the contents of a Time Machine backup, as doing so could damage the backup hierarchy. The default file system permissions do not give you write access to these items.
![]() Legacy FileVault home folders remain inside an encrypted disk image in the Time Machine backup. Thus, you need users’ passwords to access their secure home folder contents.
Legacy FileVault home folders remain inside an encrypted disk image in the Time Machine backup. Thus, you need users’ passwords to access their secure home folder contents.
![]() If your Time Machine configuration supports local snapshots, those snapshots are cached locally to a hidden /.MobileBackups folder. Although you can navigate here and look around, the items in this location aren’t permanent, because they are eventually copied to a backup disk and then erased on the local disk to save space.
If your Time Machine configuration supports local snapshots, those snapshots are cached locally to a hidden /.MobileBackups folder. Although you can navigate here and look around, the items in this location aren’t permanent, because they are eventually copied to a backup disk and then erased on the local disk to save space.
![]() If you do not have file system permissions to the backup folders, you will have to change the ownership or permissions to open the folders in the Finder. You can find out more about changing permissions in Lesson 11, “Manage Permissions and Sharing.”
If you do not have file system permissions to the backup folders, you will have to change the ownership or permissions to open the folders in the Finder. You can find out more about changing permissions in Lesson 11, “Manage Permissions and Sharing.”
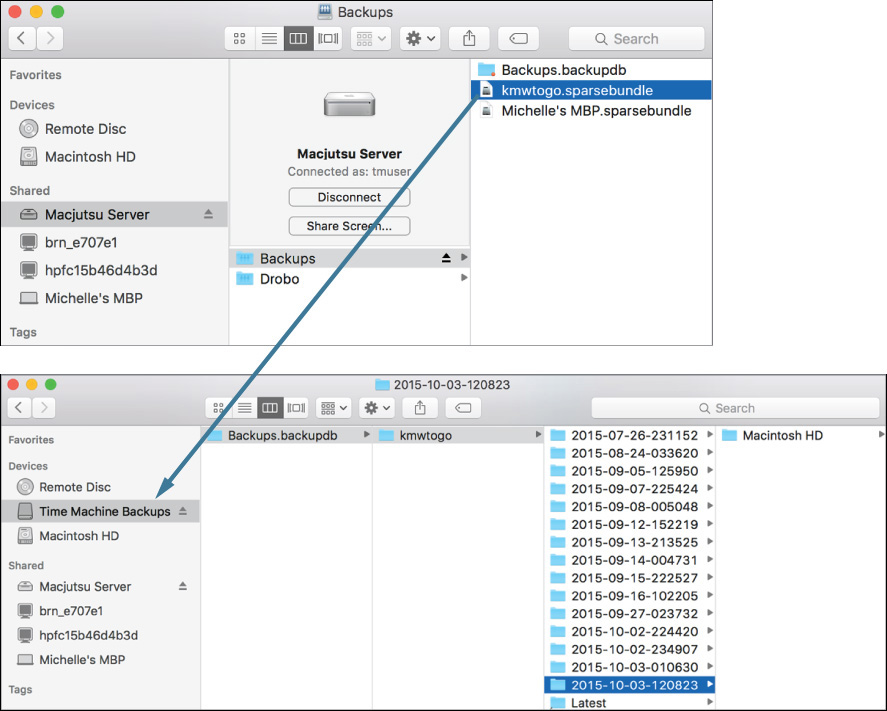
If you’re accessing Time Machine over a network, you need to manually connect to the Time Machine share first. (Connecting to shares is covered in Lesson 22, “Manage Network Services.”) Once connected, you need to locate the Time Machine backup disk images. They are at the root of the Time Machine share, most commonly named Backups. Each Mac computer’s backup is saved as a separate sparse disk image file named with the computer’s sharing name.
Double-click to mount the Time Machine backup disk image volume, which is named “Backup of” followed by the computer’s name. Remember that if the backup is encrypted, you will have to authenticate again to mount the backup disk image. Inside this volume is the same Backups.backupdb folder and contents you would find on a directly connected Time Machine backup.
Exercise 15.1 Configure Time Machine
![]() Prerequisites
Prerequisites
![]() You must have created the Local Admin (Exercise 2.1, “Configure a New macOS System for Exercises,” or Exercise 2.2, “Configure an Existing macOS System for Exercises”) and Chris Johnson (Exercise 5.1, “Create a Standard User Account”) accounts.
You must have created the Local Admin (Exercise 2.1, “Configure a New macOS System for Exercises,” or Exercise 2.2, “Configure an Existing macOS System for Exercises”) and Chris Johnson (Exercise 5.1, “Create a Standard User Account”) accounts.
![]() You must have partitioned your internal disk to create a Backup partition (Exercise 9.1, “Repartition a Disk Dynamically”), have an external disk in Mac OS Extended format, or have a Time Capsule appliance to use for back-ups.
You must have partitioned your internal disk to create a Backup partition (Exercise 9.1, “Repartition a Disk Dynamically”), have an external disk in Mac OS Extended format, or have a Time Capsule appliance to use for back-ups.
In this exercise, you will configure Time Machine to back up your user home folders to your internal disk’s Backup partition, an external disk drive, or a Time Capsule appliance.
Backing up to a second partition on your computer’s internal disk is not a recommended backup strategy because it provides no protection against disk failure or loss of the computer. It is presented in this exercise for demonstration purposes only. If you are performing these exercises on a computer you use for tasks other than exercises, configure it to back up to an external disk, Time Capsule, or macOS Server with the Time Machine service turned on instead.
Configure Exclusions for Time Machine
By default, Time Machine backs up the entire startup volume (excluding some types of files), but for this exercise you will configure it to back up only user files. In most situations, this is sufficient since the system and applications can always be reinstalled; if you want to be able to do a full system restore, do not exclude anything from the backup.
1 If necessary, log in as Chris Johnson.
2 Open System Preferences, and select the Time Machine pane.
3 If necessary, click the lock icon, and authenticate as Local Admin.
4 Select the “Show Time Machine in menu bar” checkbox if it is not already selected.
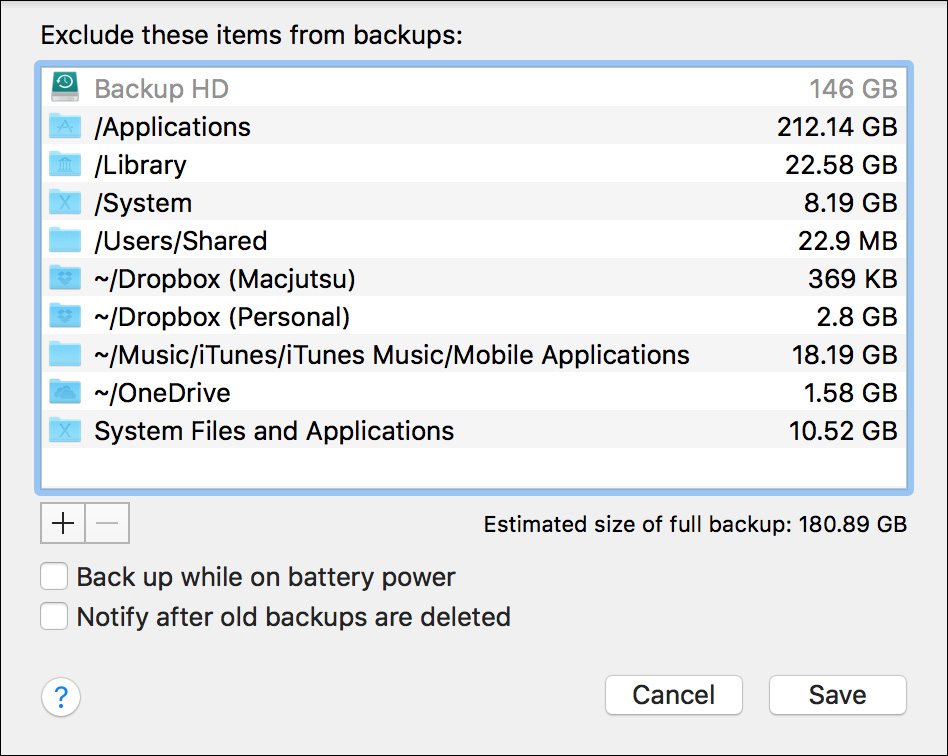
5 Click the Options button to reveal a dialog allowing you to exclude folders from backups.
There may already be an entry for /Users/Shared/adi in the exclude list; this is used internally by iBooks, and you can ignore it.
6 Click the Add (+) button at the bottom of the list.
7 Navigate to your startup volume (generally Macintosh HD), and select the Applications, Library, and System folders.
Note that you can Command-click folders to add them to the selection.
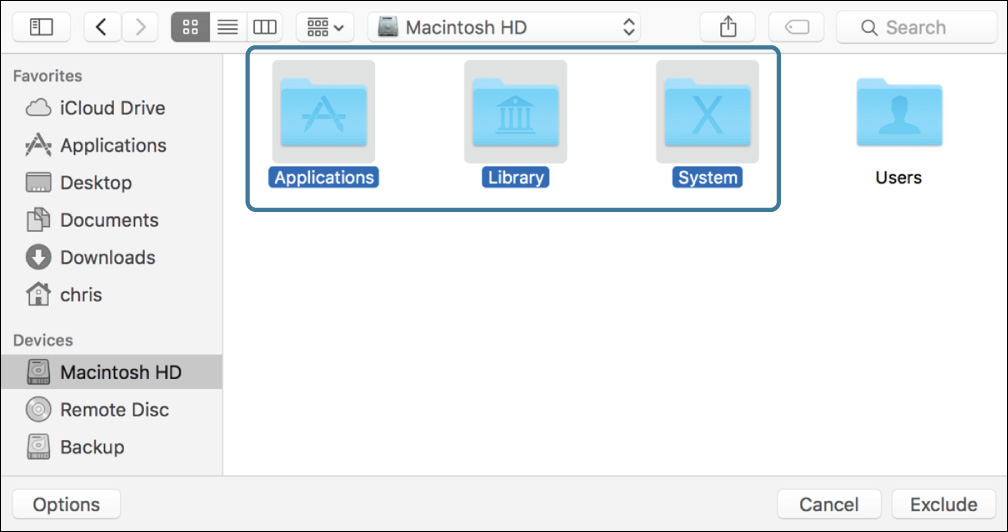
8 Click Exclude.
9 When you see the message “You’ve chosen to exclude the System folder,” click Exclude All System Files.
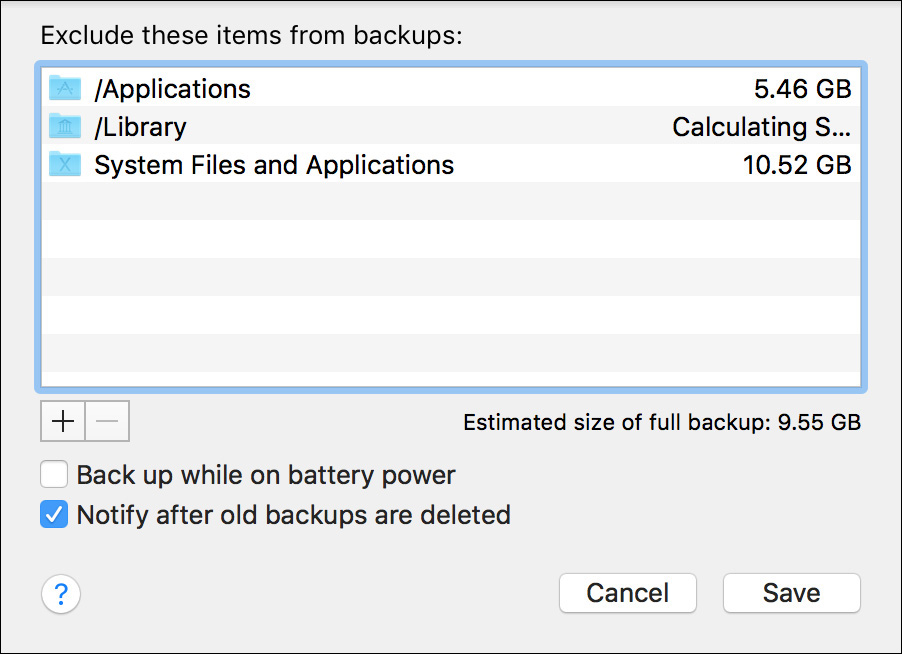
Your exclusion list now looks like the following figure (although the sizes may be different, /Users/Shared/adi may be listed, and the option to back up while on battery power appears only on laptop computers).
10 Click Save.
Select a Backup Volume
1 If you want to back up this computer to an external disk, connect the disk to the computer now.
2 If a dialog appears asking if you want to use the disk to back up with Time Machine, click Decide Later so that you can configure the backup manually.
3 Select the Back Up Automatically checkbox.
A dialog appears with a choice of backup targets.
4 Select the volume or Time Capsule you want to back up to. If you do not have an external disk or Time Capsule, use the Backup volume for demonstration purposes.
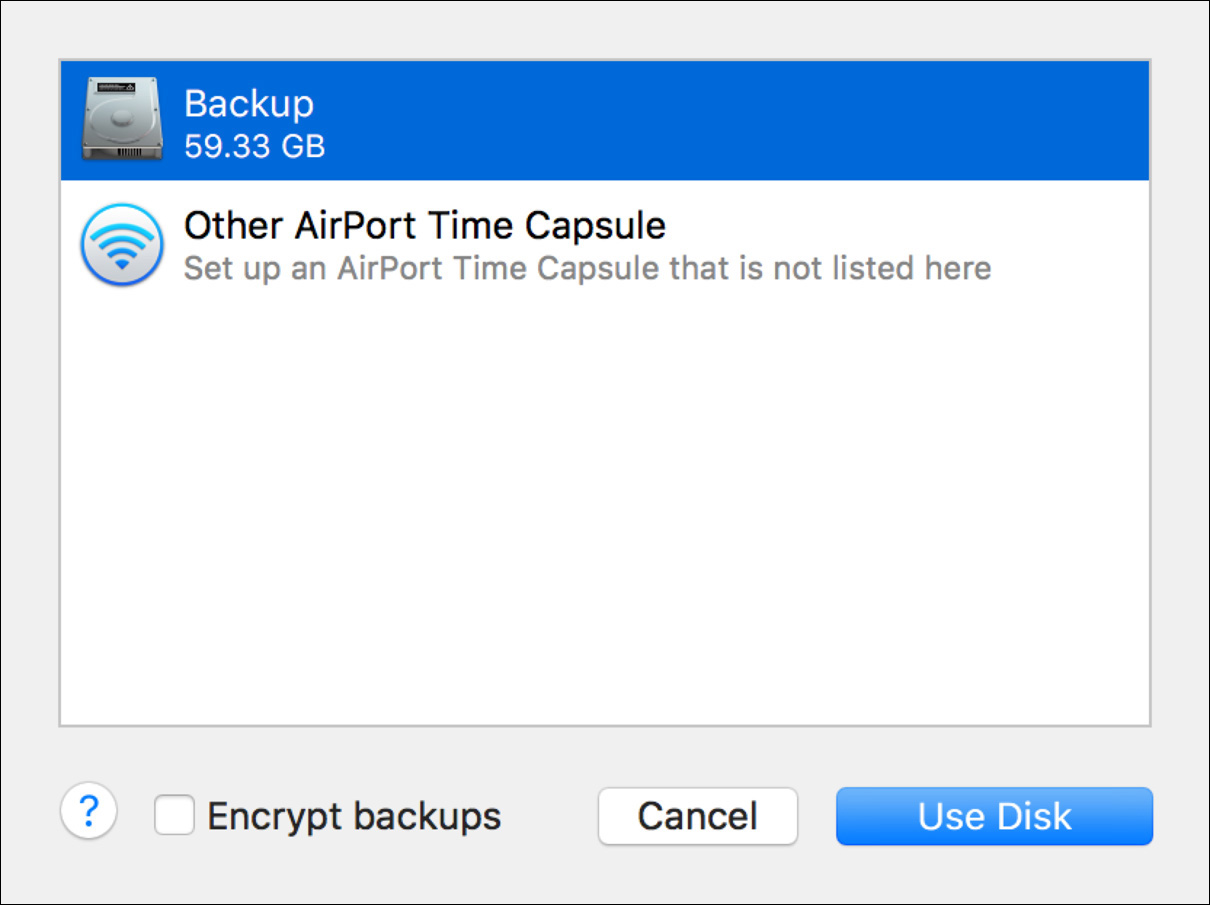
Storing the backup on the same disk as your original data does not protect you in the event of a hard disk failure. It will, however, be sufficient for the purposes of these exercises.
Note the checkbox that allows you to encrypt the backups. This encrypts the backup volume the same way as encrypting it in the Finder.
If you are performing these exercises in a class, do not encrypt the volume since doing so delays the initial backup. If you are performing them on your own, you can encrypt the backup volume if you want; however, you have to wait for the conversion to encrypted format before you can start Exercise 15.2, “Restore Using Time Machine.”
5 Click Use Disk.
6 If a dialog appears asking if you are sure you want to back up to the same device your original data is on, click Use Selected Volume.
Time Machine will start backing up in two minutes. You do not have to wait for it before proceeding.
7 Quit System Preferences.
You should now perform Exercise 15.2, “Restore Using Time Machine,” to test the backup.
In this exercise, you will learn how to use the Time Machine interface to recover lost files from the backup.
Wait for the Backup to Finish
Before testing the backup, make sure it has finished backing up and is up to date.
1 If necessary, log in as Chris Johnson.
2 Click the Time Machine menu bar item. If the menu indicates that it is still backing up, wait for it to finish.
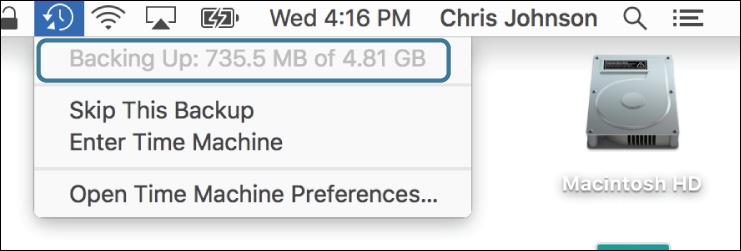
3 If you are notified that the backup is not encrypted, click Close.
4 If you are notified that the backup is complete, click Close.
Delete Some Files
Here you will delete several files and folders from the student materials.
1 In the Finder, open /Users/Shared/StudentMaterials/Lesson15.
2 Move the “Archived announcements” folder to the Trash.
This folder contains the Pretendco company’s old media information.
3 If you are prompted to, authenticate as Local Admin.
4 Choose Finder menu > Empty Trash. In the confirmation dialog, click Empty Trash.
Restore a File Using Time Machine
Time Machine allows you to search through your backup to find deleted files, even if you don’t remember exactly where they were. You will test this capability by searching for an announcement about Pretendco’s plans for solid-state encabulation device (SSED) development.
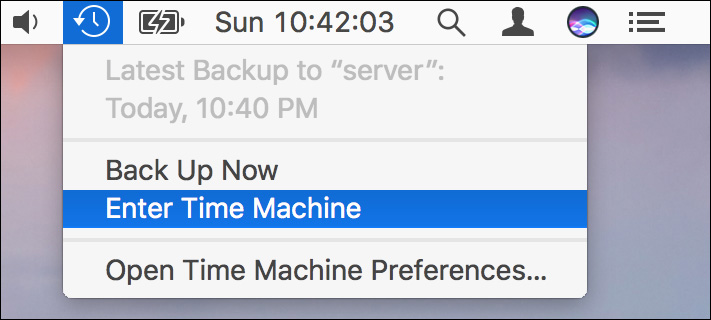
1 From the Time Machine menu, choose Enter Time Machine.
Time Machine opens and shows snapshots of your files fading into the past.
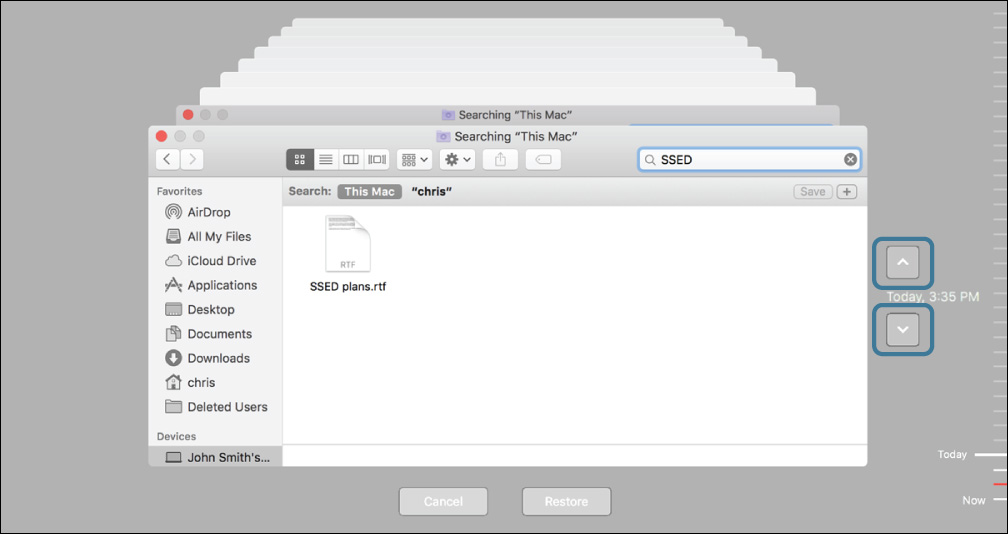
2 Enter SSED in the search field at the upper right of the window.
No matching files are found, since the only match was in the folder you deleted, and you are viewing files as they exist now.
3 Use the up and down arrows to navigate through time until the file SSED plans.rtf appears.
You can also navigate through time using the timeline along the right side of the screen.
4 Select SSED plans.rtf, and press Command-Y.
A Quick Look preview opens. Quick Look is available in Time Machine so you can verify that you have the right file before restoring it.

5 Press Command-Y again to close Quick Look.
6 With the file still selected, click Restore.
Since the folder the file was in has also been deleted, Time Machine gives you the option of re-creating the original enclosing folder or choosing a new location for the restore.
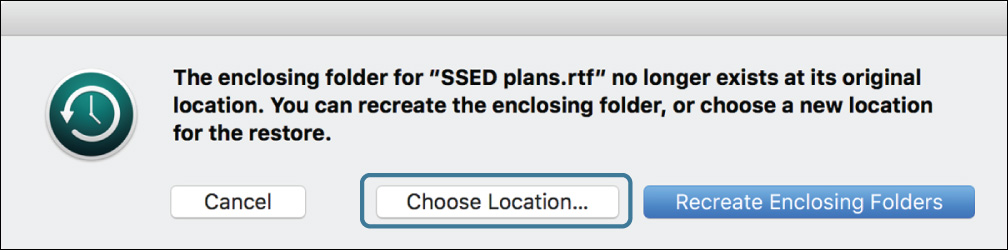
7 Click Choose Location.
8 If necessary, navigate to your Documents folder by selecting it in the sidebar, and then click Choose.
9 If you are prompted, authenticate as Local Admin.
10 In the Finder, navigate to your Documents folder (choose Go menu > Documents, or press Command-Shift-O).
The restored SSED plans.rtf file is visible here.
Restore Directly from Time Machine
When backing up to a local volume, Time Machine stores its backups in the file system. This means you can restore files by directly inspecting the backup and copying files out of it. If you are backing up to a Time Capsule, directly accessing backups is more complex; in that case, you should skip this section of the exercise.
1 In the Finder, open the volume you have chosen to back up to.
2 Open the Backups.backupdb folder. In this folder is a folder for your client. Open it.
This folder contains one or more snapshot folders, named with the date and time they were taken. There is also an alias named Latest that always points to the latest backup.
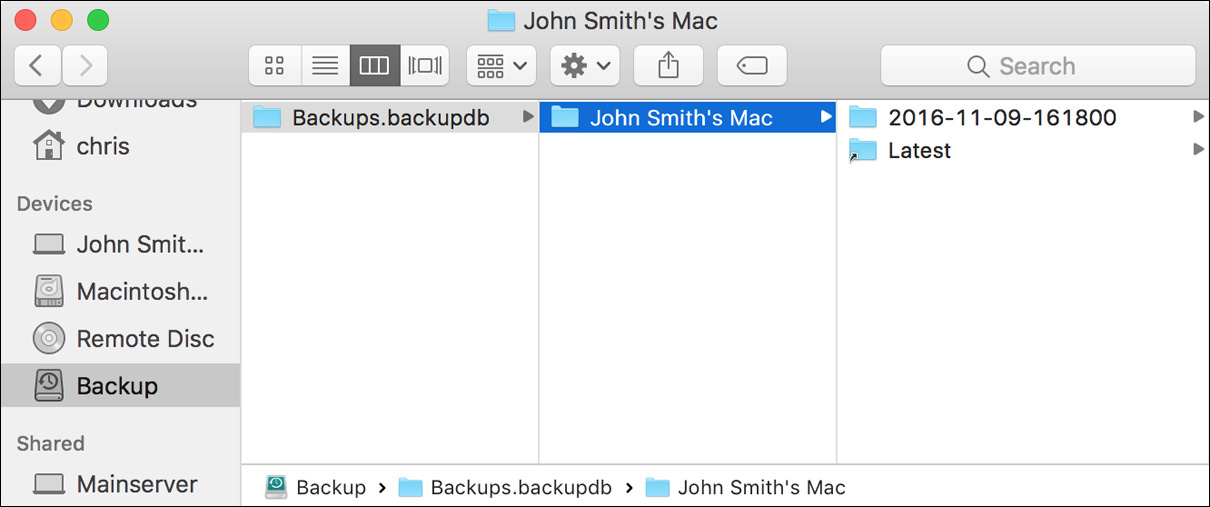
3 Browse through these folders: Latest/Macintosh HD/Users/Shared/StudentMaterials /Lesson15/Archived announcements/2010/04-April.
4 Drag a copy of SSED plans.rtf to your desktop.