Lesson 9. Manage File Systems and Storage
Goals
![]() Recognize the various file systems supported by macOS
Recognize the various file systems supported by macOS
![]() Manage disks, partitions, and volumes
Manage disks, partitions, and volumes
![]() Troubleshoot and repair partition and volume issues
Troubleshoot and repair partition and volume issues
Although personal computer processor speed has increased around a thousandfold since the first Mac was introduced in 1984, storage capacity has easily increased a million times over. Compare 1984’s 400 KB floppy to today’s average desktop disk at 1 TB, which is roughly equivalent to 1,000,000,000 KB, or 2.5 million 400 KB floppies. Users have responded by moving thousands of pictures and hundreds of hours of music and video, historically stored in analog form, to digital storage. Even though the Internet has recently changed our perception of what a computer is used for, it’s clear that the computer’s primary role continues to be as a tool to organize, access, and store our stuff.
In this lesson, you examine the storage technology used by macOS. Storage hardware, such as flash disks, is covered alongside logical storage concepts like partitions and volumes. Naturally, you will learn how to properly manage and troubleshoot these storage assets as well. Lastly, this lesson will show you how to verify and potentially repair file system elements.
Reference 9.1 About File Systems
Before you begin managing storage in macOS, it is important to understand the distinction between storage, partitions, and volumes. Traditionally, computer storage has been defined by spinning disk hardware. However, alternative formats have become extremely popular as they have increased in capacity and performance. These formats primarily include internal solid-state disks or flash storage, and removable storage like USB flash disks (also called key or thumb disks) and compact flash cards. All are equally viable storage destinations for macOS.
Tip
Mac computers can start up from USB, FireWire, and Thunderbolt external disks.
Storage Concepts
Without proper formatting, though, any storage technology is nothing more than a big empty bucket of ones and zeros, and consequently not very useful to the Mac. Formatting is the process of applying logic to storage in the form of partitions and volumes. Partitions are used to define boundaries on a storage device. You can define multiple partitions if you want the physical storage to appear as multiple separate storage destinations. Even if you want to use the entire space available on a device as a single contiguous storage location, the area must still be defined by a partition.
Once partitions have been established, the system can create usable volumes inside the partition areas. Volumes define how the files and folders are actually stored on the hardware. In fact, it’s the volume that you see represented as a usable storage icon in the Finder. Obviously, a storage device with several partitions, each containing a separate volume, appears as several storage location icons in the Finder.

macOS Sierra includes support for an entirely new file system known as Apple File System (APFS). Although you can use Terminal commands to create APFS volumes, at this point they are considered experimental and should only be used for testing. However, Apple has announced that future versions of macOS will default to this new file system. You can find out more about APFS at the Apple Developer site, https://developer.apple.com/library/content/documentation/FileManagement/Conceptual/APFS_Guide/Introduction/Introduction.html.
About Partition Schemes
As mentioned earlier, disks must be partitioned to define and possibly segregate the disk’s usable space. Every disk requires at least one partition, but macOS can support up to 16 partitions per disk. You learned the advantages and disadvantages of using single and multiple partitions in Lesson 1, “Install macOS Sierra.”
As of this writing, macOS supports three types of partition schemes. This may seem excessive, but it’s necessary that Mac computers support multiple partition schemes in order to start up computers using modern Intel processors, support older Mac disks, and use standard PC-compatible volumes.
The three partition schemes supported by macOS are:
![]() GUID Partition Map (GPT)—This is the default partition scheme used by Intel-based Mac computers. It is also the only partition scheme supported for Intel-based Mac computers to start up using disk-based storage. PowerPC-based Mac computers running Mac OS X Tiger 10.4 or later can also access this type of partitioning, but they cannot start up from it. Windows Vista or later and Windows Server 2003 SP1 or later also support disks using GPT.
GUID Partition Map (GPT)—This is the default partition scheme used by Intel-based Mac computers. It is also the only partition scheme supported for Intel-based Mac computers to start up using disk-based storage. PowerPC-based Mac computers running Mac OS X Tiger 10.4 or later can also access this type of partitioning, but they cannot start up from it. Windows Vista or later and Windows Server 2003 SP1 or later also support disks using GPT.
![]() Apple Partition Map (APM)—This is the default partition scheme used by previous PowerPC-based Mac computers. It is also the only partition scheme that PowerPC-based Mac computers can start up from. However, all Intel-based Mac computers can also access this type of partitioning. No version of Windows includes built-in support for disks using APM.
Apple Partition Map (APM)—This is the default partition scheme used by previous PowerPC-based Mac computers. It is also the only partition scheme that PowerPC-based Mac computers can start up from. However, all Intel-based Mac computers can also access this type of partitioning. No version of Windows includes built-in support for disks using APM.
![]() Master Boot Record (MBR)—This is the default partition scheme used by most non-Mac computers, including Windows-compatible PCs. Consequently, this is the default partition scheme you find on most new preformatted storage disks. This partition scheme is also commonly used by peripherals that store to flash memory, such as digital cameras or smartphones. Even though no Mac can start up from this type of partitioning, all Mac computers can fully use MBR partitioned disks.
Master Boot Record (MBR)—This is the default partition scheme used by most non-Mac computers, including Windows-compatible PCs. Consequently, this is the default partition scheme you find on most new preformatted storage disks. This partition scheme is also commonly used by peripherals that store to flash memory, such as digital cameras or smartphones. Even though no Mac can start up from this type of partitioning, all Mac computers can fully use MBR partitioned disks.
Obviously, if you have any additional disks formatted with APM or MBR, you have to repartition those disks for them to act as a startup disk for an Intel-based Mac. But if you don’t plan on ever using any of these additional disks as a system disk, there is no advantage to repartitioning. Also, you should keep MBR disks unmodified if you want them to be backward compatible with generic PCs or peripherals.
About Volume Formats
The volume format defines how the files and folders are saved to the disk. To maintain compatibility with other operating systems and provide advanced features for later Mac computers, macOS supports a variety of storage volume formats.
Volume formats supported as read/write in macOS are:
![]() Mac OS Standard—This is the legacy volume format used by the classic Mac OS. This format, though a precursor to Mac OS Extended, is not supported as a startup volume for macOS.
Mac OS Standard—This is the legacy volume format used by the classic Mac OS. This format, though a precursor to Mac OS Extended, is not supported as a startup volume for macOS.
![]() Mac OS Extended—This volume format, previously known as OS X Extended, is the legacy format designed and supported by Apple for Mac computers. This format is itself an update from the earlier Mac OS Standard format. Mac OS Extended supports all the advanced features required by macOS, including Unicode filenames, rich metadata, POSIX (Portable Operating System Interface) permissions, access control lists, UNIX-style links, and aliases.
Mac OS Extended—This volume format, previously known as OS X Extended, is the legacy format designed and supported by Apple for Mac computers. This format is itself an update from the earlier Mac OS Standard format. Mac OS Extended supports all the advanced features required by macOS, including Unicode filenames, rich metadata, POSIX (Portable Operating System Interface) permissions, access control lists, UNIX-style links, and aliases.
![]() Mac OS Extended (Case-Sensitive)—This Mac OS Extended format adds case sensitivity to the file system. Normally, Mac OS Extended is case-preserving but case-insensitive, which means that a normally formatted Mac volume remembers what case you chose for the characters of a file’s name but cannot differentiate between similar filenames where the only difference is the case. In other words, it would not recognize “MYfile” and “myfile” as different filenames. By adding support for case sensitivity, Apple resolved this issue. However, case sensitivity is generally an issue only for volumes that need to support traditional UNIX clients, like those shared from Mac computers running macOS Server. Further, many third-party applications exhibit significant issues when running from a case-sensitive file system. Thus, the case-sensitive option is not supported as a default for macOS client systems.
Mac OS Extended (Case-Sensitive)—This Mac OS Extended format adds case sensitivity to the file system. Normally, Mac OS Extended is case-preserving but case-insensitive, which means that a normally formatted Mac volume remembers what case you chose for the characters of a file’s name but cannot differentiate between similar filenames where the only difference is the case. In other words, it would not recognize “MYfile” and “myfile” as different filenames. By adding support for case sensitivity, Apple resolved this issue. However, case sensitivity is generally an issue only for volumes that need to support traditional UNIX clients, like those shared from Mac computers running macOS Server. Further, many third-party applications exhibit significant issues when running from a case-sensitive file system. Thus, the case-sensitive option is not supported as a default for macOS client systems.
![]() Mac OS Extended (Journaled) or Mac OS Extended (Case-Sensitive, Journaled)—This feature is an option for the Mac OS Extended format that adds advanced file-system journaling to help preserve volume structure integrity. The journal records what file operations (creation, expansion, deletion, and so on) are in progress at any given moment. If the system crashes or loses power, the journal can be “replayed” to make sure operations that were previously in process are completed rather than left in a half-completed, inconsistent state. This helps avoid the possibility of file corruption and greatly reduces the amount of time it takes to complete the check-and-repair process on the volume after a crash. Because of these enhancements, the required format for a macOS system volume is Mac OS Extended (Journaled).
Mac OS Extended (Journaled) or Mac OS Extended (Case-Sensitive, Journaled)—This feature is an option for the Mac OS Extended format that adds advanced file-system journaling to help preserve volume structure integrity. The journal records what file operations (creation, expansion, deletion, and so on) are in progress at any given moment. If the system crashes or loses power, the journal can be “replayed” to make sure operations that were previously in process are completed rather than left in a half-completed, inconsistent state. This helps avoid the possibility of file corruption and greatly reduces the amount of time it takes to complete the check-and-repair process on the volume after a crash. Because of these enhancements, the required format for a macOS system volume is Mac OS Extended (Journaled).
Note
While journaling protects the file structure, it cannot protect the contents of files themselves against corruption. If a large file was half-written when the system crashed, the journal makes sure that the half-file is consistently entered in the volume’s file-tracking databases, but it’s still only half a file.
![]() Mac OS Extended (Journaled, Encrypted) or Mac OS Extended (Case-Sensitive, Journaled, Encrypted)—This feature is an option to the Mac OS Extended format that adds full disk, XTS-AES 128 encryption. This is the technology behind FileVault system volume encryption. Lesson 10, “Manage FileVault,” covers this topic in greater detail.
Mac OS Extended (Journaled, Encrypted) or Mac OS Extended (Case-Sensitive, Journaled, Encrypted)—This feature is an option to the Mac OS Extended format that adds full disk, XTS-AES 128 encryption. This is the technology behind FileVault system volume encryption. Lesson 10, “Manage FileVault,” covers this topic in greater detail.
Note
Encrypted Mac OS Extended volumes are not compatible with Mac systems prior to OS X Lion 10.7.
Note
No version of Windows includes built-in support for any form of Mac OS volume formats. Thus, if you require a disk that’s compatible across both of these common platforms, you should choose a volume format supported by Windows.
![]() File Allocation Table (FAT)—FAT is the legacy volume format used by Windows PCs and by many peripherals. This format has evolved over the years, with each progressive version supporting larger volumes: FAT12, FAT16, and FAT32. Apple Boot Camp supports running Windows XP from a FAT32 volume, but macOS itself cannot start up from such a volume.
File Allocation Table (FAT)—FAT is the legacy volume format used by Windows PCs and by many peripherals. This format has evolved over the years, with each progressive version supporting larger volumes: FAT12, FAT16, and FAT32. Apple Boot Camp supports running Windows XP from a FAT32 volume, but macOS itself cannot start up from such a volume.
![]() Extended File Allocation Table (ExFAT)—Created specifically for large flash storage disks, ExFAT basically extends the legacy FAT architecture to support disks larger than 32 GB. Many flash-based digital camcorders use ExFAT to support the large storage volumes required for high-definition video.
Extended File Allocation Table (ExFAT)—Created specifically for large flash storage disks, ExFAT basically extends the legacy FAT architecture to support disks larger than 32 GB. Many flash-based digital camcorders use ExFAT to support the large storage volumes required for high-definition video.
![]() UNIX File System (UFS)—UFS is the legacy native volume format supported by UNIX systems. UFS served as the default UNIX file system for decades. UFS volumes are not supported as startup volumes for macOS. Further, Disk Utility does not support the creation of UFS volumes.
UNIX File System (UFS)—UFS is the legacy native volume format supported by UNIX systems. UFS served as the default UNIX file system for decades. UFS volumes are not supported as startup volumes for macOS. Further, Disk Utility does not support the creation of UFS volumes.
Volume formats supported as read-only in macOS are:
![]() New Technology File System (NTFS)—Windows 7, Windows Vista, Windows XP, and Windows Server all use this as their default native volume format. Once again, Boot Camp supports running Windows from an NTFS volume, but macOS itself cannot write to or start up from such a volume. Further, Disk Utility does not support the creation of NTFS volumes.
New Technology File System (NTFS)—Windows 7, Windows Vista, Windows XP, and Windows Server all use this as their default native volume format. Once again, Boot Camp supports running Windows from an NTFS volume, but macOS itself cannot write to or start up from such a volume. Further, Disk Utility does not support the creation of NTFS volumes.
Tip
You can add NTFS volume write support to macOS by installing the free, open source NTFS-3G + Ntfsprogs software, available at www.tuxera.com/community/open-source-ntfs-3g/.
![]() ISO 9660 or Compact Disc File System (CDFS)—This is a common standard for read-only CD media. Note, however, that “Mac formatted” CD media can also contain Mac OS Standard formatted volumes.
ISO 9660 or Compact Disc File System (CDFS)—This is a common standard for read-only CD media. Note, however, that “Mac formatted” CD media can also contain Mac OS Standard formatted volumes.
![]() Universal Disk Format (UDF)—This is a common standard for read-only DVD media. Again, note that “Mac formatted” DVD media can also contain Mac OS Standard volumes.
Universal Disk Format (UDF)—This is a common standard for read-only DVD media. Again, note that “Mac formatted” DVD media can also contain Mac OS Standard volumes.
More Info
Wikipedia has a great comparison of the wide variety of file systems: http://en.wikipedia.org/wiki/Comparison_of_file_systems.
About Core Storage
Core Storage is an additional management layer between the traditional partition scheme and volume formats of a disk. Although this adds complexity to the file system, it also adds significant flexibility. For example, Core Storage allows macOS Sierra to encrypt (or decrypt) a volume without interrupting use of the volume, as used by FileVault system volume encryption. Core Storage also allows for more complex arrangements of multiple disks, as used by Fusion Drive. Further, Core Storage offers increased file system crash protection and more reliable methods for storing file system metadata and catalog data.
In previous Mac operating systems, Core Storage was enabled only if the system used either FileVault system volume encryption or Fusion Drive. With OS X El Capitan 10.11 and later, Core Storage is enabled by default for late-model Mac portable computers even if they aren’t using FileVault or a Fusion Drive. Specifically, during an upgrade to OS X El Capitan or later, the installer will automatically enable Core Storage on any Mac portable that supports accelerated disk encryption. Further, on these systems, the Setup Assistant will encourage the user to enable FileVault, as covered in Lesson 2, “Set Up and Configure macOS.”
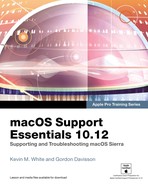
The following graphic represents a typical macOS Sierra system disk. As you can see, the disk uses GPT to define two partitions. The first partition, occupying the majority of the disk, contains the system volume. This partition is managed by Core Storage and is formatted as either a Mac OS Extended (Journaled) volume or a Mac OS Extended (Journaled, Encrypted) volume if FileVault system volume encryption is enabled.
The second partition, occupying the final ~650 MB of the disk, is an “Apple_Boot” formatted volume that contains the Recovery HD system. Aside from providing macOS Recovery functionality, this second partition is intentionally not managed by Core Storage, since it provides the software necessary for a Mac computer’s (relatively simple) firmware to understand Core Storage volumes. Thus, the initial startup of macOS is facilitated by the Recovery HD volume.
About Fusion Drive
Mac computers featuring Fusion Drive break from the traditional disk, partition, and volume paradigm. Courtesy of Core Storage, a Mac with Fusion Drive uses two separate physical disks to form one logical storage device. This provides a hybrid storage solution that has both the speed of flash storage and the size of traditional spinning disk media.
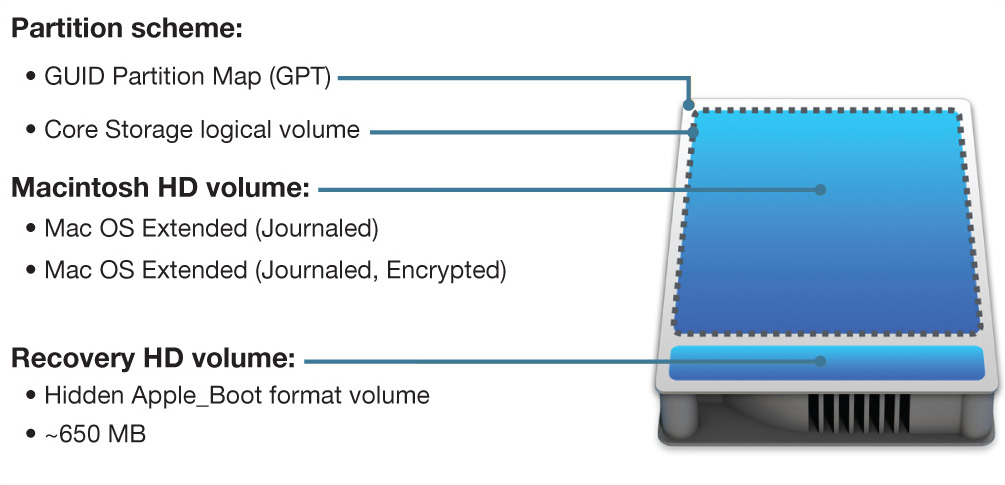
The following graphic represents a typical macOS Sierra system disk on a Mac with Fusion Drive. As you can see, each separate physical disk uses GPT to define two partitions. The first partitions of each disk, occupying the majority of each disk, are combined into a single system volume. These two partitions, again from two separate disks, are managed by Core Storage, which has the ability to merge the two separate physical volumes into a single logical volume. The resulting combined volume is formatted as either a Mac OS Extended (Journaled) volume or a Mac OS Extended (Journaled, Encrypted) volume if FileVault system volume encryption is enabled.
The second partition on each disk is intentionally not managed by Core Storage, as it provides the software necessary for the Mac computer’s (relatively simple) firmware to understand Core Storage volumes. In the case of Fusion Drive, the smaller flash storage disk contains a ~185 MB “Boot OS X” volume, and the larger spinning disk contains the ~650 MB Recovery HD system. As you can tell from the name, the Boot OS X volume is used to facilitate the initial macOS system startup.
More Info
Additional partitions on a Fusion Drive disk can be added only to the larger spinning disk. Thus, additional partitions are not able to take advantage of the flash storage performance increase normally seen with Fusion Drive. For more information, see Apple Support article HT202574, “Mac mini (Late 2012 and later), iMac (Late 2012 and later): About Fusion Drive.”
Reference 9.2 Mount, Unmount, and Eject Disks
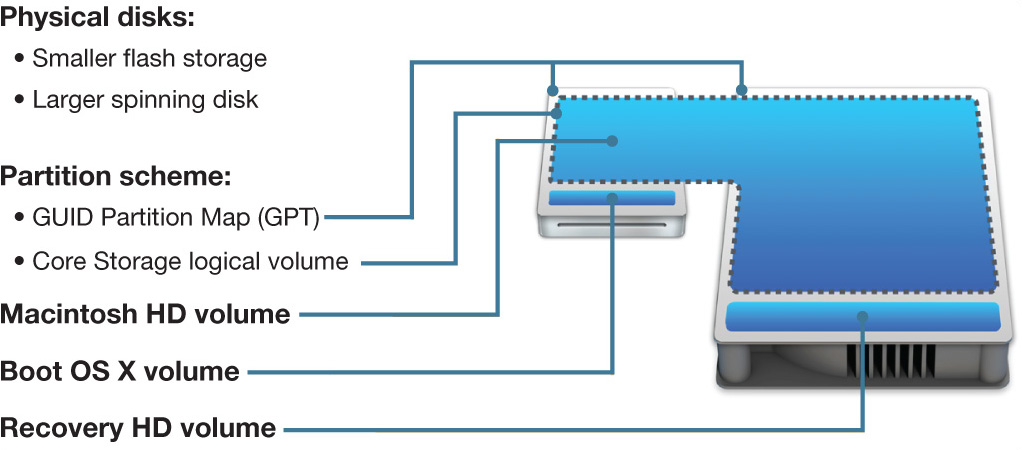
Mounting a volume is the process by which the system establishes a logical connection to a storage volume. This is not something users normally concern themselves with on the Mac, because the system automatically mounts any volume connected to the Mac. Simply plug a disk in, and the disk’s volumes automatically appear in the Finder and Disk Utility. The only exception to this rule is for Mac OS Extended (Journaled, Encrypted) volumes, which require that you enter a password to unlock the disk’s contents.
Ensuring that users properly unmount and eject volumes is critical to maintaining data integrity. Unmounting is the process of having the Mac cleanly disconnect from a disk’s volumes, whereas ejecting is the process of having the Mac additionally disconnect electronically from the actual hardware disk or media. When you choose to eject a disk from the Finder, the computer actually unmounts the volumes first and then ejects the disk.
Ejecting Disks
There are five ways to unmount and eject a disk from the Finder:
![]() In the Finder, drag the disk icon to the Trash icon in the Dock. You’ll note that the Trash icon changes to an Eject icon, indicating the appropriate action.
In the Finder, drag the disk icon to the Trash icon in the Dock. You’ll note that the Trash icon changes to an Eject icon, indicating the appropriate action.
![]() In the Finder sidebar, click the small Eject button next to the volume you want to unmount and eject.
In the Finder sidebar, click the small Eject button next to the volume you want to unmount and eject.
![]() In the Finder, select the volume you want to unmount and eject, and then choose File > Eject.
In the Finder, select the volume you want to unmount and eject, and then choose File > Eject.
![]() In the Finder, select the volume you want to unmount and eject, and then use the Command-E keyboard shortcut.
In the Finder, select the volume you want to unmount and eject, and then use the Command-E keyboard shortcut.
![]() In the Finder, select the volume you want to unmount and eject, and then secondary-click (or Control-click) to reveal a pop-up menu allowing you to select Eject.
In the Finder, select the volume you want to unmount and eject, and then secondary-click (or Control-click) to reveal a pop-up menu allowing you to select Eject.
Note
Pressing and holding the Eject key (the farthest top-right key on some Mac keyboards) for a few moments unmounts and ejects only optical media, like CDs or DVDs. If you have more than one optical disc drive, press Option-Eject to eject the second optical disc.
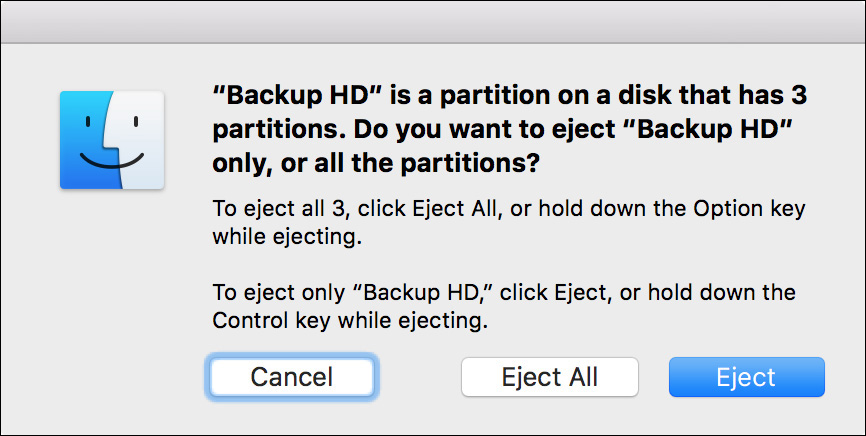
When you use the Finder to unmount and eject a single volume that is part of a disk with several mounted volumes, you see a warning dialog giving you the choice to unmount and eject all the volumes on the disk or just the one you originally selected. You shouldn’t experience any problems with a disk if some volumes are mounted and others remain unmounted. Just remember to properly unmount the remaining volumes before you physically disconnect the disk.
Tip
In the Finder, you can eject all the volumes of a disk without additional confirmation by holding down the Option key while you click the Eject button.
Disk Utility Mount Management
If you’re using the Finder, remounting volumes on a connected disk is a bit of a hassle. You must first unmount and eject any remaining volumes and then physically disconnect and reconnect the disk. Alternatively, open /Applications/Utilities/Disk Utility to manually mount and unmount volumes without physically disconnecting and reconnecting the disk.
In the following screenshot of Disk Utility, a variety of volumes are shown. Notice that the volume names from the second disk appear in dimmed text; those volumes are physically connected to the Mac but are not mounted.
To mount an unmounted volume on a connected disk, select the volume’s dimmed name and then click the Mount button in the toolbar. The volume immediately mounts and appears in the Finder and as normal text in Disk Utility.
As covered previously, if you try to mount a Mac OS Extended (Journaled, Encrypted) volume, unless the password was previously saved to an open keychain, a dialog will appear where you can enter a password to unlock the disk’s contents. Once authenticated, the volume immediately mounts.
Tip
If you often use an encrypted disk, you can save time by saving the disk’s password to your keychain. Using Keychain is covered in Lesson 7, “Manage Security and Privacy.”
If you have selected a volume to unmount, simply click the Unmount button in the toolbar. If you have selected an entire disk, to unmount all its volumes and eject it, click the Eject button in the toolbar. All the disk’s volumes unmount, and then the disk disconnects from the system, disappearing from the Finder and from Disk Utility. In this case, you have to physically disconnect and reconnect the disk for its volumes to be remounted.
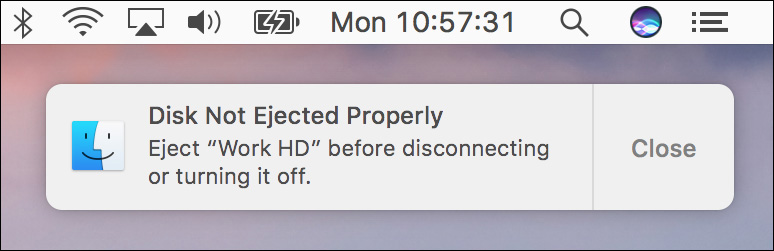
Ejecting In-Use Volumes
Any volume that contains files currently in use by an application or system process cannot be unmounted or ejected. The obvious reason for this is to avoid data corruption when a process attempts to write to files on that volume. If you try to eject a volume with in-use files, the Finder does not allow you to do so, but, depending on the situation, it may try to help you eject the volume. If the application or process using the volume belongs to your account, the Finder lets you know via the following dialog. In this case, the resolution is as simple as quitting the suspect application and attempting to eject the volume again.
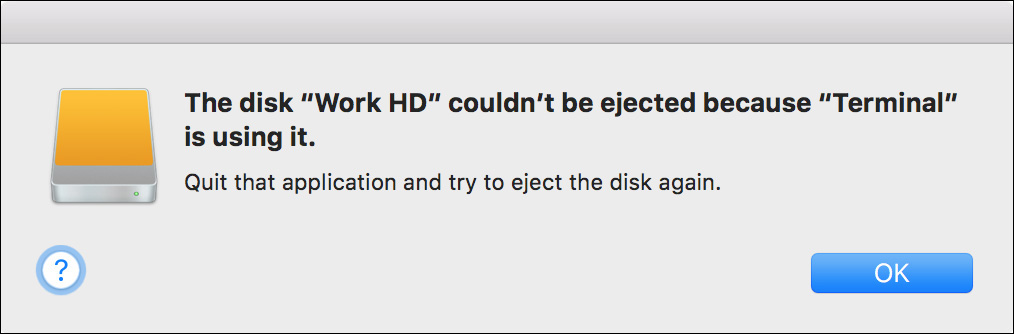
Note
As the screenshot shows, using Terminal can prevent you from ejecting a volume. Even if no process is active, just having Terminal open, with the volume as the current working directory, prevents unmounting.
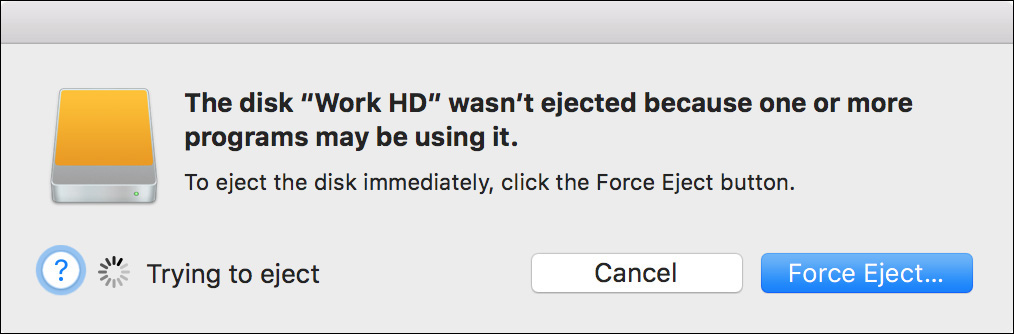
If you don’t own the application or process using the volume, the Finder asks if you want to attempt to forcibly eject the volume. To do that, you have to click the Force Eject button twice; the Finder then tries to quit the offending application or process to release the volume you’re attempting to eject. If the volume is successfully ejected, you are notified by the dialog.
If this doesn’t work or the Finder doesn’t tell you which application is the problem, you can always log out the current user to quit all of his or her processes and then log in again, or fully restart the Mac to clear the issue. Although this may seem excessive, it is not advisable to physically disconnect a volume without first unmounting it, as covered in the next section.
Improperly Unmounting or Ejecting
Disconnecting a volume from a Mac that you did not first unmount can lead to data corruption. If you forcibly eject a disk by physically disconnecting it before you unmount it, or if the system loses contact with the disk due to power failure, the Mac warns you with a device removal dialog. You should immediately reconnect the device so the Mac can attempt to verify or repair its contents.
Anytime you reconnect a disk that was improperly unmounted, the Mac automatically runs a file system diagnostic on the disk before it remounts any volumes. Depending on the format and size of the disk, it may take anywhere from a few seconds to several hours for the system to verify the contents of the disk. Again, journaled volumes, like Mac OS Extended (Journaled), verify quite quickly.
If you connect a disk and notice a fair amount of disk activity but the volumes have not mounted yet, the system is probably running a diagnostic on the disk. You can verify that the system is diagnosing a volume by opening the /Applications/Utilities/Activity Monitor application and looking for a background process with “fsck” in its name. Monitoring processes is covered in Lesson 18, “Manage and Troubleshoot Applications.”
Reference 9.3 Inspect File System Components
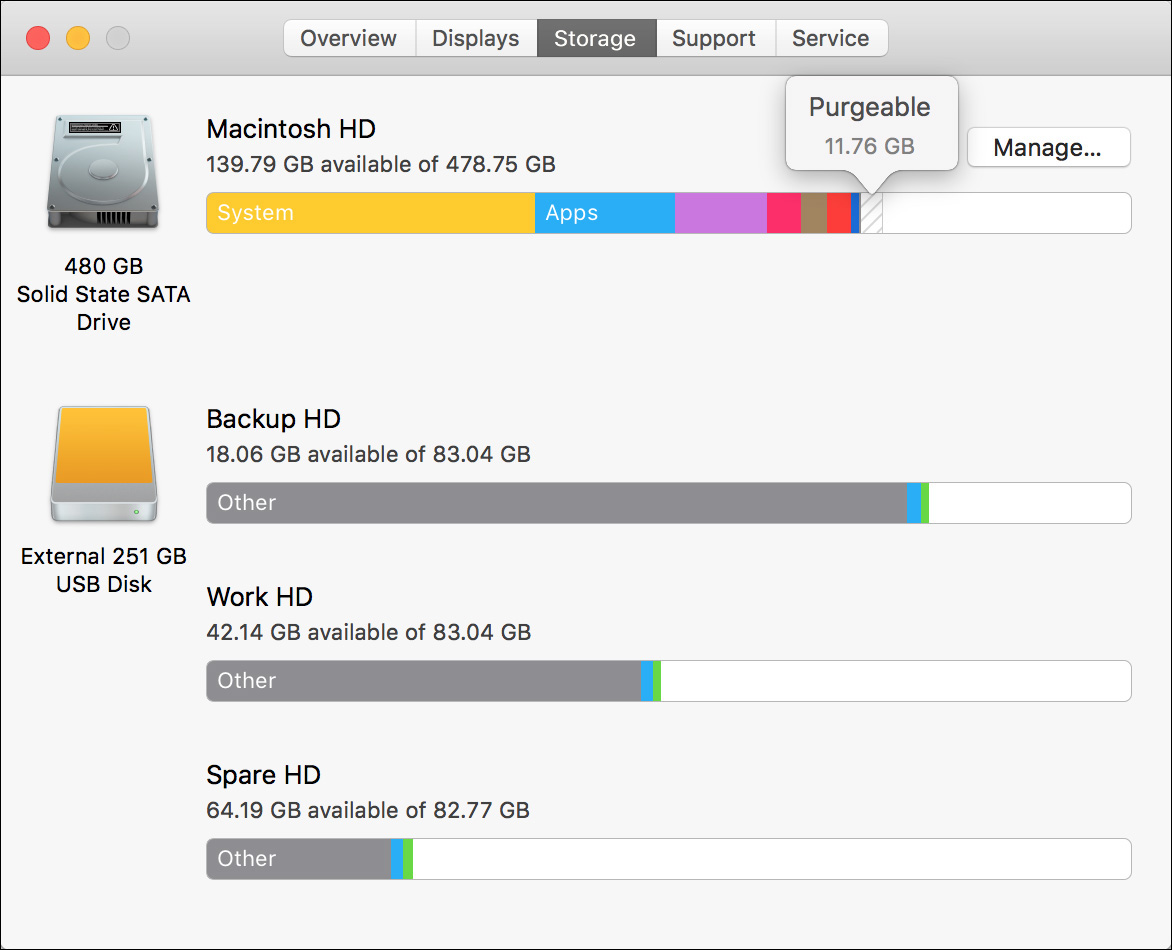
If you plan to manage or troubleshoot the computer’s file system, you should become fully familiar with the current configuration you’re dealing with. You can quickly access a graphical overview of the Mac computer’s storage from the Stage pane of the About This Mac dialog, which can be opened from the Apple menu.
More Info
You can find out more about Purgeable items and the new macOS Sierra storage optimization features (accessed via the Manage button in the About This Mac dialog) in Lesson 17, “Manage Documents.”
For a more detailed examination of the storage systems, you’ll need to use the Disk Utility and System Information applications. These tools allow you to inspect the availability and status of storage hardware currently available to the system.
Examine Storage via Disk Utility
The primary storage management tool included in macOS is /Applications/Utilities /Disk Utility. When you open Disk Utility, it scans the file system for all attached devices and volumes.
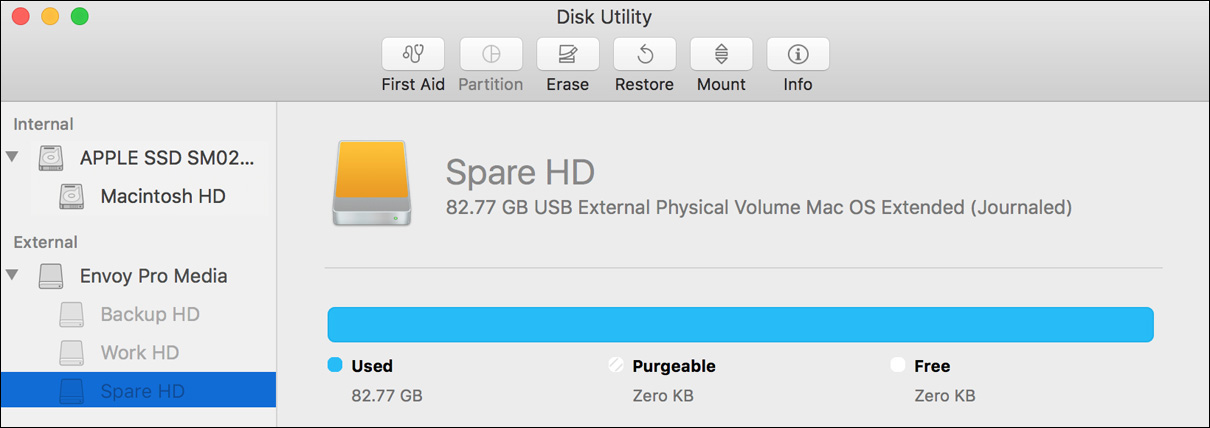
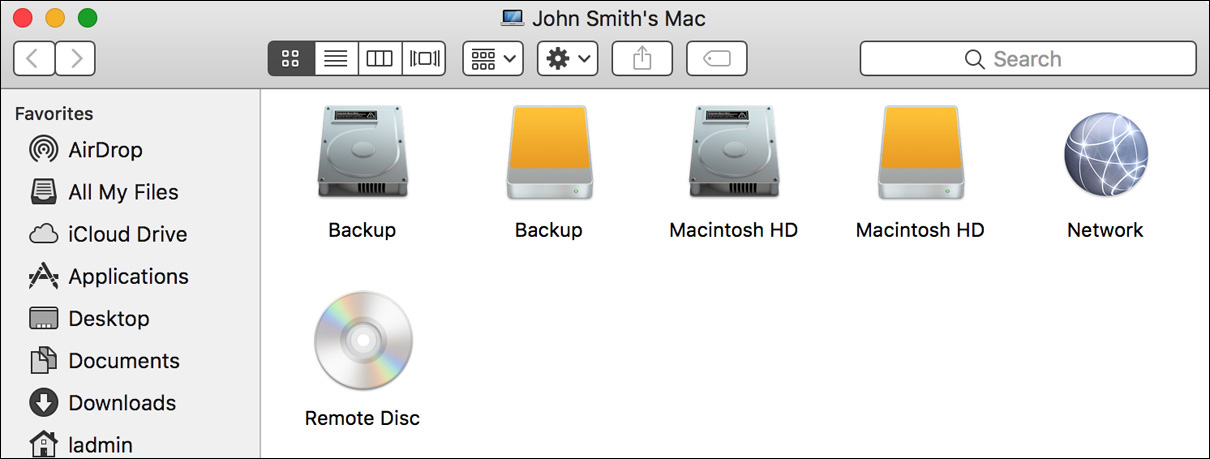
The disk storage hardware is listed first, and directly below each disk is the list of volumes. The disk’s name is a combination of the manufacturer and model name. Volume names are first set when the volume is formatted but can be changed at any time by the user. Thus, volume names often vary widely.
For example, the preceding screenshot shows three physical disks. The first disk is the internal system disk and contains one mounted volume. This volume is currently selected and also happens to be the Mac computer’s current system volume. The second external disk also contains one mounted volume, but as you can guess from the name it’s a backup volume. The third external disk contains three volumes, but their light gray coloring indicates that the volumes are not currently mounted. Unmounted volumes will not appear in the Finder.
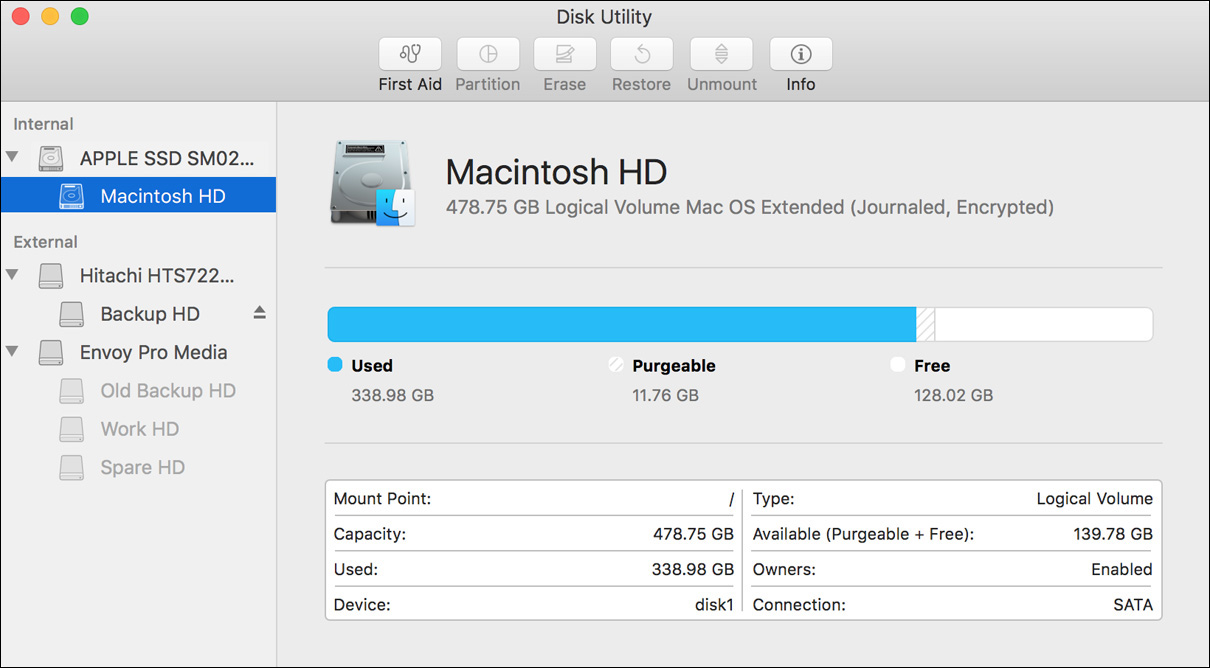
Also, as you can see in the previous screenshot, selecting any item in Disk Utility will reveal information about the item, including utilization, formatting, and connection information. To gather detailed information about a specific disk or volume in Disk Utility, select the item from the column on the left and then click the Info button in the toolbar.
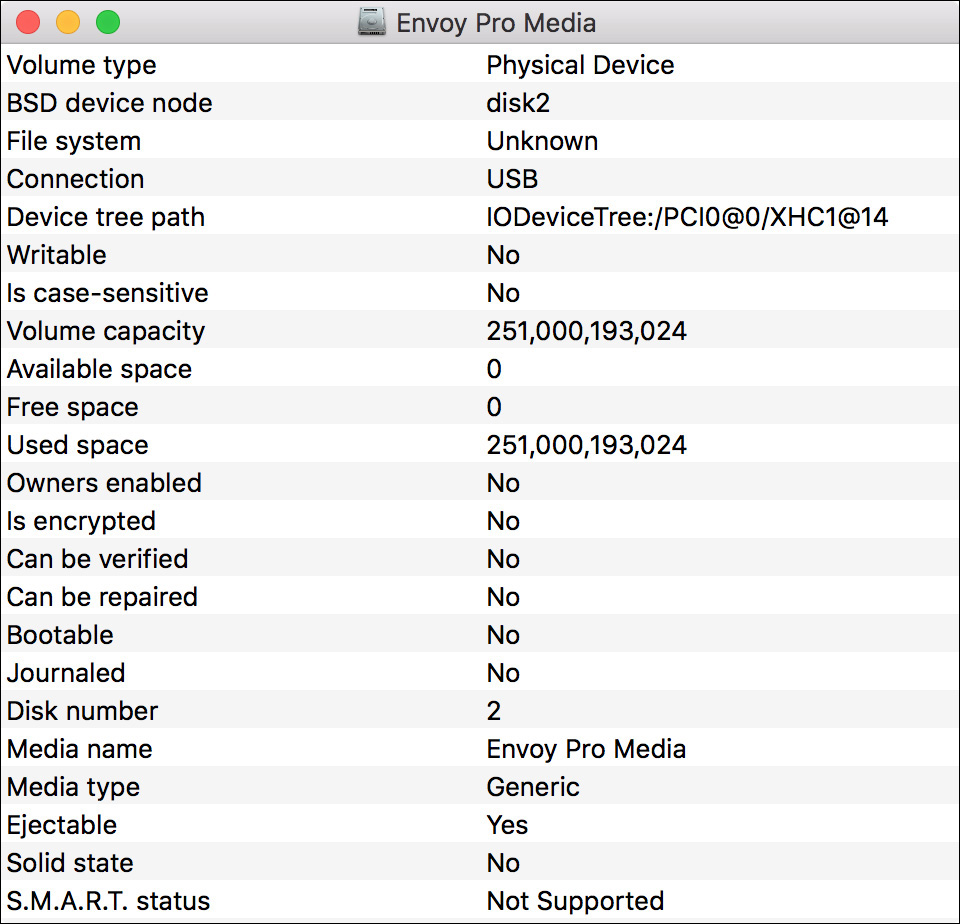
The information gathered from this dialog reveals a great deal about the status of a disk or volume. A particularly helpful piece of information for identifying hardware failure is a disk’s S.M.A.R.T. (self-monitoring, analysis, and reporting technology) status. S.M.A.R.T. can automatically determine whether a disk is suffering from some sort of internal hardware failure. Unfortunately, as you can see from the preceding screenshot, many external disks don’t support S.M.A.R.T.
Examine Storage via System Information
There are several instances where you may want to double-check the disk’s status using /Applications/Utilities/System Information. For example, it’s possible that a disk has suffered such catastrophic failure that it doesn’t even appear in the Disk Utility list. Another example is that Disk Utility doesn’t show hidden volumes such as the Recovery HD volume that is often adjacent to the macOS system volume.
When you open System Information, your first step should be to examine the physical storage devices by selecting one of the storage interfaces. If a physical device does not appear in System Information, it is not available to the Mac in its current state. At that point, you should focus your efforts on troubleshooting the disk hardware. This includes simple fixes, such as looking for loose connections or replacing bad cables, as well as more complex fixes, such as replacing bad hardware like the disk enclosure.
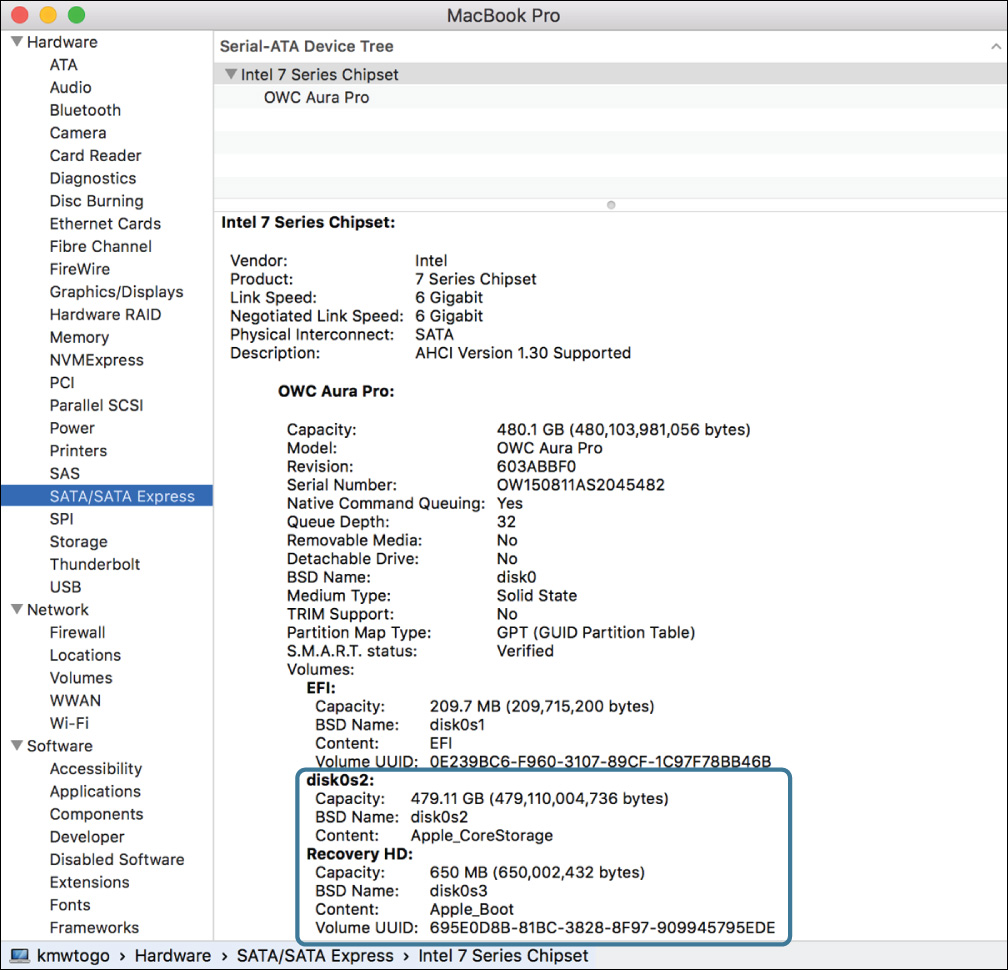
When inspecting disks, you may notice that internal disks are named by the manufacturer, which in many cases is not Apple. Only recent flash-based Mac computers will show the name APPLE SSD. In the previous example screenshot, the system uses a replacement disk, an OWC Aura Pro, connected via SATA, so selecting the SATA/SATA Express section in System Information reveals more information about the hardware.
A bit of confusion when inspecting physical storage in System Information is that Core Storage volumes don’t appear with their appropriate volume name. As you can see in the previous screenshot, the OWC Aura Pro disk contains a Core Storage volume, but we can’t see its name. One clue, however, is the existence of a Recovery HD volume that’s often adjacent to a macOS system volume.
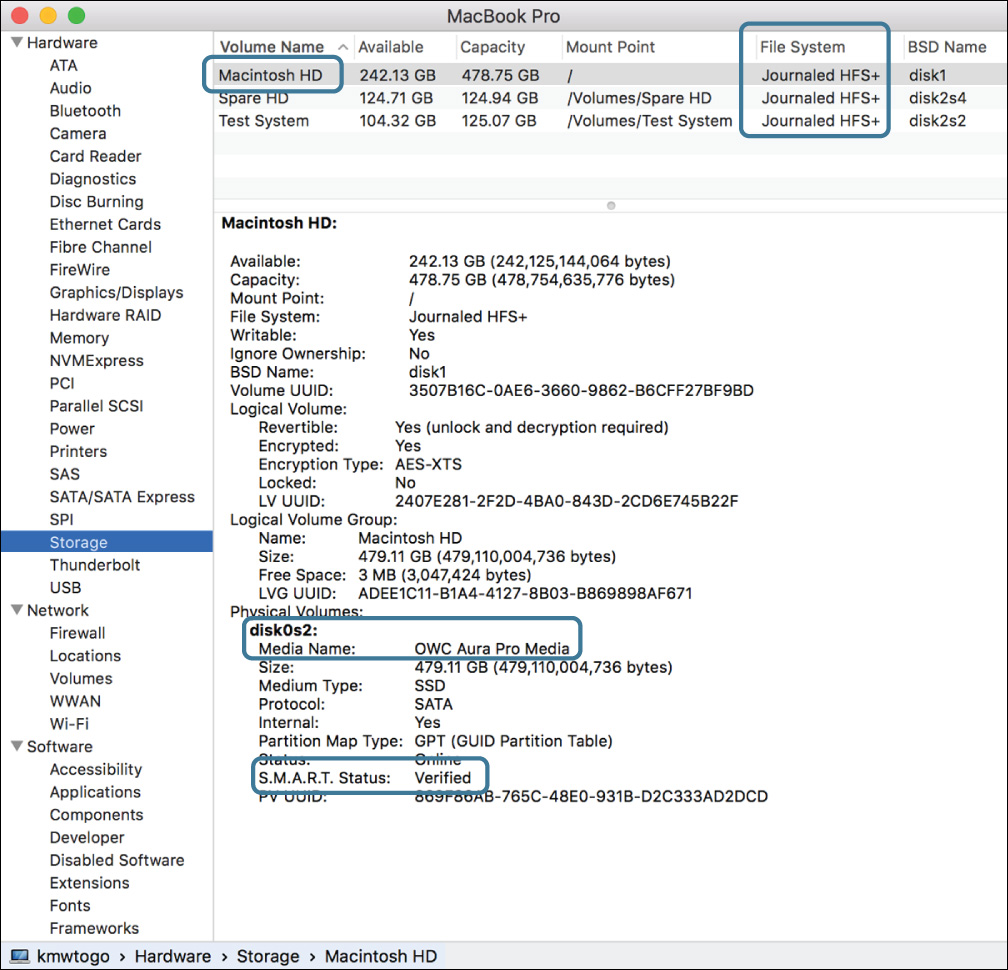
To solve this mystery, you can further inspect the contents of the Storage section in System Information. The Storage section will show you all currently mounted volumes, regardless of origin. The following screenshot was taken on the same system but shows the Storage section in System Information. Note that in the Storage section you can easily identify the physical storage device used for the encrypted Macintosh HD volume, OWC Aura Pro Media, and that the device’s S.M.A.R.T. status is Verified.
Yet, every good mystery ends with a twist; in the same screenshot note the name used to describe the File System type. The System Information application uses the term “Journaled HFS+” to describe the file system instead of “Mac OS Extended (Journaled),” as you would see in Disk Utility. The acronym “HFS+” stands for Hierarchical File System Plus, which was the original name for what is now known as Mac OS Extended.
Reference 9.4 Manage File Systems
Again, the primary storage management tool included in macOS Sierra is /Applications/Utilities/Disk Utility. In this section you will explore how you can use Disk Utility to modify disks and volumes.
Tip
In the Finder, you can rename any volume without having to reformat or erase its content. Simply edit the volume name as you would any other item in the Finder, or, from the Finder sidebar, secondary-click (or Control-click) to rename it.
Format Unreadable Disks
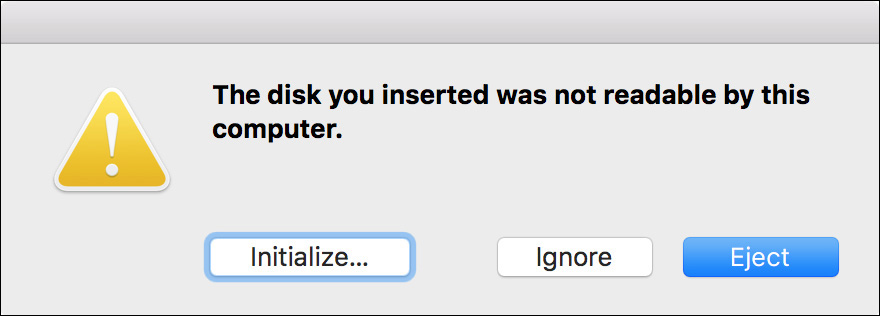
Most new storage devices are either completely blank or formatted for Windows. For the most part, you can use Windows-formatted disks on the Mac without reformatting. However, if you want to install the Mac operating system on a disk, or you have a new disk that is completely blank, you have to erase and format (or initialize) the disk.
If you attach an unformatted disk, the Mac automatically prompts you to open Disk Utility. Once in Disk Utility you can click the Erase button to quickly erase and format the selected disk. Specific instructions for erasing in Disk Utility are covered later in this lesson.
Note
If you attach a disk that should work but you get this message, the disk likely has serious problems. See Reference 9.5, “Troubleshoot File Systems,” later in this lesson for troubleshooting suggestions.
Partition a Disk
Disk Utility allows you to dynamically partition a disk without destroying any data currently stored on the disk. This functionality is also used to facilitate the Boot Camp setup process and the creation of the hidden Recovery HD during a macOS upgrade installation.
The only downside to dynamic partitioning is that some disks may not support the partition changes you want to make. For instance, some disks may be too full for you to repartition. Also, Disk Utility is less flexible in its ability to modify disks containing encrypted volumes or Fusion Drive disks, and it does not support dynamically partitioning disks formatted with the MBR partition scheme. If you come across any of these issues, you will have to erase the disk, as covered later in this lesson.
Note
Always back up important data before making changes to a disk’s file system.
Note
Modifying a macOS system disk often requires relocating the hidden macOS Recovery HD. Fortunately, Disk Utility handles this automatically for you.
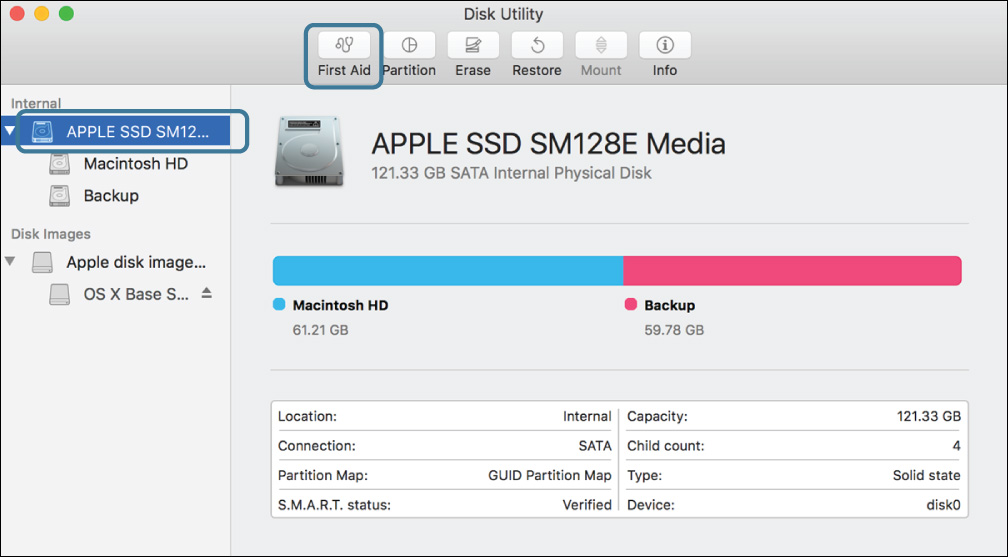
Again, opening Disk Utility reveals a list of connected disks and volumes. Physical disks are identified by the manufacturer and model name of the device. Select the disk (not the volume) that you want to modify, and then click the Partition button in the toolbar.
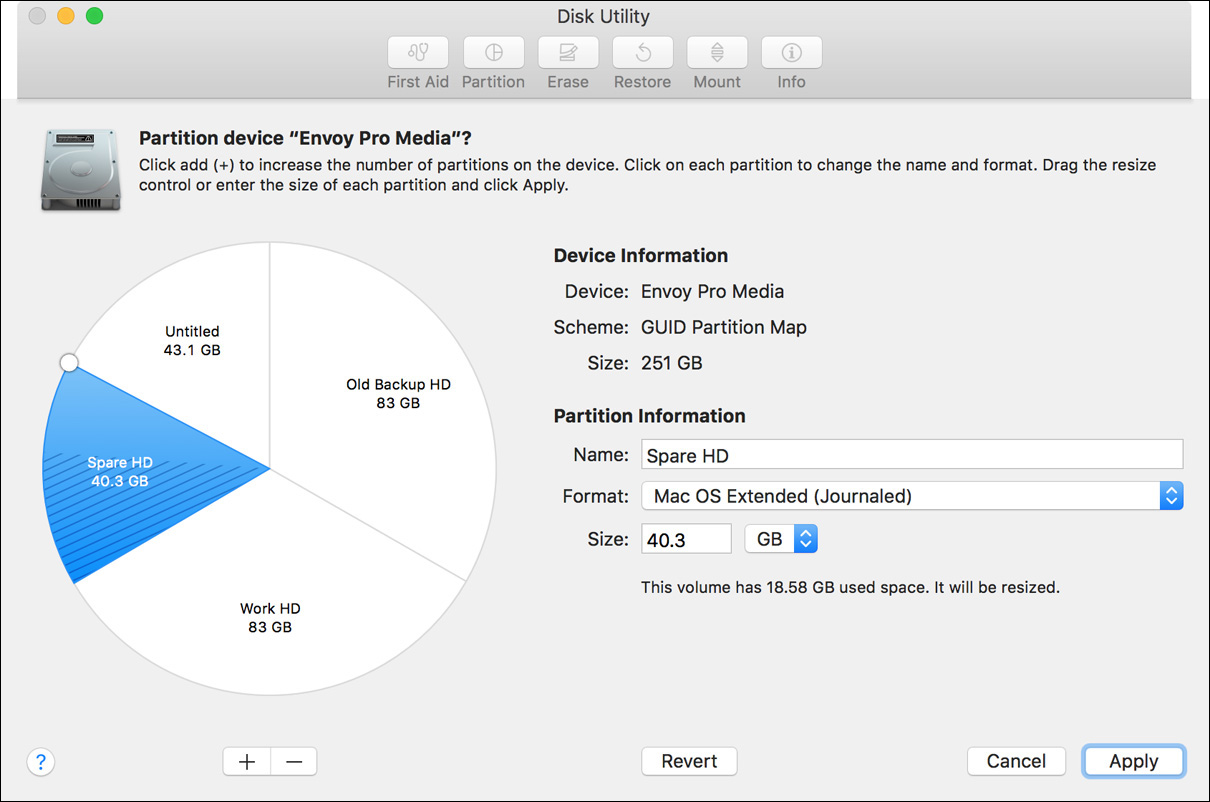
The disk will be represented by a pie chart graphic. Each slice of the pie represents a separate partition and its volume on the disk. The “beginning” of the disk’s storage is at the 12:00 position; moving clockwise indicates progression through the available storage, returning to the “end” of the disk at 12:00 again. Thus, the pie chart in the previous screenshot illustrates a disk that would eventually have four partitions. The two partitions of the disk are larger, followed by two smaller partitions, and the second-to-last partition is selected for editing.
The partition interface in Disk Utility allows you to:
![]() Erase and reformat a partition—Selecting a partition slice will reveal the partition’s name, format, size, and used space. Selecting a different format from the Format pop-up menu will indicate that you want to erase and reformat the selected partition. The act of erasing and reformatting won’t be applied to the disk until you click the Apply button.
Erase and reformat a partition—Selecting a partition slice will reveal the partition’s name, format, size, and used space. Selecting a different format from the Format pop-up menu will indicate that you want to erase and reformat the selected partition. The act of erasing and reformatting won’t be applied to the disk until you click the Apply button.
Note
In Disk Utility, you can change the partition scheme of a disk only by erasing the entire disk, as covered later in this lesson.
![]() Resize a partition—Drag the small circle indicators at the edge of the pie chart until you reach the desired new size of a partition slice. Alternatively, you can enter a specific partition size in the Size field. As easy as this interface appears, there are a few rules that are automatically enforced. First, you cannot shrink a partition smaller than the current volume’s content, as indicated by diagonal hash marks in the selected partition. Also, you cannot move the beginning of an existing partition. Finally, you cannot rearrange the order of existing partitions on the disk.
Resize a partition—Drag the small circle indicators at the edge of the pie chart until you reach the desired new size of a partition slice. Alternatively, you can enter a specific partition size in the Size field. As easy as this interface appears, there are a few rules that are automatically enforced. First, you cannot shrink a partition smaller than the current volume’s content, as indicated by diagonal hash marks in the selected partition. Also, you cannot move the beginning of an existing partition. Finally, you cannot rearrange the order of existing partitions on the disk.
Tip
While viewing the Partition interface in Disk Utility, hold the Shift key to show the used space on all partitions, and hold the Command key to show the small circle indicators that allow you to click and drag to resize a partition.
![]() Add a new partition—Click the Add (+) button below the pie chart to add a new partition. The default behavior will halve the currently selected partition slice. Remember that you can have as many as 16 partitions per disk, each containing a unique volume. Be sure to choose an appropriate name and volume format from the pop-up menu for each new volume.
Add a new partition—Click the Add (+) button below the pie chart to add a new partition. The default behavior will halve the currently selected partition slice. Remember that you can have as many as 16 partitions per disk, each containing a unique volume. Be sure to choose an appropriate name and volume format from the pop-up menu for each new volume.
![]() Delete a partition—Select the partition slice and click the Delete (–) button below the pie chart. Obviously, indicating that you want a partition deleted will effectively erase that partition’s content. The deleted partition’s space will be allocated to the previous partition, but you can continue to make adjustments until you click the Apply button. Disk Utility will not actually perform the delete action until you click the Apply button.
Delete a partition—Select the partition slice and click the Delete (–) button below the pie chart. Obviously, indicating that you want a partition deleted will effectively erase that partition’s content. The deleted partition’s space will be allocated to the previous partition, but you can continue to make adjustments until you click the Apply button. Disk Utility will not actually perform the delete action until you click the Apply button.
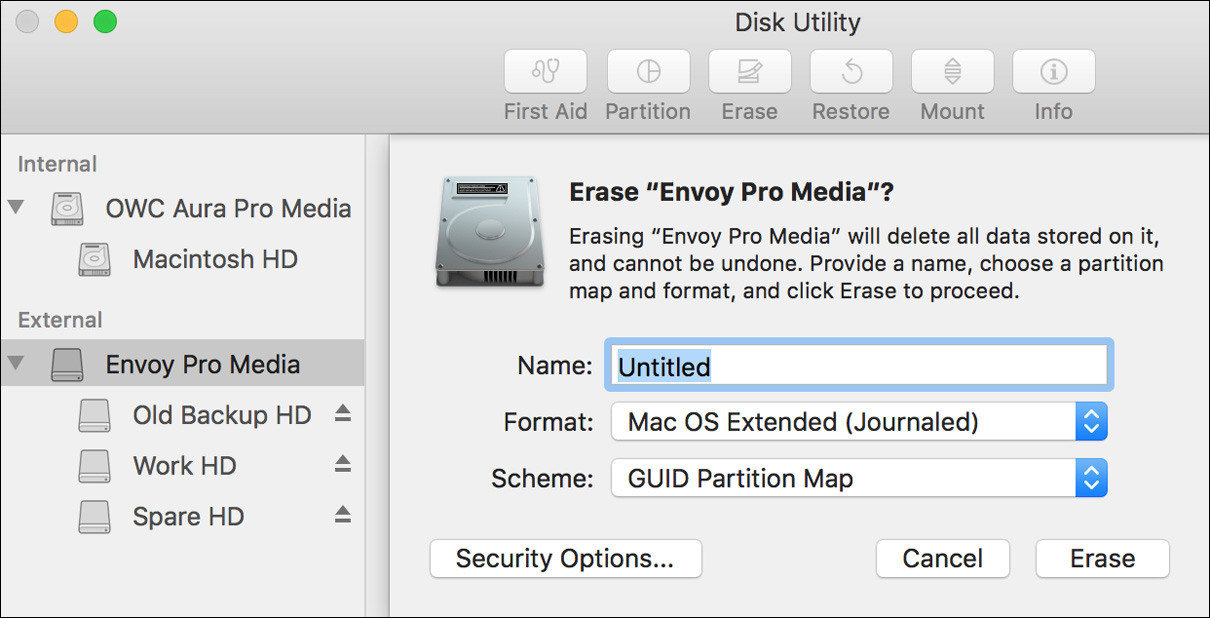
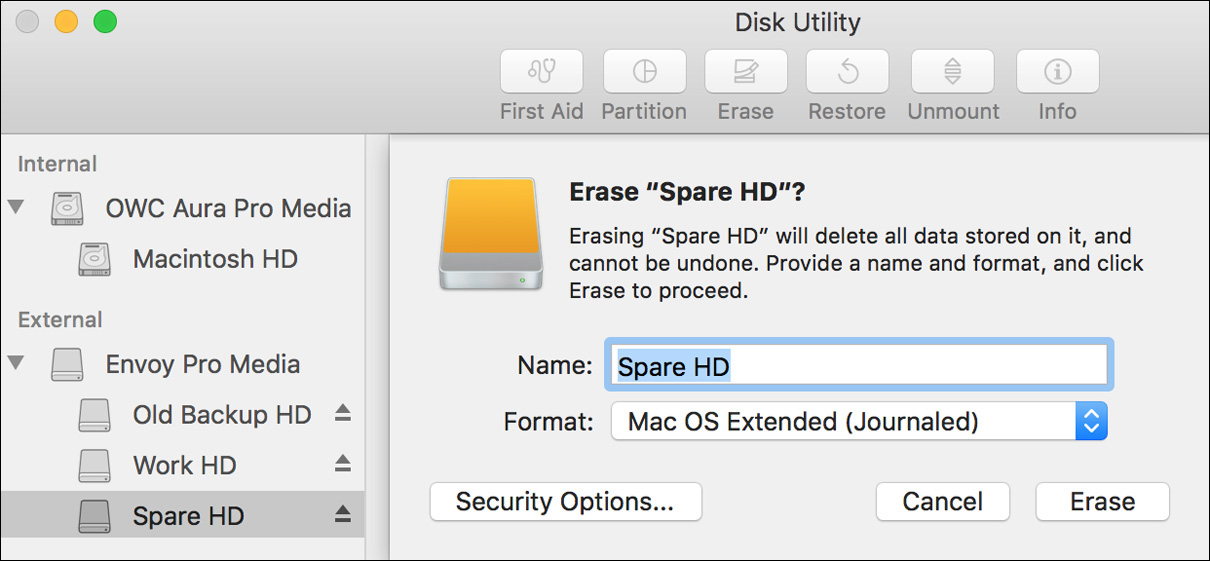
Erase a Disk or Volume
In Disk Utility, the act of erasing a disk or volume will automatically format (or initialize) the storage. Again, opening Disk Utility reveals a list of connected disks and volumes. Physical disks are identified by the manufacturer and model name of the device. Volume names vary, but they always appear indented below the disk identifier. Select the disk or volume you want to erase, and then click the Erase button in the toolbar.
When you erase a disk (as opposed to a volume), Disk Utility automatically creates a new volume format and partition scheme. Disk Utility defaults to the Mac OS Extended (Journaled) format and the GUID Partition Map scheme. To select a different format or scheme, select it from the appropriate pop-up menu. Differences between specific volume formats and partition schemes are detailed earlier in this lesson.
When you erase a volume (as opposed to a disk), Disk Utility automatically creates a new volume format, again defaulting to Mac OS Extended (Journaled). Importantly, when you erase a selected volume, none of the other volumes on the disk are affected. Further, you cannot change the disk’s partition scheme—that would affect all volumes on the disk.
Note
If you have selected an encrypted volume format, a dialog appears, allowing you to set the encrypted volume’s password. Note that, as the dialog states, you are not able to recover data from the encrypted volume if you lose the password. Choose the password wisely.
Erasing and reformatting storage destroys any existing volume formatting; a reformatted disk is effectively losing its contents. Yet the default Disk Utility erase process does not actually erase any files from the disk; Disk Utility creates new “empty” volumes by simply replacing the file and folder structures. The old data files still remain on the disk and can be recovered using the appropriate third-party tools.
In fact, there is no such thing as erasing data from a disk—all you can do is write new data on top of the old data. Therefore, if you want to truly “erase” a disk or volume, you must somehow write new nonsensitive data on top of it. When erasing a selected partition or volume in Disk Utility, you also have the option of securely erasing the selected item’s content.
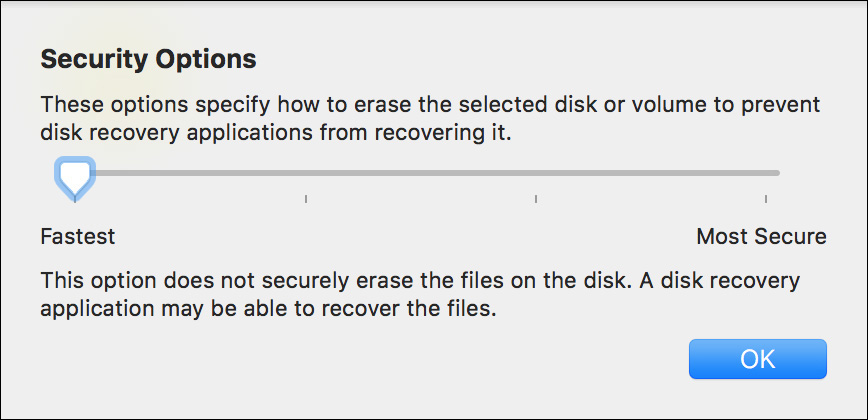
If you require a secure erase, click Security Options to display a dialog with four options along a slider:
![]() Fastest: don’t erase data—This is the default action that occurs when you erase or reformat a disk or volume. Obviously, this option does not provide any security from disk-recovery utilities. On the other hand, this choice provides a nearly instantaneous erase option.
Fastest: don’t erase data—This is the default action that occurs when you erase or reformat a disk or volume. Obviously, this option does not provide any security from disk-recovery utilities. On the other hand, this choice provides a nearly instantaneous erase option.
![]() Second choice: 2-pass erase—This option writes a first pass of random data and then a second pass of zeros. This is the quickest of the secure erase options, and for most users provides an adequate level of security. This is also the best option for flash-based media because additional passes do not provide more security and can lead to degraded disk performance.
Second choice: 2-pass erase—This option writes a first pass of random data and then a second pass of zeros. This is the quickest of the secure erase options, and for most users provides an adequate level of security. This is also the best option for flash-based media because additional passes do not provide more security and can lead to degraded disk performance.
![]() Third choice: 3-pass erase—This is a very secure option that writes two passes of random data followed by a single pass of known data to the disk. According to Apple, this option meets U.S. Department of Energy standards for securely erasing data.
Third choice: 3-pass erase—This is a very secure option that writes two passes of random data followed by a single pass of known data to the disk. According to Apple, this option meets U.S. Department of Energy standards for securely erasing data.
![]() Most Secure: 7-pass erase—This is the most secure option, which according to Apple meets U.S. Department of Defense standards for securely erasing magnetic media. The Mac writes seven different passes of random and patterned data to the disk. Obviously, this method takes the longest to complete.
Most Secure: 7-pass erase—This is the most secure option, which according to Apple meets U.S. Department of Defense standards for securely erasing magnetic media. The Mac writes seven different passes of random and patterned data to the disk. Obviously, this method takes the longest to complete.
Note
Depending on the size of the selected disk or volume and the secure erase option you choose, this process can take anywhere from seconds to days.
Deleted Files Security
The default macOS behavior simply marks deleted files as free space, leaving the files intact until written on top of by another action. Thus, all files previously “erased” by the system could potentially still be accessible on the disk given the appropriate third-party tools.
macOS Sierra does not have the ability to securely delete individual items in the Finder or the remaining free space on a volume in Disk Utility. You can still use Disk Utility to securely erase a volume, but if security is truly a concern, a better solution would be to store all of your data on encrypted volumes.
This is because all of the data (current or “erased”) on an encrypted volume is always scrambled to those who don’t have authorization to access its contents. After all, the items you haven’t erased are probably more important than the items you have erased. Thus, concerning yourself with securely erasing deleted items is a waste of time when you have the ability to encrypt the entire volume in the first place.
Encrypt an External Disk
Disk Utility cannot convert an existing Mac OS Extended volume to an encrypted volume. Instead, as covered earlier, it can only erase and reformat the volume as encrypted. This is obviously inconvenient if you want to encrypt the contents of an existing disk. Fortunately, in macOS you can easily convert an existing disk to an encrypted disk using the Finder.
There are, however, a few caveats when encrypting an existing disk. First, encrypted Mac OS Extended volumes are only compatible with Mac computers running OS X Lion 10.7 or later. Further, due to the complex nature of solid-state and flash disk controllers, encrypting a disk may still leave some parts of the original data in a recoverable form. To minimize the security risk, it’s ideal to encrypt a flash-based disk before saving any sensitive data to it. Finally, the Finder can convert volumes only on disks formatted with the GPT partition scheme.
Tip
To encrypt the macOS system volume, you need to enable FileVault. Lesson 10, “Manage FileVault,” covers this topic in greater detail.
To encrypt a disk in the Finder, secondary-click (or Control-click) the disk you want to encrypt, and from the shortcut menu choose Encrypt <diskname>, where <diskname> is the name of the disk you’ve selected.
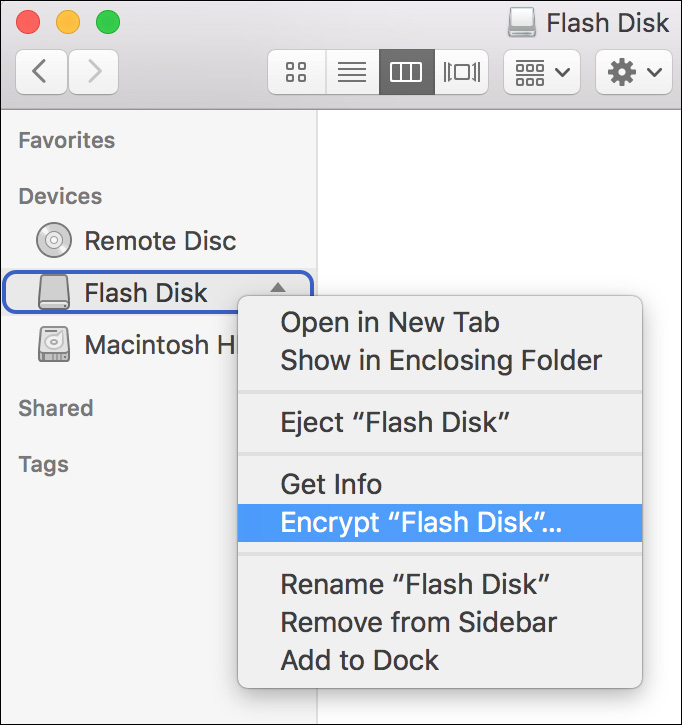
The Finder prompts you to set a password and a password hint for the encrypted disk. You must set a password hint, because it’s the only thing that will help you recover a lost password. Should you lose the password, there is no way to recover the disk’s data. Once you enter these items and then click Encrypt Disk, you may notice that the disk quickly disappears, and then after a few seconds it reappears in the Finder as the system begins encrypting the disk’s contents.

Amazingly, you can continue to use the disk as usual while the system encrypts the disk’s contents in the background, though you might notice some performance degradation. From this point forward, whenever you attempt to connect the encrypted disk, you are prompted for the disk’s password.
Tip
Again, you can configure the system to automatically authenticate an encrypted disk by saving the password to your keychain. This can be configured when you reconnect the encrypted disk and are prompted for the disk’s password. Using keychains is covered in Lesson 7, “Manage Security and Privacy.”
You can see whether the encryption is complete in the Finder by secondary-clicking (or Control-clicking) the disk. In the shortcut menu, a fully encrypted disk shows a Decrypt <diskname> option, where <diskname> is the name of the disk you’ve selected.
Tip
From the Disk Utility File menu, you can change the password or decrypt an encrypted disk. Obviously, you must know the encrypted disk’s current password to perform these operations.
Reference 9.5 Troubleshoot File Systems
Because any operating system requires a functional file system, the software that drives the file system is very reliable. In fact, most file system failures are due to bad hardware or media. No matter how good the software is, though, if the hardware is no longer reading or writing bits, it’s pretty much useless to the file system.
File System Troubleshooting First Steps
Your first step is to verify hardware connectivity to the problematic storage device. If the problematic storage is a nonsystem disk, refer to Reference 9.3, “Inspect File System Components,” to verify storage hardware functionality.
If the problem appears to involve the system disk, you can attempt to start up from macOS Recovery by holding down Command-R at startup. From macOS Recovery, you can access Disk Utility to inspect and potentially repair the system disk. If the default macOS Recovery system doesn’t work, you can use any of the alternative methods detailed in Lesson 3, “Use macOS Recovery.”
If, during initial troubleshooting, you determine that catastrophic hardware failure is the problem, there really isn’t anything you can do from a software perspective to repair the device. Only a data recovery service, such as DriveSavers, might have a chance of recovering your data.
More Info
DriveSavers is the most popular hard disk recovery service for Mac-formatted volumes. You can find out more at www.drivesaversdatarecovery.com.
Conversely, if you’re experiencing file system issues but the storage hardware still appears to function, you may be experiencing partial hardware failure or file system corruption. In these cases, you can try some steps using the built-in utilities in macOS to repair the volumes or at least recover data.
About Disk Utility First Aid
To access data on the disk, the file system must first read the partition scheme and volume directory structure to locate the appropriate bits on the disk that make up the requested items. The partition scheme is used to define the space where volumes exist. The volume directory structure is used by the file system to catalog where files and folders exist on the disk. Obviously, any damage to this information can lead to serious problems, including data loss.
Before any disk is mounted, the Mac automatically performs a quick consistency check to verify the disk’s partition scheme and volume directory structure. The system also quickly scans the startup disk during the startup process. However, if the system is unable to mount a disk or its volumes, or you are experiencing problems accessing a disk’s content, you can use Disk Utility First Aid to verify and repair the partition scheme or volume directory structures.
To use the First Aid feature in Disk Utility, first double-check that the disk you want to repair is attached to the computer, and then open /Applications/Utilities/Disk Utility. Select the disk or volume you want to verify or repair from the column on the left, and then click the First Aid button in the toolbar.

By selecting a disk, you are indicating that you want to repair the selected disk’s partition scheme. However, by selecting a volume you are indicating that you want to repair the selected volume’s directory structure. As a best practice, you should attempt to repair all components of a problematic disk by starting with the disk’s partition scheme, followed by any volumes.
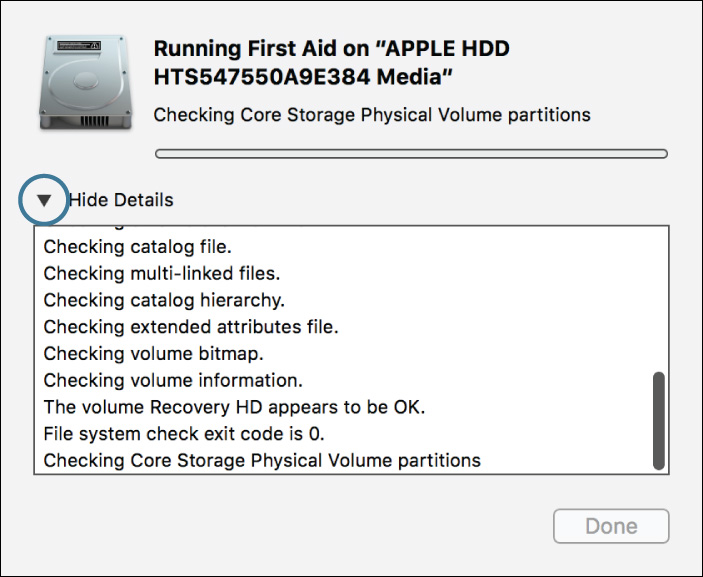
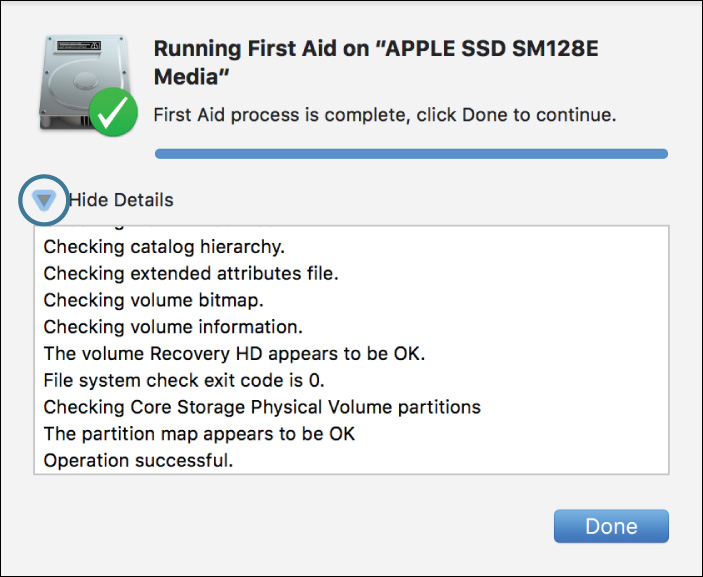
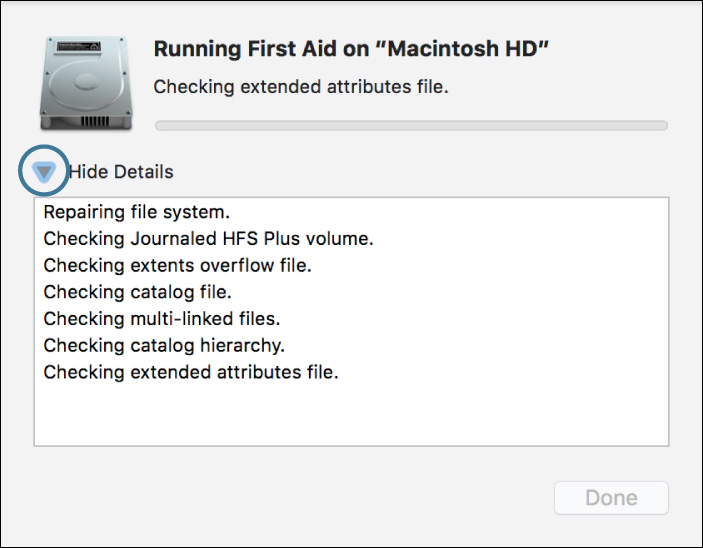
The First Aid verify and repair process may take a few minutes to complete. During this time, Disk Utility shows a progress indicator and log entries in the history area. Click the Show Details disclosure triangle to view more detail in the history log.
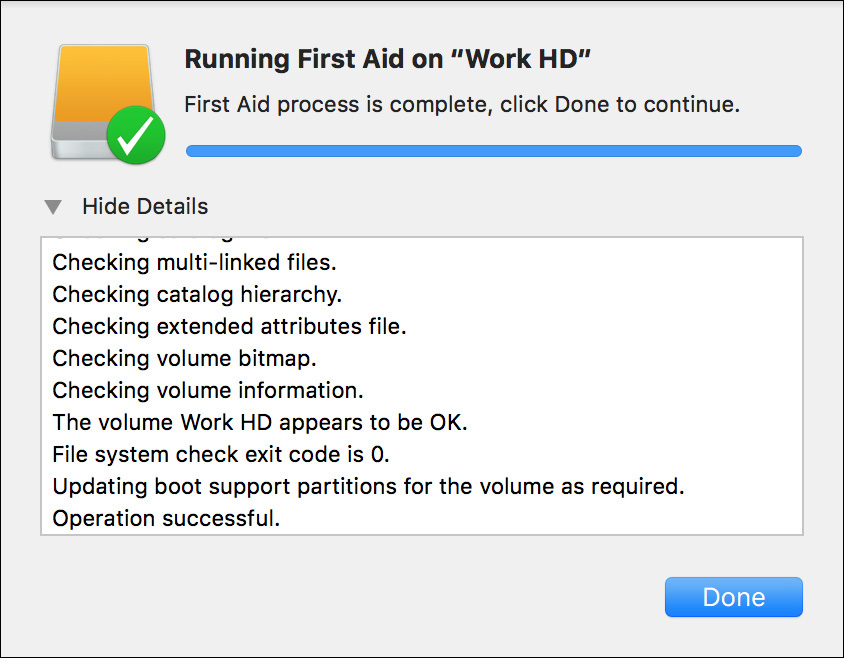
If no problems are found, a green checkmark will appear. If problems are uncovered, they appear in bright red text in the log. If the disk has problems, the First Aid process will attempt to repair the issues. The system continues to run the repair process until no more problems are found. This may take a while, because the system may run through the repair process several times.
About Target Disk Mode
Mac hardware has a unique ability to share its internal disks via a feature called target disk mode. Basically, when target disk mode is engaged, instead of starting up normally from the system disk the Mac creates a connection from the internal disks to the FireWire, Thunderbolt, or USB-C ports.
More Info
MacBook models that feature only a single USB-C port have limited Time Machine compatibility. These models support Target Disk Mode only via an appropriate USB-C cable. For more information, see Apple Support article HT204360, “Using USB-C and Thunderbolt 3 (USB-C) ports and adapters on your Mac notebook.”
Because the target disk mode function is built into the Mac computer’s hardware, you can still use this feature even if the installed operating system volume is corrupted. An administrator user can enable target disk mode on a currently running Mac by clicking the Target Disk Mode button in Startup Disk preferences. Alternatively, assuming the system doesn’t have a firmware password, any user can engage target disk mode during system startup by holding down the T key while turning on the Mac.
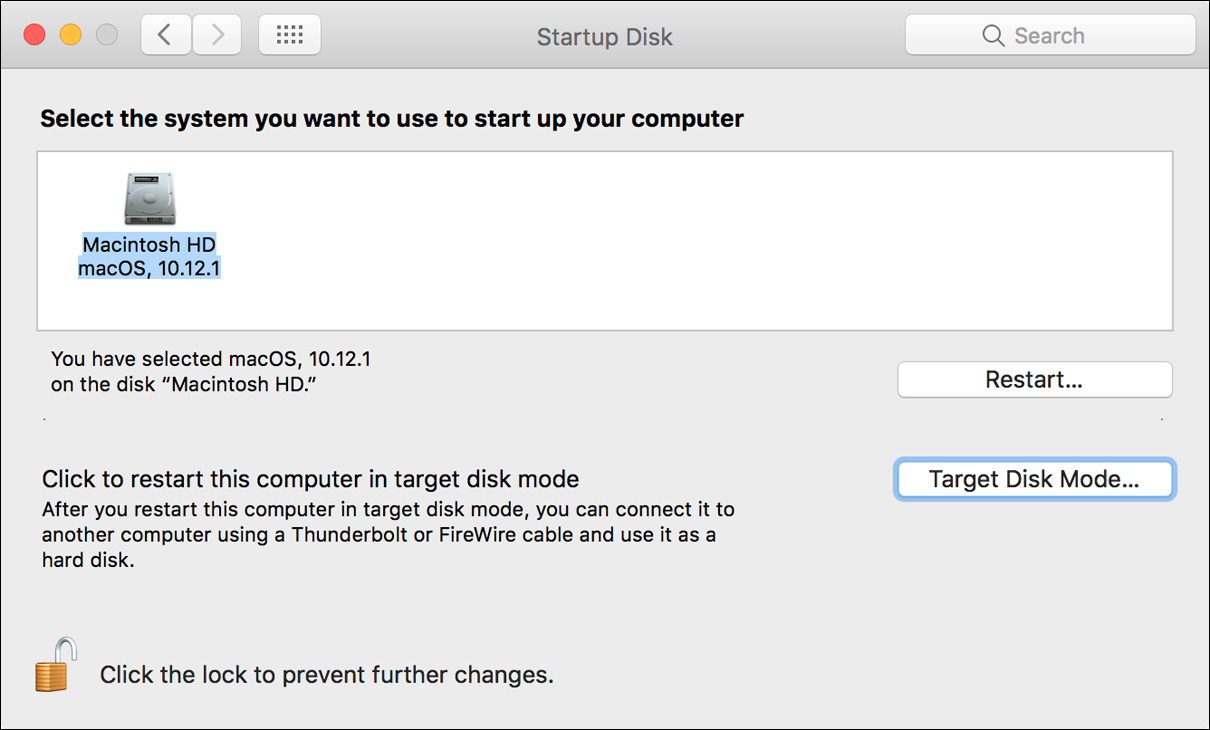
Once target disk mode has been engaged, large FireWire, Thunderbolt, and/or USB symbols appear on the screen, and then you can simply plug the targeted Mac into another fully functioning Mac using a FireWire, Thunderbolt, or USB-C cable.
The targeted Mac’s internal volumes mount normally on the other Mac, as if you had plugged in a normal external disk. At this point, you can do anything to the targeted Mac’s internal disk that you could do to any local disk, including installations, repairs, and data migration.
As useful as target disk mode is, be aware of a few caveats:
![]() Older USB-A ports on Mac computers do not support target disk mode. However, older Mac computers with USB-A ports can mount disks of newer Mac computers in target disk mode via USB-C with an appropriate USB-C to USB-A adapter.
Older USB-A ports on Mac computers do not support target disk mode. However, older Mac computers with USB-A ports can mount disks of newer Mac computers in target disk mode via USB-C with an appropriate USB-C to USB-A adapter.
![]() Target disk mode is not supported on disks that use third-party storage interfaces, like those found on PCI Express expansion cards.
Target disk mode is not supported on disks that use third-party storage interfaces, like those found on PCI Express expansion cards.
![]() Target disk mode cannot be engaged during system startup when using a Bluetooth wireless keyboard.
Target disk mode cannot be engaged during system startup when using a Bluetooth wireless keyboard.
![]() Certain forms of hardware failure can prevent a Mac from entering target disk mode. If you suspect this is the case, try using Apple Hardware Test, as covered in Lesson 26, “Troubleshoot Startup and System Issues.”
Certain forms of hardware failure can prevent a Mac from entering target disk mode. If you suspect this is the case, try using Apple Hardware Test, as covered in Lesson 26, “Troubleshoot Startup and System Issues.”
Recovering Data from a Nonstarting System
If you are still stuck with a Mac that refuses to fully start up from its internal system disk, you might be able to recover important data off the disk as long as it’s functional. You can use the Mac’s built-in target disk mode to easily access the internal system disk and transfer important data to another working Mac.
Note
If your Mac doesn’t support, or is unable to engage, target disk mode, your best bet is to visit an Apple Authorized Service Provider. As an alternative, you could attempt to remove the disk from the troubled computer and attach it to a fully functional Mac.
First, turn on or restart the problematic Mac while holding down the T key to engage target disk mode, and connect the computer to another, fully functioning Mac using an appropriate cable. If the targeted Mac’s volume appears in the Finder, first attempt to repair the disk and volumes via Disk Utility First Aid, as detailed earlier in this lesson.
After repairs have been completed, you have a variety of data recovery options:
![]() Use the Finder to manually copy data from the targeted Mac to storage attached to the functioning Mac.
Use the Finder to manually copy data from the targeted Mac to storage attached to the functioning Mac.
![]() Use Disk Utility on the functioning Mac to create a disk image archive of the targeted Mac’s system volume. Creating disk images is covered in Lesson 12, “Use Hidden Items, Shortcuts, and File Archives.”
Use Disk Utility on the functioning Mac to create a disk image archive of the targeted Mac’s system volume. Creating disk images is covered in Lesson 12, “Use Hidden Items, Shortcuts, and File Archives.”
![]() Migrate user data to the other system either manually or using Migration Assistant. Migrating user data is detailed in Lesson 6, “Manage User Home Folders.”
Migrate user data to the other system either manually or using Migration Assistant. Migrating user data is detailed in Lesson 6, “Manage User Home Folders.”
![]() After you have migrated the data, use Disk Utility to reformat the targeted Mac’s disk, and then attempt to reinstall the operating system. Lesson 1, “Install macOS Sierra,” covers this topic in greater detail.
After you have migrated the data, use Disk Utility to reformat the targeted Mac’s disk, and then attempt to reinstall the operating system. Lesson 1, “Install macOS Sierra,” covers this topic in greater detail.
Depending on the amount of corruption to the targeted Mac’s system disk, you may not be able to use Disk Utility or Migration Assistant. The disk may simply be too corrupted to recover all that data. In this case, you have to resort to manually copying data.
In general, the items most important to users are stored in their home folder, so you should start there. This can be a time-consuming process, because when the Finder discovers damaged files, you have to manually restart the copy process and omit the damaged files.
Tip
Use the ample spare time between manual file copies to remind the Mac’s owner (or yourself) that you wouldn’t need to labor over a broken disk if there had been a good backup! Lesson 15, “Manage Time Machine,” covers this topic in greater detail.
Tip
Several third-party disk recovery utilities are available for macOS. This guide doesn’t recommend one over another; contact an Apple Authorized Service Provider for recommendations.
Exercise 9.1 Repartition a Disk Dynamically
![]() Prerequisites
Prerequisites
![]() You must have created the Local Admin account (Exercise 2.1, “Configure a New macOS System for Exercises,” or Exercise 2.2, “Configure an Existing macOS System for Exercises”).
You must have created the Local Admin account (Exercise 2.1, “Configure a New macOS System for Exercises,” or Exercise 2.2, “Configure an Existing macOS System for Exercises”).
![]() Your startup volume must be less than half full.
Your startup volume must be less than half full.
In this exercise, you will partition your computer’s internal disk. If you do not want to repartition your internal disk, you can still perform the steps in the “View Disk Information with Disk Utility” section and then skip the rest of this exercise; however, if you choose not to repartition your disk, you will need an external disk to use as a Time Machine backup volume in Lesson 15, “Manage Time Machine.” You can also partition your disk now and then remove the additional partition after you have finished testing Time Machine.
As always, backing up any important data before partitioning is a good idea.
View Storage Information with About This Mac
Before you repartition your disk, you will gather information about it using About This Mac and Disk Utility.
1 Log in as Local Admin (password: ladminpw, or whatever you chose when you created the account).
2 Choose Apple menu > About This Mac.
3 Click the Storage tab.
This pane shows the volumes mounted on your Mac (usually Macintosh HD will be the only one), and shows how much disk space is in use for several categories of file. You can hover your pointer over the colored sections of the bar to see what category they correspond to.

4 Click the Manage button.
System Information opens and shows several options for reducing disk usage on your computer.
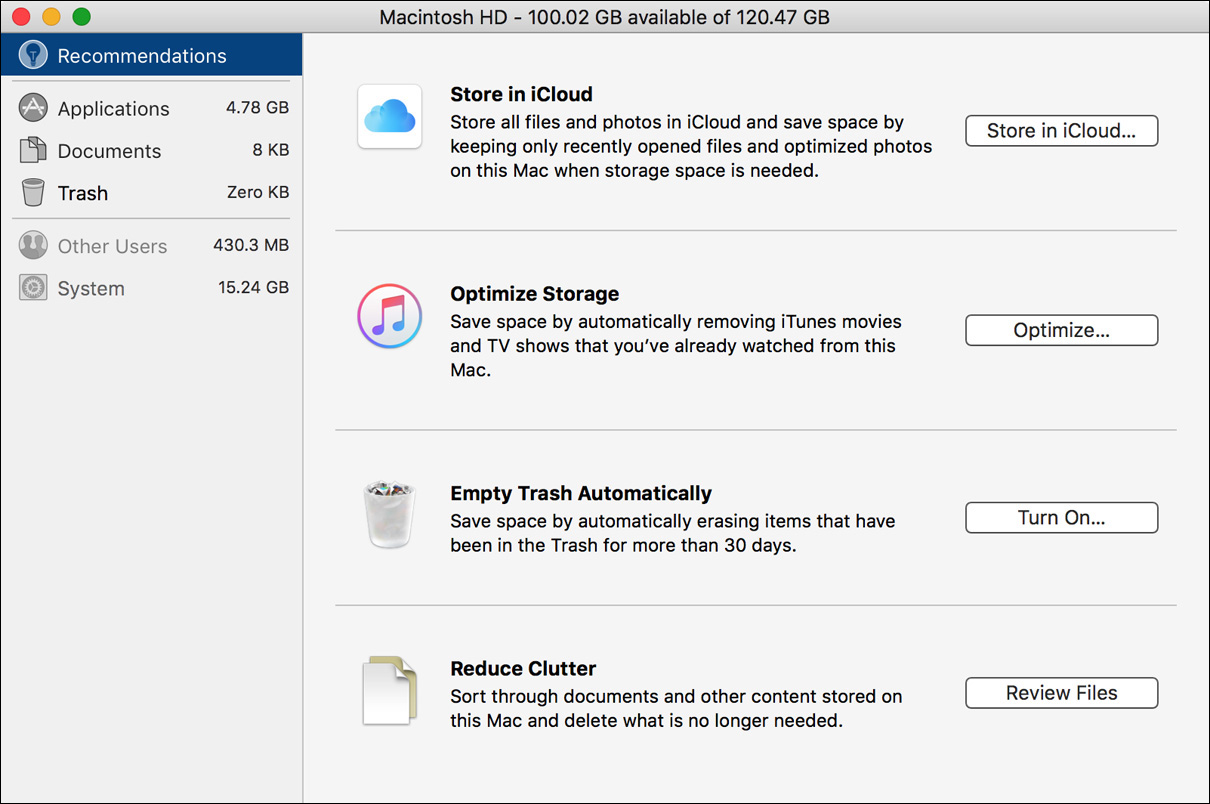
These options are covered in detail in Reference 17.5, “Optimize Local Storage.”
5 Click through the other items in the sidebar.
These show details about the different categories of files on your Mac. Note that the Other Users and System categories cannot be viewed in detail.
6 Quit System Information.
View Disk Information with Disk Utility
1 Open Disk Utility from the Utilities folder. Remember that you can reach this folder in the Finder by choosing Go menu > Utilities or by pressing Command-Shift-U.
2 If necessary, select the entry for your startup volume (generally Macintosh HD) in the sidebar.
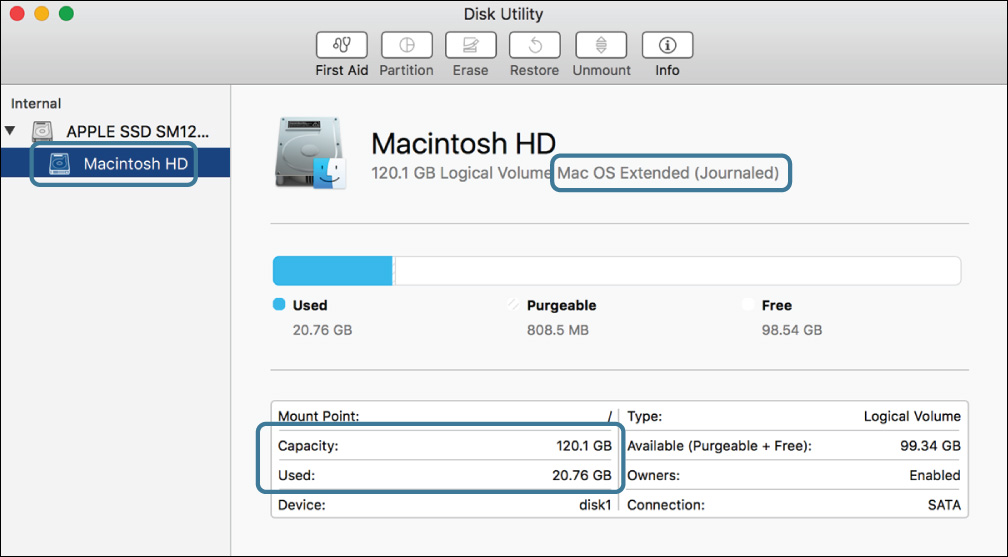
Basic information about the volume appears in the right side of the window. Note that the volume format is shown under the volume’s name.
The volume in the screenshot is listed as a logical volume because it is being managed by Core Storage; if it were not managed by Core Storage, it would be listed as a physical volume instead. Reference 9.1, “About File Systems,” describes Core Storage in more detail.
3 Check the amount of used space in the volume. If the volume is more than half full, you will not have enough space to repartition it and should stop this exercise at the end of this section.
4 Click the Info button in the toolbar.
A window opens showing additional details about the volume. You may need to scroll down to see all the window’s contents.
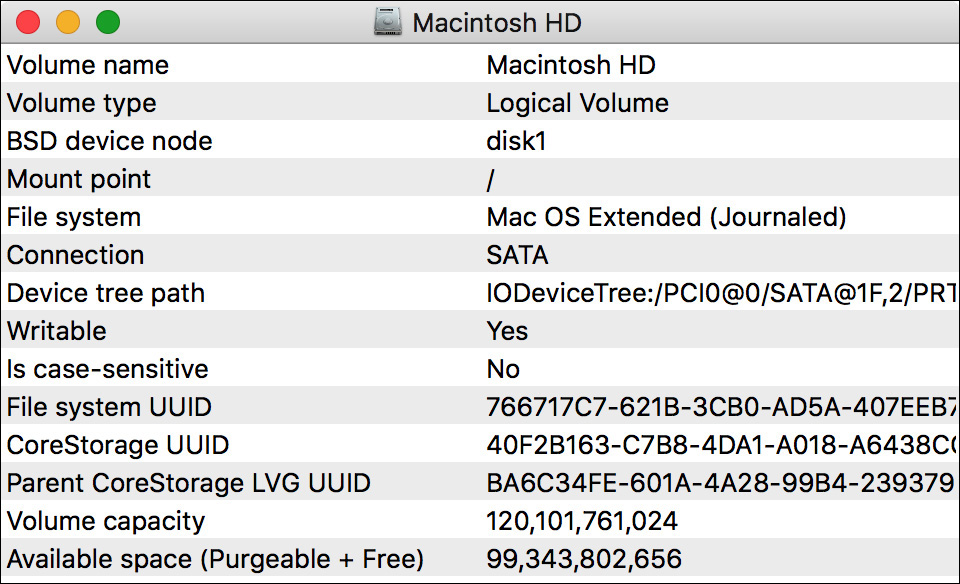
5 Close the information window.
6 Select the entry for your internal disk (generally the top item) in the sidebar.
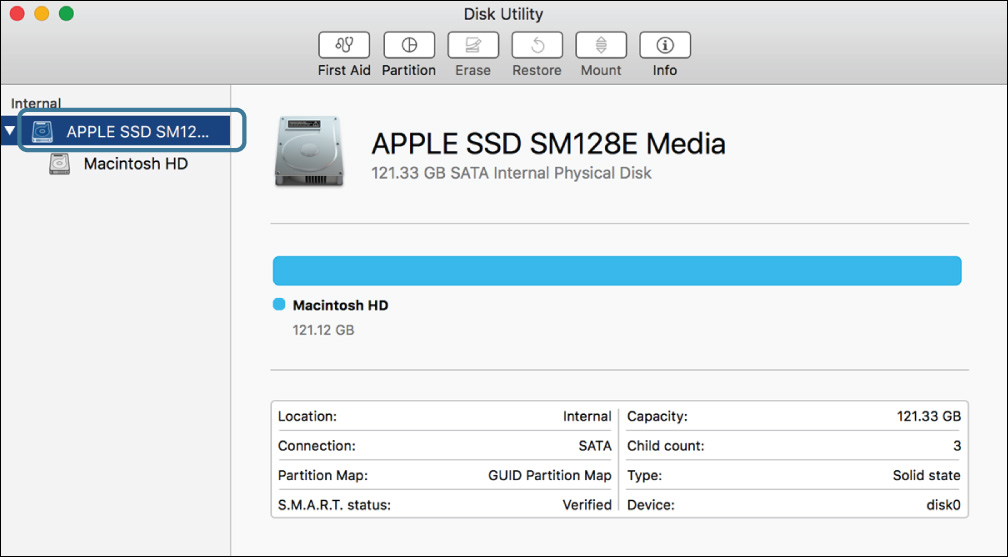
Basic information about the disk (including its total capacity and partition map type) appears near the bottom of the window.
7 Click the Info button in the toolbar.
Again, a window opens with additional information. Since this window shows information about the disk as a whole, it shows different information than you saw in the volume info window.
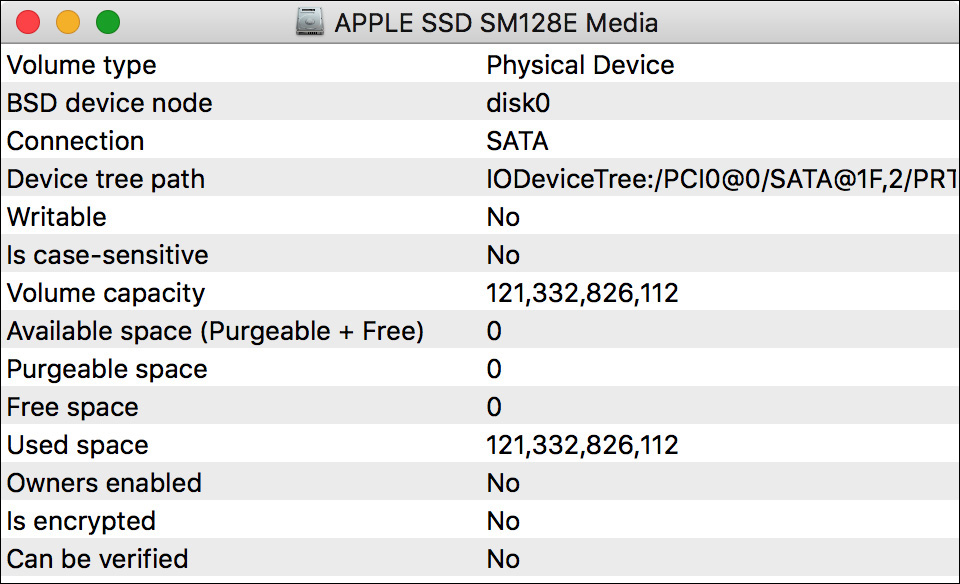
Note
The “Available space” and “Free space” entries will normally be zero. These entries refer to space on the disk device that is not allocated to any volume, not to free space within volumes.
8 Close the information window.
Repartition Your Startup Disk Without Erasing
1 If any applications other than Disk Utility are running, quit them.
Do not use any other applications while Disk Utility is working to repartition the disk.
2 In Disk Utility, make sure the entry for your startup disk (generally the top item) is selected in the sidebar.
3 Click the Partition button in the toolbar.
4 Click the Add (+) button below the partition chart.
The disk’s layout appears divided into two equally sized partitions.
5 Change the new partition’s name to Backup.
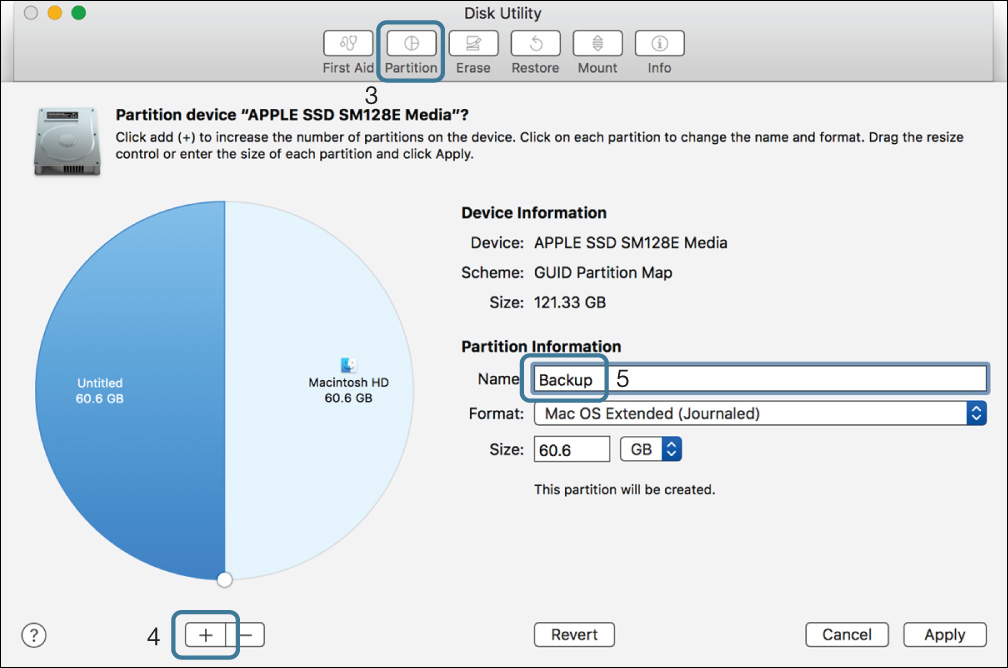
6 Click Apply.
7 In the confirmation dialog, click Partition.
8 If a warning about repartitioning the boot drive appears, click Continue.
9 Click the disclosure triangle labeled Show Details to view the details of the repartitioning process.
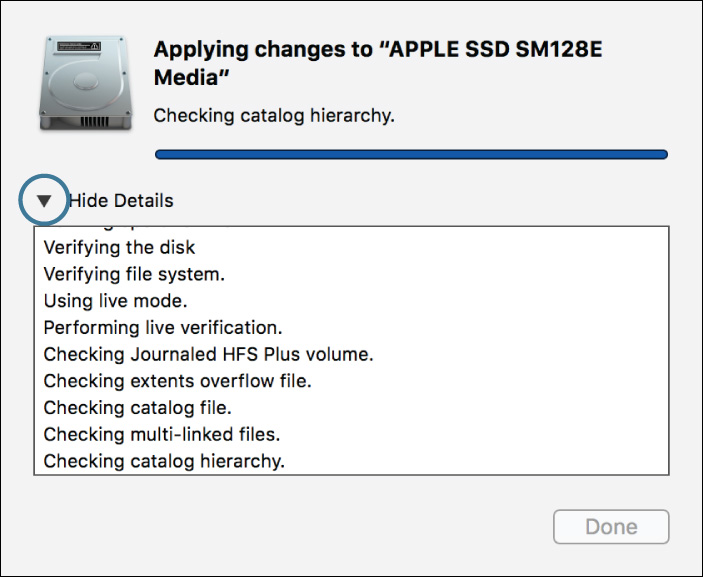
Disk Utility partitions the disk, which can take a few minutes. Disk Utility verifies the file system before making any changes and may also have to move existing data that resides in the space allocated to the second partition.
10 If a dialog appears asking whether you want to use this disk as a Time Machine device, click Don’t Use.
11 When the repartitioning is finished, click Done.
Exercise 9.2 Erase a Disk
![]() Prerequisites
Prerequisites
![]() You must have created the Local Admin account (Exercise 2.1, “Configure a New macOS System for Exercises,” or Exercise 2.2, “Configure an Existing macOS System for Exercises”).
You must have created the Local Admin account (Exercise 2.1, “Configure a New macOS System for Exercises,” or Exercise 2.2, “Configure an Existing macOS System for Exercises”).
![]() This exercise requires an erasable external disk, such as a flash drive.
This exercise requires an erasable external disk, such as a flash drive.
In this exercise, you will use Disk Utility to erase and partition an external disk using a new partition scheme.
Use Disk Utility to Erase and Reformat a Disk
Many external storage systems (USB flash drives, USB and FireWire hard disks, and so on) come preformatted for Windows, using the Master Boot Record (MBR) partition scheme and the FAT32 volume format. For the best compatibility with macOS, you can reformat them to use the GUID partition table (GPT) scheme and Mac OS Extended volume format.
1 If necessary, log in as Local Admin (password: ladminpw, or whatever you chose when you created the account).
2 Plug in the external disk you’re using for this exercise.
Warning
This exercise erases all information on the external disk. Do not perform this exercise with a disk that contains any files you want to keep.
3 If necessary, open Disk Utility from the Utilities folder.
4 In the sidebar, select the external disk device (or “Apple read/write Media” if you are using the disk image). Be sure to select the device, not the volume or volumes it contains.
5 Click Erase in the toolbar.
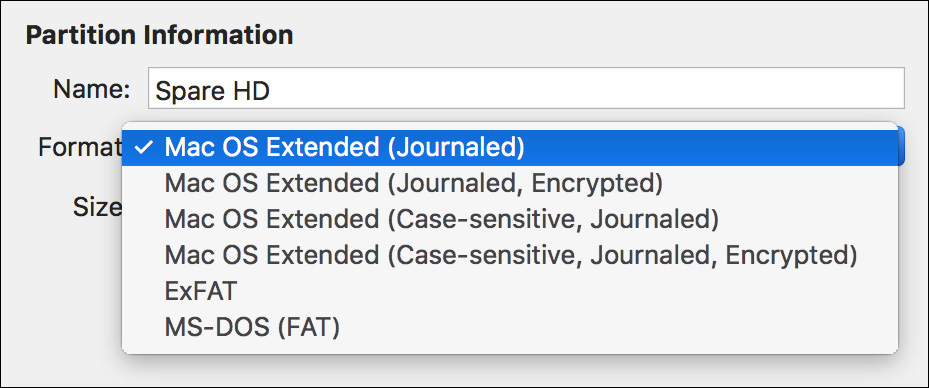
6 View the options available in the Format and Scheme pop-up menus, and then choose “Mac OS Extended (Journaled)” and “GUID Partition Map” from them.
7 Name the disk Flash Drive.
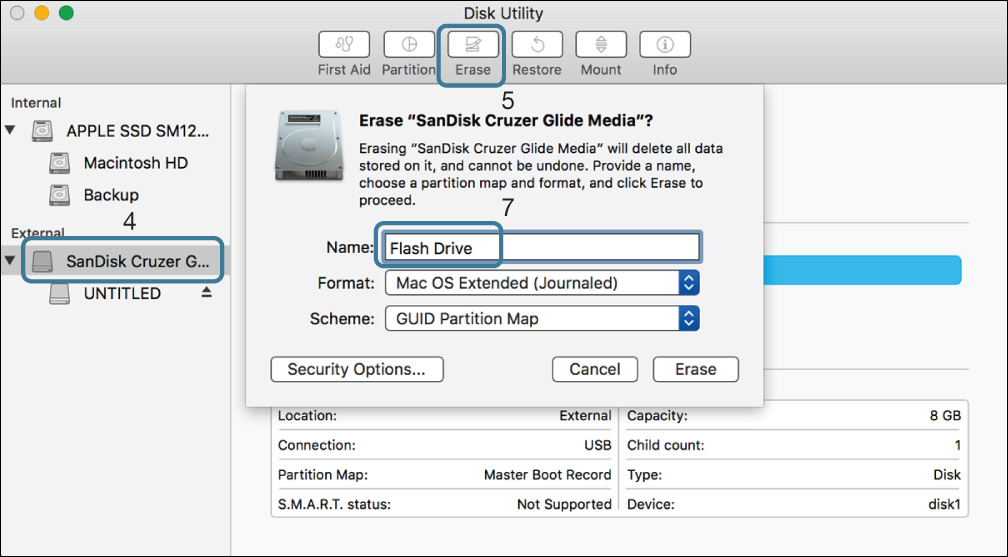
8 Click Erase.
9 Click the disclosure triangle labeled Show Details to view the details of the reformatting process.

10 When the reformatting is finished, click Done.
11 Click the Eject button next to the new volume in the Disk Utility sidebar.
When the volume has finished ejecting, it will vanish from the desktop. It will remain in the Disk Utility sidebar.
12 Unplug the disk from your Mac.
Exercise 9.3 Repair Partitions and Volumes in Target Disk Mode
![]() Prerequisites
Prerequisites
![]() You must have created the Mayta Mishtuk account (Exercise 6.1, “Restore a Deleted User Account”).
You must have created the Mayta Mishtuk account (Exercise 6.1, “Restore a Deleted User Account”).
![]() You need another computer running macOS Sierra.
You need another computer running macOS Sierra.
![]() Both computers must have FireWire, Thunderbolt, or USB-C interfaces, and you need the appropriate cable to connect them.
Both computers must have FireWire, Thunderbolt, or USB-C interfaces, and you need the appropriate cable to connect them.
In this exercise, you will start your computer in target disk mode and use another computer to check its file structure and to examine its files directly in the Finder. These are techniques that could be used to repair or recover files from a computer that could not start up normally because of file system damage.
Note
This exercise and Exercise 9.4, “Repair Partitions and Volumes in Recovery Mode,” cover many of the same operations, but they use different modes to run the disk repair tools. You do not need to perform both. Generally, if you have access to another Mac running Sierra and both computers have FireWire, Thunderbolt, or USB-C (and you have the appropriate cable), this is the preferred exercise. If you are participating in a classroom setting, you can perform this exercise with a partner, using one of your computers as the host and the other as the target.
Start Your “Target” Computer in Target Disk Mode
Choose one of your computers to act as a “host” (the computer that will run the disk repair tools) and one to act as a “target” (the computer that will have its disk repaired).
1 Shut down the target computer.
2 Hold down the T key on the target computer while you press the power button. Keep holding the T key until you see a FireWire, Thunderbolt, or USB logo (or some combination) on the screen.
3 When you see the logo on the screen, release the T key.
4 If necessary, log in to the host computer.
5 Connect the two computers with a FireWire, Thunderbolt, or USB-C data cable.
6 If a dialog appears asking whether you want to use this disk as a Time Machine device, click Don’t Use.
7 If the target computer’s startup disk is encrypted with FileVault, you are prompted for a password to unlock the disk; you can enter the password of any FileVault-enabled account (ladminpw or chris, or whatever password you chose).
Repair the Partition Table and Volume
1 On the host computer, open Disk Utility.
2 In the External section of the Disk Utility sidebar, select the target computer’s disk device.
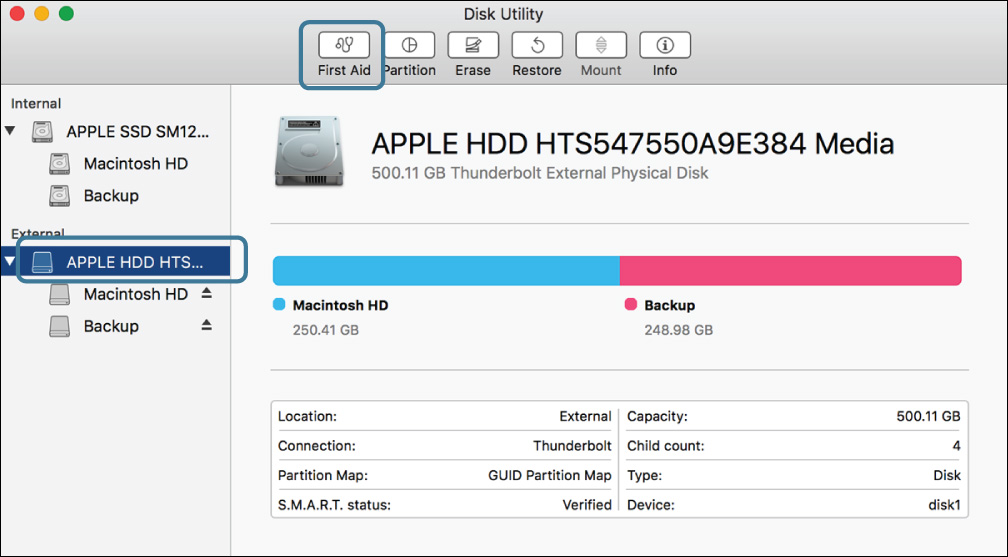
Note that the connection is listed as FireWire, Thunderbolt, or USB-C.
3 Click the First Aid button in the toolbar.
4 In the confirmation dialog, click Run.
5 Click the disclosure triangle labeled Show Details.
Disk Utility checks (and, if necessary, repairs) the partition table as well as certain hidden disk contents such as the EFI system partition.
Disk Utility shouldn’t find any problems; if it does, use First Aid again to make sure that all problems were repaired successfully.
6 When the process finishes, click Done.
7 Select the entry for the target computer’s Macintosh HD volume, and then click First Aid again.
8 Click Run, and then click the disclosure triangle labeled Show Details.

This time, Disk Utility checks (and, if necessary, repairs) the file structure within the Macintosh HD volume. Since there are a large number of files in the volume, this process may take a few minutes.
As before, it should not find any problems; if it does, use First Aid again to make sure that all problems are repaired successfully. You can also repair the Backup volume.
9 When the process finishes, click Done.
10 Quit Disk Utility.
Examine Files Manually in Target Disk Mode
1 In the host computer’s Finder, open the Computer view by pressing Command-Shift-C.
Both computers’ volumes appear. Generally, you can distinguish them by the target computer’s orange volume icons.
2 Select the target computer’s Macintosh HD volume, and choose File menu > Get Info (Command-I).
3 If necessary, expand the Sharing & Permissions section of the Info window.
4 Click the padlock, and authenticate as Local Admin.
5 If necessary, select the “Ignore ownership on this volume” checkbox.
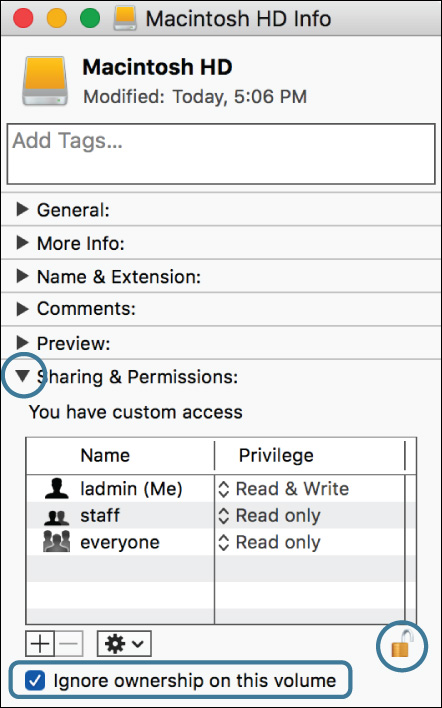
Selecting this option allows you full access to the other computer’s volume. This is particularly useful if the other computer has different user accounts so that the file ownership does not match up between the computers. This is discussed in Reference 11.3, “Manage Permissions.”
6 Close the Info window.
7 Open the target computer’s Macintosh HD volume, and then navigate into Users/mayta/Desktop.
Because ownership is being ignored, you can access Mayta’s files directly. If necessary, you could recover files from a computer this way even if the computer could not start up normally.
8 In the Finder sidebar, Option-click the Eject button next to one of the target computer’s volumes.
Holding Option while clicking Eject tells the Finder to eject all volumes on that disk, not just the one you clicked the Eject button for.
9 Wait for the target computer’s volumes to vanish from the sidebar and desktop.
10 Press and hold the power button to shut down the target computer, and then unplug the cable after the computer has been turned off.
11 If you are not going to perform the next exercise, restart the target computer normally.
Exercise 9.4 Repair Partitions and Volumes in Recovery Mode
![]() Prerequisites
Prerequisites
![]() You must have created the Chris Johnson account (Exercise 5.1, “Create a Standard User Account”).
You must have created the Chris Johnson account (Exercise 5.1, “Create a Standard User Account”).
![]() Your computer must have a local hidden Recovery HD partition.
Your computer must have a local hidden Recovery HD partition.
In this exercise, you will start your computer in macOS Recovery mode and check its file structure and home folder permissions. These are techniques you can use to repair a computer that will not start up normally because of file system damage.
Note
This exercise and Exercise 9.3, “Repair Partitions and Volumes in Target Disk Mode,” perform many of the same operations but use different modes to run the disk repair tools. You do not need to perform both.
Repair the Partition Table and Volume
1 Restart your computer, and then hold down Command-R until the gray Apple logo appears on the screen.
2 At the Utilities screen, select Disk Utility and click Continue.
3 If your startup volume is encrypted with FileVault, it appears dimmed in the disks and volumes list; select it, click the Mount button in the toolbar, and then enter the password of any FileVault-enabled account (ladminpw or chris, or whatever password you chose).
4 Select your computer’s internal disk device (generally the top entry in the sidebar).
5 Click the First Aid button in the toolbar.
6 In the confirmation dialog, click Run.
7 Click the disclosure triangle labeled Show Details.
Disk Utility checks the partition table as well as certain hidden disk contents such as the EFI system partition and Recovery HD partition and attempts to repair any problems it finds.
8 When the process finishes, click Done.
9 Select the entry for the Macintosh HD volume, and then click First Aid again.
10 Click Run, and then click the disclosure triangle labeled Show Details.
This time, Disk Utility checks the file structure within the Macintosh HD volume and repairs it if necessary.
11 When the process finishes, click Done.
You can also repair the Backup volume if you want.