Lesson 23. Manage Host Sharing and Personal Firewall
Goals
![]() Examine and enable host-sharing services built into macOS
Examine and enable host-sharing services built into macOS
![]() Use screen-sharing tools to access other network hosts
Use screen-sharing tools to access other network hosts
![]() Use AirDrop to quickly and easily share files
Use AirDrop to quickly and easily share files
![]() Secure shared services by configuring the personal firewall
Secure shared services by configuring the personal firewall
![]() Troubleshoot shared service issues
Troubleshoot shared service issues
Although macOS Server requires a separate purchase in the Mac App Store, macOS already includes many of the core technologies that make macOS Server possible. Of course, macOS Server supports additional advanced network services and administration tools, but the two share the same software for providing several network services.
In this lesson, you will focus on using macOS as both a network client and a shared resource for a variety of network and Internet services. After an introduction to the general concepts of providing shared services, you will delve into remotely controlling Mac computers via screen-sharing services. Then you will see how to use AirDrop—the easiest way to share files between Apple devices. You will also learn how to secure access to shared resources from macOS using the built-in personal firewall. Finally, this lesson covers general troubleshooting methods to resolve issues that may arise when you attempt to share services from your Mac.
Reference 23.1 Enable Host-Sharing Services
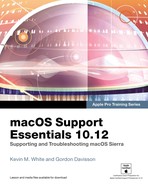
macOS includes an assortment of shared network services, and you’ll now see how to manage them. These shared services vary in implementation and purpose, but they all allow users to remotely access resources on the Mac providing the service. They are also all easily enabled and managed from the Sharing preferences.
Note
Users cannot access services on a Mac in sleep mode. You can turn off your Mac computer’s automatic sleep activation or enable automatic waking for network access from the Energy Saver preferences. Automatic wake on both wired and wireless networks works on macOS if your network hardware supports it. You can find out more from Apple Support article HT201960, “About Wake on Demand and Bonjour Sleep Proxy.”
It’s important to recognize the security risk involved in providing a service that allows other users to control processes on your Mac. Obviously, if you’re providing a service that allows remote control and execution of software, it’s certainly possible for an attacker to cause trouble. Thus, it’s paramount that when you enable these types of services you choose strong security settings. Using strong passwords is a good start, but you can also configure limited access to these services from the Sharing preferences.
Configure Network Identification
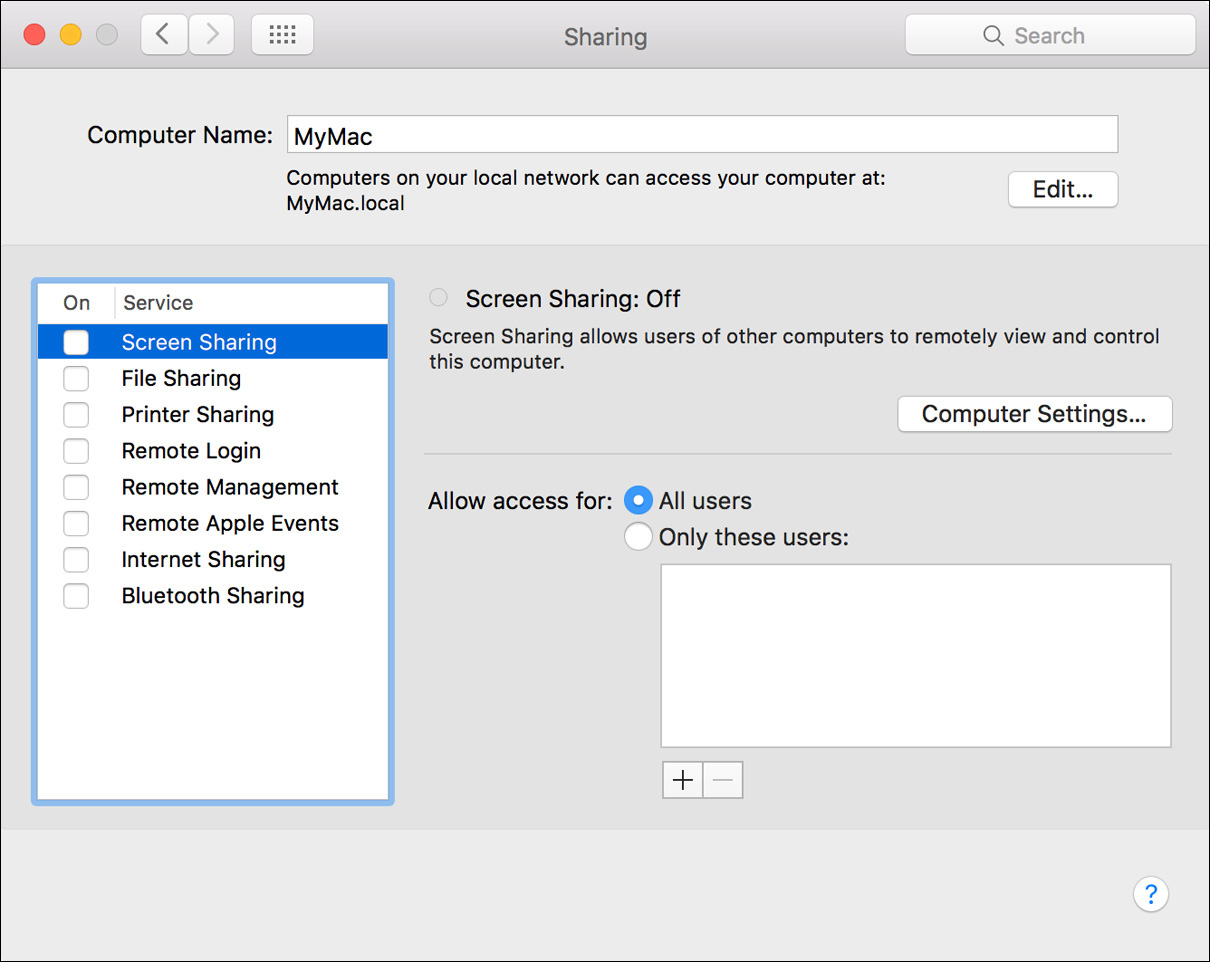
You may be unable to control your Mac computer’s IP address or DNS host name, because the network administrator usually controls these. But as long as the Mac has properly configured TCP/IP settings, as outlined in Lesson 19, “Manage Basic Network Settings,” your configuration is complete for these two identifiers. If your Mac has multiple IP addresses or DNS host names properly configured, it also accepts connections from those.
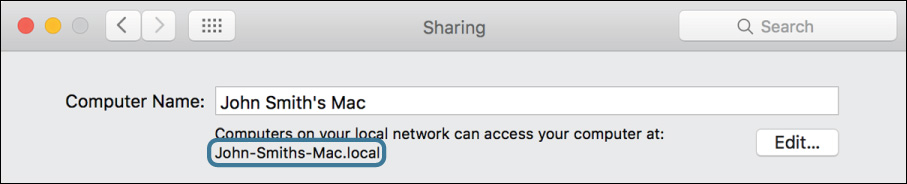
For dynamic network discovery protocols, though, your Mac uses network identification that can be set locally by an administrator. By default, your Mac automatically chooses a name based either on its DNS name or on the name of the user created with the Setup Assistant. However, at any time an administrator user can change the Mac computer’s network identifier from the Sharing preferences. Simply enter a name in the Computer Name field, and the system sets the name for each available discovery protocol.
For example, if you enter the computer name MyMac, the Bonjour name is set to MyMac.local and the NetBIOS/WINS name is set to MYMAC. If the name you choose is already taken by another local device, the Mac automatically appends a number to the end of the name. NetBIOS/WINS may require additional configuration if your network uses multiple domains or workgroups, as covered in Lesson 20, “Manage Advanced Network Settings.”
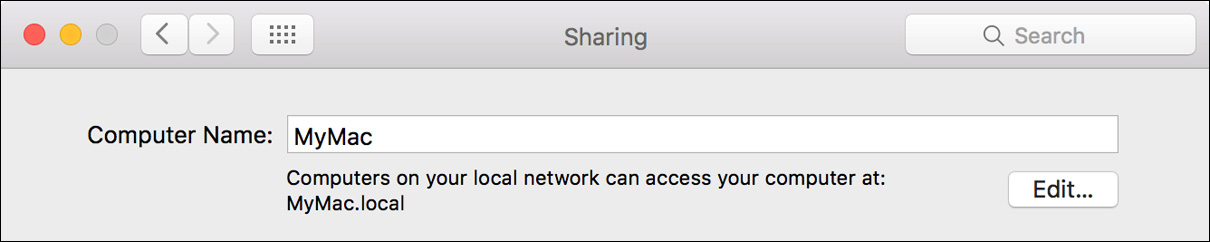
The local Bonjour service needs no additional configuration, but if you want to set a custom Bonjour name, click the Edit button below the Computer Name field to reveal the Local Hostname field. From this interface you can also register your Mac computer’s identification for Wide-Area Bonjour. Wide-Area Bonjour uses an intermediary service to facilitate Bonjour browsing to networks outside of the computer’s current subnet. If this service is available on your network, select the “Use dynamic global hostname” checkbox to reveal the Wide-Area Bonjour settings.
About Shared Services
The macOS sharing services include:
![]() DVD or CD Sharing (Remote Disc)—Allows you to share your Mac computer’s optical disc, if available, via the network. It’s primarily designed to let you install software for Mac computers that lack a built-in optical disc. Do not confuse Remote Disc with standard file-sharing services covered later in this lesson. This service differs in several key respects: it shares only what is on the optical disc, you cannot configure user-specific access, and it can only be accessed via Bonjour. By enabling this service, the launchd control process starts the ODSAgent background process, which listens for Remote Disc requests on a very high randomly selected TCP port. This service can be accessed only by other Mac computers from the Finder sidebar or the Migration Assistant application.
DVD or CD Sharing (Remote Disc)—Allows you to share your Mac computer’s optical disc, if available, via the network. It’s primarily designed to let you install software for Mac computers that lack a built-in optical disc. Do not confuse Remote Disc with standard file-sharing services covered later in this lesson. This service differs in several key respects: it shares only what is on the optical disc, you cannot configure user-specific access, and it can only be accessed via Bonjour. By enabling this service, the launchd control process starts the ODSAgent background process, which listens for Remote Disc requests on a very high randomly selected TCP port. This service can be accessed only by other Mac computers from the Finder sidebar or the Migration Assistant application.
More Info
For more information about Remote Disc, see Apple Support article HT203973, “Use the CD or DVD drive from another computer with your Mac.”
More Info
Details on the launchd control process are covered in Lesson 26, “Troubleshoot Startup and System Issues.”
![]() Screen Sharing—Allows remote control of your Mac. Using this service is detailed later in this lesson.
Screen Sharing—Allows remote control of your Mac. Using this service is detailed later in this lesson.
![]() File Sharing—Allows remote access to your Mac computer’s file system via the Server Message Block (SMB) Protocol and Apple Filing Protocol (AFP) network file-sharing services. When you enable the File Sharing service, the launchd control process listens for SMB service requests on TCP port 445 and automatically starts the smbd process as necessary to handle any requests. Further, the launchd control process listens for AFP service requests on TCP port 548 and automatically starts the AppleFileServer process as necessary to handle any requests. By default on macOS, only standard and administrator users have access to file-sharing services, but you can modify access for other users as outlined in Lesson 11, “Manage Permissions and Sharing.”
File Sharing—Allows remote access to your Mac computer’s file system via the Server Message Block (SMB) Protocol and Apple Filing Protocol (AFP) network file-sharing services. When you enable the File Sharing service, the launchd control process listens for SMB service requests on TCP port 445 and automatically starts the smbd process as necessary to handle any requests. Further, the launchd control process listens for AFP service requests on TCP port 548 and automatically starts the AppleFileServer process as necessary to handle any requests. By default on macOS, only standard and administrator users have access to file-sharing services, but you can modify access for other users as outlined in Lesson 11, “Manage Permissions and Sharing.”
![]() Printer Sharing—Allows network access to printers that are directly attached to your Mac. Using this service is covered in Lesson 25, “Manage Printers and Scanners.”
Printer Sharing—Allows network access to printers that are directly attached to your Mac. Using this service is covered in Lesson 25, “Manage Printers and Scanners.”
![]() Scanner Sharing—Allows network access to document scanners that are configured for your Mac. This service works only with other Mac computers on a local network (Bonjour) via the Image Capture application. This service also operates only on a per-user basis, and is available only when the user is logged in. When this service is enabled, the launchd control process listens for scanner-sharing requests on a very high randomly selected TCP port and starts the Image Capture Extension background process as needed to handle any requests. The only additional configuration is that you can, from the Sharing preferences, enable specific scanners if you have more than one attached.
Scanner Sharing—Allows network access to document scanners that are configured for your Mac. This service works only with other Mac computers on a local network (Bonjour) via the Image Capture application. This service also operates only on a per-user basis, and is available only when the user is logged in. When this service is enabled, the launchd control process listens for scanner-sharing requests on a very high randomly selected TCP port and starts the Image Capture Extension background process as needed to handle any requests. The only additional configuration is that you can, from the Sharing preferences, enable specific scanners if you have more than one attached.
![]() Remote Login—Allows remote control of your Mac computer’s command line via Secure Shell (SSH). Further, SSH remote login allows you to securely transfer files using Secure File Transfer Protocol (SFTP) or the secure copy command scp. With Remote Login enabled, the launchd control process listens for remote login service requests on TCP 22 and starts the sshd background process as needed to handle any requests. By default, all standard and administrator user accounts are allowed to access the service. Command-line usage is beyond the scope of this guide; thus, using SSH is beyond the scope of this guide.
Remote Login—Allows remote control of your Mac computer’s command line via Secure Shell (SSH). Further, SSH remote login allows you to securely transfer files using Secure File Transfer Protocol (SFTP) or the secure copy command scp. With Remote Login enabled, the launchd control process listens for remote login service requests on TCP 22 and starts the sshd background process as needed to handle any requests. By default, all standard and administrator user accounts are allowed to access the service. Command-line usage is beyond the scope of this guide; thus, using SSH is beyond the scope of this guide.
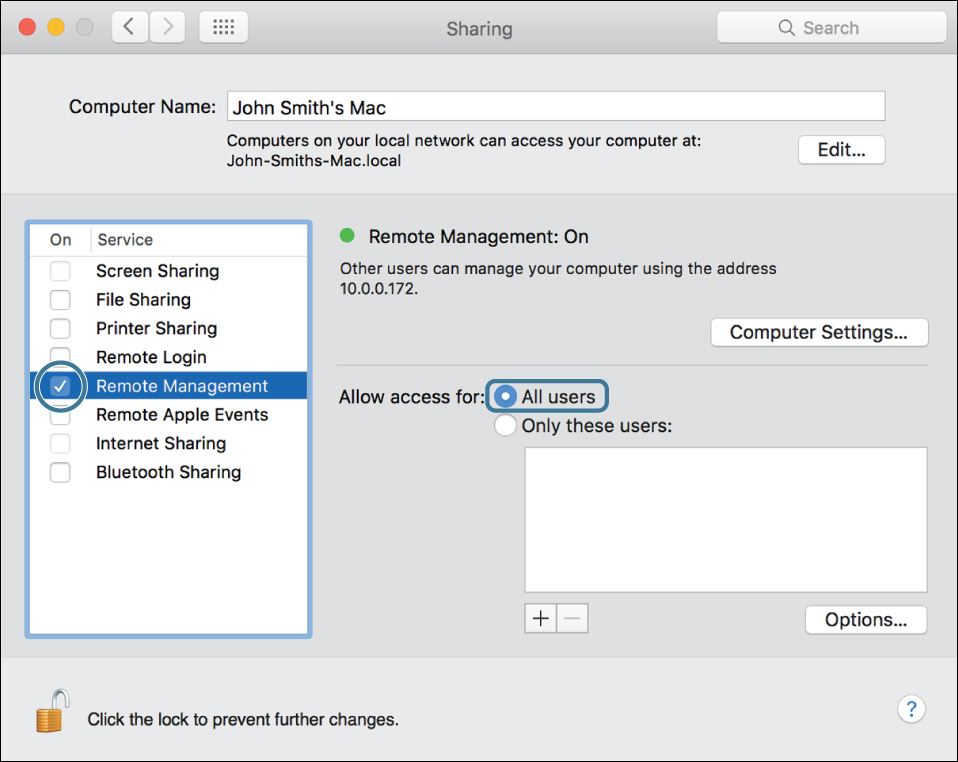
![]() Remote Management—Augments the Screen Sharing service to allow remote administration of your Mac via the Apple Remote Desktop (ARD) application. This service is covered in greater detail later in this lesson.
Remote Management—Augments the Screen Sharing service to allow remote administration of your Mac via the Apple Remote Desktop (ARD) application. This service is covered in greater detail later in this lesson.
![]() Remote Apple Events—Allows applications and AppleScripts on another Mac to communicate with applications and services on your Mac. This service is most often used to facilitate automated AppleScript workflows between applications running on separate Mac computers. When this service is enabled, the launchd control process listens for remote Apple Events requests on TCP and UDP port 3130 and starts the AEServer background process as needed to handle any requests. By default, all nonguest user accounts are allowed to access the service, but you can limit this to specific users from the Sharing preferences.
Remote Apple Events—Allows applications and AppleScripts on another Mac to communicate with applications and services on your Mac. This service is most often used to facilitate automated AppleScript workflows between applications running on separate Mac computers. When this service is enabled, the launchd control process listens for remote Apple Events requests on TCP and UDP port 3130 and starts the AEServer background process as needed to handle any requests. By default, all nonguest user accounts are allowed to access the service, but you can limit this to specific users from the Sharing preferences.
![]() Internet Sharing—Allows your Mac to “reshare” a single network or Internet connection with any other network interface. For example, if your Mac had Internet access via a cellular network USB adapter, you could enable Internet Sharing for the Mac computer’s Wi-Fi and turn it into a wireless access point for the other computers. When you enable the Internet Sharing service, the launchd process starts several background processes. The natd process performs the Network Address Translation (NAT) service that allows multiple network clients to share a single network or Internet connection. The bootpd process provides the DHCP automatic network configuration service for the network devices connected via your Mac. When a network device connects to your Mac computer’s shared network connection, it automatically obtains an IP address, usually in the 10.0.2.X range. Finally, the named process provides DNS resolution for network devices connected to the Internet via your Mac.
Internet Sharing—Allows your Mac to “reshare” a single network or Internet connection with any other network interface. For example, if your Mac had Internet access via a cellular network USB adapter, you could enable Internet Sharing for the Mac computer’s Wi-Fi and turn it into a wireless access point for the other computers. When you enable the Internet Sharing service, the launchd process starts several background processes. The natd process performs the Network Address Translation (NAT) service that allows multiple network clients to share a single network or Internet connection. The bootpd process provides the DHCP automatic network configuration service for the network devices connected via your Mac. When a network device connects to your Mac computer’s shared network connection, it automatically obtains an IP address, usually in the 10.0.2.X range. Finally, the named process provides DNS resolution for network devices connected to the Internet via your Mac.
![]() Bluetooth Sharing—Allows access to your Mac via Bluetooth short-range wireless. Using this service is covered in Lesson 24, “Troubleshoot Peripherals.”
Bluetooth Sharing—Allows access to your Mac via Bluetooth short-range wireless. Using this service is covered in Lesson 24, “Troubleshoot Peripherals.”
Reference 23.2 Control Remote Computers
Providing remote phone support can be arduous. Inexperienced users don’t know how to properly communicate the issues they are experiencing and may not be able to describe what they are seeing on the screen. Further, attempting to describe the steps involved in performing troubleshooting or administrative tasks to an inexperienced user over the phone is, at best, time-consuming for both parties.
When it comes to troubleshooting or administration, nothing beats actually seeing the computer’s screen and controlling its mouse and keyboard. macOS includes built-in software that allows you to view and control the graphical interface via three methods: system Screen Sharing, Messages screen-sharing, and Remote Management.
About Screen-Sharing Services
Both system Screen Sharing and Messages screen-sharing are included with macOS Sierra, and their use is covered in the following sections of this lesson. A standard installation of macOS includes only the client-side software for Remote Management. The administrative side of Remote Management, Apple Remote Desktop (ARD), used to control other Mac computers, is a separate purchase available from the Mac App Store.
Note
Mac computers with OS X Lion 10.7 or later can remotely control Mac computers with macOS Sierra via Screen Sharing. Further, macOS Sierra can remotely control Mac operating systems earlier than OS X Lion that have an updated ARD Remote Management agent.
Screen Sharing is a subset of Remote Management, so when you enable Remote Management, you are also enabling Screen Sharing. This may seem a bit confusing if you look at the Sharing preferences interface, which deselects the Screen Sharing checkbox when Remote Management is enabled. Rest assured, though, enabling Remote Management also enables Screen Sharing. Thus, you can save yourself a step by initially configuring Remote Management, which allows for both ARD and Screen Sharing access.
More Info
ARD is beyond the scope of this guide. You can find out more about ARD here: http://help.apple.com/remotedesktop/mac/.
All Apple screen-sharing services are based on a modified version of the Virtual Network Computing (VNC) protocol. The primary modification is the use of optional encryption for both viewing and controlling traffic. Another change is the ability to copy files and clipboard content between Mac computers using Screen Sharing.
Further, macOS allows you to access a virtual desktop on another Mac via Screen Sharing. In other words, Screen Sharing allows you to have your own virtual login on another Mac, completely separate from the login currently being used by the local user. This feature is similar to fast user switching (covered in Lesson 5, “Manage User Accounts”), except the second user is entirely remote via Screen Sharing and potentially using the computer at the same time as the local user.
More Info
VNC is a cross-platform standard for remote control, so if configured properly, the macOS Screen Sharing service integrates well with other third-party VNC-based systems. Thus, your Mac can control (or be controlled by) any other VNC-based software regardless of operating system or platform. For more details on VNC, refer to its Wikipedia entry, https://en.wikipedia.org/wiki/Virtual_Network_Computing.
Enable System Screen Sharing
Before you can access a Mac remotely via Screen Sharing, the remote Mac must first have the Screen Sharing service enabled. To enable Screen Sharing for your Mac, open the Sharing preferences, click the lock icon in the lower-left corner, and authenticate as an administrator user to unlock the preferences.
Note
Again, the Screen Sharing service is a subset of the Remote Management service. Thus, if Remote Management is enabled, the Screen Sharing checkbox is unavailable.
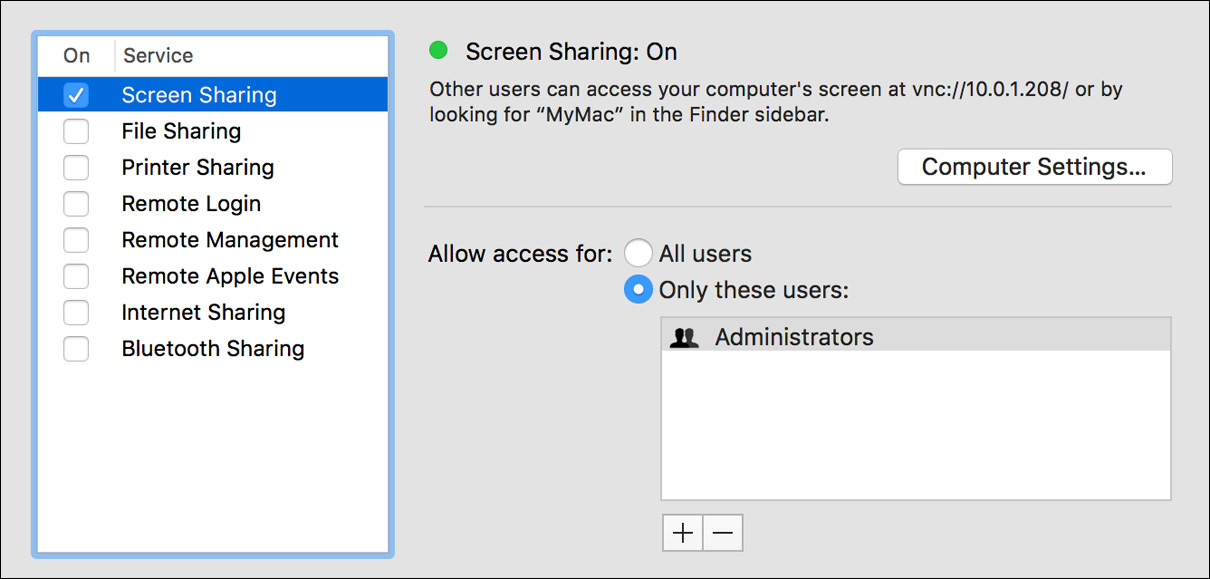
Select the Screen Sharing checkbox in the Service list to turn on Screen Sharing. The launchd control process starts the AppleVNCServer background process, which listens for Screen Sharing service requests on TCP and UDP port 5900. By default, only administrator user accounts are allowed to access the service.
Optionally, you can adjust Screen Sharing access by selecting the “All users” radio button or by using the Add (+) and Delete (–) buttons at the bottom of the users list. When adding accounts, a dialog appears allowing you to select the specific users or groups you want to grant Screen Sharing access. You can select existing users or groups, or you can create a new Sharing user account by clicking the New Person button or selecting a contact from your Contacts.
Also optionally, you can allow a wider range of operating systems to access your Mac computer’s Screen Sharing service by clicking the Computer Settings button. This reveals a dialog where you can enable guest and standard VNC screen-sharing access.
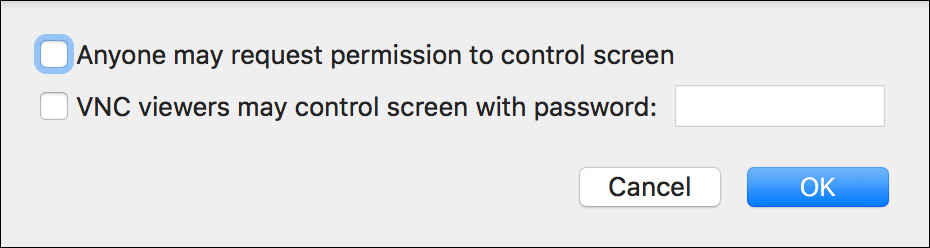
When attempting to access your Mac computer’s screen, the currently logged-in user must authorize the session. By default, only local authorized users and groups are allowed to use Screen Sharing. Select the “Anyone may request permission to control screen” checkbox to allow anyone (from another Mac) to ask permission to share the screen. For this feature to work, you must remove any access restrictions for Screen Sharing by allowing access to all users.
Standard third-party VNC viewers cannot authenticate using the secure methods employed by the macOS Screen Sharing service. Thus, if you select the “VNC viewers may control screen with password” checkbox, you must also set a specific password for VNC access. Remember that all standard VNC traffic is unencrypted. Further, standard VNC viewers cannot use the Screen Sharing service’s clipboard copy, file copy, or virtual desktop features.
Connect via Screen Sharing
The process to connect to and control another computer for Screen Sharing is similar to how you connect to a shared file system. From the Finder, you can connect to another computer that has Screen Sharing, Remote Management, or VNC enabled. You can initiate the connection using one of two methods. The first method works only for Screen Sharing or Remote Management service hosts on the local network. In the Finder, browse to and select the computer from the Finder sidebar Shared list or the Finder Network folder, and then click the Share Screen button.
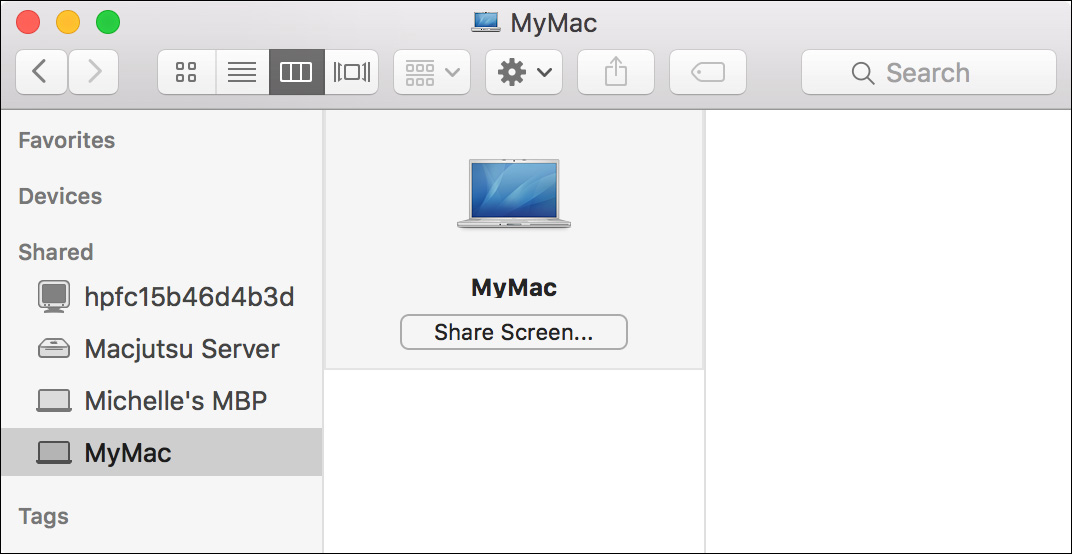
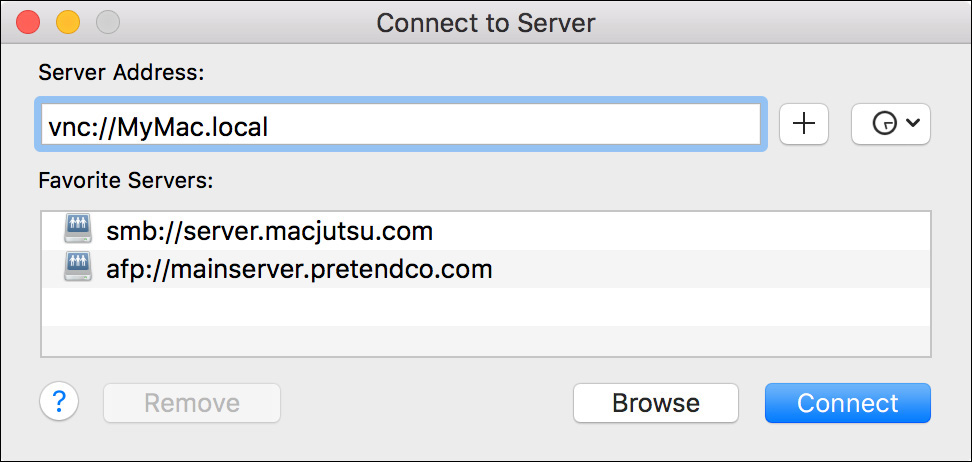
The second method allows you to connect to and control any host providing Screen Sharing, Remote Management, or standard VNC services. In the Finder, choose Go > Connect to Server. In the “Connect to Server” dialog, enter vnc://, followed by the computer’s IP address, DNS host name, or Bonjour name, and then click Connect.
Regardless of the connection method, the macOS automatically opens the /System/Library/CoreServices/Applications/Screen Sharing application and initiates a connection to the specified host. You are presented with a dialog that requires you to make an authentication choice.
Note
If you are using Kerberos single sign-on or have previously saved your authentication information to a keychain, the Mac automatically authenticates for you and doesn’t present the authentication dialog.
The first authentication choice, which appears only if you are connecting to macOS with this option enabled, is to ask the current user for permission. The second authentication choice, the default for any system, is to authenticate with a user account. As a final option, you can select the checkbox that saves this information to your login keychain. Once you have made your authentication selection, click Connect to continue.
Depending on the remote computer’s system, one of three situations occurs when Screen Sharing establishes the connection:
![]() If the remote computer is not a Mac running macOS, you will instantly connect to the current screen of the remote computer.
If the remote computer is not a Mac running macOS, you will instantly connect to the current screen of the remote computer.
![]() If the remote computer is a Mac running macOS and no one is logged in, or if you authenticated as the currently logged-in user, or if the currently logged-in user is not an administrator, you will instantly connect to the current screen of the remote Mac.
If the remote computer is a Mac running macOS and no one is logged in, or if you authenticated as the currently logged-in user, or if the currently logged-in user is not an administrator, you will instantly connect to the current screen of the remote Mac.
![]() If the remote computer is a Mac running macOS and you authenticated as a different user from the administrator who is currently logged in to the Mac, you are presented with a dialog allowing you to choose between asking permission or logging in as yourself to a virtual desktop.
If the remote computer is a Mac running macOS and you authenticated as a different user from the administrator who is currently logged in to the Mac, you are presented with a dialog allowing you to choose between asking permission or logging in as yourself to a virtual desktop.

When presented with this Screen Sharing dialog, if you choose the option to ask for permission, the remote administrator user is prompted with a dialog to either allow or deny you access. The remote user’s choice dictates whether you can connect. If, however, you choose to log in as yourself, you are instantly connected to a new virtual screen that logs in to your account. In this case, the other user does not directly know that you are remotely using the computer, but the user could verify by examining the Fast User Switching menu or the Users & Groups preferences.
If you need the ability to control another user’s session without asking permission, you should enable the Remote Management service instead of the Screen Sharing service. With Remote Management enabled, when you connect via Screen Sharing the remote user is not asked for permission. The Remote Management service is also designed for use with the Apple Remote Desktop management application, as covered later in this lesson.
Control Another Mac via Screen Sharing
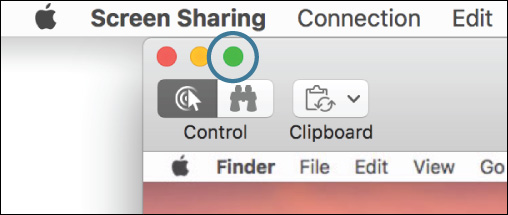
Once you are connected to the remote Mac, a new window opens, titled with the controlled Mac computer’s name, showing a live view of the controlled Mac computer’s screen(s). Whenever this window is active, all keyboard entries and mouse movements are sent to the controlled Mac. For example, pressing Command-Q quits the active application on the Mac being controlled. Thus, to quit the Screen Sharing application, you have to click the close (X) button in the upper-left corner of the window. More options are available in the Screen Sharing toolbar when you select View > Show Toolbar.

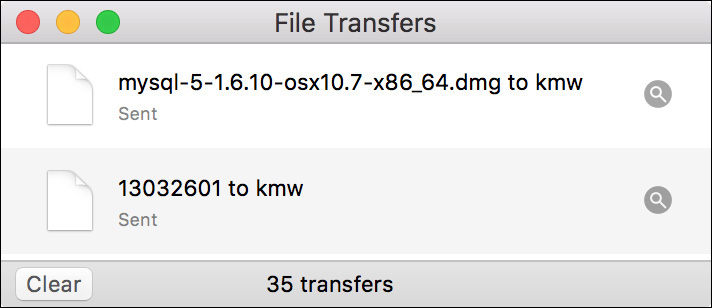
The buttons in the toolbar reveal additional Screen Sharing features, including the option of sharing clipboard content between your Mac and the remote Mac. Optionally, if the remote Mac is running macOS, you can drag files from your Finder to the Mac computer’s remote desktop. Doing so opens a File Transfers dialog, allowing you to verify the transfer progress or cancel the file transfer.
While using the Screen Sharing application, check the preference options by choosing Screen Sharing > Preferences. Use these preferences to adjust screen size and quality settings. If you are experiencing slow performance, adjust these settings for faster performance. Some network connections, such as crowded wireless or dial-up connections, are so slow that these preferences don’t matter much; you have to wait for the screen to redraw.
About Messages Screen-Sharing
The included Messages application, formerly known as iChat, can be used to initiate a screen-sharing session and, as an added bonus, simultaneously provides voice chat services between the administrator Mac and the controlled Mac. Messages screen sharing also makes it much easier to locate other Mac computers to control, because Messages automatically resolves the location of remote computers based on your active chats or available buddies. Further, Messages also supports reverse screen sharing—the administrator Mac can push its screen to display on another Mac for demonstration purposes.
Messages does not require a Mac to have system Screen Sharing enabled in Sharing preferences. This is because Messages includes a quick and easy authorization process for initiating a screen-sharing session via iCloud authentication and the iMessage communication service. Obviously, this requires that users on both Mac computers be signed in to iCloud and iMessage. Details regarding signing in to iMessage and iCloud are covered in Lesson 22, “Manage Network Services.”
Note
With Messages or iChat in OS X Yosemite 10.9 or earlier, you can only initiate a screen-sharing session via AIM- or Jabber-based messaging accounts. With Messages on OS X El Capitan 10.10 or later, you can initiate a screen-sharing session only via iCloud authentication and the iMessage service.
Control Another Mac via Messages
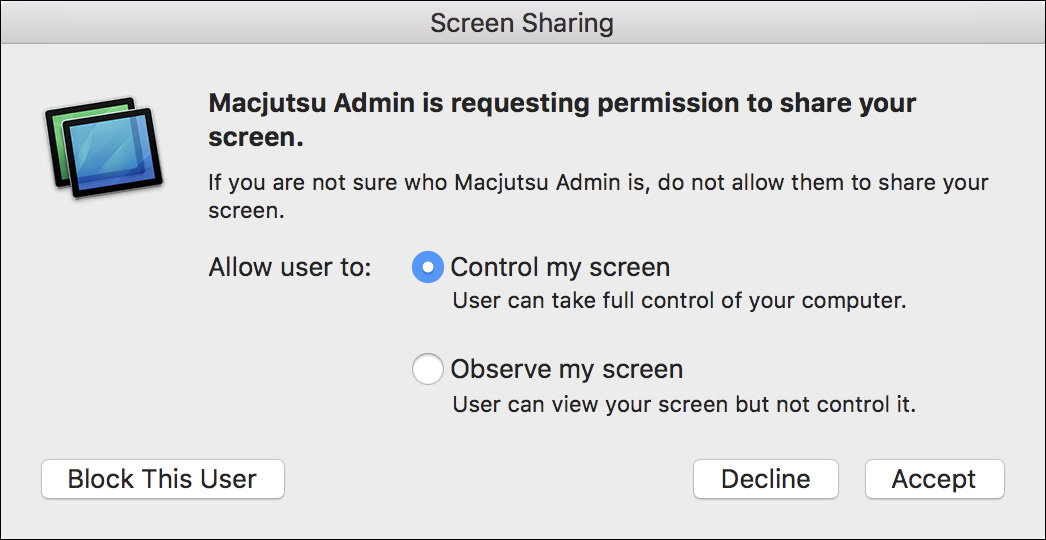
To initiate a Messages screen-sharing session, you must have already started an iMessage chat with the other user. Assuming this is the case, you can select the chat history of the other user in the main Messages window. Once you’ve selected the user, click the Details text button in the top right of the main Messages window. This opens a pop-up dialog where you can click the Screen Sharing button and then choose either “Invite to share my screen” or “Ask to share screen.” As you can tell from these choices, screen sharing in Messages works in both directions.
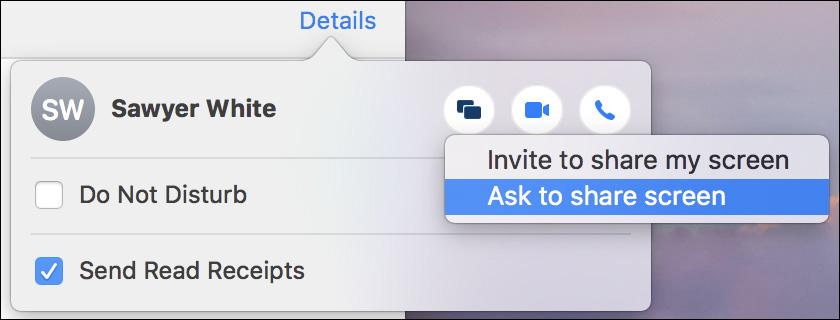
The user on the other Mac will see an authorization dialog offering the choice to accept or decline your request to share screens. With Messages you cannot force other users to share their screens; they have the sole power to allow or deny your request.
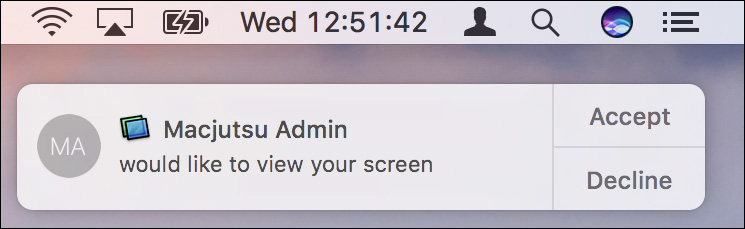
If the other user clicks the Accept button, she will be prompted again to verify the screen-sharing session and select whether you can control or only observe her screen. The idea is that the user may want to think twice about sharing her screen with someone she may not trust. Again, the other user has the sole power to allow you to control or observe her Mac.
Once the other user has accepted the screen-sharing session, the Screen Sharing application initiates the connection. Further, if both computers support voice chat, Messages automatically starts a voice chat session between the two computers. You may need to configure Audio/Video settings in the Messages preferences for this feature to work properly.
Messages leverages the same Screen Sharing application used by the system Screen Sharing service, as covered previously in this lesson. The only exception is that, by the other user’s choice, you may not have control of the remote computer. As you can see in the following screenshot of the Screen Sharing toolbar, the binocular Control button is selected, indicating that you can observe but not control.
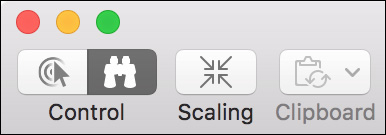
In this case, clicking the shared screen will have no direct effect, except that it will show a magnifying glass–style circle on the remote screen. This is to help users identify something you may be trying to assist them with.
You can request remote control access to the user’s Mac by selecting the mouse cursor Control button. This will issue another notification prompt to the remote user for her to agree to allow you to control the computer. Alternatively, the other user can select the Screen Sharing menu to allow for remote control.
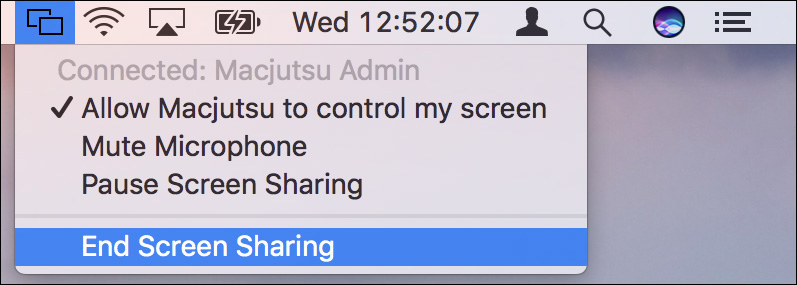
As you can see in the previous screenshot, the user can also manage other features of the Messages screen-sharing session from this menu, including the ability to end the session.
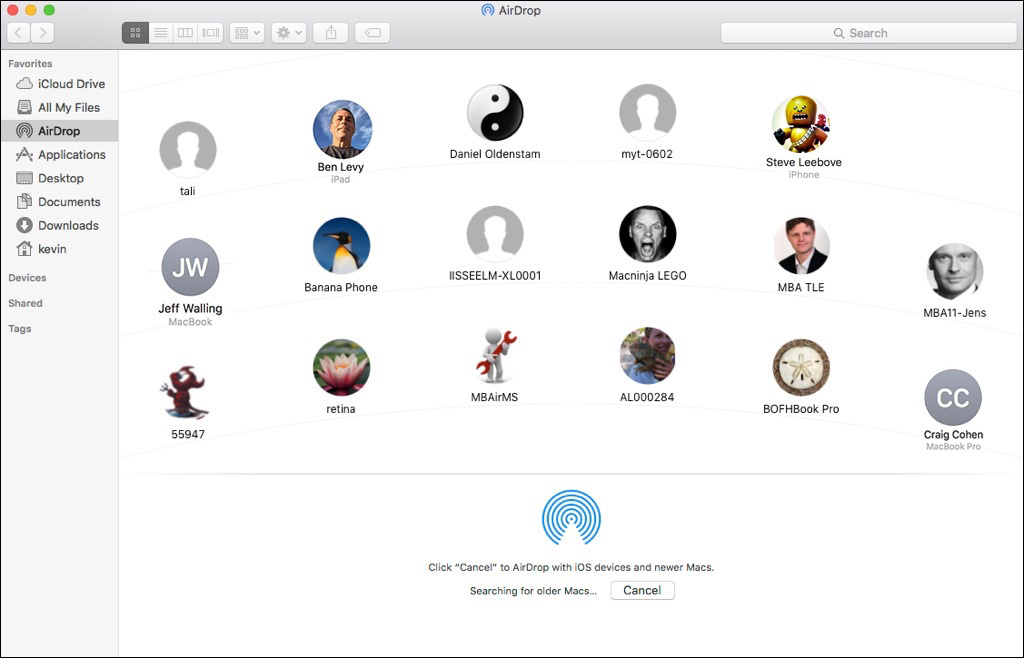
Reference 23.3 Share Files via AirDrop
In addition to traditional file-sharing services, macOS features a peer-to-peer Wi-Fi file-sharing service called AirDrop. Although AirDrop isn’t available for all Apple devices, it’s the easiest way to share files between Apple devices, both macOS and iOS, that are in close proximity.
About AirDrop
AirDrop uses Wi-Fi networking, but the radio frequencies it uses are outside the Mac computer’s normal network connection; thus, it does not travel across your established network. In fact, you don’t need a network at all to use AirDrop, because it creates a closed network between local devices.
The most significant feature of AirDrop is that it requires no setup or configuration. Users who want to share items need only navigate to the AirDrop sharing interface, and macOS presents a browser where they can select other users to easily share files with. AirDrop handles all the details of peer-to-peer file sharing, including discovery, easy authentication, and secure file transfer using Transport Layer Security (TLS) encryption.
AirDrop works only between Apple devices within local Wi-Fi and Bluetooth range. This range varies based on several factors, but it’s generally limited to 30 feet. Also, AirDrop was specifically designed to provide direct file sharing for selected items, as opposed to traditional file sharing, which allows the user to browse another computer’s file system. Finally, AirDrop is supported only on devices with the appropriate system software and wireless hardware.
There are currently two implementations for AirDrop. The most recent implementation for AirDrop uses Bluetooth 4.0 wireless for discovery (due to its low power requirements) and then faster Wi-Fi for the data transfer. The later AirDrop implementation allows for sharing between iOS devices and Mac computers and is available on iOS 7 and later and OS X Yosemite 10.10 and later. The previous AirDrop implementation uses only Wi-Fi and is limited to sharing between Mac computers. It is available on OS X Lion 10.7 and later. AirDrop hardware compatibility varies depending on the Wi-Fi and Bluetooth capabilities built into the Apple devices.
More Info
AirDrop hardware requirements for iOS devices can be found in Apple Support article HT204144, “How to use AirDrop with your iPhone, iPad, or iPod touch,” and for Mac models in Apple Support article HT203106, “Use AirDrop to send content from your Mac.”
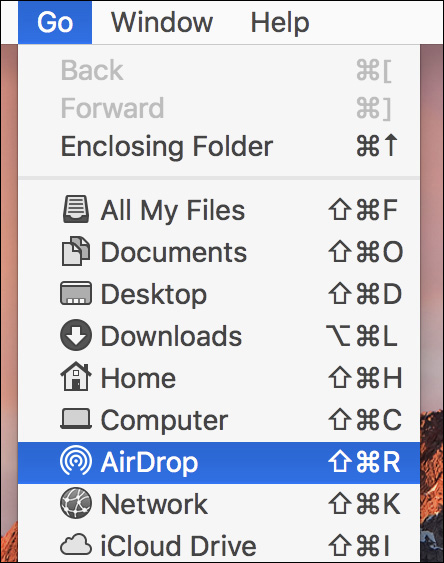
You can also verify whether a Mac supports AirDrop in the Finder by clicking the Go menu. If an AirDrop menu option appears, the Mac supports AirDrop.
Send Items via AirDrop
To quickly share files between Apple devices that support AirDrop, you start by finding other devices in the AirDrop discovery window. On macOS computers, you can open this interface by selecting the AirDrop icon in the Finder sidebar, choosing Go > AirDrop, or pressing Shift-Command-R. Any of these methods opens the AirDrop discovery interface in a Finder window, allowing you to share any item you can drag to this Finder window.
If the Mac computer’s Wi-Fi or Bluetooth interface is turned off, click the Turn On button to enable AirDrop.
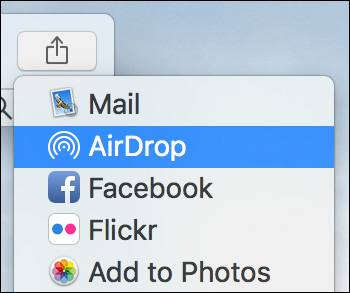
Alternatively, you can engage AirDrop to share a specific open document by clicking the Share button (the box with an up-pointing arrow) at the top of the document window. This will also open the AirDrop discovery interface, but it will share the currently selected document as well. On an iOS device, tapping the Share button is the only way to share an item with another AirDrop device.
Whenever you open the AirDrop discovery interface, the system automatically scans for other AirDrop devices within local wireless range. Other AirDrop devices will appear automatically as long as AirDrop is enabled and using a compatible discovery method. The reasons you might not be able to find a specific AirDrop device are covered in the next section of this lesson.
Once AirDrop has found the other device you want to transfer an item to, sending the item is quite simple. If you are in the Finder, drag a file or folder on top of the icon representing the other device. If you are in a Share window, click the icon representing the other device. In either case, AirDrop will notify the other device that you would like to share something.
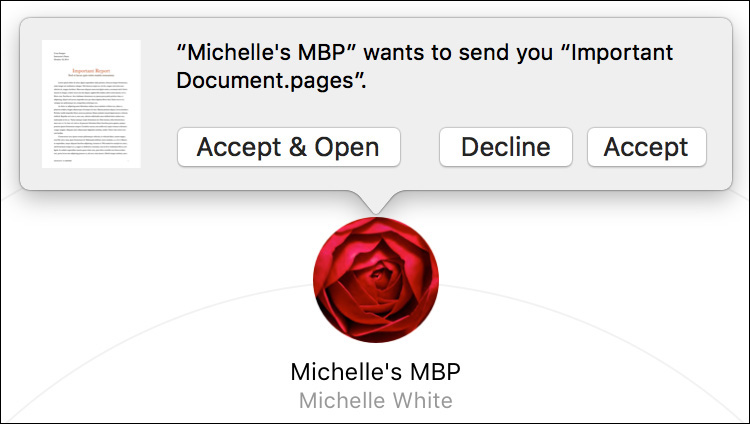
On the other device, a notification appears where the user can accept (or decline) the incoming item. On a Mac, the user is given three choices: If the Accept button is clicked, the item is transferred to the user’s Downloads folder. Clicking Accept & Open saves to the same location and then automatically opens the item. Clicking Decline cancels the transfer and notifies the other user in the AirDrop interface.
About AirDrop Discovery
There are several reasons your Mac might not be able to discover another AirDrop device. First, start with the basics: is AirDrop enabled on the other devices? On another Mac, open the AirDrop window in the Finder to enable AirDrop. On an iOS device, swipe up from the bottom of the screen to open Control Center, and make sure AirDrop is enabled. If this doesn’t solve your AirDrop discovery issues, things get a bit complicated.
As covered previously, there are currently two AirDrop implementations. The more recent implementation works only on newer Apple devices with more recent Apple operating system versions (iOS 7 and OS X Yosemite 10.10 and later). The earlier implementation works only on older Mac computer models or Mac computers with earlier Mac operating systems (OS X Lion 10.7 through OS X Mavericks 10.9). The two AirDrop implementations are not compatible. Thus, it’s possible you won’t be able to find the other device you’re trying to share with in the AirDrop discovery interface.
If you are using an older Mac running OS X Yosemite 10.10 or later, it’s possible that your Mac doesn’t have Bluetooth 4.0 and therefore defaults to the previous AirDrop discovery method. You can confirm this on your Mac from the AirDrop discovery interface; the text below the AirDrop icon will read, “To share with someone using a Mac...”

In this case, even though your older Mac computer is running OS X Yosemite 10.10 or later, the wireless hardware is compatible only with the previous AirDrop discovery method. As a default you will not be able to discover iOS devices or any newer Mac computers running OS X Yosemite 10.10 or later. This is because iOS devices and newer Mac computers running OS X Yosemite 10.10 or later default to the latest AirDrop implementation, which utilizes Bluetooth 4.0 for discovery.
You can force a newer Mac to use the previous AirDrop discovery method by clicking the words “Don’t see who you’re looking for?” at the bottom of the AirDrop interface. Clicking the “Search for an Older Mac” button will switch to the previous AirDrop discovery method.

Again, this will allow your newer Mac with OS X Yosemite 10.10 or later to discover older Mac computers and Mac computers with earlier Mac operating systems. In this mode your Mac will temporarily lose iOS devices and other newer Mac computers with OS X Yosemite 10.10 or later. Every time you open the AirDrop interface on a newer Mac computer, it resets to the new AirDrop discovery method.
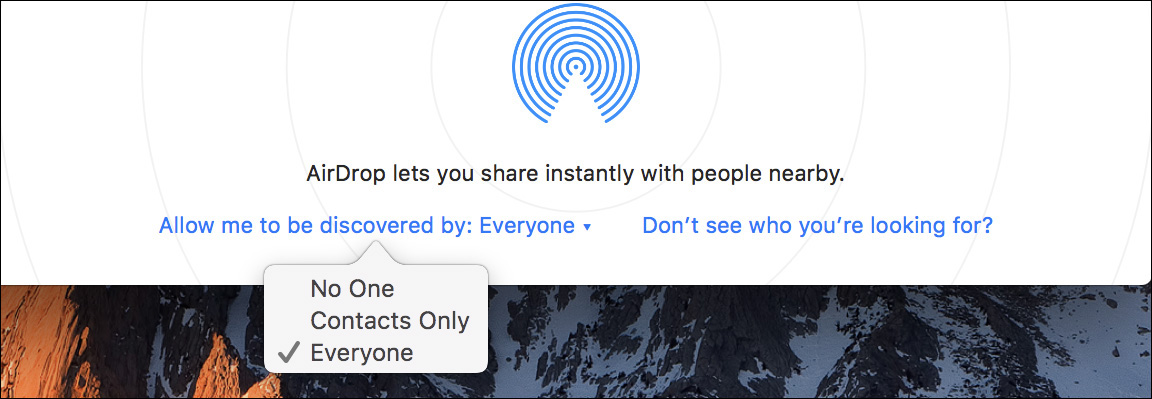
For devices using the newer AirDrop method, AirDrop defaults to a safer mode that limits discovery to only users with matching information in your Contacts. This may also limit your ability to discover other devices in the AirDrop discovery interface. To resolve this issue, on the other device you can set AirDrop discovery to allow everyone. To change AirDrop discoverability on macOS, click the words “Allow me to be discovered by” at the bottom of the AirDrop interface. To change AirDrop discoverability on iOS, in Control Center tap the AirDrop button.
Reference 23.4 Manage the Personal Firewall
From a network services standpoint, your Mac is already very secure, because, by default, only a few essential services are running that respond to external requests. Even once you start providing individual shared services, your Mac is designed to respond only to those services that are enabled.
Further, services that could cause trouble if compromised, like File Sharing or Screen Sharing, can be configured to have limited access authorization. Still, users can open third-party applications or background services that could leave a Mac vulnerable to a network attack.
Tip
To maintain a high level of network security, you should leave sharing services off unless absolutely necessary. If you do enable sharing services, be sure to limit authorization access as much as possible.
About the Personal Firewall
The most common method for securing network services is to configure a firewall, which blocks unauthorized network service access. Most networks use a firewall to limit inbound traffic from an Internet connection.
In fact, most home routers, like AirPort base stations, are by design also network firewalls. While network-level firewalls block unauthorized Internet traffic into your network, they don’t block traffic that originated from inside your network to your Mac. Also, if your Mac is mobile and is often joining new networks, odds are that every new network you join will have different firewall rules.
Thus, to prevent unauthorized network services from allowing incoming connections to your specific Mac, you can enable the built-in personal firewall. A personal firewall blocks unauthorized connections to your Mac no matter where they originated. The macOS firewall also features a single-click configuration that provides a high level of network service security, which works for most users.
A standard firewall uses rules based on service port numbers. As you’ve learned in this lesson, each service defaults to a standard port or set of ports. However, some network services, like Messages, use a wide range of dynamic ports. If you were to manually configure a traditional firewall, you would have to make dozens of rules for every potential port the user may need.
To resolve this issue, the macOS firewall uses an adaptive technology that allows connections based on applications and service needs, without you having to know the specific ports they use. For example, you can authorize Messages to accept any incoming connection without configuring all of the individual TCP and UDP ports used by the Messages application.
The personal firewall also leverages another built-in feature, code signing, to ensure that allowed applications and services aren’t changed without your knowledge. Further, code signing allows Apple and third-party developers to provide a guarantee that their software hasn’t been tampered with. This level of verifiable trust allows you to configure the firewall in default mode with a single click, automatically allowing signed applications and services to receive incoming connections.
Finally, because the personal firewall is fully dynamic, it opens only the necessary ports when the application or service is running. Again, using Messages as an example, the personal firewall allows only incoming connections to the required ports if Messages is running. If the application quits because the user logs out, the firewall closes the associated ports. Having the required ports open only when an application or service needs them provides an extra layer of security not found with traditional firewalls.
Turn On the Personal Firewall
To enable and configure the macOS personal firewall, open Security & Privacy preferences, click the lock icon in the lower-left corner, and authenticate as an administrator user to unlock Security & Privacy preferences. Select the Firewall tab, and then click the Turn On Firewall button to enable the default firewall rules. Once enabled, this button changes to a Turn Off Firewall button, allowing you to turn off the firewall.
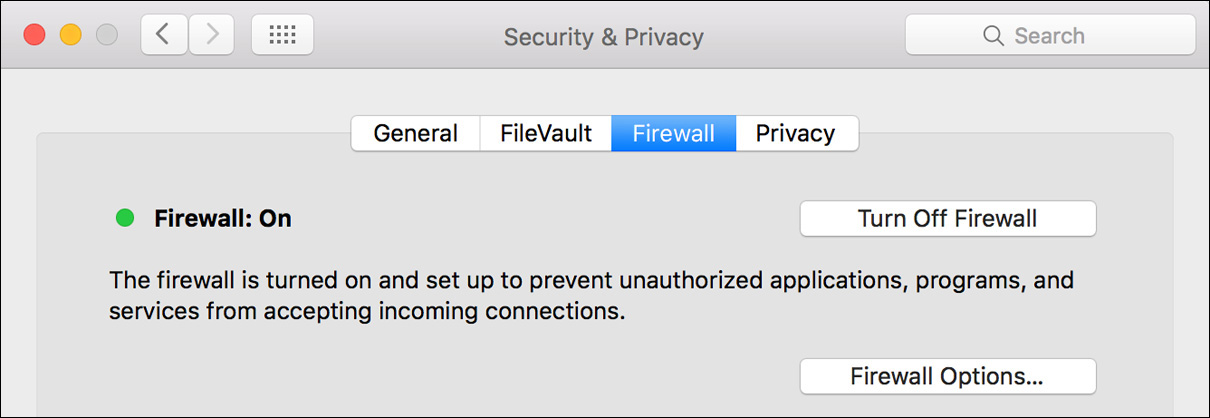
The default firewall configuration is to allow incoming traffic for established connections (connections that were initiated from your Mac and are expecting a return) and for any signed software or enabled service. This level of security is adequate for most users.
Configure the Personal Firewall
If you want to customize the firewall, you can reveal any additional firewall configuration by clicking the Firewall Options button. From the firewall options window, a list of services currently allowed appears. Without any additional configuration, sharing services enabled from the Sharing preferences automatically appear in the list of allowed services. Conversely, deselecting a shared service from the Sharing preferences removes the service from the list of allowed services.
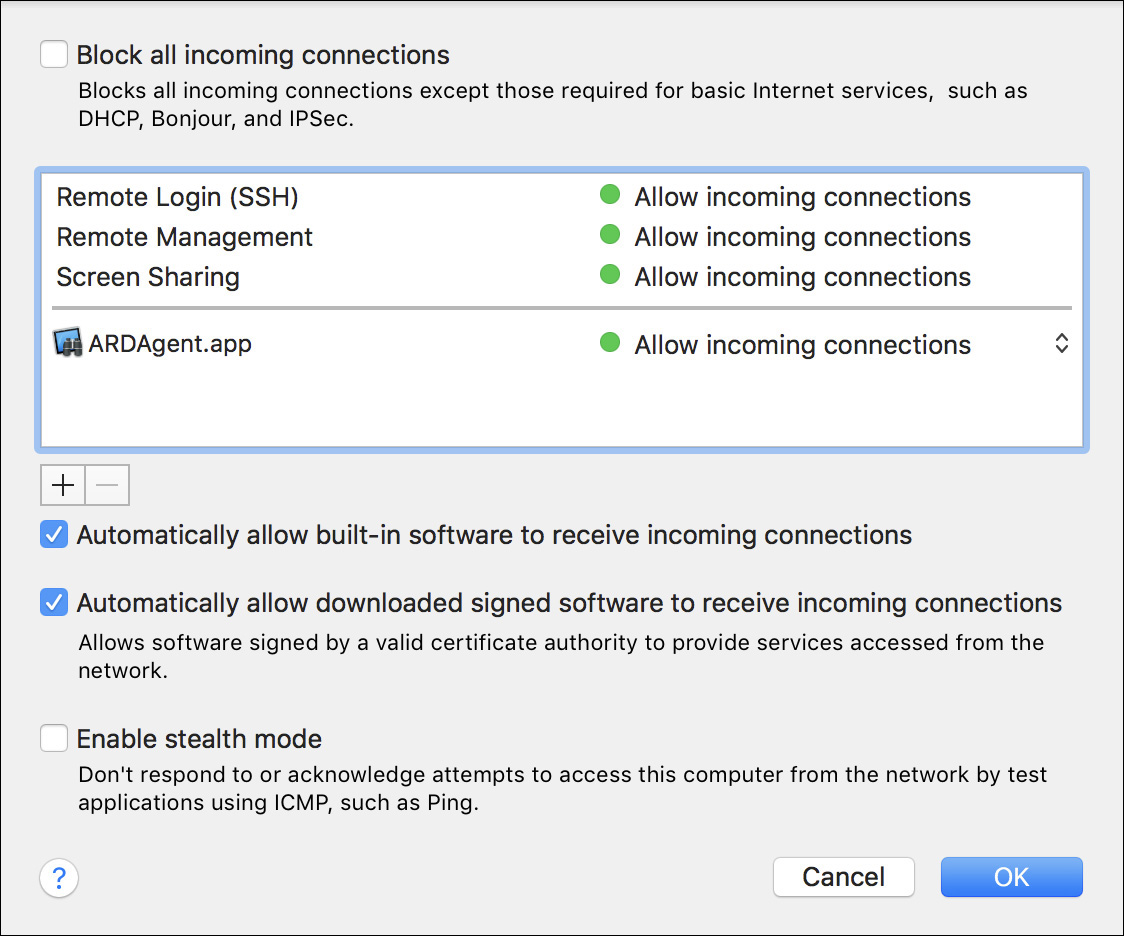
Optionally, for a bit more control, you can manually set which applications and services the firewall allows by deselecting the checkbox to automatically allow signed software. With this firewall choice, as you open new network applications for the first time or update existing network applications, you see a dialog where you can allow or deny the new network application. This dialog appears outside the Security & Privacy preferences whenever a new network application requests incoming access.
If you are manually setting network application and service firewall access, you can always return to the Advanced Firewall dialog to review the list of items and either delete items from the list or specifically disallow certain items.
For a bit more security, you can select the “Enable stealth mode” checkbox to prevent response or acknowledgment of a failed attempt to the requesting host. With this enabled, your Mac does not respond to any unauthorized network connections, including network diagnostic protocols like ping, traceroute, and port scan.
In other words, your computer simply ignores the request instead of returning a response of failure to the requesting host. However, your Mac still responds to other allowed services. This includes, by default, Bonjour, which dutifully announces your Mac computer’s presence, thus preventing your Mac from being truly hidden on the network.
When the utmost security is needed, you can select the “Block all incoming connections” checkbox. Notice that selecting this option automatically selects stealth mode as well.
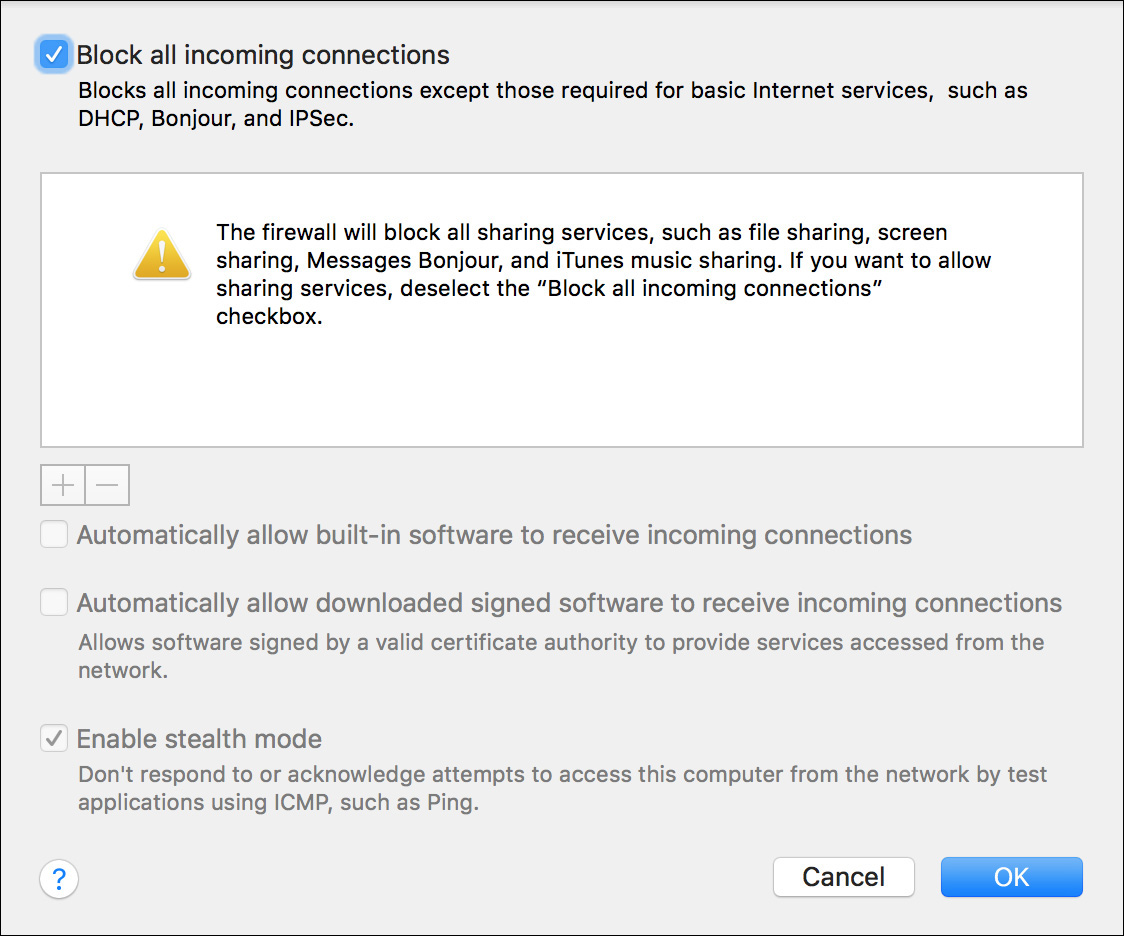
When blocking all incoming connections, your Mac does not respond to any incoming network connections except for those required for basic network services or established connections, such as those needed to browse the web or check email. Obviously, this prevents any shared service or application hosted on your Mac from working remotely.
Reference 23.5 Troubleshoot Shared Services
If you’re providing a shared service from your Mac and others are having trouble reaching it, you must first consider how established the service is to determine where to focus your efforts. For example, if your Mac has been reliably providing a shared service for a while but now a single client computer has trouble accessing the service, troubleshoot the client computer before troubleshooting your shared Mac.
Otherwise, if multiple clients cannot access your shared Mac, you may indeed have an issue with the sharing service. After ruling out other potential local client and network issues, you can safely assume that the problem lies with the Mac providing shared services. If so, shared network service issues fall into two general categories: service communication and service access.
Service communication issues are manifested by an inability to establish a connection to the shared service. If you are presented with an authentication dialog, the client and server are establishing a proper connection, and you should troubleshoot the issue as a service access issue. However, if authentication fails, or you can authenticate but you’re not authorized to access the service, then you are experiencing a service access issue.
Troubleshoot Network Service Communication
If you are unable to establish a connection to the shared service, this may signal a network service communication issue. Use these methods to troubleshoot that type of issue:
![]() Double-check the shared Mac network configuration—From Network preferences, make sure the Mac computer’s network interfaces are active and configured with the appropriate TCP/IP settings. You can also use Network Utility to verify the network configuration. If a DNS server is providing a host name for your shared Mac, use the Lookup tool in Network Utility to verify the host name.
Double-check the shared Mac network configuration—From Network preferences, make sure the Mac computer’s network interfaces are active and configured with the appropriate TCP/IP settings. You can also use Network Utility to verify the network configuration. If a DNS server is providing a host name for your shared Mac, use the Lookup tool in Network Utility to verify the host name.
![]() Double-check the Mac computer’s sharing service configuration—From the Sharing preferences, verify the Mac computer’s sharing name and ensure that the appropriate services are enabled and configured.
Double-check the Mac computer’s sharing service configuration—From the Sharing preferences, verify the Mac computer’s sharing name and ensure that the appropriate services are enabled and configured.
![]() Double-check the Mac computer’s firewall configuration—From the Security & Privacy preferences, first temporarily stop the firewall to see whether turning it off makes a difference. If you are able to establish a connection, adjust the list of allowed services and applications before you restart the firewall.
Double-check the Mac computer’s firewall configuration—From the Security & Privacy preferences, first temporarily stop the firewall to see whether turning it off makes a difference. If you are able to establish a connection, adjust the list of allowed services and applications before you restart the firewall.
![]() Check for basic network connectivity to the shared Mac—First, turn off the firewall’s stealth mode, and then, from another Mac, use the Network Utility ping tool to check for basic connectivity to the shared Mac. If you can’t ping the shared Mac, you’re probably having a network-level issue that goes beyond service troubleshooting.
Check for basic network connectivity to the shared Mac—First, turn off the firewall’s stealth mode, and then, from another Mac, use the Network Utility ping tool to check for basic connectivity to the shared Mac. If you can’t ping the shared Mac, you’re probably having a network-level issue that goes beyond service troubleshooting.
![]() Check for network service port connectivity to the shared Mac—First, turn off the firewall’s stealth mode, and then, from another Mac, use the Network Utility port scan tool to verify that the expected network service ports are accessible. If the shared Mac is configured properly, the appropriate network service ports should register as open. If there are network routers between the network clients and the shared Mac, consider the possibility that a network administrator has decided to block access to those ports.
Check for network service port connectivity to the shared Mac—First, turn off the firewall’s stealth mode, and then, from another Mac, use the Network Utility port scan tool to verify that the expected network service ports are accessible. If the shared Mac is configured properly, the appropriate network service ports should register as open. If there are network routers between the network clients and the shared Mac, consider the possibility that a network administrator has decided to block access to those ports.
Troubleshoot Network Service Access
Failure to authenticate or be granted authorization to a shared service is considered a network service access issue. Use the following to troubleshoot these access issues:
![]() Verify the local user account settings—When using local user accounts, make sure the correct authentication information is being used. You may find that the user is not using the right information, and you may have to reset the account password. (Troubleshooting user account issues is covered in Lesson 5, “Manage User Accounts.”) Also, some services do not allow the use of guest and sharing-only user accounts. Further, the standard VNC service uses password information that is not directly linked to a user account.
Verify the local user account settings—When using local user accounts, make sure the correct authentication information is being used. You may find that the user is not using the right information, and you may have to reset the account password. (Troubleshooting user account issues is covered in Lesson 5, “Manage User Accounts.”) Also, some services do not allow the use of guest and sharing-only user accounts. Further, the standard VNC service uses password information that is not directly linked to a user account.
![]() Double-check directory service settings—If you use a network directory service in your environment, verify that the Mac is properly communicating with the directory service by checking its status in the Directory Utility application. Even if you’re only trying to use local accounts, any directory service issues can cause authentication problems. Some services, like Remote Management, do not by default allow you to authenticate with accounts hosted from network directories.
Double-check directory service settings—If you use a network directory service in your environment, verify that the Mac is properly communicating with the directory service by checking its status in the Directory Utility application. Even if you’re only trying to use local accounts, any directory service issues can cause authentication problems. Some services, like Remote Management, do not by default allow you to authenticate with accounts hosted from network directories.
![]() Double-check shared service access settings—Several authenticated sharing services allow you to configure access lists. Use Sharing preferences to verify that the appropriate user accounts are allowed to access the shared service.
Double-check shared service access settings—Several authenticated sharing services allow you to configure access lists. Use Sharing preferences to verify that the appropriate user accounts are allowed to access the shared service.
Exercise 23.1 Use Host-Sharing Services
![]() Prerequisites
Prerequisites
![]() You must have created the Local Admin (Exercise 2.1, “Configure a New macOS System for Exercises,” or Exercise 2.2, “Configure an Existing macOS System for Exercises”) and Chris Johnson (Exercise 5.1, “Create a Standard User Account”) accounts.
You must have created the Local Admin (Exercise 2.1, “Configure a New macOS System for Exercises,” or Exercise 2.2, “Configure an Existing macOS System for Exercises”) and Chris Johnson (Exercise 5.1, “Create a Standard User Account”) accounts.
![]() You need another Mac running macOS Sierra on the same network as your primary Mac. If you are performing these exercises in a class, you will work with a partner.
You need another Mac running macOS Sierra on the same network as your primary Mac. If you are performing these exercises in a class, you will work with a partner.
In this exercise, you will use the macOS screen-sharing capability to control another computer remotely. You will use both the option to share the current user’s session and the option to use a virtual display to log in as a different user.
Turn On Screen Sharing
1 If the Local Admin account is logged in (even as a background session), log it out.
2 If necessary, log in as Chris Johnson.
3 Open System Preferences, and select the Sharing pane.
4 Click the lock icon, and authenticate as Local Admin.
5 Select the checkbox next to Remote Management, if it is not already selected.
Note that although you will be using screen sharing, you are configuring it via the Remote Management service. Remote Management includes screen sharing as an optional capability. If you look at the checkbox for the Screen Sharing service, you’ll see that it is dimmed; this does not mean the service is unavailable but rather that it is being controlled by Remote Management.
6 Ensure that “All users” is selected for “Allow access for.”
8 Ensure that all options are selected. An easy way to do this is to Option-click a checkbox until all the checkboxes are selected.
9 Click OK, and then quit System Preferences.
Remotely Control Another Computer’s Screen
In this section, you will use screen sharing to control another computer. Which computer you will control depends on whether you are performing these exercises in a class or on your own:
![]() If you are in a class, you will work with a partner and take turns controlling each other’s computers.
If you are in a class, you will work with a partner and take turns controlling each other’s computers.
![]() If you are performing these exercises on your own, you will perform this section from another computer and use it to control your primary exercise computer.
If you are performing these exercises on your own, you will perform this section from another computer and use it to control your primary exercise computer.
1 If you are working with a partner, wait for her to finish turning on and configuring Remote Management, and then decide who will go first. If your partner goes first, wait for her to finish this section before starting.
2 If you are on your own, log in to the other computer.
3 In the Finder, choose Go menu > Network (or press Command-Shift-K).
The computer you are going to control appears in the display of shared computers on the local network. Note that this shows computers offering file sharing, screen sharing, or both.
The Finder sidebar also displays local computers offering sharing services, but it shows only a limited number. The network view shows all of them.
4 Double-click the computer you will control in the Network window.
Since the other computer does not offer file-sharing service, your computer only has the option to share its screen.

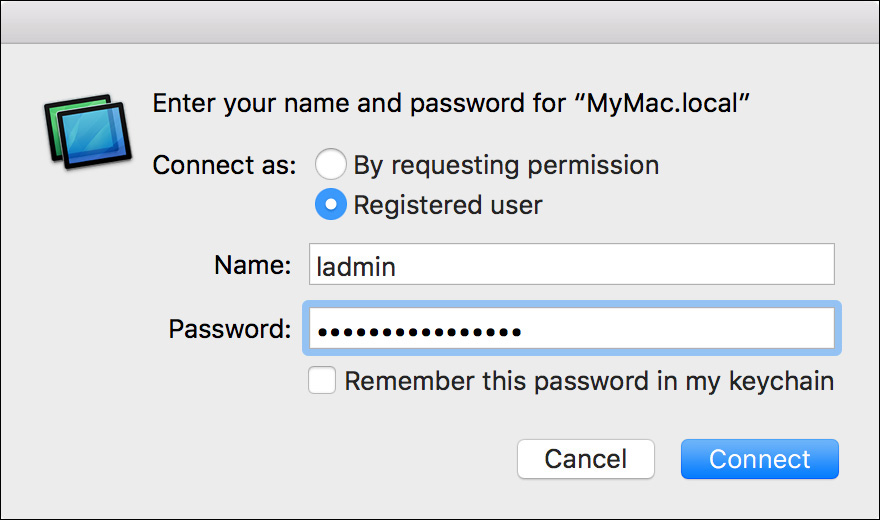
6 Authenticate as Chris Johnson. Note that you can use the account’s short name (chris) and that if you are working with a partner who used a different password for the Chris Johnson account, you must use her password.
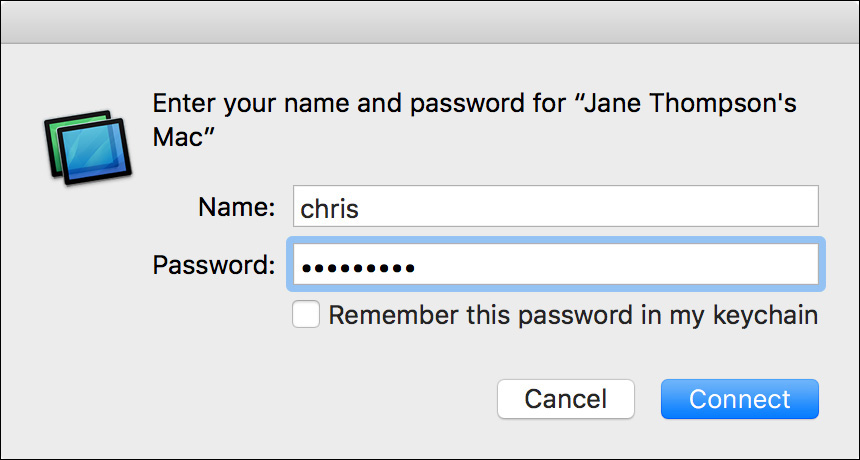
7 Click Connect.
Screen sharing begins, and you see a window with a live, interactive picture of the other computer’s desktop.
8 Open System Preferences on the other computer, and select the Desktop & Screen Saver pane.
9 Select a different picture for the other computer’s desktop.
10 Press Command-Q.
This quits System Preferences on the other computer. You cannot use standard shortcuts to control the Screen Sharing application itself.
11 Click the green Full Screen button in the title bar of the Screen Sharing window.
The window expands and takes over your entire screen. In full-screen mode, your display is a virtual mirror of the other computer’s display.
12 Move your mouse to the top of the screen, and leave it there for a few seconds.
The Screen Sharing menu, window controls, and toolbar appear at the top of the screen. This allows you to exit full-screen mode or access the Screen Sharing controls.
13 Choose Screen Sharing menu > Quit Screen Sharing.
14 If you are working with a partner, switch roles, and have your partner repeat these steps.
Connect to a Virtual Display
By connecting to another Mac as a different user, you can work with a virtual display instead of sharing the local user’s display. As in the previous section, you will either work with a partner (although this time you can both work at once, rather than taking turns) or connect to your primary exercise Mac from another Mac.
1 If necessary, wait for your partner to finish the previous section.
2 If necessary, reopen the Network view (press Command-Shift-K), and select the computer you will control.
3 Click Share Screen.
4 This time authenticate as Local Admin (you can use the short name ladmin), and click Connect.
Since you authenticated as a different user than is logged in to the other computer, you are now presented with the choice of sharing the current user’s display or logging in as a different user with a virtual display.
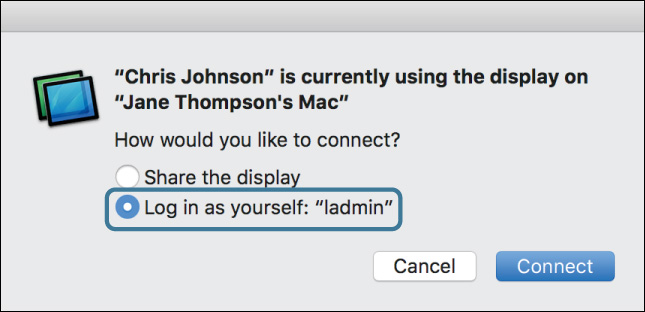
5 Select “Log in as yourself,” and click Connect.
A screen-sharing window opens and displays a login screen for your partner’s computer. The orange checkmark next to Chris Johnson indicates that Chris is already logged in to the computer.
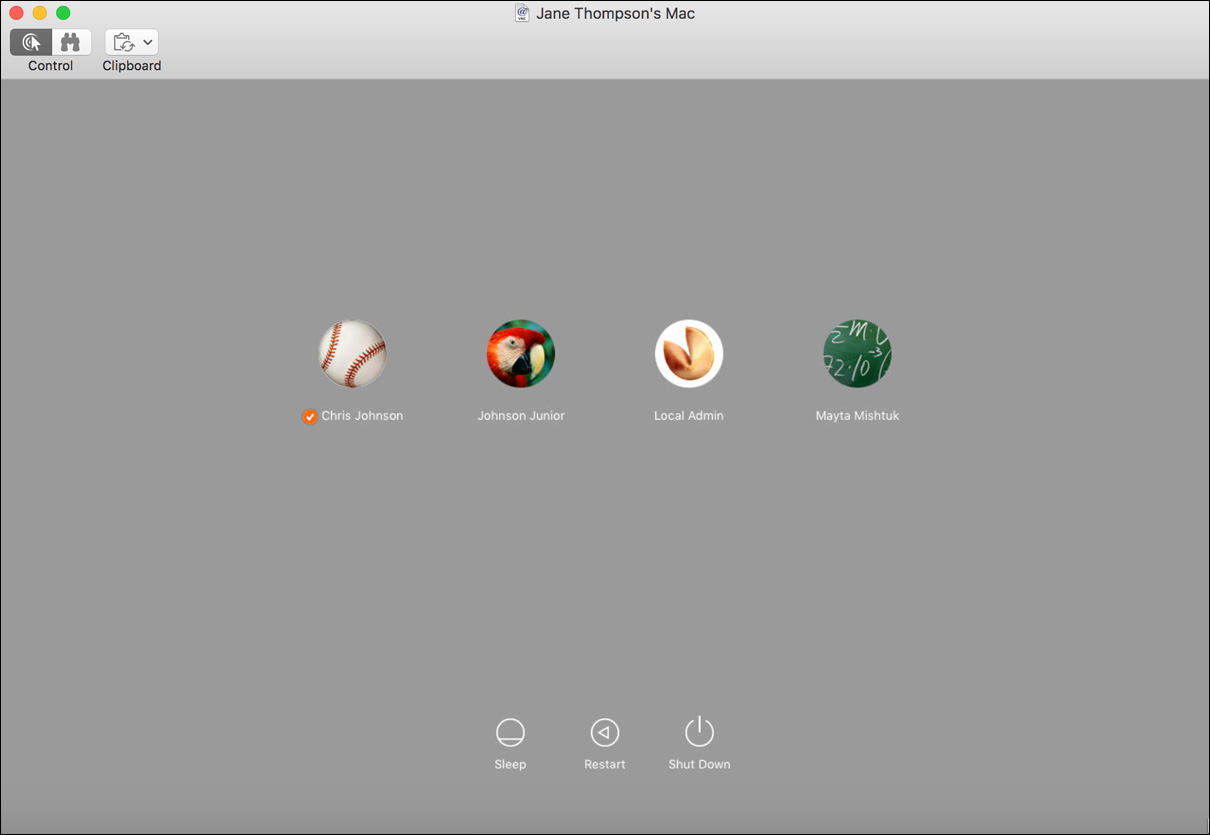
6 Log in to your partner’s computer as Local Admin.
This virtual screen capability makes it easy to remotely manage users’ Mac computers without disturbing them. Note that if you are in a class, your partner is connecting to your Mac at the same time, but you do not see any indication of this.
7 On the other Mac, open System Preferences, and select the Users & Groups pane.
If you use the Apple menu or the Dock, be sure to use the one contained in the window, not the one at the edge of your screen.
Do not make any changes in the Users & Groups preferences at this time.
8 Quit System Preferences on your partner’s computer.
9 Click the fast user switching menu on the other computer.
You see that both Chris Johnson (either your partner or the session you left logged in there) and Local Admin (you) are now logged in to the other computer. Your virtual display is treated as a fast user switching session.
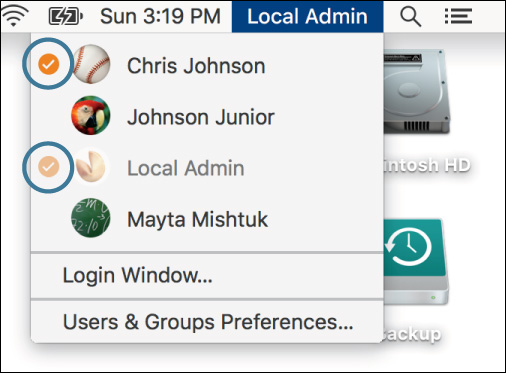
10 From the remote menu bar, choose Apple menu > Log Out Local Admin, and then click the Log Out button.
If you disconnect screen sharing without logging out first, you leave behind an orphaned fast user switching session.
11 From the menu bar at the top of the screen, choose Screen Sharing menu > Quit Screen Sharing.
12 If you are working with a partner, wait for him to finish before starting the next exercise.
13 If you are working on your own, move back to your primary exercise Mac for the first part of the next exercise.
Exercise 23.2 Configure the Personal Firewall
![]() Prerequisites
Prerequisites
![]() You must have created the Local Admin (Exercise 2.1, “Configure a New macOS System for Exercises,” or Exercise 2.2, “Configure an Existing macOS System for Exercises”) and Chris Johnson (Exercise 5.1, “Create a Standard User Account”) accounts.
You must have created the Local Admin (Exercise 2.1, “Configure a New macOS System for Exercises,” or Exercise 2.2, “Configure an Existing macOS System for Exercises”) and Chris Johnson (Exercise 5.1, “Create a Standard User Account”) accounts.
![]() You need another computer running macOS on the same network as your primary computer. If you are performing these exercises in a class, you will work with a partner.
You need another computer running macOS on the same network as your primary computer. If you are performing these exercises in a class, you will work with a partner.
A firewall blocks network traffic based on port numbers and protocols. The macOS firewall allows only ports based on application and service requests. The macOS built-in firewall is simple to configure from the user interface. In this exercise, you will turn on the firewall and start a network-aware application. Then, you will view the firewall log. You will also configure the advanced stealth option and see that it blocks responses to network pings.
Enable the Firewall
1 If necessary, log in as Chris Johnson.
2 Open the Security & Privacy pane in System Preferences.
3 Click the Firewall tab.
4 Click the lock icon, and authenticate as Local Admin.
5 Click Turn On Firewall.
6 Click Firewall Options.
Notice that Remote Management and Screen Sharing are already on the list as “Allow incoming connections.” The system assumes that if you turn on a service in the Sharing pane, you must want users to be able to connect to it, so it automatically allows those services through the firewall.
7 Deselect “Automatically allow built-in software to receive incoming connections” and “Automatically allow downloaded signed software to receive incoming connections.”
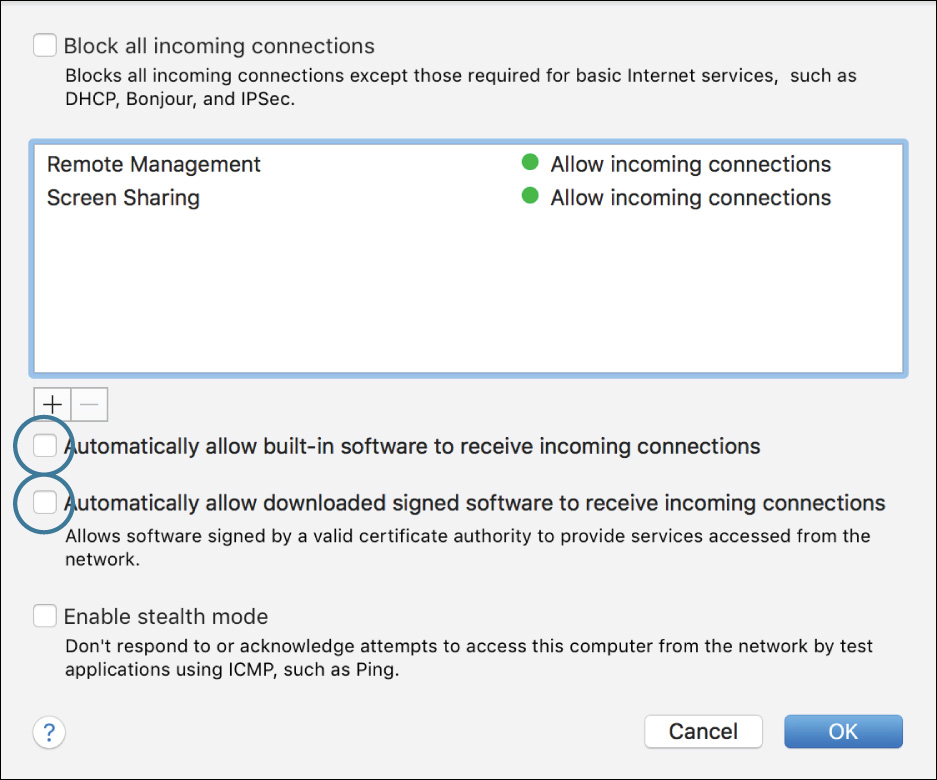
8 Click OK.
9 Quit System Preferences.
Note
With the firewall in this mode, you may receive alerts about various system components attempting to accept incoming connections. A common example is “ubd” (the ubiquity daemon, part of iCloud). It is generally safe to allow these through the firewall.
Test Firewall Settings
1 Open iTunes, which is in the Applications folder.
2 If you see the iTunes software license agreement, click Agree.
3 If you see a message telling you a new version of iTunes is available, click Don’t Download.
4 If an iTunes Tutorials window opens, close it.
5 Open iTunes preferences (iTunes menu > Preferences or Command-Comma).
6 Click the Sharing icon.
7 Select the checkbox “Share my library on my local network.”
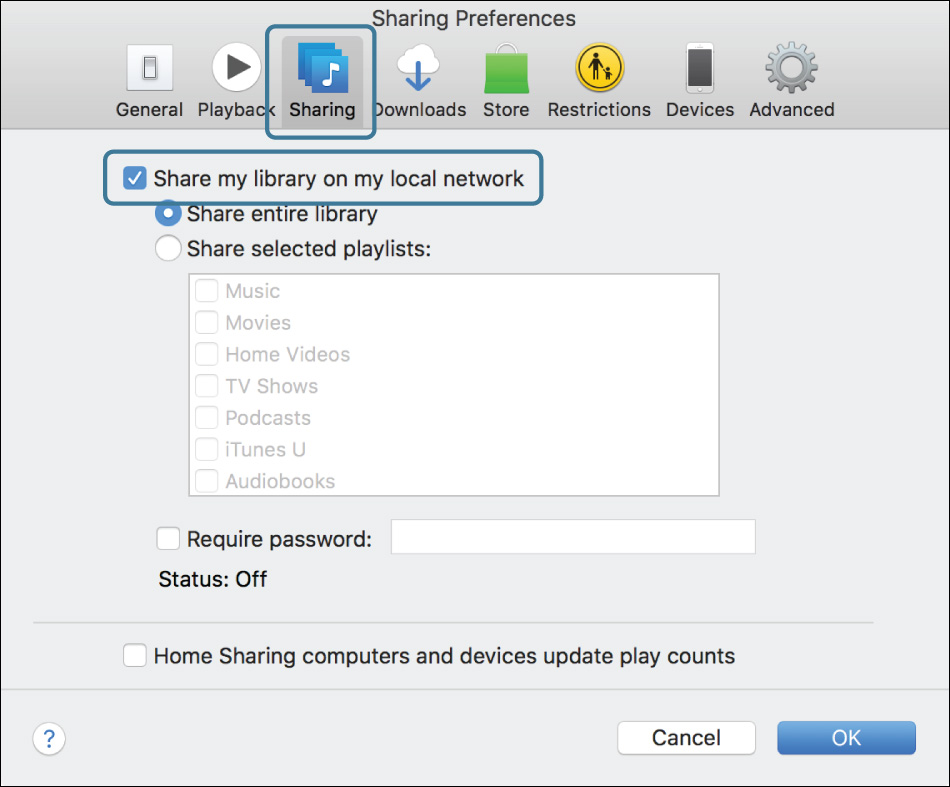
8 Click OK.
9 In the copyright reminder dialog, click OK (you may need to drag an iTunes dialog out of the way to get to it).
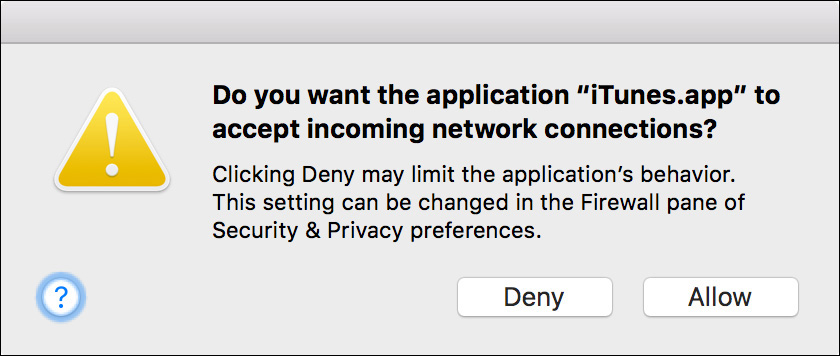
10 If a dialog appears asking if you want the application iTunes.app to accept incoming connections, click Deny; you will allow it later in the firewall preferences. Note that clicking Allow would prompt for an administrator password to allow the exception to the firewall rules.
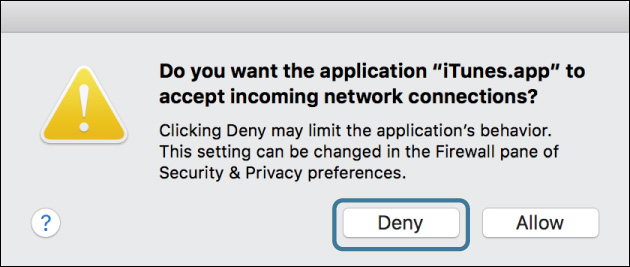
iTunes displays a dialog indicating that the firewall settings prevent you from using some iTunes features.
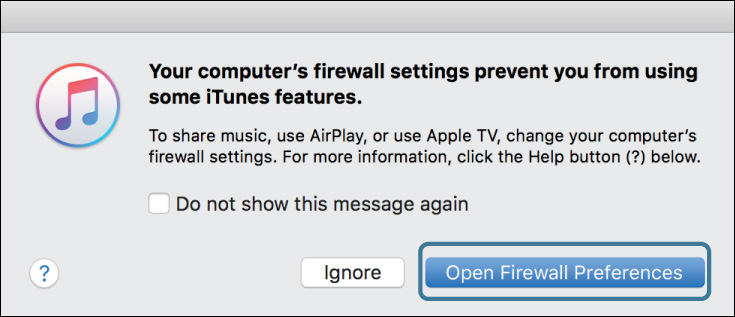
If you click Ignore here, iTunes music sharing would turn on, but other computers would not be able to connect to it and listen to your songs.
11 Click Open Firewall Preferences.
12 In the Firewall pane of the Security & Privacy pane of System Preferences, authenticate if necessary, and then click Firewall Options.
Notice that iTunes has been added to the list and is set to “Block incoming connections.”
13 Click “Block incoming connections,” and choose “Allow incoming connections” from the pop-up menu that appears.
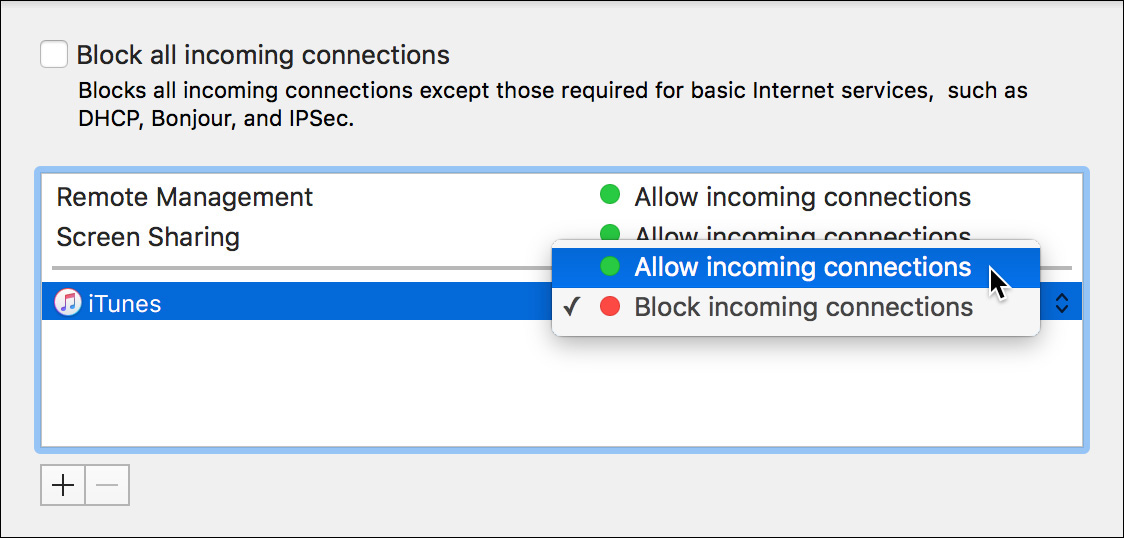
Since you have authenticated as an administrator, you can change the firewall policy for any specific application.
14 Click OK to dismiss the Firewall Options dialog.
15 Quit iTunes, but leave System Preferences open.
Test Stealth Mode
As in the previous exercise, you will either work with a partner or connect to your primary exercise computer from another computer.
1 In System Preferences, switch to the Sharing pane.
Note your computer’s Bonjour name, listed beneath its computer name.
2 If you are working on your own, switch to your other computer.
3 Open Network Utility. Remember that you can find it with Spotlight.
4 Click the Ping tab.
5 If you are working with a partner, ask for her computer’s Bonjour name, and enter it as the network address to ping. If you are working on your own, enter the Bonjour name of your primary exercise Mac.
6 If necessary, set it to send only five pings, and click Ping.
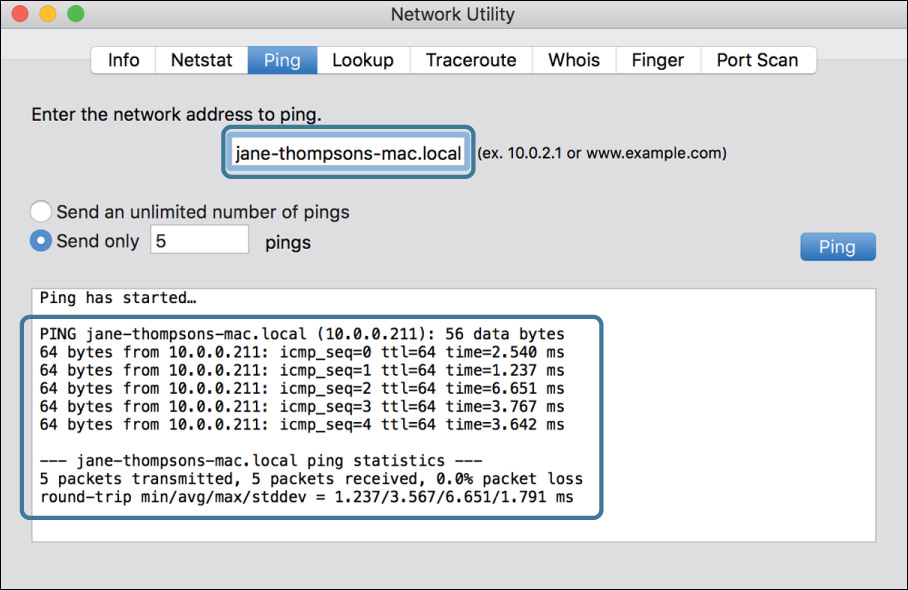
You should see successful pings.
7 If you are working with a partner, wait for her to finish pinging your computer. If you are working on your own, switch to your primary exercise computer.
8 Switch to System Preferences, switch to the Security & Privacy pane, and open Firewall Options.
9 Select “Enable stealth mode,” and click OK.
10 If you are working with a partner, wait for her to finish turning on stealth mode. If you are working on your own, switch to your other computer.
11 Switch to Network Utility, and click Ping to rerun the connectivity test.
After a few seconds, “Request timeout” messages appear in Network Utility.
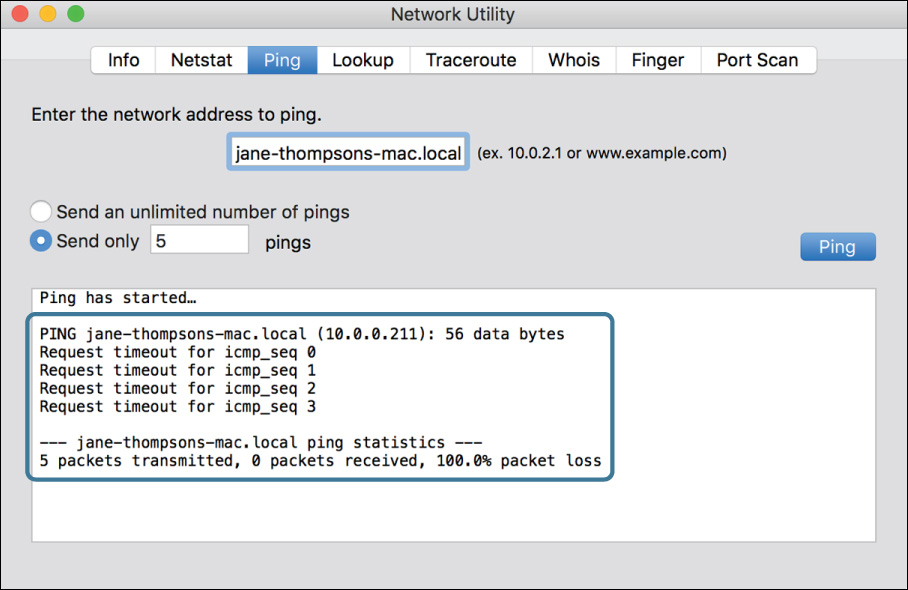
Note
Although stealth mode is an excellent security feature, it interferes with network troubleshooting. If a computer does not respond to a ping, in addition to checking cables you should check firewall settings.
12 On your Mac, turn off the firewall.
13 Quit all running programs.