Lesson 10. Manage FileVault
Goals
![]() Describe how FileVault helps protect data
Describe how FileVault helps protect data
![]() Enable FileVault protection
Enable FileVault protection
![]() Regain access to a FileVault-protected Mac when all passwords are lost
Regain access to a FileVault-protected Mac when all passwords are lost
Although third-party solutions for full-system volume encryption exist for macOS, these solutions often exhibit issues whenever Apple updates hardware or software. Many third-party full-system volume encryption schemes may stop working during updates, leaving users stranded, with no way to reach their encrypted data.
Apple engineers decided to take this problem into their own hands and introduced a new version of FileVault (sometimes called FileVault 2). In this lesson, you will learn how FileVault protects the system volume and how to enable this protection. You will also learn how to recover a system protected with FileVault when all local users’ passwords are lost.
Note
All instances of “FileVault” in this guide refer to FileVault 2, the newer system volume encryption technology, unless otherwise specified.
Reference 10.1 About FileVault
Although FileVault 2 is often branded as “full disk encryption,” it protects the system by encrypting the system volume. Most Mac computers use only one large system volume for all local storage, so this is acceptable in most situations. However, if you make use of more than one volume, consider encrypting the other volumes, as covered in Lesson 9, “Manage File Systems and Storage.”
About Full-System Encryption
FileVault 2 protects the system volume by converting it to Mac OS Extended (Journaled, Encrypted) format, which uses XTS-AES-128 encryption with 256-bit keys. This adoption of a full-system volume encryption scheme resolves all the limitations of the older encryption technology used by Mac computers, known as Legacy FileVault. This is because FileVault 2 performs the encryption at the file system driver level of the operating system. Thus, most processes and applications don’t even know the system volume is encrypted, so they behave as usual.
More Info
You can find out more about the specifics of FileVault’s encryption from the following Apple Technical White Paper: http://training.apple.com/pdf/WP_FileVault2.pdf.
The current FileVault solution is more than just a new volume format; it’s a system of new technologies that enables your Mac to transition from a standard system volume to a protected system volume. Full details of all the changes required to engineer FileVault are beyond the scope of this guide, but the primary new technologies instrumental in the current version include seamless volume format conversion, user account password synchronization, optional secure key storage on Apple servers for lost password recovery, macOS Recovery for initial system startup, and a new firmware login window.
You can see many of these new pieces at work during startup to an encrypted system volume. What was traditionally a straightforward task—starting up the system—takes on a new level of complexity when you can’t read the system volume to start with. Thus, Apple had to devise a method to authenticate and access the protected system volume during startup.
When starting up from an encrypted system, the Mac actually starts from the hidden, unencrypted Recovery HD volume first, to present users with a login window. Users enter their account password, which is then used to access the decryption key that ultimately unlocks the protected system volume. Once the Mac has access to the system volume, startup continues normally, with one exception: users, having already authenticated to unlock encryption, are automatically logged in to their accounts.
If the system disk is missing the hidden macOS Recovery HD volume, you cannot enable FileVault. Fortunately, macOS also makes it impossible to accidentally engage it without that volume. Re-creating the Recovery HD volume is covered in Lesson 3, “Use macOS Recovery.”
About Legacy FileVault
Prior to OS X Lion 10.7, Legacy FileVault existed as a technology that secured user data by encrypting the user’s home folder content. This method, though effective, has a variety of drawbacks. For one, it does not protect data outside the user’s home folder. More problematic, though, is that many system management and backup utilities don’t work properly with Legacy FileVault home folders. With FileVault 2 system disk encryption, Legacy FileVault home folder encryption is deprecated.
Legacy FileVault is still supported by macOS for existing or migrated user accounts, but you can no longer enable it for new user accounts. If you are currently using a Legacy FileVault account on a Mac computer, the Security & Privacy preferences presents a window prompting you to turn off Legacy FileVault.
Note
It is strongly suggested that you turn off Legacy FileVault and switch to the much more robust and secure FileVault 2 system volume encryption. You must completely disable all Legacy FileVault users to enable FileVault 2.
Turning off Legacy FileVault requires a logout and a potentially lengthy copy process as the system migrates the encrypted data back to “regular” data. This also means that turning off Legacy FileVault requires enough free space on the system disk to duplicate an entire decrypted copy of your home folder data. If there is not enough free space, you can’t turn off Legacy FileVault. You may want to consider manually migrating a copy of your home folder, as covered in Lesson 6, “Manage User Home Folders.”
If you dismiss the first Legacy FileVault dialog, you can always decide later to turn off Legacy FileVault. Return to the Legacy FileVault pane of the Security & Privacy preferences. You can reset the master password from this location as well.
If you decide to stick with Legacy FileVault encrypted home folders, they will behave as they did in Mac OS X Snow Leopard 10.6. Other sections in this lesson cover techniques for managing passwords. Be sure to look for techniques pertaining to Legacy FileVault, because these accounts must be handled differently from standard user accounts.
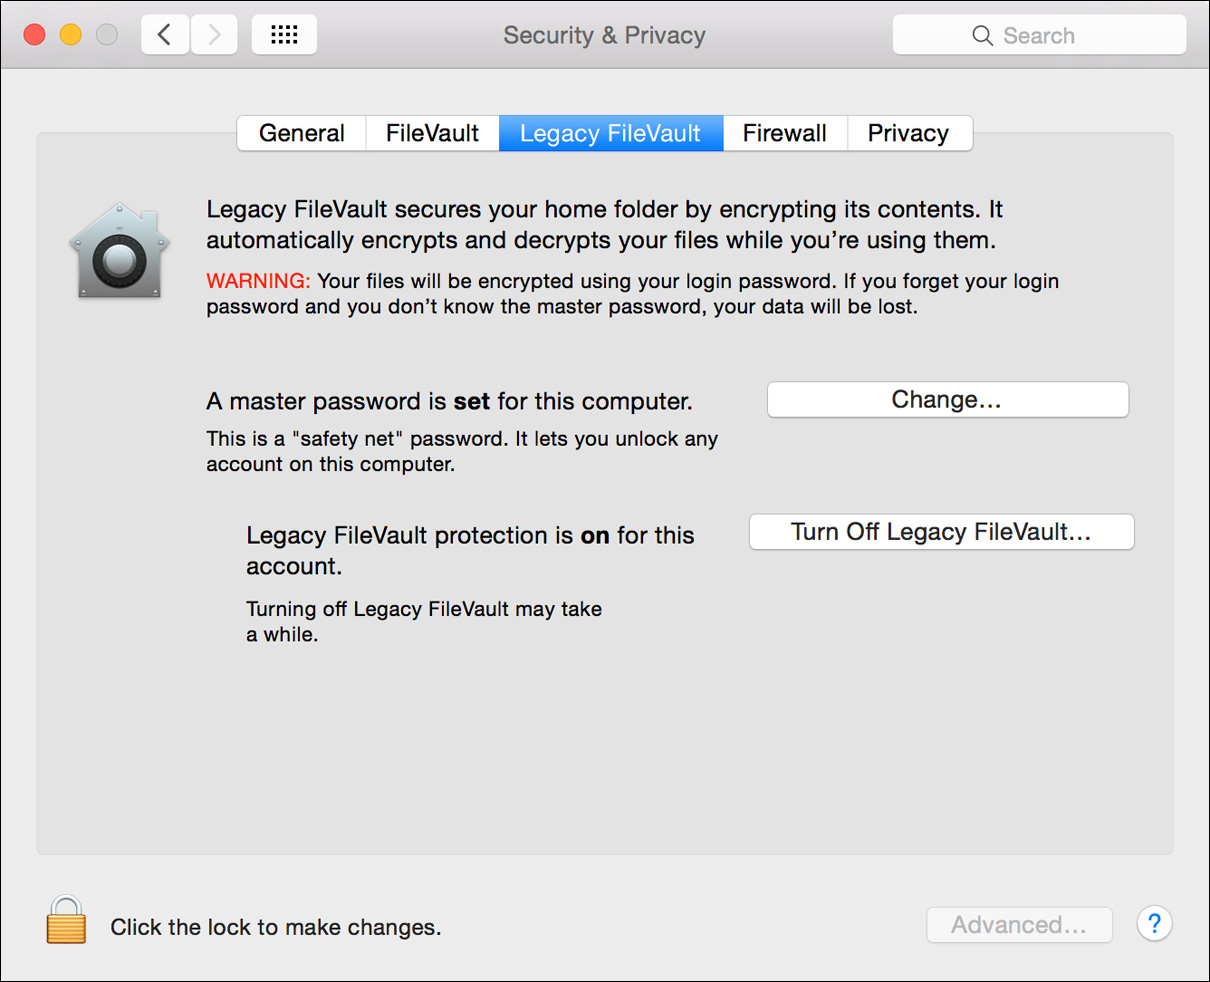
Reference 10.2 Enable FileVault
In typical Apple style, despite the underlying complexity of transitioning an existing system to a secure encrypted system, turning on FileVault requires only a few simple steps. In fact, as covered in Lesson 2, “Set Up and Configure macOS,” late-model Mac portable computers meeting the appropriate criteria will automatically prompt the user to enable FileVault during the Setup Assistant process.
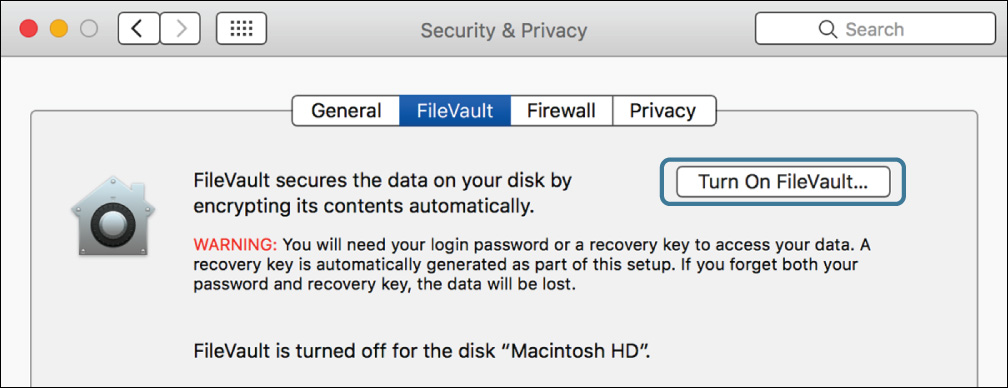
Even if Setup Assistant doesn’t prompt you to enable FileVault, an administrator user can enable it at any time from the Security & Privacy preferences. Clicking the Turn On FileVault button initiates the setup process.
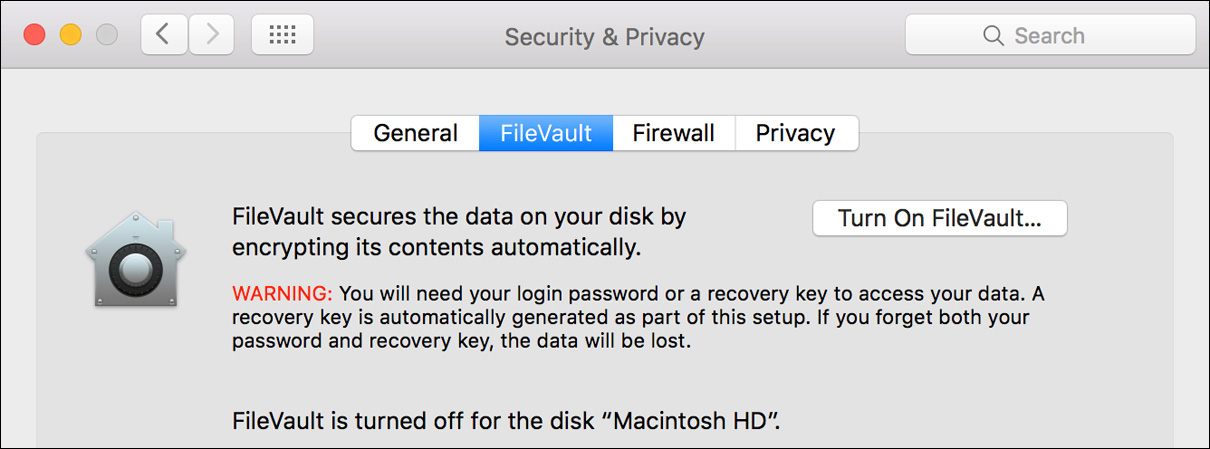
Configure FileVault Recovery
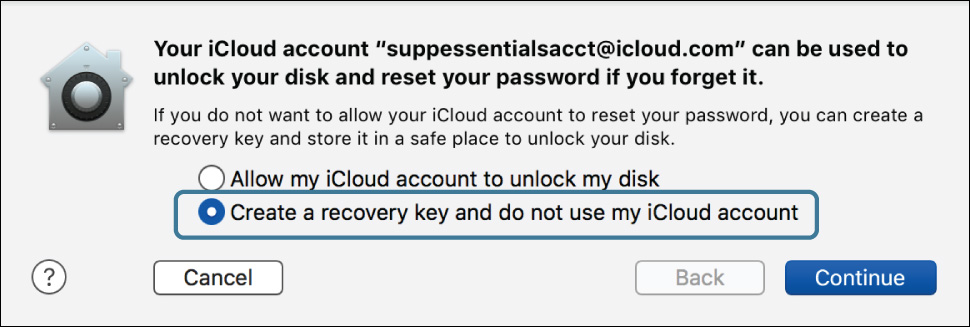
During the FileVault setup, a dialog appears that offers two methods for recovering should all FileVault-enabled user passwords be lost. This is a very important decision, because if you do not have authentication or recovery access to the FileVault-protected system volume, then all data will be lost. In this case, the security mechanisms used by FileVault are so strong that not even Apple can help you recover the data.
The first method for recovery is to use an Apple ID (or iCloud) account to unlock the FileVault volume and reset the user’s lost password. This new recovery method generates a random FileVault recovery key and then saves it to the user’s iCloud account on Apple servers. Although the user cannot see the recovery key, if the need arises the system will be able to retrieve the key from iCloud once the user’s Apple ID is authenticated.
Note
The macOS interface sometimes uses “iCloud password” instead of “Apple ID password.” However, because all Apple services, including iCloud, are accessed via Apple ID authentication, this guide uses the term “Apple ID” when discussing Apple service authentication.
This recovery method obviously requires that the system have Internet access and that the user be signed in using his or her Apple ID to the iCloud service (via the iCloud preferences). However, it does not require that the user’s local account password be linked to his or her Apple ID. In other words, the user can continue to use a separate local account password even if the Apple ID account is configured for FileVault recovery.
Finally, it’s important to note that only one user’s Apple ID account can be configured for FileVault recovery. Other users can be given the ability to log in to the FileVault-protected system, but they do not have access to the recovery key stored in iCloud. Thus, for multiuser systems, it’s best that an administrator user enable FileVault and use an appropriate Apple ID account to save the key.
Note
If you choose to use an Apple ID account for FileVault recovery, it’s strongly recommended that you also take advantage of two-step verification or two-factor authentication for the Apple ID. For more information about two-step verification see Apple Support article HT204152, “Two-step verification for Apple ID.” For more information about two-factor authentication, see Apple Support article HT204915, “Two-factor authentication for Apple ID,” and article HT205075, “Availability of two-factor authentication for Apple ID.”
Note
Previous versions of the Mac operating system allowed you to save a FileVault recovery key with Apple without using an Apple ID. This recovery method is no longer available beginning with OS X Yosemite 10.10.
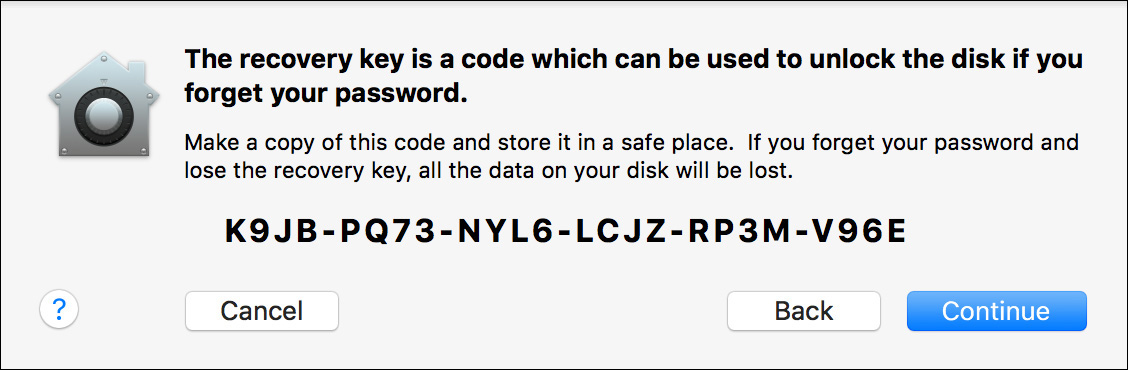
An alternative method for FileVault recovery that doesn’t involve iCloud is the creation of a locally saved recovery key. This randomly generated key can be used later to unlock the FileVault-protected volume and reset the user’s lost password. As the dialog states, you will need to manually copy this key and store it somewhere safe other than the computer on which you are currently enabling FileVault. A good choice may be to take a photo with a mobile device, providing it uses strong local security as well.
For organizations deploying and managing systems en masse, there are more appropriate options for configuring FileVault than the default method covered here. For example, you can use an institutional recovery key for FileVault recovery, as covered in Apple Support article HT202385, “Set a FileVault recovery key for Mac computers in your institution.”
Enable Additional Users for FileVault
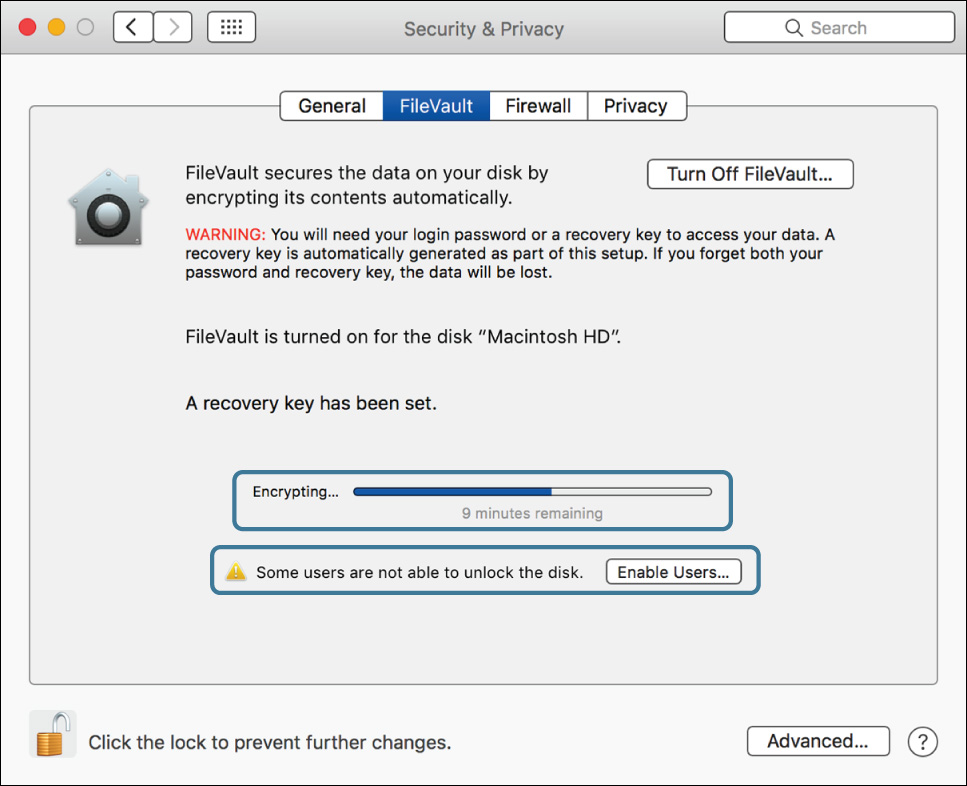
During the FileVault setup process, if more than one local user exists on the system, a dialog appears where you can enable existing local users to unlock the protected system volume. This grants these other users the ability to start up the system. Click the Enable User button next to each user you want to be able to access the FileVault system volume. These users must then enter their account password to enable this ability. An administrator cannot override this step, because each user must each enter his or her unique password.
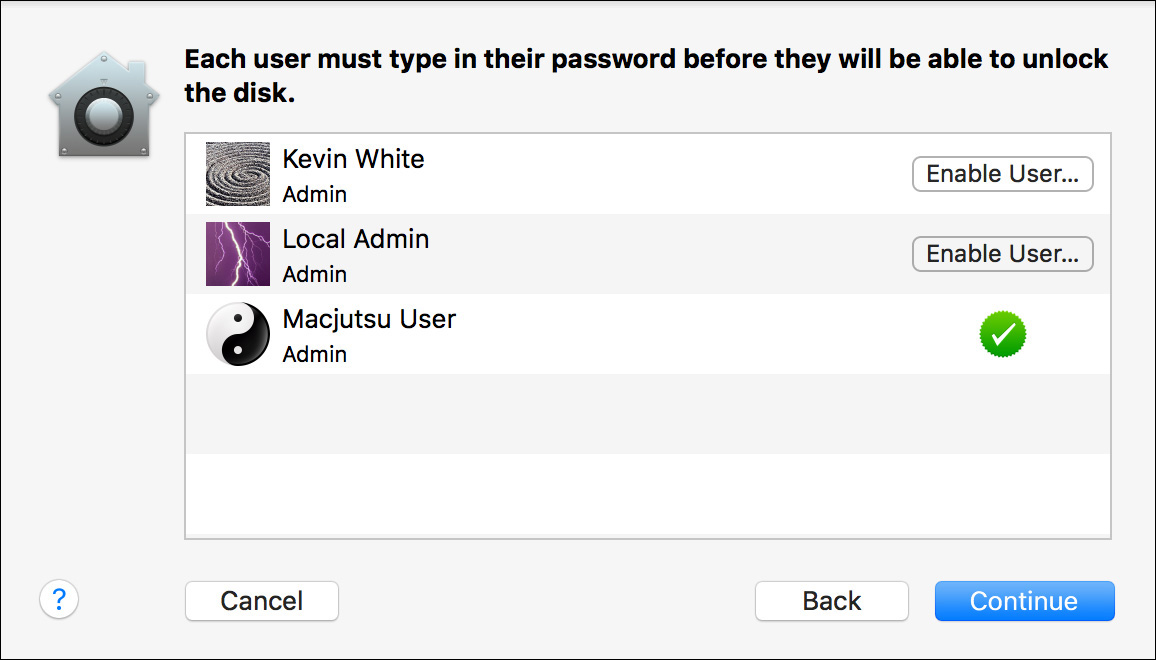
Any user not initially enabled to unlock FileVault can be configured for this ability later; just click the Enable User button in the FileVault pane of the Security & Privacy preferences. Only local users or cached mobile network users can be FileVault enabled. New local users or cached mobile network users created after FileVault is turned on are automatically able to unlock FileVault.
Any user password changes that occur will continue to be FileVault enabled as long as those changes occur on the system protected with FileVault. In other words, if you reset the password for a cached mobile user from the network directory server, the account will not be allowed to unlock the local FileVault system volume. To resolve this issue, either you can use a FileVault recovery method or you can log in as another administrator user and then reenable the reset local account by clicking the Enable User button in the FileVault pane of the Security & Privacy preferences.
Restart and Encrypt
Most Mac computers will need to be restarted to begin the system volume encryption. Upon restart of the Mac, notice that the login window appears much more quickly than usual. This is the new FileVault login window, hosted from the hidden Recovery HD volume. You will also notice that only FileVault-enabled users appear here. Authenticate as any FileVault-enabled user, and system startup continues until the user is automatically logged in to his or her account.
From the FileVault pane of the Security & Privacy preferences, you can view the progress of the system volume encryption as well as an estimated completion time. It may take several hours to completely encrypt a system volume. Obviously, the length of time varies greatly, depending on the amount of data that must be encrypted.
Note
Due to the complex nature of solid-state and flash disk controllers, encrypting a volume may still leave some parts of the original data in a recoverable form. Thus, to minimize the security risk, enable FileVault before saving any sensitive data to the system volume.
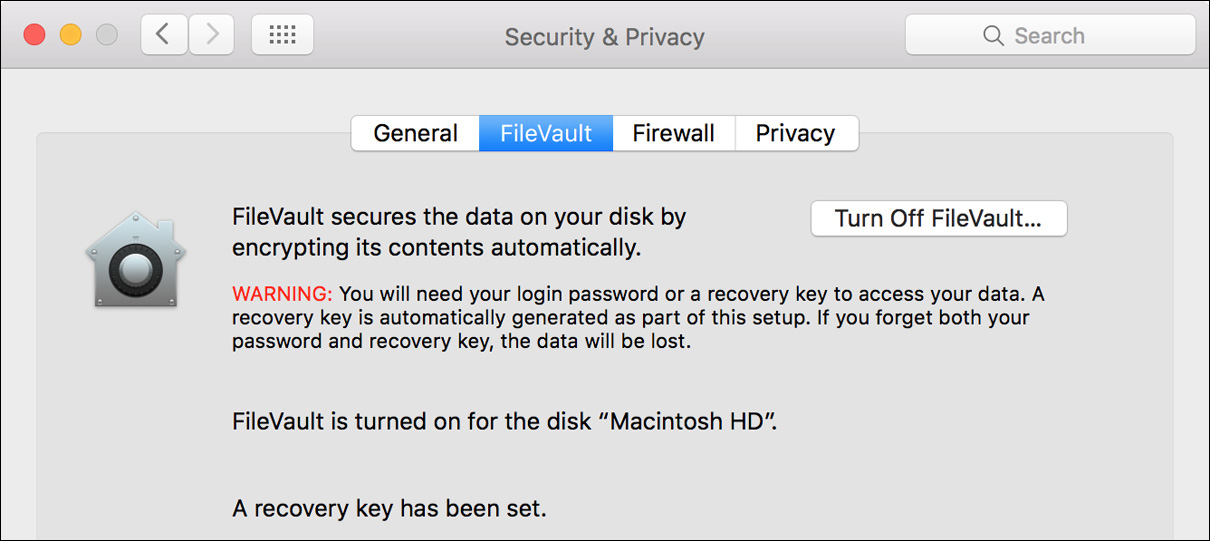
Amazingly, you can close the Security & Privacy preferences and continue to use the Mac as usual, even though the system is slowly encrypting the volume it’s running from. No notification appears once encryption is complete, but you can always return to Security & Privacy to check the progress.
To conserve battery power, portable Mac computers may pause encryption when they aren’t plugged in. The encryption will continue once the Mac portable is connected to a power source.
If for some reason you want to turn off FileVault encryption, you can do so from the same Security & Privacy pane. This requires another system restart and a potentially lengthy decryption process. However, similar to the encryption process to enable FileVault, the decryption process can continue in the background without interrupting the user.
Reference 10.3 Use FileVault Recovery
Although it’s highly unlikely on multiuser systems, it’s more common than you think for a Mac with a single user to lose the login password. If by some means all FileVault-enabled account passwords are lost on a system protected with FileVault, you may still be able to unlock the system.
The ability to unlock a FileVault-protected system lies with the recovery key. As covered previously, this key can be stored in a user’s iCloud service or saved manually by the user. Hopefully, the user either knows his or her Apple ID authentication or has dutifully copied and saved the FileVault recovery key somewhere safe.
About FileVault Recovery
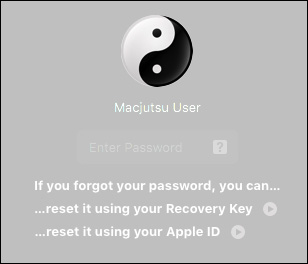
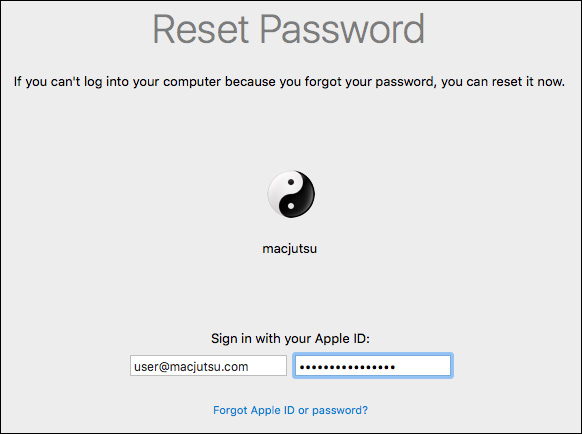
To start the FileVault recovery process, at the FileVault login window select a user and then click the small “?” icon to the right of the password entry field. A message appears suggesting you reset the user’s password with a recovery key or an Apple ID. This message will also appear automatically should a user fail to authenticate three times in a row.
Only systems that were running OS X Yosemite 10.10 or later during the FileVault-enabling process have the option to use FileVault with Apple ID recovery. Also, on multiuser systems, you will need to select the specific user who enabled FileVault with Apple ID recovery.
The quickest recovery method is to enter the recovery key. Click the arrow next to Recovery Key to enter the key, if you have it. After you successfully enter the key, the system unlocks the system volume and continues the startup process. The traditional Mac login window eventually appears, prompting you to set a new password for the user. Enter a new password twice, then an optional password hint, and then click Reset Password to log in the user.
Note
If FileVault was configured using a previous version of macOS and you elected to save the recovery key with Apple, you must contact AppleCare directly to retrieve the key. You can find out how to directly contact AppleCare from Apple Support article HT201232, “Contacting Apple for support and service.”
About Apple ID FileVault Recovery
If you select the option to reset the password using an Apple ID, the system will start up into a special Reset Password Assistant that resides only on the hidden Recovery HD volume. This application looks similar to Setup Assistant, but it’s specifically designed to provide a way to authenticate the user’s Apple ID, retrieve the recovery key from Apple’s iCloud servers, and reset the local user’s password. Further, the Reset Password Assistant can also help users reset their Apple ID password if it’s lost as well.
The Reset Password Assistant requires an Internet connection to reach the Apple iCloud servers. The Recovery HD system attempts to automatically connect to the previously used Wi-Fi network, but if this doesn’t work you will have to manually configure a network connection. Either connect the Mac to a DHCP-enabled Ethernet network, or move the cursor to the top of the screen and select the Wi-Fi menu to configure a Wi-Fi network.
Once the user authenticates with the Apple ID, the Reset Password Assistant retrieves the recovery key from iCloud and then checks the FileVault-protected Mac for a matching local user account. If the user’s local password was linked to his or her Apple ID password, it will be reset to the new password. However, if the user’s local password was separate from the Apple ID, the Reset Password Assistant presents a screen where you can enter a new password for the local user account. Once the reset process is complete, restart the system, and then authenticate with the new user account password to gain access to the system.
Lost FileVault Recovery Key
If, in a worst-case scenario, you have lost all FileVault-enabled account passwords and you are unable to access the FileVault recovery key (either by local methods or with Apple), there is no way to recover the data on the system volume. You might as well start up to macOS Recovery (covered in Lesson 3, “Use macOS Recovery”) and then erase the system disk (covered in Lesson 9, “Manage File Systems and Storage”). At that point, you could reinstall macOS (covered in Lesson 1, “Install macOS Sierra”) or restore from a Time Machine backup (covered in Lesson 15, “Manage Time Machine”).
Exercise 10.1 Turn On FileVault
![]() Prerequisite
Prerequisite
![]() You must have created the Local Admin (Exercise 2.1, “Configure a New macOS System for Exercises,” or Exercise 2.2, “Configure an Existing macOS System for Exercises”) and Chris Johnson (Exercise 5.1, “Create a Standard User Account”) accounts.
You must have created the Local Admin (Exercise 2.1, “Configure a New macOS System for Exercises,” or Exercise 2.2, “Configure an Existing macOS System for Exercises”) and Chris Johnson (Exercise 5.1, “Create a Standard User Account”) accounts.
If you lose all the passwords and the recovery key for a FileVault-encrypted volume, you will not be able to regain access to the data stored in it. If you are performing this exercise on your own computer and have any files you do not want to risk losing, you must back up your computer before starting this exercise.
FileVault allows you to encrypt your startup volume and control which users can gain access to the volume. In this exercise, you will turn on FileVault protection for your startup volume. If you do not want to protect your computer with FileVault, you can turn it off in Exercise 10.4, “Turn Off FileVault.”
Use System Preferences to Turn On FileVault
1 If necessary, log in as Chris Johnson (password: chris, or whatever you chose when you created the account).
2 Open the Security & Privacy pane in System Preferences.
If a dialog appears indicating that “You’re using an old version of FileVault,” it means you have old user accounts set up using Legacy FileVault encryption. You can either click Turn Off Legacy FileVault and follow the prompts to turn it off or click Keep Using Legacy FileVault and skip this lesson’s exercises. You cannot use both Legacy FileVault and the current version, FileVault 2, at the same time.
3 Click the FileVault tab.
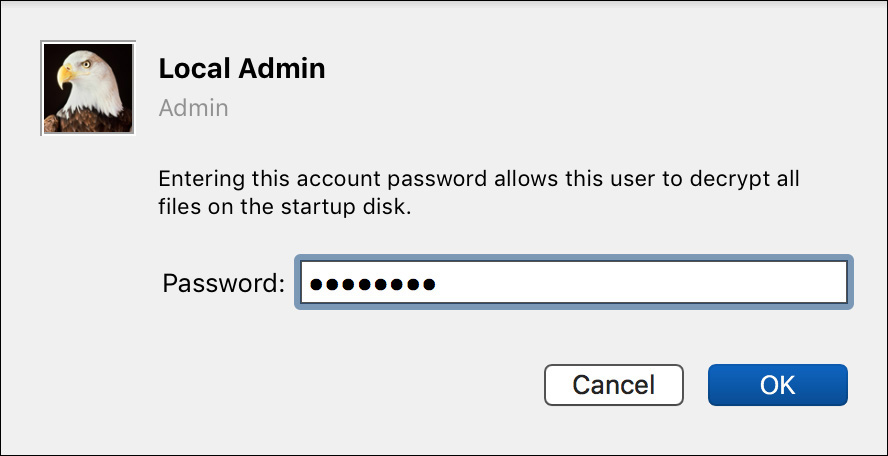
4 Unlock the preference pane, and authenticate as Local Admin (password: ladminpw).
5 Click Turn On FileVault.
If a dialog appears saying “A recovery key has been set by your company, school, or institution,” it means your computer was preloaded with an institutional recovery key (described in Apple Support article HT202385, “Set a FileVault recovery key for Mac computers in your institution”). In this case, click Continue and skip to step 9. You will also not be able to perform Exercise 10.3, “Use a FileVault Recovery Key.”
If an institutional key has not been set, a dialog appears giving you the choice of allowing your iCloud account to unlock the disk or creating a recovery key. Note that the dialog will be slightly different if you have not linked the Chris Johnson account to an Apple ID.
6 Select “Create a recovery key and do not use my iCloud account,” and click Continue.
7 Record your recovery key.
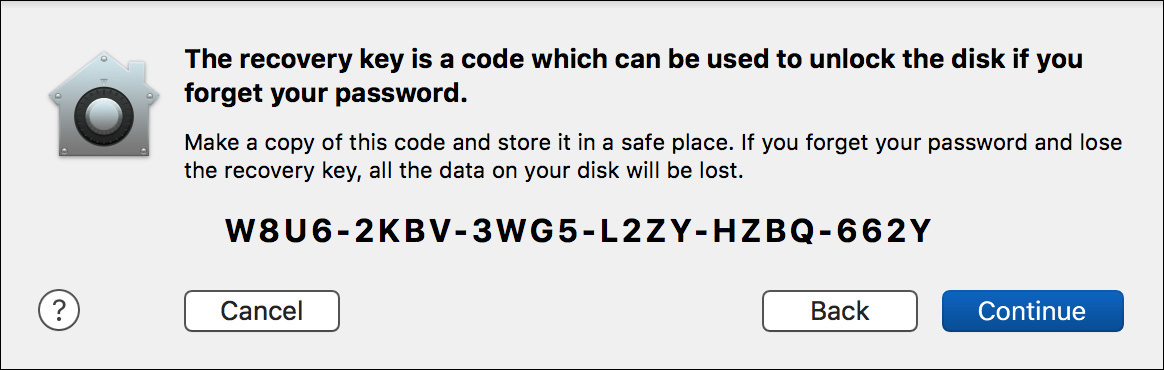
Recovery key: ______________________________________________
If you are performing these exercises on your own computer and intend to leave FileVault on at the end of these exercises, store the recorded recovery key in a physically secure location.
One convenient option for recording the key is to take a picture of it with a smartphone (or other camera). However, you should consider the security implications of someone stealing your computer and phone together.
You could also take a screenshot on the computer itself, but then you would need to copy it someplace else to make it available if you get locked out of your computer.
8 Click Continue.
A dialog appears, allowing you to select which users can unlock the disk.

9 Click the Enable User button for Local Admin.
10 Enter the Local Admin password, and then click OK.
11 If the Chris Johnson account is not already enabled (green checkmark to the right of the account), enable it as well.
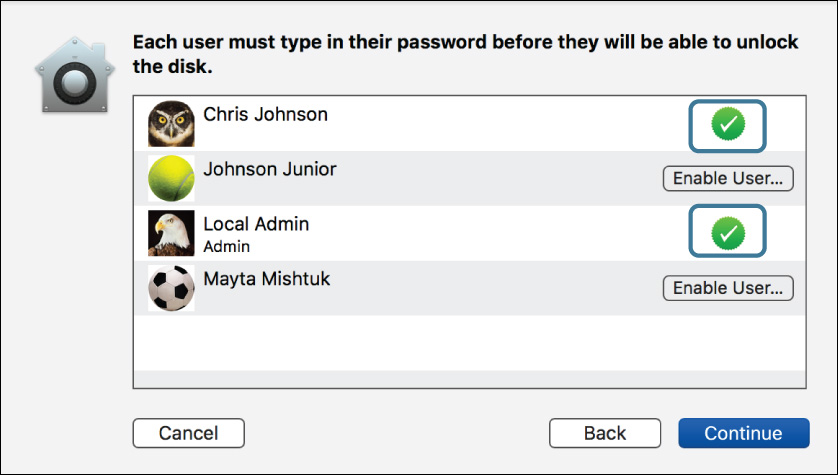
Do not enable any accounts other than Chris Johnson and Local Admin.
12 Click Continue.
13 Click Restart to begin the encryption process.
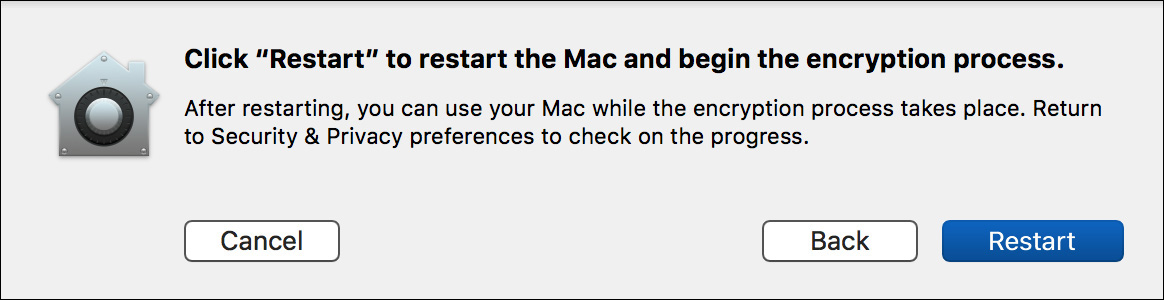
14 If you are prompted to, authenticate as Local Admin.
Your computer restarts, and the FileVault authentication screen appears. This screen is similar to the normal login screen, but only the enabled users, Chris Johnson and Local Admin, are available at this screen. Users who have not been enabled for FileVault cannot start the computer up but can log in after an enabled user has started it.
Encrypting the entire partition takes a while, but you can use the computer normally during the encryption process.
You can now leave your computer at the authentication screen and proceed to Exercise 10.2, “Restart a FileVault-Protected System,” or Exercise 10.3, “Use a FileVault Recovery Key”; if you do not want to leave FileVault on, wait for the encryption process to finish, and then use Exercise 10.4, “Turn Off FileVault,” to turn it off. You can also perform exercises from other lessons while you are waiting for it to finish encrypting your disk.
Exercise 10.2 Restart a FileVault-Protected System
![]() Prerequisites
Prerequisites
![]() You must have created the Local Admin (Exercise 2.1, “Configure a New macOS System for Exercises,” or Exercise 2.2, “Configure an Existing macOS System for Exercises”), Chris Johnson (Exercise 5.1, “Create a Standard User Account”), and Mayta Mishtuk (Exercise 6.1, “Restore a Deleted User Account”) accounts.
You must have created the Local Admin (Exercise 2.1, “Configure a New macOS System for Exercises,” or Exercise 2.2, “Configure an Existing macOS System for Exercises”), Chris Johnson (Exercise 5.1, “Create a Standard User Account”), and Mayta Mishtuk (Exercise 6.1, “Restore a Deleted User Account”) accounts.
![]() You must have performed Exercise 10.1, “Turn On FileVault.”
You must have performed Exercise 10.1, “Turn On FileVault.”
In this exercise, you’ll see how FileVault modifies the macOS startup process by requiring one of the selected user’s passwords. Once the computer is fully started, all users may use the computer normally.
Your computer restarts and displays a FileVault access screen. This looks similar to the login screen, but you see only Chris Johnson and Local Admin. The operating system has not started yet because you need to unlock the disk before the system files can be read.
If Find My Mac were turned on, you would also see a Guest account listed here. Selecting Guest starts the computer in a Safari-only mode with no access to the startup volume. This exists primarily to tempt computer thieves into connecting the computer to the Internet, allowing the Find My Mac service to, locate, lock, or wipe the Mac.
Log In to a FileVault-Enabled Account

1 On the FileVault authentication screen, click Chris Johnson.
2 Enter Chris’s password, and press Return.
At this point, the normal macOS startup process proceeds, and you are automatically logged in as Chris Johnson. Since you already authenticated as Chris Johnson at the FileVault authentication screen, macOS facilitates an automatic login for you.
3 Select your startup volume from the desktop.
4 In the Finder, choose File menu > Get Info (Command-I).
5 If necessary, click the triangle to expand the General section of the Info window.
The format of the volume is now Mac OS Extended (Journaled, Encrypted).
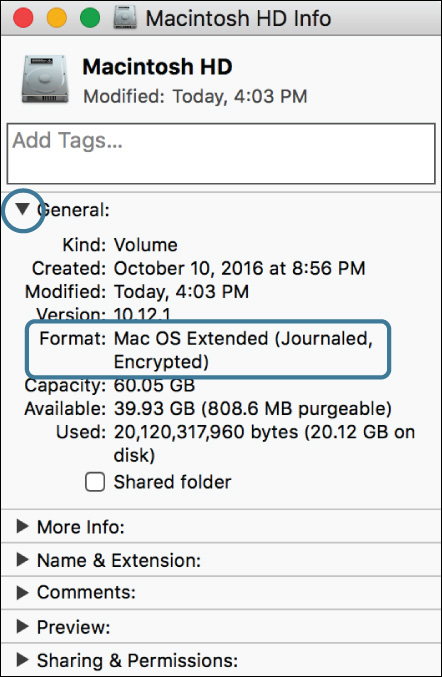
6 Close the Info window.
Enable Another Account for FileVault
1 Open System Preferences, select Security & Privacy, and click the FileVault tab.
A progress indicator shows the encryption status. As you have just seen, FileVault provides some protection immediately, but your data is not fully secured until the encryption process finishes.
2 Unlock the preference pane, and authenticate as Local Admin.
3 Click Enable Users.
A dialog appears that allows you to enable additional users to start up the computer. You can enable additional users at any time, but you will need to enter each user’s password to enable them.
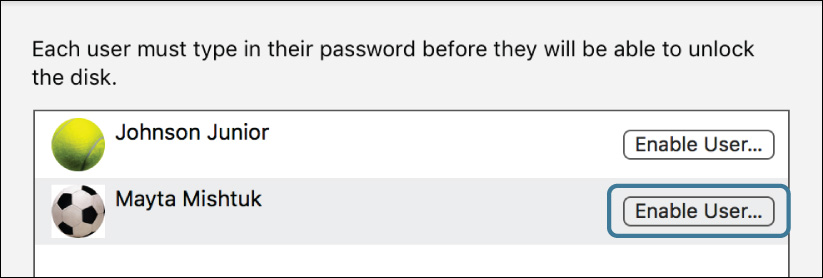
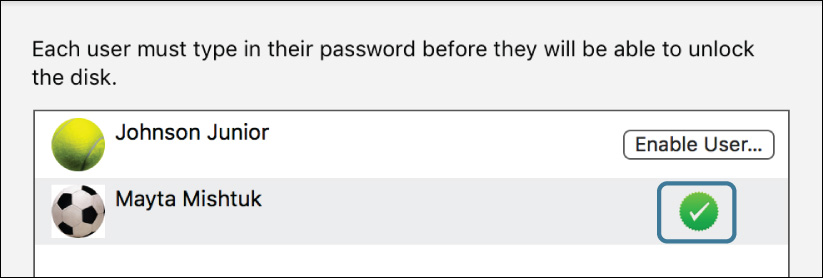
4 Click the Enable User button for Mayta Mishtuk.
5 Enter Mayta’s password (mayta, or whatever you chose), and click OK.
Mayta’s account now has a green checkmark.
6 Click Done.
7 Quit System Preferences, and log out as Chris Johnson.
The login screen appears. Notice that even though Chris’s account was used to gain access to Macintosh HD, all users can now log in normally.

8 If you plan to perform Exercise 10.3, “Use a FileVault Recovery Key,” next, click the Restart button at the bottom of the screen.
Exercise 10.3 Use a FileVault Recovery Key
![]() Prerequisites
Prerequisites
![]() You must have created the Local Admin (Exercise 2.1, “Configure a New macOS System for Exercises,” or Exercise 2.2, “Configure an Existing macOS System for Exercises”) and Chris Johnson (Exercise 5.1, “Create a Standard User Account”) accounts.
You must have created the Local Admin (Exercise 2.1, “Configure a New macOS System for Exercises,” or Exercise 2.2, “Configure an Existing macOS System for Exercises”) and Chris Johnson (Exercise 5.1, “Create a Standard User Account”) accounts.
![]() You must have performed Exercise 10.1, “Turn On FileVault,” and recorded your recovery key.
You must have performed Exercise 10.1, “Turn On FileVault,” and recorded your recovery key.
You can use the FileVault recovery key to reset user passwords at startup. In this exercise, you will use this capability to reset Chris Johnson’s password.
Reset Chris Johnson’s Password
1 If your computer is not at the FileVault authentication screen, restart it.
If you performed Exercise 10.2, the Mayta Mishtuk account now appears on the FileVault authentication screen along with Chris Johnson and Local Admin. If you also see the Johnson Junior account, you may have logged out without restarting the computer, in which case you are seeing the normal login screen, not FileVault.
2 At the FileVault authentication screen, click Chris Johnson.
3 Click the Help (?) button at the right of the Password field or fail to authenticate with the correct password three times.
You will see an option that lets you reset the password with the recovery key.
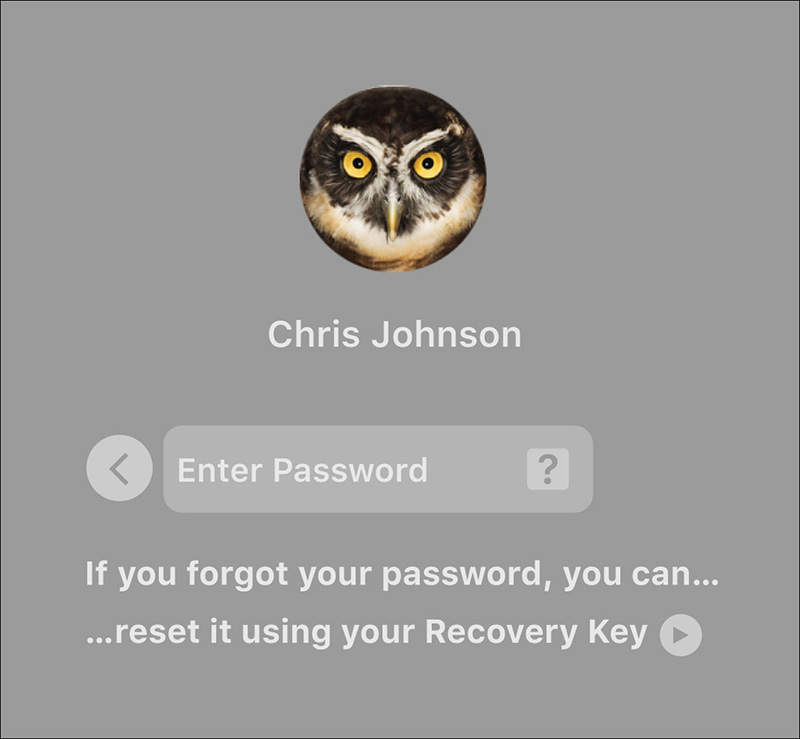
4 Click the arrow to start the reset process.
A Recovery Key field replaces the Password field.
5 Enter the recovery key you recorded earlier, and press Return.

If the Recovery Key field shakes and resets, you have not entered the recovery key correctly. If reentering it does not correct the problem, you may have recorded it incorrectly. In this case, you can’t perform the password reset portion of this exercise; instead, cancel the password reset by clicking the left-arrow button, log in normally using any of the enabled accounts, and skip the rest of this exercise.
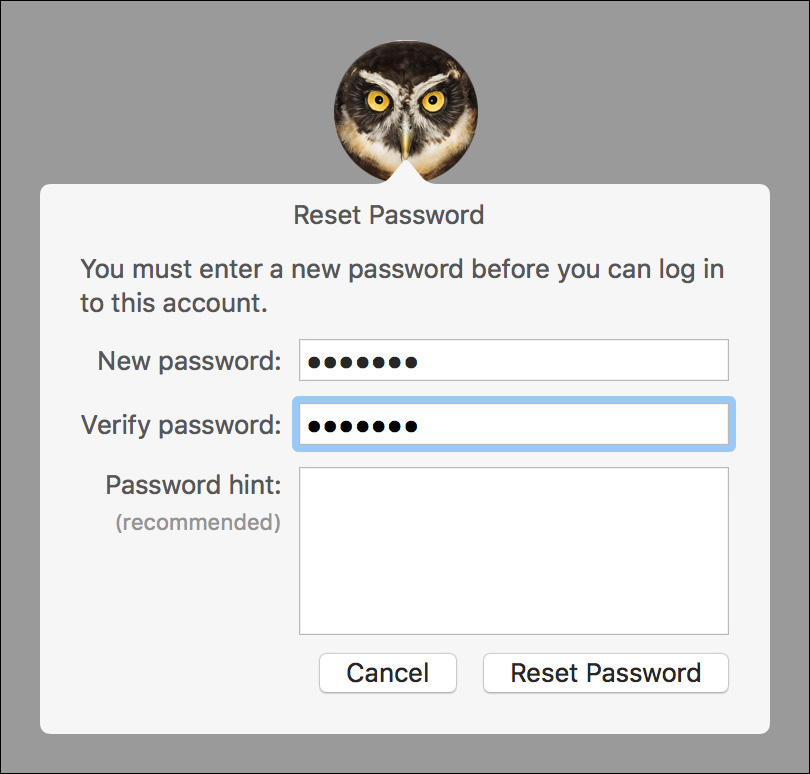
The operating system starts up. Once the startup process finishes, a Reset Password dialog appears under the Chris Johnson account’s icon.
6 In the Reset Password dialog, enter vaultpw in the “New password” and “Verify password” fields, and then click Reset Password.
You are now logged in to Chris’s account. Since his password has been reset, you receive the warning that the system was unable to unlock his login keychain.
7 Click Continue Log In.
8 If you are prompted, enter the password for Chris’s login keychain (chris, or whatever you chose when you created the account).
Restore Chris Johnson’s Original Password
To avoid confusion for the rest of the exercises, you will now change the Chris Johnson password back.
1 Open the Users & Groups pane in System Preferences.
2 Click Change Password.
3 Enter vaultpw as the old password, and enter the Chris Johnson account’s original password (chris, or whatever you chose earlier) in the New Password and Verify fields.
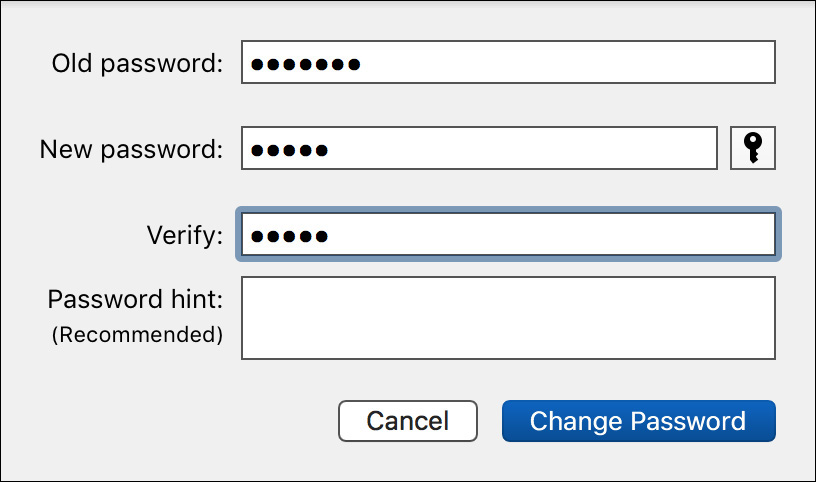
4 Click Change Password.
Note that this also brings Chris’s account password back in sync with his keychain password.
5 Log out as Chris Johnson.
Exercise 10.4 Turn Off FileVault
![]() Prerequisites
Prerequisites
![]() You must have created the Local Admin (Exercise 2.1, “Configure a New macOS System for Exercises,” or Exercise 2.2, “Configure an Existing macOS System for Exercises”) and Chris Johnson (Exercise 5.1, “Create a Standard User Account”) accounts.
You must have created the Local Admin (Exercise 2.1, “Configure a New macOS System for Exercises,” or Exercise 2.2, “Configure an Existing macOS System for Exercises”) and Chris Johnson (Exercise 5.1, “Create a Standard User Account”) accounts.
![]() You must have performed Exercise 10.1, “Turn On FileVault,” and the en-cryption process must have finished.
You must have performed Exercise 10.1, “Turn On FileVault,” and the en-cryption process must have finished.
You can turn off FileVault encryption as easily as you turned it on. If you are performing these exercises on your own and want to leave FileVault protection enabled on your computer, you can skip this exercise.
If you are performing these exercises in a class, you should not skip this exercise.
Turn Off Encryption on the Macintosh HD Volume
1 If necessary, log in as Chris Johnson.
2 Open the Security & Privacy preferences.
3 Click the FileVault tab.
If the encryption process has not finished, you will not be able to turn off FileVault yet. You may perform other exercises while the encryption proceeds in the background and then return to this exercise when the volume is fully encrypted.
4 Click the lock icon, and authenticate as Local Admin. Only administrators can turn FileVault on and off.
5 Click Turn Off FileVault.
You are asked to confirm that you want to turn off FileVault.
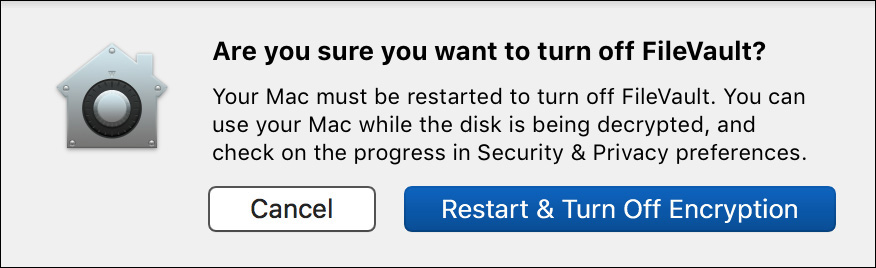
6 Click “Restart & Turn Off Encryption.”
7 If you are prompted to do so, reauthenticate as Local Admin.
Your computer restarts, and the decryption process begins. Note that since you authenticated to FileVault when you started up the computer, no special FileVault password is required at this point. As with the encryption process, you can continue to use the computer normally during the decryption process.