Lesson 14. Use Metadata, Spotlight, and Siri
Goals
![]() Describe how macOS Sierra stores and uses file metadata
Describe how macOS Sierra stores and uses file metadata
![]() Use metadata, such as tags and comments, to organize your files
Use metadata, such as tags and comments, to organize your files
![]() Use Spotlight and Siri to search for local and Internet resources
Use Spotlight and Siri to search for local and Internet resources
Metadata is data about data. More specifically, metadata is information used to describe content. The most basic forms of file and folder metadata employed by nearly every operating system are names, paths, modification dates, and permissions. These metadata objects are not part of the item’s content, yet they are necessary to describe the item in the file system. Mac systems use several types of additional file system metadata for a variety of technologies that ultimately lead to a richer user experience. Apple has expanded on this already rich base by offering a new metadata mechanism—tags—that can be found throughout the system.
This lesson details how macOS makes use of file metadata and how this metadata is stored on various file systems. It also demonstrates how to take advantage of all this metadata by using the file system tags feature, as well as the macOS advanced Spotlight and Siri search technologies.
Reference 14.1 About File System Metadata
Resource forks, dating back to the original Mac OS, are the legacy metadata technology in the Mac operating system. To simplify the user experience, Apple created a forked file system to make complex items, such as applications, appear as a single icon. Forked file systems, such as Mac OS Extended, enable multiple pieces of data to appear as a single item in the file system. In this case, a file appears as a single item but is actually composed of two separate pieces: a data fork and a resource fork. This technology also enables Mac computers to support file type identification in the data fork, whereas the extra information specific to Mac resides in the resource fork. For many years, Mac computers have relied on forked files for storing both data and associated metadata.
macOS Sierra continues and expands metadata use, even helping developers to take advantage of additional metadata items. This enables Apple and other developers to implement unique file-system solutions without having to modify the existing file system. For instance, OS X Snow Leopard 10.6 introduced compressed application code, wherein the executable program files are compressed to save space and then, when needed, automatically decompressed on the fly. To prevent previous Mac operating system versions or older applications from improperly handling these compressed executables, macOS hides the compressed bits in additional metadata locations.
The downside to legacy resource forks, and other types of additional file system metadata, is that some third-party file systems, like FAT, do not know how to properly store this additional data. The solution to this issue is addressed with the AppleDouble file format, covered later in this lesson.
About File Flags and Extended Attributes
macOS also uses metadata in the form of file system flags and extended attributes to implement a variety of system features. In general, file system flags are holdovers from the original Mac operating system and are primarily used to control user access. Examples of file system flags include the hidden flag, covered in Lesson 12, “Use Hidden Items, Shortcuts, and File Archives,” and the locked flag, covered in Lesson 17, “Manage Documents.”
With macOS, Apple needed to expand the range of possible attributes associated with any file or folder, which is where so-called extended attributes come into play. Any process or application can add an arbitrary number of custom attributes to a file or folder. Again, this enables developers to create new forms of metadata without having to modify the existing file system.
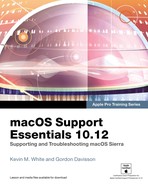
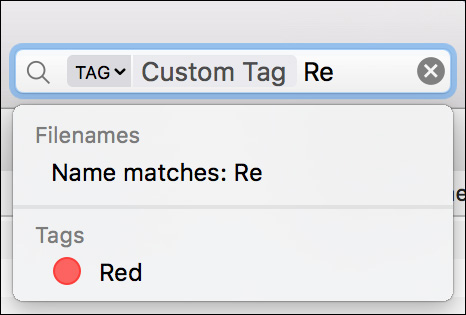
For example, file system tags are stored as extended attributes. macOS also uses extended attributes for several general file features, including the stationery pad option, hide extension option, and comments. You can access these items from the Info window in the Finder. The following Info window screenshot shows a document featuring Red and Work file system tags and a searchable text comment.
About File System Tags
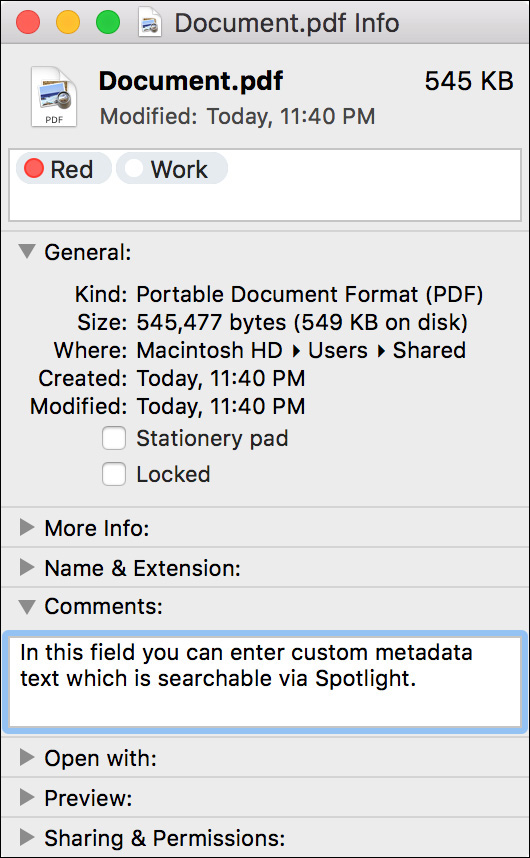
File system tags are an upgrade to an older Mac file system metadata technology: Finder labels. Prior to OS X Mavericks 10.9, you could set a single color label for any item in the Finder. File system tags expand on this feature by enabling you to assign multiple tags with custom user-defined tag colors and tag names.
Note
Similar to how developers must update their applications to support iCloud, an application must be updated to support file system tags. Thus, some applications may not recognize file-system tags.
You can modify file system tags for documents within any application that presents a Save dialog. You can define tags for documents saved locally and in iCloud. The default file system tags match the Finder labels found in previous Mac computers. However, when selecting tags for a document, you can create a new tag by typing a new name in the Tags field.
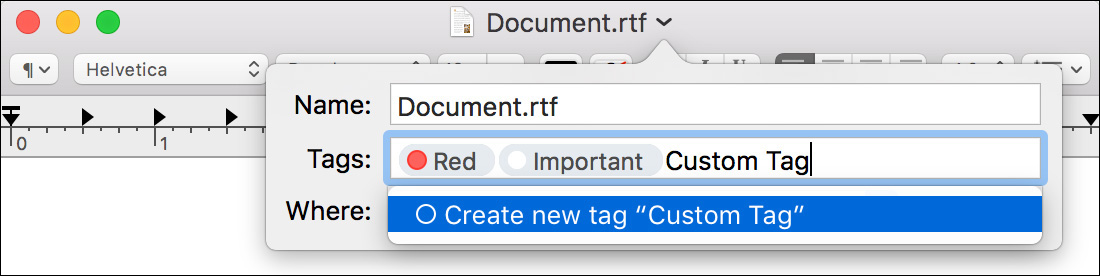
You can further customize tags in the Tags pane of the Finder preferences (choose Finder > Preferences). From this pane, you can create additional tags by clicking the Add (+) button, and you can delete existing tags by clicking the Delete (–) button. To rename a tag, click the tag’s name, and to change the color, click the tag’s color. You can also define which tags are shown in the Finder sidebar by selecting the tag’s checkbox, and you can set the tag order by dragging tag entries in the list. Finally, below the tags sidebar list, you can define favorite tags so that they will appear in Finder menus.
Items from previous Mac operating systems with Finder labels appear as file-system tags in OS X Mavericks 10.9 and later. Mac operating systems prior to Mavericks are not fully compatible with items using custom tags or with items that use more than one tag. These older Mac operating systems display only the last saved tag of an item, and even then will only display it as a standard Finder label color.
Most importantly, though, macOS includes interfaces that enable you to quickly search for your items or organize your items by file-system tag. In the Finder, you can find tags in the Spotlight search field or the sidebar. In updated applications, you can access tags from a similar Spotlight search and sidebar as well. Using Spotlight for searching is detailed later in this lesson.
More Info
You can find out more about file-system tags in Apple Support article HT202754, “OS X: Tags help you organize your files.”
About AppleDouble File Format
Although file-system metadata helps enrich your experience in macOS, compatibility with third-party file systems can be an issue. Only volumes formatted with the Mac OS Extended file system fully support resource forks, data forks, file flags, and extended attributes. Third-party software exists for Windows-based operating systems to enable them to access the extended metadata features of Mac OS Extended. More often, though, users take advantage of the compatibility software built into macOS to help other file systems work with these metadata items.
For most anything other than Mac OS Extended volumes, including FAT volumes, older Xsan volumes, and older NFS shares, macOS stores metadata from the file system in a separate hidden data file. This technique is called AppleDouble.
For example, if you copy a file that contains metadata and is named My Document.docx to a FAT32 volume, macOS automatically splits the file and writes it as two discrete pieces on the FAT32 volume. The file’s internal data is written with the same name as the original, but the metadata is written to a file named ._My Document.docx, which remains hidden from the Finder. This works out well for most files, because Windows applications only care about the contents of the data fork. But some files do not take well to being split up, and all the extra dot-underscore files may confuse users of computer systems that rely on other file systems.
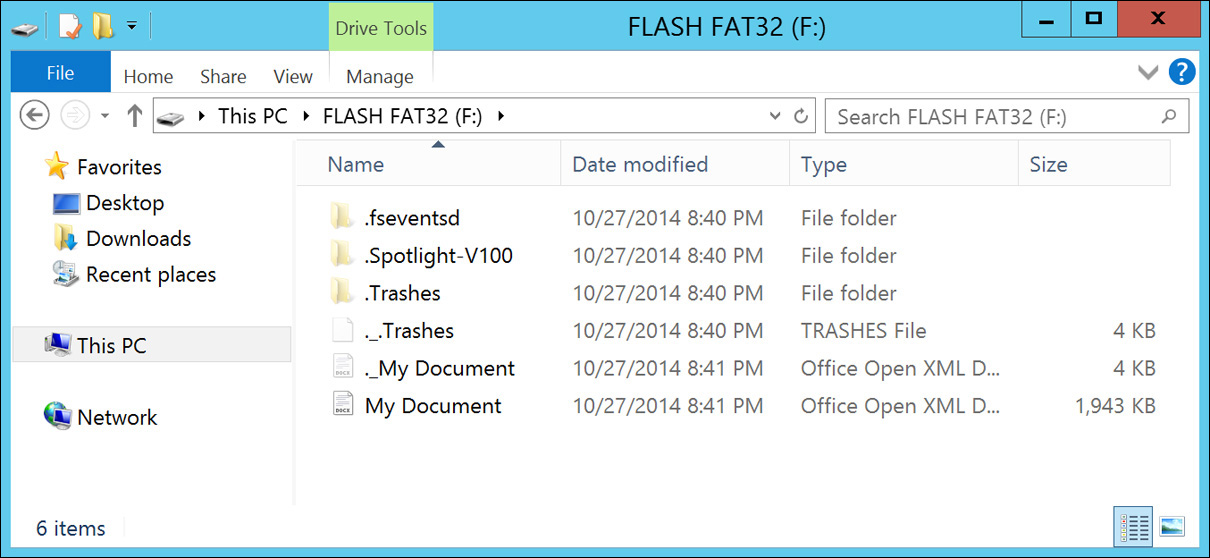
Recent Windows systems default to automatically hiding dot-underscore files. In fact, to acquire the Windows screenshot shown here, showing hidden files had to be manually enabled. Further, macOS includes a method for handling metadata on SMB network shares from NTFS volumes that doesn’t require the AppleDouble format. The native file system for current Windows-based computers, NTFS, supports something similar to file forking, known as alternative data streams. The file system writes the metadata to the alternative data stream, so the file appears as a single item on both Windows and macOS.
Note
Hidden files named “.DS_Store” are not technically metadata files. Instead, these files are used by the Finder to store folder window view information. Similar to AppleDouble files, .DS-Store files are benign and you shouldn’t edit them.
Reference 14.2 Search with Spotlight and Siri
With Spotlight and Siri on macOS Sierra, you can perform nearly instantaneous searches that go wider and deeper than any other portable or desktop computer search technology. For any query, Spotlight and Siri can go beyond simple file-system searches and find relevant information from inside local documents, application function results, and Internet sources. As a default in macOS Sierra, you’ll find both the Spotlight and Siri icons in the upper-right corner of the screen between the time and the Notification Center icon at the far right.

Search with Spotlight
Spotlight combines the search results list and search results preview into a Spotlight window that appears on top of your other open windows. You can initiate a Spotlight search by clicking the Spotlight (magnifying glass) icon at the upper-right corner of the screen or by using the default Spotlight keyboard shortcut: Command-Space bar.

You can also move and resize the Spotlight search results window. Drag in the Spotlight search field to move the window. Drag the bottom edge to change the window’s size.
Spotlight search is so fast that the results change in real time as you type in your search query. The left side of the Spotlight window is a list of the search results; the right side is a preview area. Use the arrow keys to navigate the results list, or select an item (by clicking once) to show a preview. Both the results list and preview area are scrollable to reveal more content. Double-clicking an item or pressing Return will open the selected item immediately.
Search with Siri
Siri is new to Mac, available for the first time with macOS Sierra. With Siri you can speak plain-language requests and macOS returns the results, often both in spoken word and a visual representation. You can initiate a Siri request by clicking the Siri icon (to the right of the Spotlight icon) at the upper-right corner of the screen or by using the default Siri keyboard shortcut: holding Command-Space bar until the Siri window appears.
Tip
You can change the default keyboard shortcut for Siri from the Siri preferences, as detailed later in this lesson.
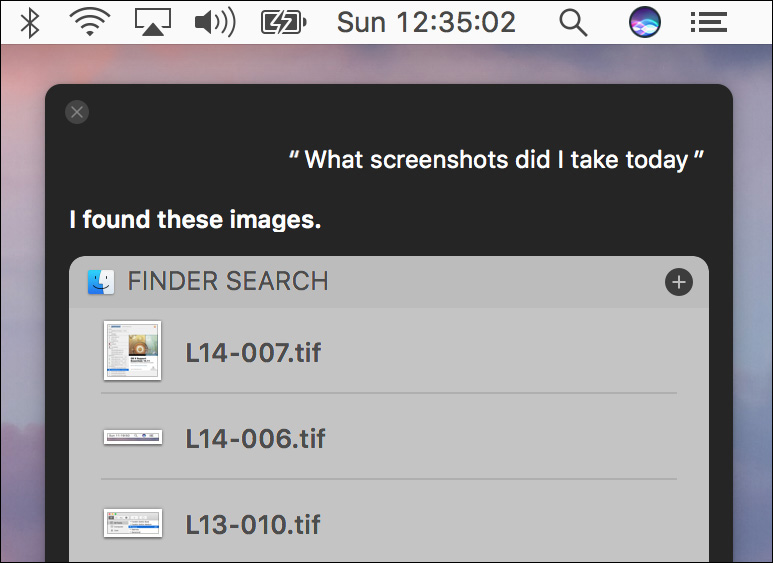
As you speak, Siri will translate your words to text, and more importantly interpret your meaning. As you can see in the preceding screenshot, Siri interpreted “screenshots” to mean “images” and “today” to mean “most recent”—thus returning a Finder search with a list of image files sorted by creation date.
If Siri misunderstands your spoken words, you can double-click the requested text at the top of the Siri window and type in corrections.
Siri also returns results nearly instantly, but there could be a bit of delay because your Mac must send the translated text to Apple servers to interpret the meaning of your words. In a local file search, Siri leverages Spotlight to provide the file list results.
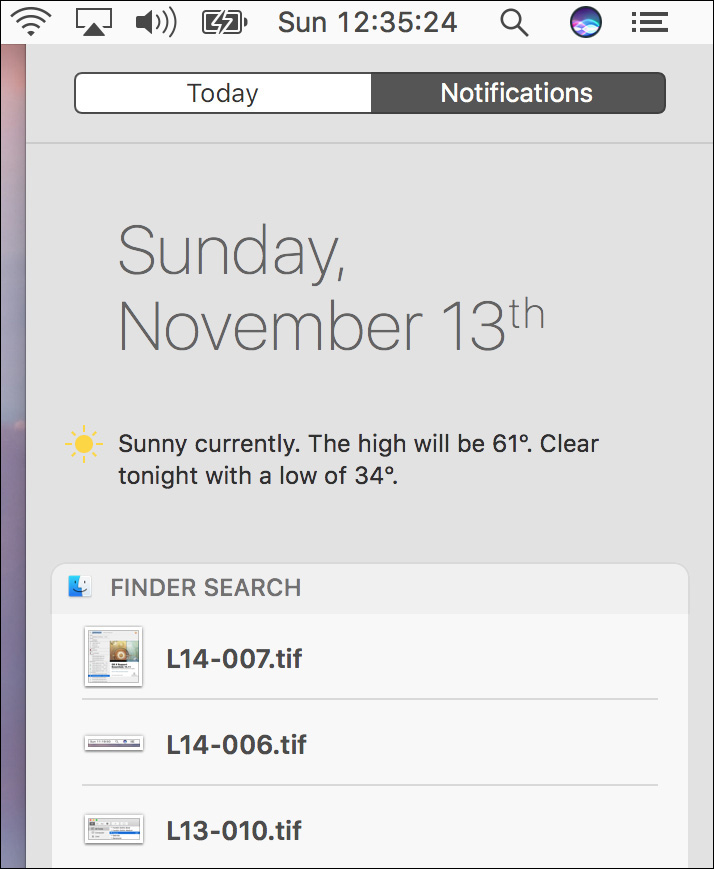
Double-clicking any item in the Siri search results will open that item in an appropriate application. You can also save the results of a Siri search by clicking the Add (plus icon) button at the top right of the Siri search results. This will create a Notification Center widget that can be accessed by clicking the Notification Center icon, which is always the furthest-right icon in the menu bar.
More Info
This guide primarily focuses on using Siri to search for local items, but Siri is capable of much more. You can find out what else you can ask by initiating a Siri request and then pressing the Esc (Escape) key. You can also check out Apple Support article HT206993, “Use Siri on your Mac.”
About Search Results
The preceding Spotlight screenshot shows the results of a Spotlight search for the query “gatekeeper.” As you can see, the results list contains documents, mail messages, and even results from Internet sources.
Spotlight can also search inside application data sources. Again, in the preceding Spotlight search result, the selected item being previewed is a PDF of the previous version of this guide stored inside the iBooks library. Note the iBooks application icon in the upper-right corner of the Spotlight search window. As you can see, neither the document’s name nor the previewed cover page contains the word “gatekeeper.” Instead, Spotlight actually searched inside the text of that rather lengthy PDF file for the word “gatekeeper.” Nevertheless, Spotlight can return search results from this long PDF along with results from other sources nearly instantly.
Spotlight and Siri can also take advantage of an application’s functions. For example, Spotlight and Siri can perform mathematical calculations and unit conversions (including market-based currency conversion) via integration with the Calculator application.
Again, for local file searches, the metadata technologies covered previously in this lesson are also searchable via Spotlight and Siri, including filenames, file flags, modification dates, and file-system tags. Additionally, many files contain internal metadata used to describe the file’s content. For example, many digital camera image files contain additional camera setting information embedded as metadata inside the file. Spotlight and Siri can search through this document-specific metadata information as well.
Tip
The quickest way to open any application on macOS is to search for it using Spotlight. For example, you can quickly find and open Disk Utility using the keyboard. Press Command-Space bar, enter disk, and press Return. You can also use Siri to open applications, but the language interpretation usually takes a little more time.
In addition to local files, Spotlight (and by proxy Siri) can search through the contents of shared files from other Mac clients, servers, AirDisk volumes (disks shared via AirPort Wi-Fi access points), Time Machine backups, and iCloud Drive.
Extending beyond local network services, Spotlight and Siri can search a variety of Internet sources through Apple services known as Spotlight Suggestions and Siri Suggestions. These Apple-hosted services use a combination of search history, location information, and user information to generate relevant search results from a wide variety of Internet sources. Obviously, an Internet connection is required to take advantage of Spotlight Suggestions and Siri Suggestions.
About Spotlight Indexing
Spotlight (and by proxy Siri) is able to perform wide and deep searches of local items and shared files quickly because it works in the background to maintain highly optimized databases of indexed metadata for each attached local volume. When you first set up macOS, it creates these databases by indexing all the available local volumes. The system also indexes new volumes when they are first attached.
On macOS, a background process automatically updates the index databases on the fly as changes are made throughout the file system. Because these indexes are kept current, Spotlight only needs to search the databases to return thorough results. Essentially, Spotlight preemptively searches everything for you in the background, so you don’t have to wait for the results when you need them.
Note
Spotlight does not create index databases on read-only volumes or write-once media such as optical discs.
Note
Spotlight directly indexes Time Machine and AirDisk volumes (drives shared via AirPort Extreme), but it does not index shared volumes from other computers. Spotlight can connect to indexes on shares hosted from other Mac operating systems.
You can find the Spotlight general index databases at the root level of every volume in a folder named .Spotlight-V100. A few applications maintain their own databases separate from these general index databases. One example is the built-in email application Mail, which maintains its own optimized email database in each user’s folder at ~/Library/Mail /V2/MailData/Envelope Index.
If you are experiencing problems with local file searching, you can force Spotlight to rebuild the index databases by deleting them and restarting your Mac or by managing the Spotlight preferences, as covered later in this lesson.
About Spotlight Plug-ins
Spotlight can create indexes, and thus search—from an ever-growing variety of local metadata—using plug-in technologies. Each Spotlight plug-in examines specific types of files or databases. Many Spotlight plug-ins are included by default, but Apple and third-party developers can create additional plug-ins to expand Spotlight search capabilities.
Included Spotlight plug-ins enable you to:
![]() Search via basic file metadata, including name, file size, creation date, and modification date
Search via basic file metadata, including name, file size, creation date, and modification date
![]() Search via media-specific metadata from picture, music, and video files, including timecode, creator information, and hardware capture information
Search via media-specific metadata from picture, music, and video files, including timecode, creator information, and hardware capture information
![]() Search through the contents of a variety of file types, including text files; application databases; audio and video files; Photoshop files; PDF files; Pages, Numbers, and Keynote files; and Microsoft Office files
Search through the contents of a variety of file types, including text files; application databases; audio and video files; Photoshop files; PDF files; Pages, Numbers, and Keynote files; and Microsoft Office files
![]() Search through personal information like the contents in Contacts and Calendar
Search through personal information like the contents in Contacts and Calendar
![]() Search for correspondence information like the contents of Mail emails and Messages chat transcripts
Search for correspondence information like the contents of Mail emails and Messages chat transcripts
![]() Search for highly relevant information like your favorites or web browser bookmarks and history
Search for highly relevant information like your favorites or web browser bookmarks and history
![]() Perform Internet searches using Microsoft Bing or Apple Spotlight Suggestions
Perform Internet searches using Microsoft Bing or Apple Spotlight Suggestions
Spotlight plug-ins, like any other macOS resource, are stored in various Library folders. The Apple built-in Spotlight plug-ins can be found in both the /System/Library/Spotlight folder and the /Library/Spotlight folder. Third-party plug-ins should always be installed in either the /Library/Spotlight folder or the ~/Library/Spotlight folder, depending on who needs access to them.
Tip
You can create custom metadata for Spotlight by entering Spotlight comments in the Info and Inspector windows from the Finder.
About Search Security
To provide security on par with the rest of the file system, Spotlight indexes every item’s permissions. Even though Spotlight indexes every item on a volume, it automatically filters search results to show only items that the current user has permissions to access. For example, you can’t search the content of another user’s Documents folder. Also, the Spotlight index database for a Legacy FileVault user is stored at the root level, inside the user’s encrypted home folder, so it’s not searchable when the user is logged out.
Be aware, though, when users search through locally attached nonsystem volumes, because they can choose to ignore ownership on these volumes. In other words, all users can search through locally attached nonsystem volumes, including mounted disk images, even if another user attached the device.
Spotlight Suggestions and Siri take advantage of a variety of Apple services and Internet sources, but they always adhere to the Apple Privacy Policy. Apple takes user privacy very seriously and always attempts to keep the user’s information as safe as possible while still providing advanced services. Further, you can disable searches that require Internet services in the Spotlight preferences and Siri preferences, as covered later in this lesson.
More Info
Apple’s Privacy Policy is clearly outlined and constantly updated at www.apple.com/privacy/.
Perform an Advanced Spotlight Search
The default Spotlight search provides quick and easy search results, but as you’ve learned in this lesson, Spotlight has a powerful range of search features. You can perform advanced file-system searches by opening a new Finder window and entering your search in the search field, by choosing File > Find, or by pressing Command-F. Selecting an item from the search results shows you the path to the selected item at the bottom of the Finder window. Selecting an item and then pressing the Space bar opens a preview of the selected item.
Tip
You can change the default Finder search location by going to Finder preferences, clicking the Advanced tab, and choosing a setting from the “When performing a search” pop-up menu.
You can refine your Spotlight search from the results in a Finder window by clicking the small Add (+) buttons below the search field; this allows you to add as many specific search attributes as you need. After you add a new search attribute, click the first word in the search attribute to choose another type from the pop-up menu.
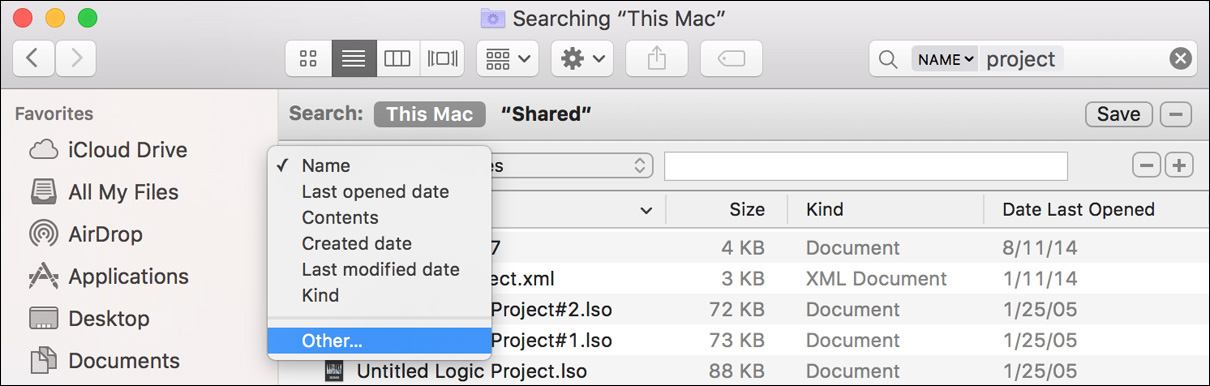
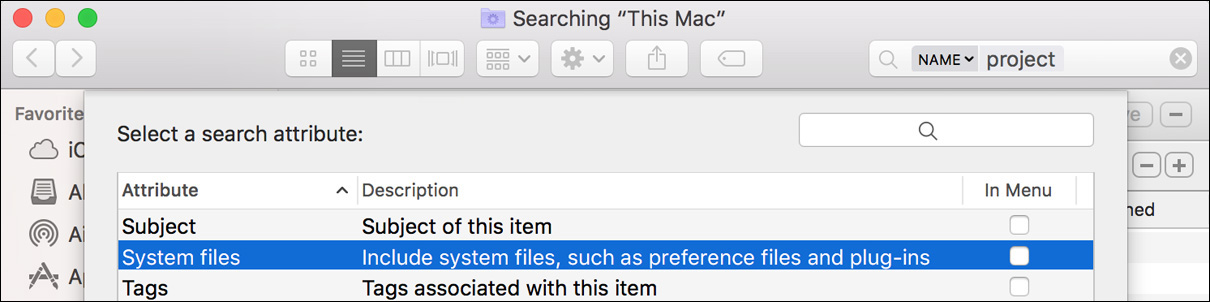
If you don’t see the search attribute you’re looking for, you can add literally dozens of other attributes that aren’t enabled by default. To add search attributes, select any attribute and choose Other from the pop-up menu. In the dialog that appears, you can add search attributes to the pop-up menu. Two especially useful search attributes for administrators are “File visibility” and “System files,” neither of which is shown by default in any Spotlight search.
Tip
Take some time to explore the additional search attributes; you may be surprised at the depth of the Spotlight search capabilities. Search attributes include specifying audio file tags, digital camera metadata, authorship information, contact information, and many other metadata types.
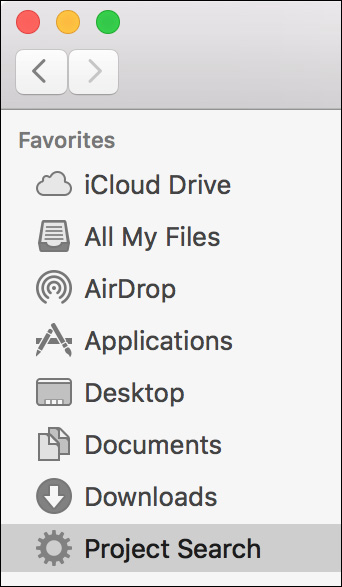
Clicking the Save button on the right saves these search criteria as a Smart Folder. Smart Folders are like normal folders in that they can be given a unique name and placed anywhere you like, including the Finder sidebar. Smart Folders are special because their contents always match your search criteria no matter how the file system changes. In fact, the All My Files and Tags items in the Finder sidebar are predefined Smart Folders.
Manage Spotlight Preferences
From Spotlight preferences, any user can choose to disable specific categories so that they do not appear in Spotlight searches. For example, users can choose to disable Spotlight Suggestions if they don’t want any search information sent over the Internet. You can also prevent some volumes from being indexed by specifying those volumes in the privacy list. However, by default, all new volumes are automatically indexed, so the user must manually configure Spotlight to ignore a volume.
The Spotlight privacy list is a computer-level setting that remains the same across all user accounts, but it’s not protected by administrator access, which means any user can change the privacy list. In this case, the Spotlight privacy list isn’t any less secure than the rest of the file system—any user can still have full access to locally connected nonsystem volumes, because the system defaults to ignoring ownership on those volumes.
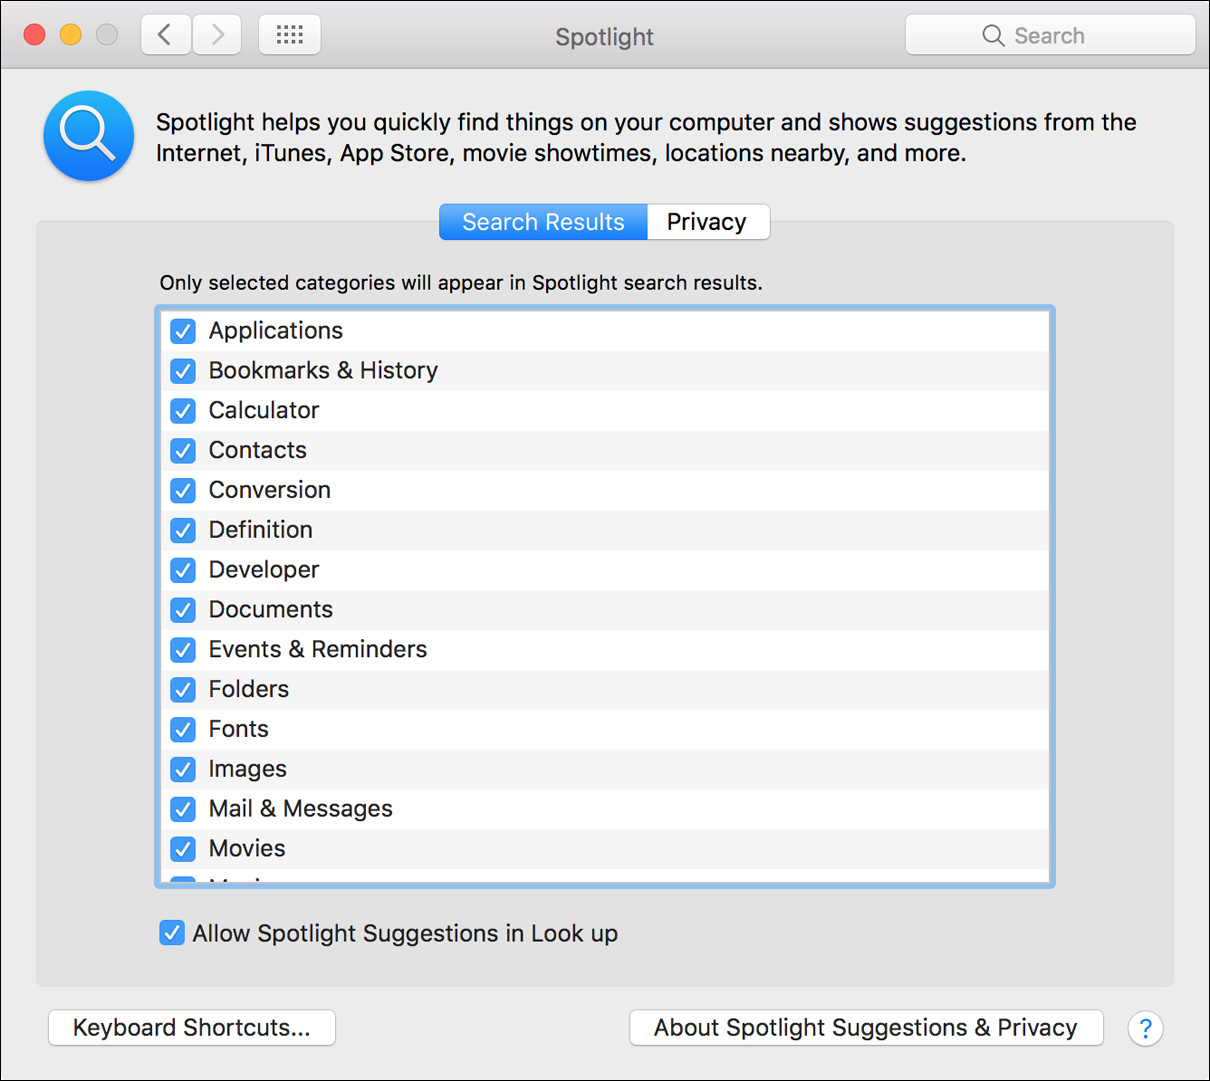
Opening Spotlight preferences defaults to the Search Results tab, where you can disable specific categories from the search results. Deselect the checkboxes next to the categories you want to ignore. You can also drag categories to change their order in the search results. Each user has his or her own separate Search Results settings.
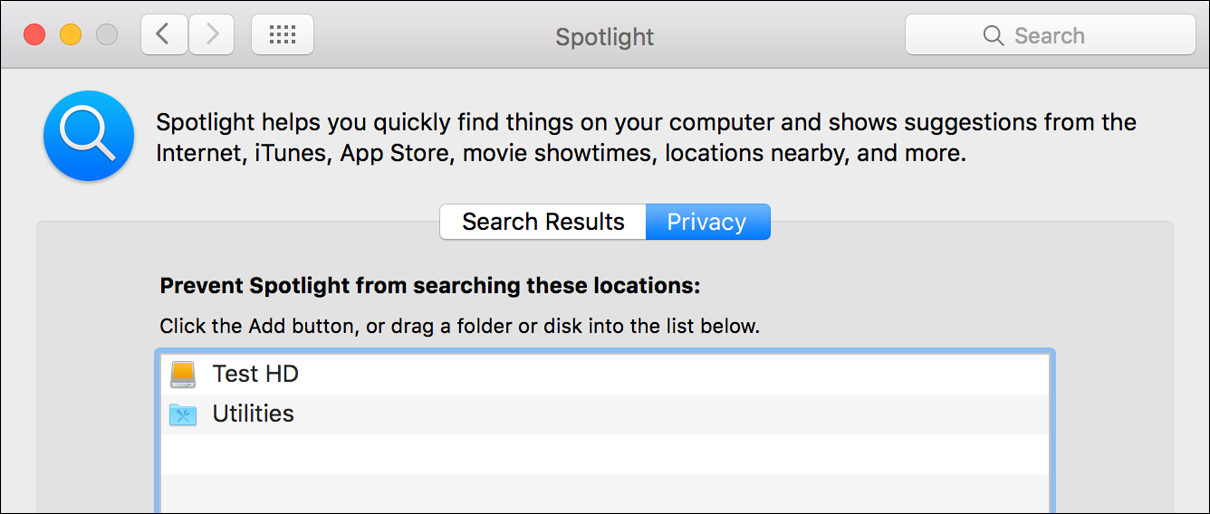
To prevent Spotlight from indexing specific local items, click the Privacy tab to reveal the list of items for Spotlight to ignore. To add new items, click the Add (+) button at the bottom of the privacy list and choose the items from a browser dialog, or drag items into the privacy list. You can delete an item from the privacy list by selecting it and then clicking the Delete (–) button at the bottom of the list.
All Spotlight settings are applied immediately. If you add an entire volume to the privacy list, the system deletes the Spotlight index database from that volume. In turn, removing a volume from the privacy list rebuilds the Spotlight index database on that volume. This technique—rebuilding the Spotlight index databases by adding and then removing a volume from the privacy list—is the most common method for resolving problematic Spotlight performance.
Manage Siri Preferences
When you use Siri, the things you say will be recorded and sent to Apple to process your requests. Your device will also send Apple other information, such as your name and nickname; the names, nicknames, and relationships (e.g., “my dad”) found in your contacts; song names in your collection; the names of your photo albums; and the names of apps installed on your device (collectively, your “User Data”). All of this data is used to help Siri understand you better and recognize what you say. It is not linked to other data that Apple may have from your use of other Apple services. When you use Siri to search for your documents, the Siri request is sent to Apple, but the names and the content of your documents are not sent to Apple. The search is performed locally on the Mac.
If you have Location Services turned on, the location of your device at the time you make a request will also be sent to Apple to help Siri improve the accuracy of its response to your requests. You may choose to turn off Location Services for Siri. To do so, open System Preferences on your Mac, click Security & Privacy, click Location Services, and deselect the checkbox for Siri.
Siri requires an Internet connection to query Apple services to interpret the meaning of your requests. Siri is enabled by default, and you may not want to have an Internet connection by default.
You may choose to turn off Siri at any time. You can disable Siri with Setup Assistant during a macOS setup or upgrade, or from System Preferences > Siri preferences.
Please visit www.apple.com/privacy for more information.

In addition to enabling or disabling Siri, you can adjust several features from Siri preferences, including:
![]() You can select the language that Siri will be expected to translate from. Siri supports over 30 languages and dialects.
You can select the language that Siri will be expected to translate from. Siri supports over 30 languages and dialects.
![]() You can select the voice that Siri will use to speak responses. The choices in this pop-up menu are based on the selected language. Note that you can also disable the voice feedback entirely.
You can select the voice that Siri will use to speak responses. The choices in this pop-up menu are based on the selected language. Note that you can also disable the voice feedback entirely.
![]() You can select the microphone input that Siri will use to listen for your requests. The internal microphone on Apple portable computers is optimized for Siri input and often includes noise-cancelation technology. However, for desktop Mac computers lacking a microphone or if you are in a particularly noisy environment, you will be best served by a dedicated headset-style microphone.
You can select the microphone input that Siri will use to listen for your requests. The internal microphone on Apple portable computers is optimized for Siri input and often includes noise-cancelation technology. However, for desktop Mac computers lacking a microphone or if you are in a particularly noisy environment, you will be best served by a dedicated headset-style microphone.
![]() You can select the keyboard shortcut used to start a Siri request. Note that you can also disable the Siri menu bar icon if you only want to initiate Siri via the keyboard shortcut.
You can select the keyboard shortcut used to start a Siri request. Note that you can also disable the Siri menu bar icon if you only want to initiate Siri via the keyboard shortcut.
Exercise 14.1 Examine File Metadata
![]() Prerequisite
Prerequisite
![]() You must have created the Chris Johnson account (Exercise 5.1, “Create a Standard User Account”).
You must have created the Chris Johnson account (Exercise 5.1, “Create a Standard User Account”).
In this exercise, you will examine some file metadata in the Info window in the Finder and add custom metadata.
Use Tag and Comment Metadata
1 If necessary, log in as Chris Johnson.
2 Open Safari, and navigate to www.apple.com.
3 Choose File menu > Save As (or press Command-S).
If File > Save As is not available, the page may not have fully loaded. Click the “X” in the right side of the URL/search field, and the Save As option should become available.
4 In the Tags field, enter Apple Info. The tag may complete automatically if a previous student has performed this exercise using the same iCloud account.
5 In the pop-up menu that appears, click “Create new tag ‘Apple Info’” or “Apple Info.”
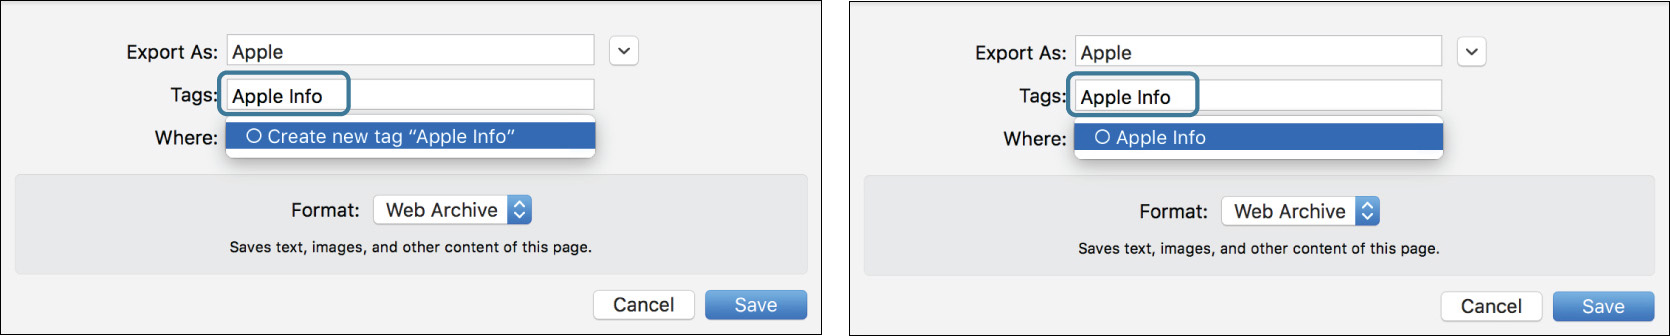
6 If necessary, click elsewhere in the dialog to dismiss the Tags pop-up.
7 Ensure that the location (the Where option) is set to Documents and that Format is set to Web Archive, and then click Save.
9 In the Finder, navigate to your Documents folder (choose Go menu > Documents, or press Command-Shift-O).
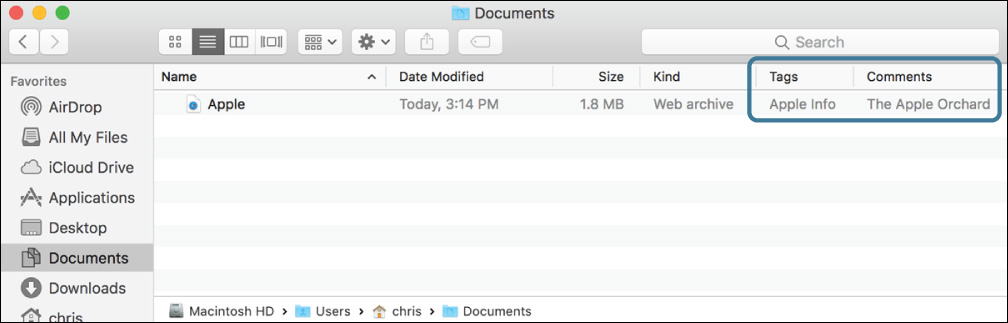
10 Select the web archive file, probably called “Apple,” and get info about it (choose File menu > Get Info, or press Command-I).
11 If necessary, expand the General, More Info, and Comments sections of the Info window.
The Info window in the Finder displays a variety of information about the file, from basic metadata such as its size to information about where on the web it came from, as well as the tag you added when you saved it. It also lets you edit some types of metadata.
12 In the Comments section, type The Apple Orchard.
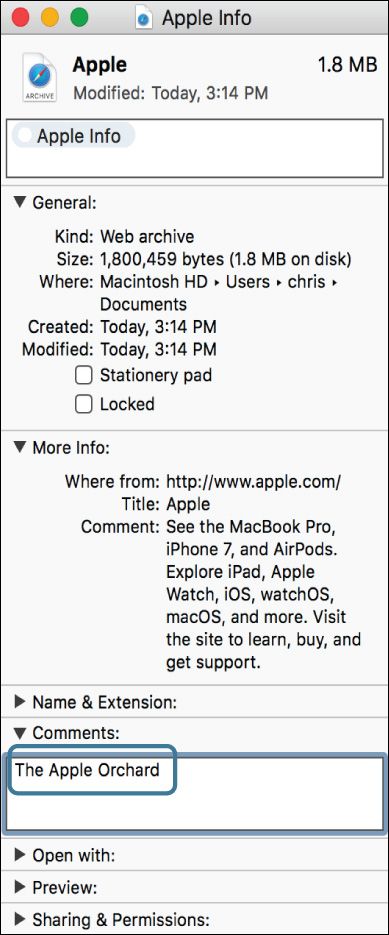
This field adds custom metadata to the file, allowing you to attach searchable comments and keywords. You will see how to use this comment later in this exercise.
13 Close the Info window.
14 If necessary, change the Finder view of the Documents folder to list view (click the List View button in the toolbar, choose View menu > “as List,” or press Command-2).
15 Choose View menu > Show View Options (or press Command-J).
16 In the Show Columns section, select Comments and Tags.

Note that this setting applies only to this specific folder. Clicking “Use as Defaults” would make it the default for all folders.
17 Close the View Options window, and, if necessary, widen the Documents window until you can see the Tags and Comments fields.
18 Close the Documents window.
Use Spotlight to Search for Documents
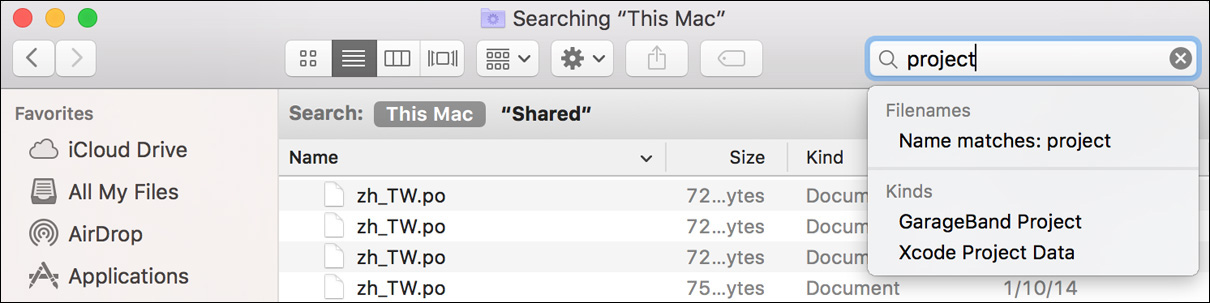
1 In the Finder, choose File menu > Find (Command-F).
2 In the search field of the window that opens, type orchard.
The search finds the web archive you saved earlier because the word orchard appears in its Spotlight comment. Note that you can also restrict the search to files with orchard in the name.
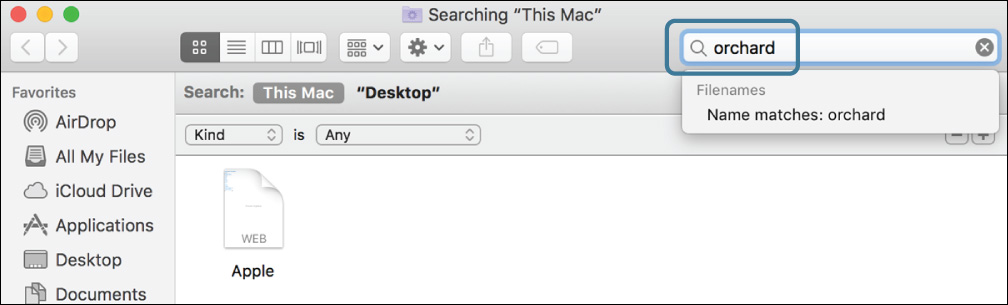
Spotlight can search a wide variety of file metadata as well as the contents of files. It generally displays all possible matches and then suggests ways to narrow the search (for example, only filename matches or “downloaded from” matches).
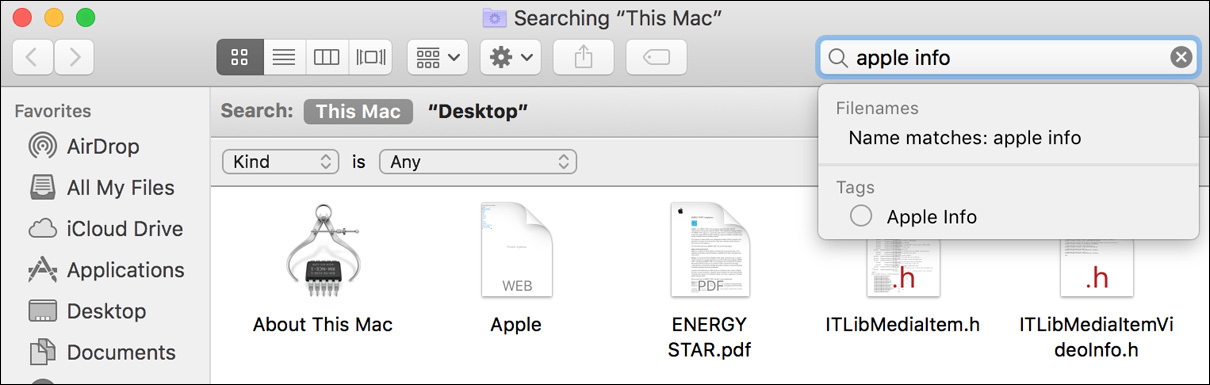
3 Change the search to apple info.
This time it finds the archive file by its tag and gives you options to restrict the search to name or tag matches only. Since it is searching all file attributes, it may find a number of other matching files.
4 Change the search to www.apple.com.
Again, the web archive is found, this time because your search matches the site it was downloaded from. It also finds the Energy_Saver.mobileconfig file in the StudentMaterials/Lesson2 folder, because it contains a document type descriptor that says it conforms to a format defined at www.apple.com/DTDs/PropertyList-1.0.dtd. If you had any text files or PDFs that mentioned www.apple.com, they would be listed as well.