When you or another editor moves a page, the old page name doesn’t go away. Instead, it becomes a redirect page (or simply a redirect). That’s good—other pages in Wikipedia are probably linked to the old name, and the redirect means the links on those other pages still work. They take the reader to the page in its new location.
You need to understand how redirects work for two reasons. First, sometimes a page move causes a double redirect, which you need to fix. Second, if you want, you can create redirects that will catch common spelling mistakes and get the reader to the right page.
Note
Note The editor who moves a page should fix any double redirects the move created (Fixing Double Redirects), and bots will normally fix any that remain, within a couple of days (see page 312). But it’s possible that you might find one.
To understand why redirects exist, and how they work, consider this generic situation: Article A has a direct wikilink to article B. Say you move article B, changing the title to C. When you do, Wikipedia places a notice to itself—a redirect—at page B, pointing to the new name of page C. A reader clicks the link on page A. The software goes to page B, which still exists, but is now a redirect. The software sees the redirect and takes the reader to page C, where the desired article is now located, and displays that.
Why didn’t the Wikipedia software, when you renamed page B to page C, simply change the wikilink at page A, so it points directly to C? One reason—perhaps the most important—is that Wikipedia software never, ever changes a page. Only editors can change pages, and such changes are shown in a page history. Also, the link from A to B could exist in many, many older versions of article A (hundreds, even thousands of prior versions). If B no longer exists, the links on all the older versions of page A become broken. The software would have to change all those hundreds of older versions to point to C as well. Fixing those wikilinks could be a huge load on the Wikipedia hardware, from just a single page move.
Here’s an example to illustrate how a redirect caused by a move works, using actual article names. Consider the move of the article about the venture capital firm Kleiner, Perkins, Caufield & Byers to a page with a new name: Kleiner Perkins Caufield & Byers (the change was the deletion of commas, which aren’t in the firm’s actual name). At the time of the move, the article Sand Hill Road had a link to the old, incorrect name. Figure 16-8 shows what happens when a reader clicks that link.
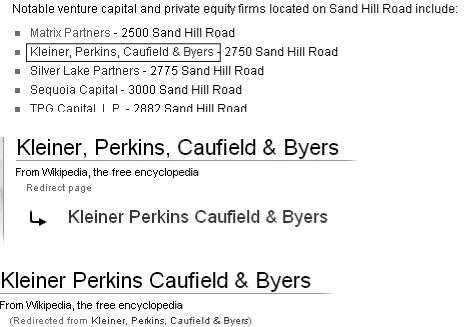
Figure 16-8. Top: When an article is renamed, as was Kleiner, Perkins, Caufield & Byers, links to that article (like the link in the article Sand Hill Road) do not change. They continue to point to the old name. Middle: When you click the old link in the Sand Hill Road article, the software goes to the article’s old name, where it finds a redirect. Instead of displaying this redirect page, the software follows the redirect. Bottom: The redirect points to the new name of the article, so that’s what you’ll see. Renaming the article didn’t break links to it. Instead, the rename just added one brief, intermediate stop at the redirect page. (The “Redirected from” in small print tells you that the original link is incorrect, though it’s good enough to get you to where you wanted to go.)
Redirects are useful for more than when you move a page. You can create redirects when there’s an alternative term for a subject, when there’s alternative capitalization and/or hyphenation, and when there’s an alternative spelling (for example, British versus U.S.).
You can also use redirects to help readers get to the right page when they misspell a word or phrase, or enter incomplete information. For example, if you’ve just created a new article about a person, and you know that it’s common to misspell the name of that person (Arnold Schwarzenegger, for example), you can create a redirect so that when a reader searches for the misspelled name (Schwartznegger), a redirect sends the reader to the article.
If fact, if you attempt to go to an article via the search box, and get “No page with that title exists” because you’ve misspelled a word, others will probably make exactly the same mistake. If so, you have an opportunity to create a redirect, so you’ll be the last person ever to see that search results page rather than the desired article.
The following steps walk you through the process of creating a redirect. First, you need a common misspelling to redirect from. If you can’t think of one off the top of your head, you can use, say, Microsoft Word’s list of commonly misspelled words (see Figure 16-9).
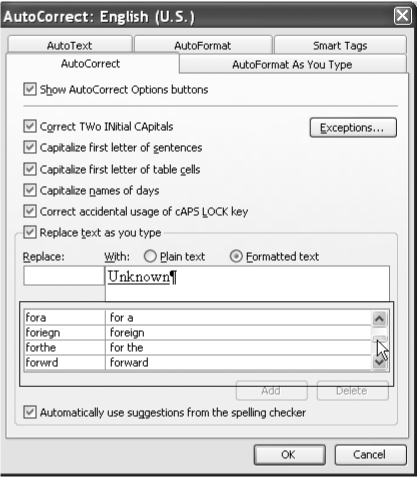
Figure 16-9. Microsoft Word can be a good source if you’re looking for a commonly misspelled word for which to create a redirect. You’ll find a list of word pairs in the AutoCorrect dialog box. In Word 2007 for Windows, choose Office button→Word options→Proofing. In earlier versions of Word, choose Tools→AutoCorrect.
Type a misspelled word into Wikipedia’s search box, click Go (or press Enter), and see if you get a response of “No page with that title exists.”
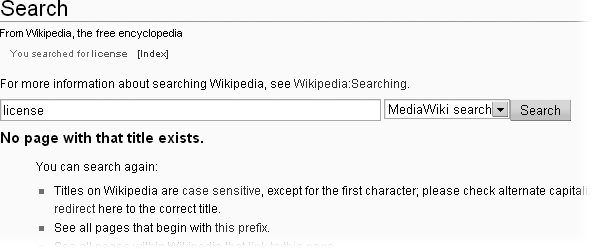
Suppose, for the sake of example, that you type “lisence” into the search box and see a page titled Search with bolded words “No page with that title exists” (Figure 16-10.).
If so, you’ve got your example.
Leaving open the window shown in Figure 16-10, open another browser window, and, in Wikipedia’s search box, type the correct spelling of the word or phrase.
You put the correct word into the search box to see where that goes, because that is where your redirect page should send the reader when she types the incorrect spelling into the search box.
Wikipedia takes you to the page with the article you wanted. It’s “License” in this example, which is what you’re going to redirect to. This step is important because you need to know the exact title of the page to redirect to (License, Licensing, or whatever).
Figure 16-10. When you’re doing a search for a word or a phrase and misspell it, consider that an opportunity to create a redirect for others who might do the same in the future. When you type the misspelling"lisence” instead of “license,” you get a search page rather than the article you’re looking for.
Note
If the correct spelling of a word or phrase still doesn’t get you to an article, and if the Wikipedia search results aren’t helpful, you’ll need to do some further searching to find the best article or disambiguation page (Chapter 4) to send the reader to. When you do find it, create a redirect so others don’t have to go through the same process.
Copy the correct name of the article (press Ctrl+C or ⌘-C). Close this second window when you’ve done this copying.
If you copy the name, you don’t have to worry about misspelling the article name when you create a redirect, which could be embarrassing.
Back at the original window, click the bolded red “create this page” link.
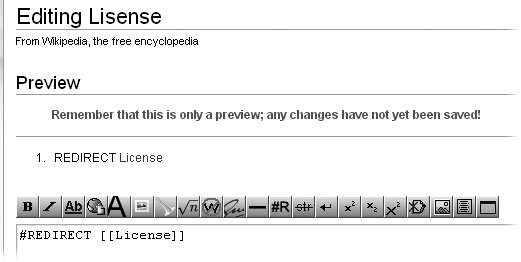
You’ll see a new page, titled Editing Lisense (for example), with a bunch of advice about creating an article. Since you’re creating a redirect, not an article, ignore the advice and scroll down to the edit box.
In the edit box, paste the text of the correct name, highlight this text, and click the “#R” icon.
You see the text for the new redirect Figure 16-11. Your redirect is almost there.
Figure 16-11. 1. In the edit box, copy and paste the correct name of the article you want to redirect to. Pasting the title, rather than typing it yourself, helps prevent typos. 2: Select the text you just pasted so you can apply the Redirect format to it. 3: Clicking the “#R” icon on the edit bar adds the redirect formatting. 4: Voila—the text for the redirect is done. All you have to do is save your work.
Add an edit summary (Creating redirect works well), and do a quick preview.
The preview shows what your new link will look like, plus the wikitext (Figure 16-12).

Click the “Save page” button.
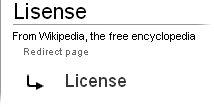
When you see a page with the misspelled title at the top and the correct link below (Figure 16-13), you’re done!
For quality control purposes, click the link.
If that takes you to the wrong page, or even to a different page via a redirect, you need to fix the redirect so it points directly to the page it should. In your browser, click the Back button to get back to the redirect page. Click the “edit this page” tab, and fix the text within the double square brackets (see #4 in Figure 16-11). Then add an edit summary, preview, and save again.
Redirects are handy for more than misspellings. For example, suppose you want to create a redirect for a relatively unknown product, called, say, ObscureProductX. Wikipedia doesn’t have an article for ObscureProductX, since it’s not notable enough. But the product is manufactured by ObscurbaCorp, about which Wikipedia does have an article. You can create a page ObscureProductX, and on that page put #REDIRECT [[ObscurbaCorp]]. Someone searching for information about that product will be redirected to the article about the company that manufacturers the product.
You can create redirects that take the reader to a section of an article rather than to the top of the page. Continuing the previous example, suppose there’s a section of the fictional ObscurbaCorp article called “Unusual health products,” and that’s the only section that mentions ObscureProductX. In this case, create the redirect wikitext like this: #REDIRECT [[ObscurbaCorp#Unusual health products ]]. The “#” sign tells the Wikipedia software that what follows is the name of the section (“Unusual health products”).
Note
If you spell the name of the section incorrectly, or another editor subsequently changes the name of the section (or even deletes that section heading), the redirect will continue to function. It will simply take the reader to the top of the ObscurbaCorp article, just as if there were no pointer to a section.
Redirecting to a section, which sends the reader to the middle of an article, has one disadvantage. For example, if the “Unusual health products” section mentions ObscureProductX just briefly near the bottom of a long section, the reader could get confused about why he was sent there. Redirecting to the top of the article, from which a search will find the product, might be better. By contrast, if the redirect in the example had been to a section called “ObscureProductX’s evaporation problem,” there’d be no confusion.
You can also add a template to a redirect that puts the redirect into a category (Category links from templates, for maintenance and stubbing)—for example, redirects that deal with misspellings. The guideline Wikipedia:Redirect (shortcut: WP:R) lists a number of these, although most are likely to be useful only if Wikipedia begins using redirects as a database. One that you should use, for any redirects involving a topic that might justifiably become an article at some later time, is the template {{R with possibilities}}. Adding that template puts the redirect page into the “Redirects with possibilities” category, which editors can use to find ideas for new articles. Simply put the template on a redirect page immediately after the ending double square brackets.
Redirects often don’t go bad, so it’s rare that you have to change one (except for double redirects, as described in the next section). But sometimes, perhaps due to vandalism, when you click a link on page A, get redirected via page B, and end up on page C, it’s clear that page B points to the wrong place. To fix it, you could change the link on page A to point directly to where you want it to go, but if there are other links that go via redirect B, those links are still going to be wrong. Redirect page B needs to be fixed.
The challenge here is that if you type “B” into the search box, the Wikipedia software takes you to page C (that’s what redirects do). To edit page B, not C, look for small print near the top of the page that says “Redirected from,” followed by a link (see Figure 16-8 for an example). Click that link to go to the redirect page (B) itself.
Once you’re at the redirect page, fixing it is straightforward: Click the “edit this page” tab, change the text within the double square brackets (see #4 in Figure 16-11), add an edit summary, preview it (Figure 16-12), and save the change.
In the steps starting on 9, renaming the Samuel E. Wyly article didn’t cause any problems with double redirects. As mentioned there, double redirects are when a link on page A goes to redirect page B, which goes to redirect page C, which points to page D. In such a case, when a reader clicks the link on page A, the Wikipedia software displays the redirect page C, which isn’t what the reader needs. The link on page A or the redirect on page B needs to be changed.
Before discussing how to fix a double redirect, consider why the software won’t take the reader to page D, even though that’s clearly the right place. Or, to be precise, why the software doesn’t let two redirects function sequentially. Suppose an editor set up redirect page C so that it pointed back to redirect page B? The software would go in circles, processing the same instructions over and over, until a human intervenes or a mechanical failure occurs. (In computer speak, that’s called an infinite loop.)
Sometimes you stumble upon double redirects, but the best time to find and fix them is when a page move creates them. Using the renaming of Kleiner Perkins Caufield & Byers (How Redirects Work (and Where They Come From)) as an example again, suppose you had just done that page move and you’re at the last step—checking for redirects. When you look at the “Pages that link to” page, in addition to the non-indented links (which point directly to the article as it’s currently named) and single-indented links (which are linked by one redirect), you see some double indents. The double indents represent double redirects, like Brook Byers in Figure 16-14.
The clue to a double redirect is to look for the black text “(redirect page)” mixed in with the blue links (page names). The first “(redirect page)” you find is okay (that’s a single redirect), but should you find a second redirect page that is indented under the first, then you’ve found a double redirect that needs to be fixed.
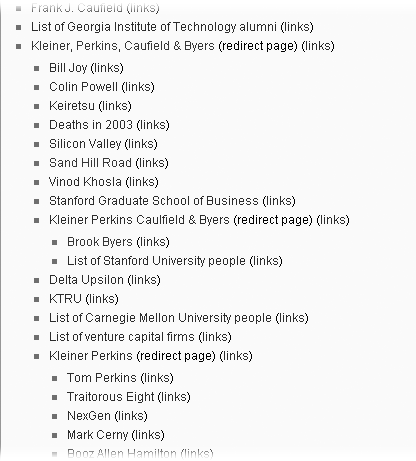
Figure 16-14. The page Pages that link to Kleiner Perkins Caufield & Byers includes, because of a recent renaming, a number of double redirects. These are the double-indented links, like Brook Byers and List of Stanford University people. Clicking a link in one of those two pages takes you to the redirect page Kleiner, Perkins, Caufield & Byers instead of the correct article. (Note the commas in the title; this redirect page has the old title from before the rename.)
A number of the links in Figure 16-14 won’t work because of double redirects. You have two choices: Fix the links within articles, so they bypass redirects altogether, going directly to the new page name; or, change a redirect. In other words, if article A links to redirect B, which points to redirect C, which points to article D, then you can fix the redirect by changing redirect B so that it points directly to article D. B is now a single redirect, which is okay. Here’s how to decide which to do:
Most of the time, fixing a redirect is better than changing the links to the redirect. In Figure 16-14, notice the large number of links to the redirect Kleiner Perkins. Fixing one redirect is faster than fixing a whole bunch of links.
When there’s a spelling mistake or something else where the reader is being misinformed, it’s best to fix both the links and the redirect. In the redirect Kleiner Perkins Caulfield & Byers, the word “Caulfield” is wrong (it should be “Caufield”). Since there are only two links to this redirect, that’s an easy decision—fix the two links plus the one redirect.
Fixing a double redirect is easy. Here are the steps:
At the top of the “Pages that link to” page, copy (to the clipboard) the current name of the article.
Use Ctrl+C, ⌘-C, or whatever works best for you. Copying reduces the likelihood of a typing error.
Find a double redirect (for example, Tom Perkins in Figure 16-14), and open it in a new tab or window. Click the “edit this page” tab to get into editing mode.
In the edit box, the old page name is inside double square brackets.
Select (highlight) the text inside the square brackets, and then paste (Ctrl-V or ⌘-V) the new name of the article over it. Tab to the edit summary box and type a brief explanation.
Something like Fixing double redirect is a good edit summary. When you’re done, click “Show preview.”
Note
If this is starting to sound familiar, that’s because the steps are similar to when you’re creating a redirect, as shown in Figure 16-11 and Figure 16-12.
Click “Save page.”
You’ve fixed a double redirect. Close the page or tab you opened (step 2), which brings you back to the “Pages that link to” page, and do the same for all other double redirects.
Once you’ve fixed all the redirects that didn’t point directly to the new name of the article, you can turn to any pages that have a link with a misspelling or other misinformation. Although these links now work, since the double redirects are gone, you may still need to correct other errors.
At the very end, check your work. Refresh the “Pages that link to” page (press Ctrl+R or ⌘-R) to make sure that everything you wanted to fix was fixed.
Note
A page that is a redirect can be moved like any other page. Don’t. You’ll break links.