If you want to keep an eye on a limited number of articles and other pages (say a hundred or so), then the watchlist that Wikipedia provides each registered editor probably meets all your needs. Most active editors use this watchlist. You simply tell Wikipedia you want to monitor selected pages—articles, user talk pages, whatever. Then you run a report whenever you want to see if anyone has edited those pages since your last report.
Note
In Wikipedia, the term watchlist sometimes refers to the list of pages you’ve told Wikipedia you want to watch, and sometimes to the report that Wikipedia generates when you click the “my watchlist” link in your screen’s upper right. For clarity, in this chapter “watchlist” refers to the list of watched pages, and “watchlist report” is what you get when you click the “my watchlist” link.
Wikipedia offers you three different watchlist reports: standard, expanded, and enhanced. The expanded and enhanced reports build on the standard report. But if you’re like many editors, the standard watchlist report (Figure 6-2) may meet all your monitoring needs. You get to it by clicking “my watchlist” (one of the six standard links in the screen’s upper right corner, when you’re logged on).
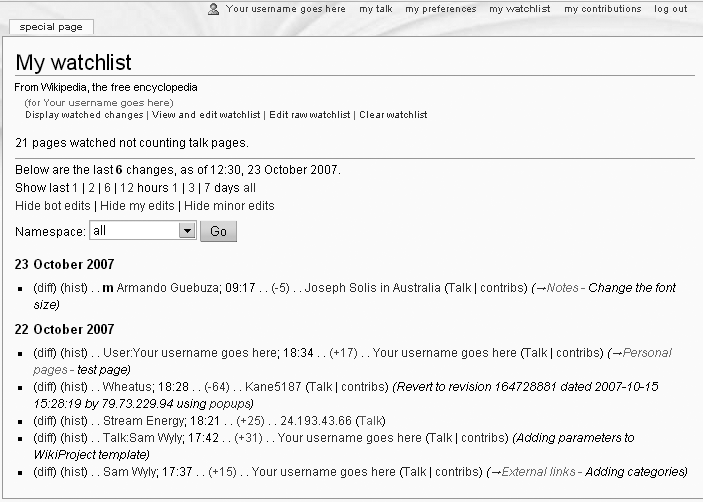
Figure 6-2. The standard watchlist report starts out in the “Display watched changes” view shown here. The number of edits listed is quite short, because this editor is watching only 21 pages, and because the watchlist report is set to show only the last 3 days of edits. (But you can change that setting; see ???.)
Note
If you’ve been following along in Wikipedia and your watchlist report comes up empty, you have few or no pages on your watchlist. See the next section to learn how to add pages, and then come back here and read on.
The rows of article-related information in the watchlist report are very similar to the rows on a page history described in Chapter 5. There’s a “diff” link to show what the edit did, a “hist” link to go to the article’s history page, the article or page name, the time edited, three links to pages of registered users (user page, user talk page, contributions page), and the edit summary.
First, you can get an overview of how active your watched articles have been. In Figure 6-2, since you’ve told Wikipedia that you want to watch 21 pages, and only six show up in the report, you know that the other 15 pages haven’t been edited in the past 3 days. So you don’t have to check those 15 pages for activity.
Second, you can check out what happened in the six listed edits by simply clicking the “diff” link for each edit. If you find vandalism or other problems, then you can revert the edit (Reverting Edits) and take other corrective action. (Chapter 7 discusses additional steps for dealing with vandalism, beyond simply reverting it.)
Third, you can jump from this report to a history page because you want to see all the recent edits to a page. The watchlist report shows only the page’s most recent edit. If, for example, there were three edits very close together, you wouldn’t be able to see the other two; you have to click the “hist” link in a row to see the history of edits for the page that’s listed in that row.
Finally, near the top of your watchlist report, you see two groups of links. One group (“View and edit watchlist”, and so on) has links to related pages. The other group (“Show last 1 | 2 | 6 |12 hours”, and so on) lets you tailor your watchlist report in different ways. Before looking at those links, however, it’s important to understand how pages get on your watchlist in the first place.
Reading a page, editing a page, or even creating a page doesn’t automatically put that page on your watchlist. To monitor that page for changes, you have to put it on your watchlist yourself. You can click something in three places to add the page. Figure 6-3 shows you those three places: where you edit or create a page, where you move a page, and where you’re viewing a page.

Figure 6-3. Wikipedia gives you three ways to add a page to your watchlist. You can turn on a checkbox when you edit or move a page (top and middle), or, at the top of the page you’re viewing, you can click the “watch” tab (bottom).
When you add a page to your watchlist, you’re actually telling Wikipedia to watch two pages for you. That’s because in Wikipedia, most pages have a corresponding talk page. For example, the South Africa article has a discussion page called Talk:South Africa associated with it; a project page such as Wikipedia:Sandbox is associated with the discussion page Wikipedia talk:Sandbox; the page Category:Uncategorized articles is associated with the discussion page Category talk:Uncategorized articles, and so on. When you pick one page of a pair (it doesn’t matter which one), both pages show up in your watchlist report. It’s normal Wikipedia behavior. You’re free to ignore those extra pages when you read the report.
On the other hand, you can’t add some pages to your watchlist at all; specifically, pages with the “Special” prefix, like the Special:Contributions page in Figure 6-1. These pages also don’t have paired talk pages. “Special” pages are essentially on-the-fly reports—when you close such a page, it’s gone. But then, there’s no point in watching them anyway—they’re not editable.
Tip
To build a quick watchlist to learn how the whole thing works (or to follow along in this chapter), at the upper-left of the window, click the “Random page” link, click the “watch” tab, and then click “Random page” again, and so on.) Don’t worry about whether you really want to monitor these pages, because, as discussed next, you can easily remove pages from your watchlist.
When you lose interest in watching an article, or when your watchlist gets too long and cumbersome, you can easily take one or more pages off it. You could, for example, temporarily remove part of your watchlist and save it elsewhere (to a subpage, or a non-Wikipedia document). Or you could use the removed links from your regular watchlist to create additional watchlists, as described on Creating Additional Watchlists. Or you can just delete the pages and simplify your life.
You can see three links that let you remove pages from your watchlist near the top of Figure 6-2:
View and edit watchlist is the commonest choice. As shown in Figure 6-4, it takes you to a neat list of your watched pages. To remove articles from the list, simply turn on their checkboxes, and then click Remove Titles (way down at the bottom of the page).
Edit raw watchlist, described next, gives you a faster way to delete titles en masse from a long watchlist.
Clear watchlist is your nuclear option. If you click it, you get an “Are you sure?” warning, and if you say yes, then you get a completely empty watchlist.
Warning
Wikipedia doesn’t store a copy of your watchlist anywhere. Once you edit it or clear it, you can’t recover or retrieve it. In case you have second thoughts about what you’re deleting from your watching list, you can copy and save a list of watched pages in, say, a user subpage or a word processing document on your computer.
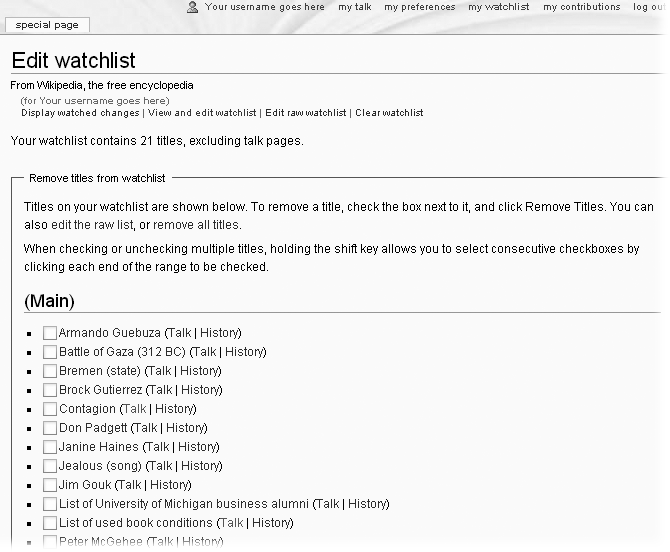
Figure 6-4. The “View and edit watchlist” link, from the watchlist report screen, leads to this straightforward page for removing pages from your watchlist.
While the “View and edit watchlist” screen makes you click a checkbox for each page you want to remove, the “Edit raw watchlist” screen lets you select and delete wide swaths of the list as if you were editing a text document. As discussed in the warning above, you may want to save (in another place) any pages that you remove from your list. Unlike regular Wikipedia pages, your watchlist has no “history” page; you can’t revert to an earlier version if you decide you’ve made a mistake.
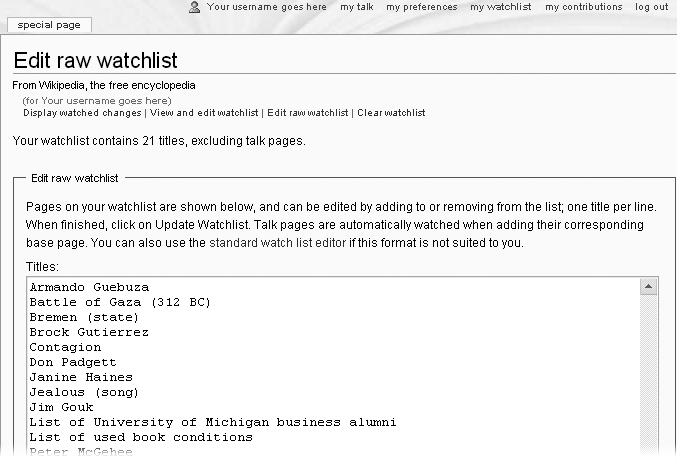
Figure 6-5. One of the easiest way to do mass edits of your watchlist is via the “Edit raw watchlist” option. You can get to this screen by clicking “Edit raw watchlist” on your watchlist report, or “edit the raw list” on the “Edit watchlist” page (Figure 6-4).
Tip
If you want to stop watching just one page, you can quickly take it off your watchlist without going to a separate edit screen. See the box below to learn how to set up your watchlist report for this trick.
You can modify the standard watchlist report in a number of ways, either temporarily or permanently. If you change it temporarily, using choices on the watchlist report page itself, the changes will be gone the next time you look at your report. If you change it permanently, using your preferences page, the changes will remain in place until you go to your preferences page again and make a further change.
You can change the information your watchlist report shows you without permanently editing your watchlist. Near the top of Figure 6-2, you can see links that let you make three types of temporary changes to your watchlist report. “Temporary” means that the next time you click “my watchlist”, the changes are no longer in effect. However, if you just refresh the watchlist report in your browser, temporary changes remain in place. The three types of temporary changes are:
You can limit how far back in time the watchlist report goes. You can tell it to show only those edits that occurred in the last hour, 2 hours, and so on, all the way up to “all” edits. (“All” in this case actually means “to the limit set in your preferences;” see ???.)
How far back you want to go with displayed changes depends on how much time and interest you have. The initial setting—3 days—is a pretty good choice. On the other hand, if you set the option to show more days, you’re still free to ignore the older edits. To change the setting, just click 1, 3, or 7 to choose the number of days, or “all” to get the big picture.
You can tell the software not to display edits by bots (automated programs that make routine corrections) or not to display edits you’ve done, or not to display edits marked as “minor”.
If your watchlist report is fairly long, it’s generally a good idea to shorten the report by hiding edits by bots and edits you’ve done yourself. Edits marked as “b”, done by software bots, can be safely assumed to be boring cleanup, not anything that changes an article’s meaning. And you may not need to see all your own edits, because you can remember what they are. (You probably want to leave these edits visible at first, until you have enough experience to judge whether you find them useful.)
Whether you want to hide the edits marked that were marked as “minor” by the editors doing them, or let these edits show on your report, depends a bit on your level of paranoia: Vandalizing edits rarely are marked as “minor”, but (unfortunately) some experienced vandals do know this trick.
You can change what type of pages are shown, via the Namespace pop-up menu. “All” pages is the standard setting. If you change it to Main, your report shows only edits to articles; if you change it to Talk, it shows only changes to the discussion pages for articles, and so on.
Changing this setting to show only changes to articles can make your life simpler, but it also hides useful information. If you put an article on your watchlist, you may learn even more about what’s happening to the article by looking at postings to the article’s talk page—that’s where content disputes flame up. (See Chapter 10 for details.)
In fact, if you’ve been concentrating elsewhere and not monitoring your watchlist for a while, setting it to Talk, and then looking at postings going back a month or so, can be a good way to find articles where interesting things are happening.
If you find yourself continually making the same temporary tweaks to your watchlist report, or if you think that the “all” option doesn’t go back far enough in time, then visit your preferences page. There, you can change nine settings for the standard watchlist report, so that when it opens, it reads the way you want, not the way it automatically starts out.
To change the factory settings for your watchlist report, click the My Preferences link (at the upper-right corner of the screen), then click the Watchlist tab. You’ll see the page in Figure 6-6.
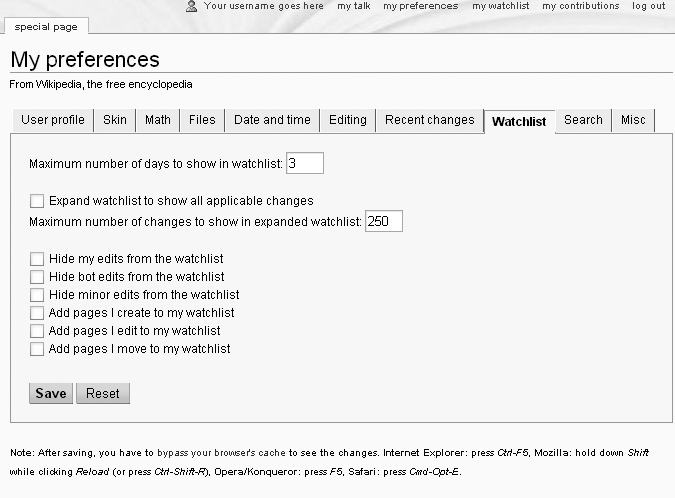
Figure 6-6. For your watchlist, there are nine different things you can change via the Watchlist tab of the My Preferences page. Whenever you open your watchlist report, Wikipedia uses these settings to decide what to show you (until you return to this tab and change them again). The “3” and the “250” are the initial settings with which every user account starts out
Of the nine settings you can change via your My Preferences page, four are settings that you can also change temporarily, as discussed on ???, while you’re viewing the watchlist report:
The next two settings, “expand watchlist to show all applicable changes”, and its companion “Maximum number of changes to show in expanded watchlist”, give you access to all changes ever made to an article. These options are discussed in the next section.
With the bottom three settings, you can have Wikipedia automatically add pages to your watchlist as you create, edit, or move them. They correspond to the checkboxes shown in Figure 6-3. With these settings set to “on”, the respective checkboxes are automatically turned on, saving you the trouble of doing so every time.
Most experienced editors do want to watch pages they create, and pages they move. As for automatically adding articles you edit to your watchlist, that depends on the kind of editing you do. If you fix a lot of typos or work on problematical external links or make similar fixes to lots of articles, you probably don’t want to turn on this setting. If you did, you’d have to constantly uncheck the “Watch this page” box—or see your watchlist fill up with tons of articles you never want to see again. On the other hand, if you restrict your editing to a limited range of articles and mostly make meaningful changes to the content, then you probably do want to turn on the setting to watch edited articles all the time.
The standard watchlist report (Figure 6-2), shows only information about the most recent edit to each changed page. You can find out if there were multiple edits to a listed page—some of which might be problematical—only when you look at the history of the page, which requires additional steps. If you’d like to see all the edits that have occurred during the period shown in the watchlist report, you can change your settings to either the expanded watchlist report, or a variant of that, the enhanced watchlist report. These reports do show you all the edits during a period; they differ only in presentation. With both of them, therefore, you don’t have to go to a history page.
Note
If you don’t have at least a couple of weeks of experience using your standard watchlist, this section may seem overwhelming. Know that your watchlist report can become more advanced, just as you will, and come back to this material later.
If you set your watchlist preferences to the expanded view (see the second and third options in Figure 6-6), then the report automatically lists all changes to your watched pages during the specified period (for example, 3 days), or up to the maximum number of changes that you specify, whichever comes first. (For example, if you specify 100 changes, and there have been 125 changes in the past 24 hours, then you’re not going to see 3 days of changes even if you’ve also specified that.)
The expanded watchlist report in Figure 6-7 has 10 entries, covering a total of six pages. By comparison, the standard watchlist report, covering exactly the same watched pages over exactly the same period, shows only six entries—one per watched page with editing activity (see Figure 6-2).
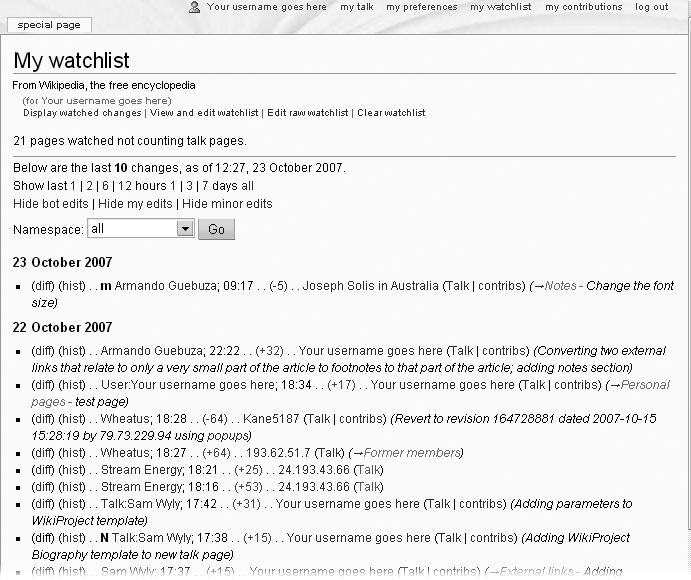
Figure 6-7. The expanded watchlist report lists all edits, not just the last edit, during a given period. You can see that report instead of the standard watchlist report shown here by turning on “Expand watchlist to show all applicable changes” in the Watchlist tab of your My Preferences page.
Note
If you’re looking at your own watchlist, and what you see is similar to Figure 6-8, not Figure 6-7, then you’ve changed another setting in your preferences, and you’re seeing the enhanced watchlist report rather than the expanded watchlist report. Read the next section to find out why.
The good news about an expanded watchlist report is that it can save you the time and trouble of going to history pages. The bad news is that the number of edits shown on your watchlist report could be many, many times what you’d see on the standard report (especially if your watchlist has a high percentage of pages that get edited frequently). For example, if the expanded report shows 2 days of changes, and one of the pages on your watchlist was edited 50 times during the last 24 hours, then all 50 changes show up.
Note
You can also make temporary changes, like the ones for the standard watchlist report, discussed on ???, to expanded and enhanced reports. Likewise, preference settings also apply equally to all three kinds of reports.
If you like the idea of the expanded watchlist report (it sharply reduces your need to go to history pages) but don’t like the added length (one row per edit), the enhanced watchlist report might appeal to you; read on.
Expanded watchlist reports can get very long. Fortunately, you can shorten the watchlist report considerably, yet still have easy access to all changes to all watched pages during a specified period, by changing to the enhanced watchlist report format. Figure 6-8 shows the same information as in Figure 6-7, but in the enhanced format.
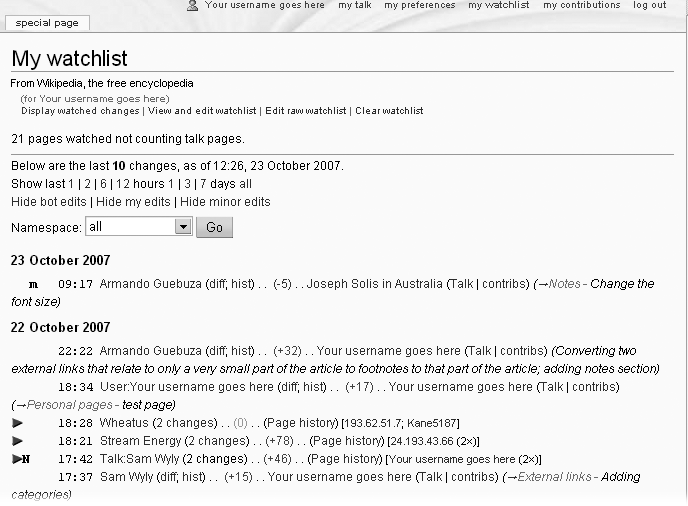
Figure 6-8. The enhanced watchlist report. This variant of the expanded watchlist report consolidates all edits into a single expandable row for each calendar day when changes to a page occurred.
To get this report, turn on the expanded report option in the Watchlist tab of My Preferences, if it’s not already on. Then, go to the “Recent changes” tab, turn on “Enhanced recent changes (JavaScript)”, and then click the Save button. Be sure to follow the instructions at the bottom of the page for bypassing your browser’s cache. For example:
Note
If you change your settings, bypass your browser’s cache, and still don’t see the enhanced version of the watchlist report when you click “my watchlist”, try shutting down your browser and starting it again. If that doesn’t work, make sure that JavaScript is enabled in your browser (see Setting Up Your Browser).
If you compare Figure 6-7 to Figure 6-8, you see that the 10 entries in the first have decreased to seven entries in the second. That’s because an enhanced watchlist report has two types of lines (in addition to the header line for each day): detail lines and summary lines. If an article has been edited only once on a given day, you see a detail line. If it was edited multiple times, you see a summary line that tells you the number of edits, and the editors’ names.
Figure 6-8 has three summary lines, as indicated by a right-pointing arrow on the far left. Examining these three lines more closely, here’s what you can tell happened:
The article Wheatus was edited twice, first by an anonymous IP editor (193.62.51.7) and then by a registered editor, Kane5187. The net result was a change of zero characters, as indicated by the “(0)”, making it highly likely that this was IP vandalism that Kane5187 reverted.
The article Stream Energy was edited twice by anonymous IP editor 193.62.51.7, who added a total of 78 characters with the two edits.
The article talk page Talk:Sam Wyly was edited twice by the editor who generated this watchlist report. (Presumably he trusts himself, and doesn’t need to investigate the changes.)
Say you want to see more details on the two edits of the article Stream Energy. Click the right-pointing arrow next to the summary line, and two detail lines appear (Figure 6-9).

Figure 6-9. When you click a summary line in an enhanced watchlist report, the right-pointing arrow changes to a down-pointing arrow, and details lines appear immediately below. Here, one of the summary lines in Figure 6-8 has been expanded.
The information in Figure 6-9 doesn’t give you much of a clue as to whether this was a vandalizing or other problem edit—note the lack of edit summaries. To inspect the changes, either click the “last” links, which produce diffs (see Looking at a single edit) or click the “Page history” link, and then, when at the history page, combine the two edits into a single diff.
So, which watchlist report format should you use? You can easily change from the standard report to the enhanced watchlist report, or vice versa. Just change and save your preference settings, and bypass the browser cache (???), so you can just play around and see what you like. If you have relatively few pages on your watchlist, the expanded watchlist is great for a full overview at a glance. If your expanded reports get too long, or you prefer to have page changes grouped by page, try the enhanced watchlist report. If none of the three report versions meets your needs, then take a look at the options in the rest of this chapter: multiple checks and real-time monitoring.