Chapter 2: Setting Up and Configuring Network Features
In This Chapter
![]() Enabling the network
Enabling the network
![]() Configuring the network installation
Configuring the network installation
![]() Disabling the network
Disabling the network
This chapter covers how to find the files you need to edit the network, how to enable multiple sites in the network, and how to remove the network should you no longer want to have multiple sites in your WordPress install.
By default, access to network settings is disabled to ensure that users don’t set up their network without researching all that the setup entails. Setting up a network is more than configuring options or turning on a feature. Before enabling and setting up a network, be sure that you read Chapter 1 of this minibook.
What you need:
![]() Backups of your site (explained in Book II, Chapter 7)
Backups of your site (explained in Book II, Chapter 7)
![]() Access to the
Access to the wp-config.php file for editing (Book II, Chapter 5)
![]() Enabled wildcard subdomains (covered in Chapter 1 of this minibook) if you’re using subdomains
Enabled wildcard subdomains (covered in Chapter 1 of this minibook) if you’re using subdomains
Enabling the Network Feature
You need to enable access to the network menu so you can set up the network and allow the creation of multiple sites.
 Before you begin your edits, make a copy of your
 wp-config.php file and keep it in a safe place on your computer.
Follow these steps:
1. Connect to your web server via FTP.
If you need a refresher on FTP, refer to Book II, Chapter 2.
2. Locate the wp-config.php file in the root or /public_html directory of your website.
This file is with the main WordPress files.
3. Open the wp-config.php file for editing in your favorite text editor.
For Windows users, Notepad does the trick. For Macs, use TextMate.
4. Find the line that reads define('DB_COLLATE', ''),. Click at the end of that line. Press Enter to create a new blank line.
Some FTP clients let you right-click the filename on the server and choose Edit to edit the file within your FTP program, depending on which program you are using.
5. Type define(‘WP_ALLOW_MULTISITE’, true );.
This line of code tells WordPress that you intend to use the multisite feature; additionally, it activates the Network option under the Tools menu on your WordPress Dashboard (covered later in this chapter).
6. Save the wp-config.php file and upload it to your website.
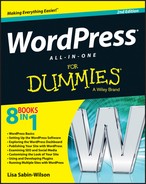
When you log in to the Dashboard of WordPress, you now see a Network Setup link on the Tools menu, as shown in Figure 2-1.
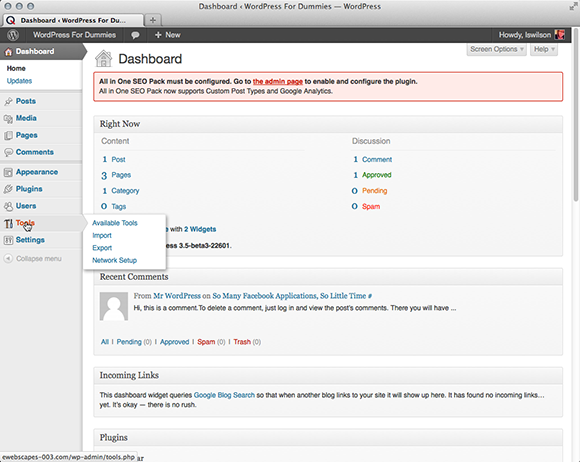
Figure 2-1: The Network Setup link on the Tools menu.
Clicking this menu item displays the Create a Network of WordPress Sites page, covered in the next section. You also see a reminder to deactivate all your plugins before continuing with network setup.
Exploring the Difference between Subdirectories and Subdomains
Before you start setting up the network, the Create a Network page lets you choose the URL format of sites you're adding beneath the Addresses of Sites in your Network heading. By default, these sites are in subdomain format (subdomain.yourdomain.com) or subdirectory (yourdomain.com/subdirectory) format.
Figure 2-2 shows both choices displayed via radio buttons.
 In some cases, depending on your setup, your choice here may be limited. WordPress does some autodetection with information about your installation and may prevent you from choosing an option that won’t work with your setup.
Table 2-1 explains some of the situations you may encounter.
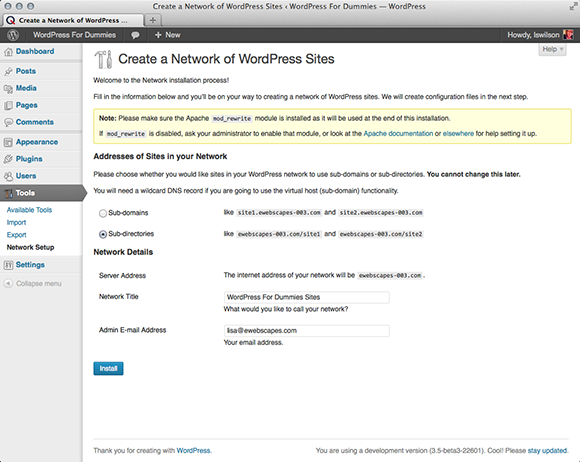
Figure 2-2: Choosing subdomains or subdirectories.
Table 2-1 Common Network Setup Situations
|
Situation |
Format |
|
Site URL is different than Home URL. |
Network cannot be enabled. |
|
Site URL is |
Subdirectories only. |
|
Site URL is an IP address. |
|
|
WordPress is installed in a folder (for example, |
|
|
WordPress is installed in the root of the domain ( |
Subdomains are default, but you can choose either. |
Site addresses generate in a similar way. They don’t really exist, and you won’t see these site addresses in your directory structure on your web server because they are served to the browser virtually when that site is requested. From a technical standpoint, subdomains require an extra step in server setup for the wildcards. (Chapter 1 in this minibook covers setting up wildcard subdomains on the server side.) Subdomains are somewhat separated from the main domain, at least in terms of content. Subdirectories, on the other hand, are part of the main domain, as if they were pages off the main site.
The terms subdirectory and subfolder are interchangeable, but I stick to subdirectory for the purposes of this book.
Because each site’s URL is saved in its tables in the database, after you pick which subsites you want to create, you cannot switch from subdirectories to subdomains (or vice versa) without reinstalling the network.
Each site format offers certain search engine optimization benefits. Search engines read subdomains as separate sites on your web host; therefore, they maintain their page rank and authority, and multiple results for your domain are listed. Subdirectories are read as pages or sections off your main domain. They also help the main domain’s page rank and authority and provide one result for your domain in search engines.
If you want your extra sites to have separate domain names, you still need to pick one of these options. Chapter 6 of this minibook covers top-level domains.
Installing the Network on Your Site
The Network Details heading on the Create a Network of WordPress Sites page has options filled in automatically. The server address, for example, is pulled from your installation and is not editable. The Network Title and Administrator E-Mail Address are pulled from your installation database, too, because your initial WordPress site is the main site in the network. Click the Install button and WordPress creates new network tables in the database. The page refreshes, and the Enabling the Network page appears, as shown in Figure 2-3.
From the Enabling the Network page, follow these steps to install the multisite feature after you install the network. Note: These steps require that you edit web server files, so be sure to have your text editor program handy.
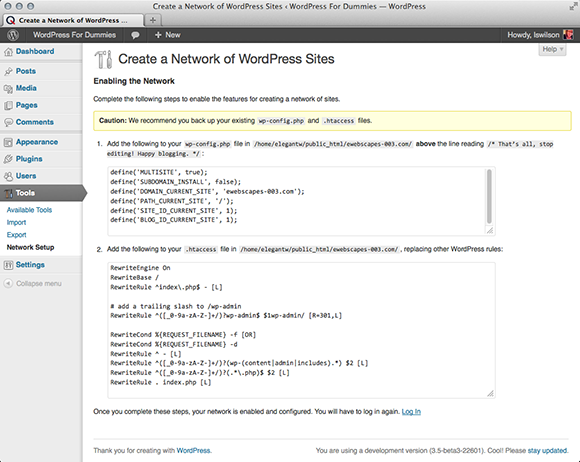
Figure 2-3: The Enabling the Network page.
1. Add the network-related configuration lines to the wp-config.php.
On the Create a Network of WordPress Sites page, WordPress gives you up to seven lines of configuration rules that need to be added to the wp-config.php file. The first line includes the line you added earlier in this chapter: define('multisite', true );. You can skip that line, copy the rest of the lines, and then paste them beneath the define('multisite', true); line in your wp-config.php file. The lines of code you add look like this:
define( 'SUBDOMAIN_INSTALL', false );
$base = '/ ';
define( 'DOMAIN_CURRENT_SITE', 'localhost' );
define( 'PATH_CURRENT_SITE', '/' );
define( 'SITE_ID_CURRENT_SITE', 1 );
define( 'BLOG_ID_CURRENT_SITE', 1 );
These lines of code provide configuration settings regarding subdomains, the base URL of your website, and your website's current path. Additionally, it assigns a unique ID of 1 to your website and blog for the main installation site of your multisite network.
 The lines of code on the Create a Network of WordPress Sites page are unique to your installation of WordPress and specific to your site setup, so make sure that you copy the lines of code from your installation.
2. Add the rewrite rules to the .htaccess file on your web server.
WordPress gives you up to 13 lines of code that you need to add to the .htaccess file on your web server in the WordPress installation directory. The lines look something like this:
RewriteEngine On
RewriteBase /
RewriteRule ^index.php$ - [L]
# add a trailing slash to /wp-admin
RewriteRule ^([_0-9a-zA-Z-]+/)?wp-admin$ $1wp-admin/ [R=301,L]
RewriteCond %{REQUEST_FILENAME} -f [OR]
RewriteCond %{REQUEST_FILENAME} -d
RewriteRule ^ - [L]
RewriteRule ^([_0-9a-zA-Z-]+/)?(wp-(content|admin|includes).*) $2 [L]
RewriteRule ^([_0-9a-zA-Z-]+/)?(.*.php)$ $2 [L]
RewriteRule . index.php [L]
Chapter 1 of this minibook discusses the Apache mod_rewrite module. You must have it installed on your web server to run the WordPress multisite feature. The rules you add to the .htaccess file on your web server are mod_rewrite rules. They need to be in place so that your web server tells WordPress how to handle things, such as permalinks for blog posts and pages, media, and other uploaded files. Without these rules in place, the WordPress multisite feature won't work correctly.
3. Copy the lines of code from the Enabling the Network page, open the .htaccess file, and paste the lines of code there.
Completely replace the rules that already exist in that file.
4. Save the .htaccess file and upload it to your web server.
5. Click the login link at the bottom of the Enabling the Network page.
You're asked to log in to WordPress again because you have changed some of the browser cookie-handling rules in the wp-config.php and .htaccess files.
Completion of the installation steps activates a Network Admin menu item in the upper-right menu of links on your WordPress Dashboard. The Network Admin Dashboard is where you, as the site owner, administer and manage your multisite WordPress network. (See Chapter 3 of this minibook.)
Disabling the Network
At some point, you may decide that running a network of sites isn’t for you, and you may find that you want to disable the multisite feature completely. Before disabling the network, you want to save any content from the other sites by making a full backup of your. Book II, Chapter 7 has detailed information about backing up your site if you need a refresher.
The first step is to restore the original wp-config.php file and .htaccess files that you saved earlier. This causes your WordPress installation to stop displaying the Network Admin menu and the extra sites.
You may also want to delete the tables that were added, which permanently removes the extra sites from your installation. Book II, Chapter 3 takes you through the WordPress database, including using a popular database administration tool called phpMyAdmin. You can use that tool to delete the multisite tables from your WordPress database when you want to deactivate the feature. The extra database tables that are no longer required when you aren’t running the WordPress multisite feature include
![]()
wp_blogs: This database table contains one record per site and is used for site lookup.
![]()
wp_blog_versions: This database table is used internally for upgrades.
![]()
wp_registration_log: This database table contains information on sites created when a user signs up, if they chose to create a site at the same time.
![]()
wp_signups: This database table contains information on users who signed up for the network.
![]()
wp_site: This database table contains one record per WordPress network.
![]()
wp_sitemeta: This database table contains network settings.
Additionally, you can delete any database tables that have blog IDs associated with them. These tables start with prefixes that look like wp_1_, wp_2_, wp_3_, and so on.
WordPress adds new tables each time you add a new site to your network. Those database tables are assigned a unique number, incrementally.
Dealing with Common Errors
Occasionally, you might enter a configuration setting incorrectly or change your mind about the kind of network you require. If you installed WordPress, enabled the network, and then want to move it to a new location, you will encounter errors when changing the URL. The proper method is to move WordPress first, disable the network if you installed it, and then enable the network at the new location.
To change from subdomains to subfolders or vice versa, follow these steps:
1. Delete the extra sites, if any were created.
2. Edit wp-config.php, changing the value of define( 'SUBDOMAIN_INSTALL', true ); to define( 'SUBDOMAIN_INSTALL', false );.
To switch from subdomains to subdirectories, change false to true.
3. Save the wp-config.php file and upload it to your website.
4. Visit the Dashboard of WordPress and click the Permalink link on the Settings menu and click the Save Changes button.
This step saves and resets your permalink structure settings and flushes the internal rewrite rules, which are slightly different in subdomains than they are in subdirectories.
You can’t do this process if you want to keep extra sites.