
Chapter 6: Using Multiple Domains within Your Network
In This Chapter
![]() Discovering domain mapping
Discovering domain mapping
![]() Understanding how to map domains
Understanding how to map domains
![]() Advanced usage
Advanced usage
With a network of multiple sites easily available in WordPress, many people have expressed the desire to run multiple sites on their own separate domain names through one install. Prior to the network feature being added to the WordPress software, you could run only one site per installation of the software. Now, it is possible to run several sites under one installation of WordPress by activating the network feature, which I discussed in Chapters 4 and 5 of this minibook.
In this chapter, I discuss using multiple domains and a feature called domain mapping, which enables you to run not only multiple sites, but also multiple sites with their own, unique domain name that is not tied to the main site installation domain.
To tackle this chapter, you need an understanding of domains (Book II, Chapter 1) and domain nameserver (DNS) records.
Finding Your Way with Domain Mapping
Domain mapping means telling your web server which domains you want WordPress to answer to, and which site you want shown to the visitor when they request that domain. This process is more than domain forwarding or masking because the URLs for your posts will have the full domain name in them. Instead of the child site being in secondsite.yourdomain.com format, it can be myotherdomain.com.
Domain mapping isn’t possible in certain instances, however. If your WordPress install is in a subfolder and this folder is part of the URL, then any mapped domain will also contain this folder name. In that case, it would be better to move the install so that it isn’t in a subfolder.
You also need to access your web host’s control panel (where you manage DNS records on your web server) and the control panel for your domain name registrar, which is often a different company.
 The network install, by default, lets you choose between a subfolder setup and a subdomain setup. This step is still required before you can specify a domain for that site. I cover how to enable the network in Chapter 2 of this minibook. Be sure to set up the network and check that it’s functioning properly before you attempt to map domains.
Parking or pointing domains
You need to set up your web server to accept any incoming requests for the domain you want to map and the location to send them to. I use the cPanel control panel (Book II, Chapter 2) in this section because it’s quite popular and available on many web hosts. On cPanel-based web hosts, this task is referred to as domain parking.
Follow these steps to park a domain on your web hosting account via cPanel:
1. Log in to your website’s cPanel.
The address is provided by your web host and usually available at http://yourdomain.com/cpanel.
2. In the Domains section, click the Parked Domains icon, as shown in Figure 6-1.
The Parked Domains page displays in your browser window and lists any domains you have parked (if you have previously parked any) and provides a form to enter a new domain.
Figure 6-1: The Parked Domains icon in cPanel.
3. In the Create a New Parked Domain section, enter the domain name you want to map.
The domain is directed to the root folder of your website, which is where your WordPress install should be located. If it isn’t, follow the next set of steps.
4. Click the Add Domain button.
The screen refreshes and shows the domain you added in a list under Domains, which indicates successful parking of the domain you entered in Step 3. See Figure 6-2.
Other web hosts may refer to domain parking as pointing or mirroring. You may need to ask your web host support team which area you need to do this in. You're using a ServerAlias directive for the mapped domains, telling the web server to send all requests for the mapped domain to the domain where WordPress is installed.
If the domain you’re using for your WordPress network installation isn’t the main domain of the website, but rather is an add-on domain, you have to do a slightly different process to park the domain. Because you can’t tell a parked domain to go anywhere other than the root folder, you need to use the Addon Domains feature.
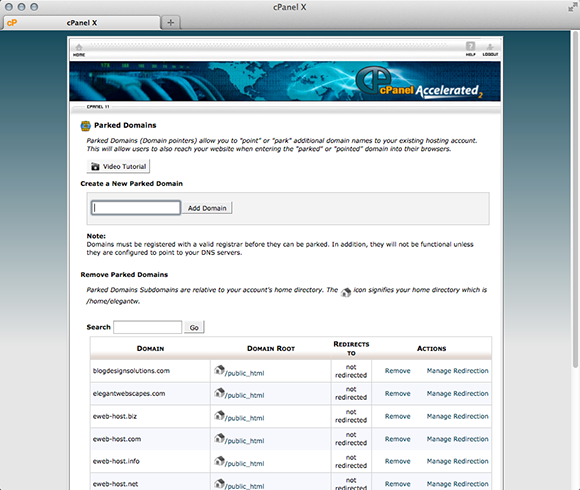
Figure 6-2: The Parked Domains page showing a parked domain.
Follow these steps to create an Addon Domain in your web hosting cPanel:
1. Log in to your website’s cPanel.
2. In the Domains section, click the Addon Domains icon, as shown in Figure 6-3.
The Addon Domains page appears.
Figure 6-3: The Addon Domains icon in cPanel.
3. Enter the new domain name you want to map in the New Domain Name field.
 The other fields, Subdomain/FTP Username and Document Root, get auto-populated by your web server; don’t alter the information your web server populates for the Subdomain/FTP Username, as this field is setting the username you will use to connect when you need to use FTP. These are default settings for Addon Domains, and you should not alter them.
4. In the Document Root field, enter the folder location of your WordPress network installation.
Figure 6-4 shows the Create an Addon Domain information filled in.
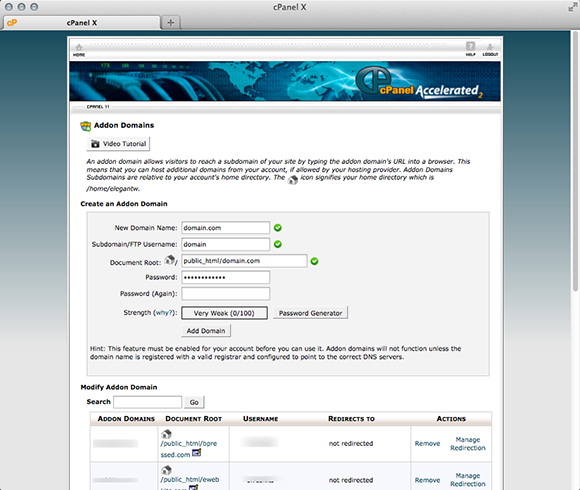
Figure 6-4: The Create an Addon Domain information in cPanel.
5. Click Add Domain to save your changes.
The Addon Domains page refreshes, and your new domain appears under the Addon Domains section.
Domain name server records
To instruct the domain name registrar where to send the domain name to, you need to edit the domain nameserver (DNS) records. A common domain name registrar is GoDaddy — I use its domain registration account interface in the following steps. To edit the name server records, follow these steps:
1. Log in to your domain name registrar.
2. Click the domain name management tools.
Figure 6-5 shows the information for the domain to map.
3. Click the Set Nameservers link in the Nameservers section.
4. Type the nameservers for your web host where your WordPress install is located and then save your changes by clicking the Save Changes button.
The servers around the world now know that your domain “lives” at this web server location. Nameserver changes may take up to 24 hours to propagate across the Internet.
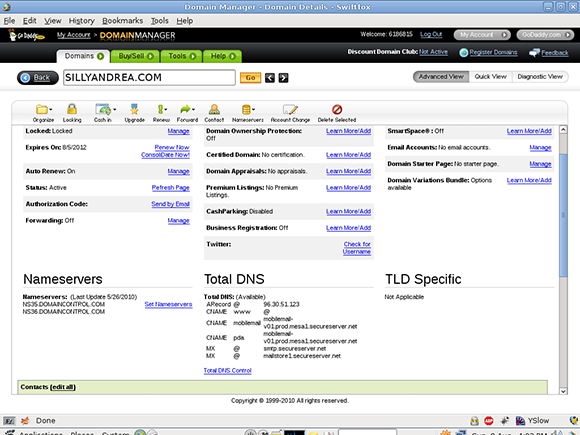
Figure 6-5: The domain name records of a mapped domain.
Installing the Domain Mapping Plugin
Before you can add your mapped domains to WordPress, you need to install the WordPress MU Domain Mapping plugin to help handle this in WordPress. The Domain Mapping plugin doesn’t do any setup on the server side; it helps rename the site and takes care of any login issues.
1. Download the plugin from http://wordpress.org/extend/plugins/wordpress-mu-domain-mapping.
2. Unzip the plugin on your local computer.
Inside are two php files: domain-mapping.php and sunrise.php.
3. Open your FTP program and navigate to your website's wp-content folder.
If you need a reminder on how to do this, see Book II, Chapter 2.
4. Upload the sunrise.php file directly into the /wp-content folder.
5. Inside the /wp-content, look for a folder called /mu-plugins. If there isn't one, use your FTP program to create this folder.
6. Upload the domain-mapping.php file into the /mu-plugins folder.
Figure 6-6 shows how these files look on the server. From here, you need to add a line to your wp-config.php file.
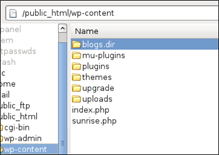
Figure 6-6: A look at the /wp-content/plugins folder that contains the sunrise.php file.
7. Download a copy of your wp-config.php file by using your FTP program.
8. Open wp-config.php on your computer with a text editor and add the following line under the define( 'MULTISITE', true ); line.
define( 'SUNRISE', 'on' );
9. Save the file and upload it to your website.
The plugin is immediately available (and running) on your network. All you need to do is set up the options and map a domain to a site. Two new items are added to the Super Admin menu: Domain Mapping and Domains. On the user administrator side, a new Domain Mapping item appears on the Tools menu.
The network admin needs to activate domain mapping on the Domain Mapping page (Network Admin⇒Domain Mapping) before a user can map a domain by enabling the Domain Mapping feature.
Obtaining your IP address
An IP address is a number assigned to every website and computer connected to the Internet. This number is used in domain mapping to help direct Internet traffic to the appropriate site in your network. You can find the IP address of your website three ways: Your web host provider can tell you, the address may appear in some place within the web host’s control panel, and you can visit an IP lookup website. Such websites can tell you the IP of your website when you provide your domain name. To find your address with an IP lookup website, follow these steps:
1. Visit Network Solutions' WHOIS feature located at www.networksolutions.com/whois/index.jsp.
2. Enter the domain name of your website and then click Search.
3. Write down the IP address it shows.
Figure 6-7 displays the IP address of mommieblogs.com.
4. In your WordPress Dashboard, choose Network Admin⇒Domain Mapping, enter your IP address, and click Save.
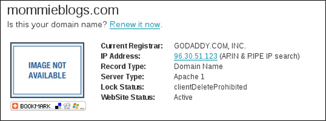
Figure 6-7: WHOIS record revealing the IP address of mommieblogs.com.
Mapping a domain to a site
To map a domain to a site in your network, here’s what you need to do:
1. Navigate to the child site you want to map.
2. Log in to the Dashboard of that child site.
3. Hover your pointer over Tools and click the Domain Mapping link.
The Domain Mapping page appears, as shown in Figure 6-8.
4. Enter the domain name you want to map to this site.
The check box indicates whether the domain is the primary domain for this site and is used only if you want to map multiple domains to the site. Only one domain can be the primary domain and used in the URL. Any other domains mapped to this site redirect to the primary domain.
5. Click the Add button to save your changes.
The site now appears when you enter the mapped domain URL in your web browser address bar.
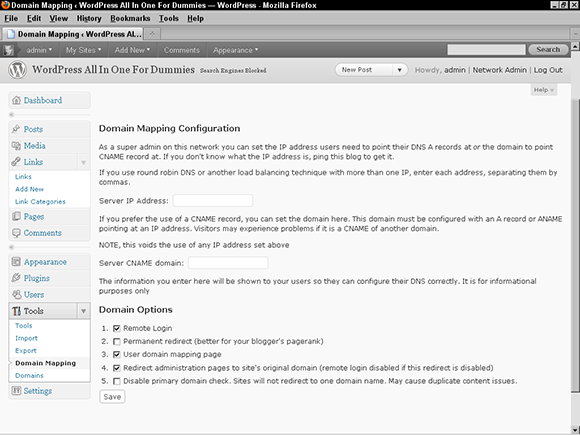
Figure 6-8: Mapping a domain to a user’s site.
This plugin also lets you map a domain to a site without visiting the site’s Dashboard. You can do this by choosing Network Admin⇒Domains. (See Figure 6-9.) Note: You need to know the ID number of the site you want to map.
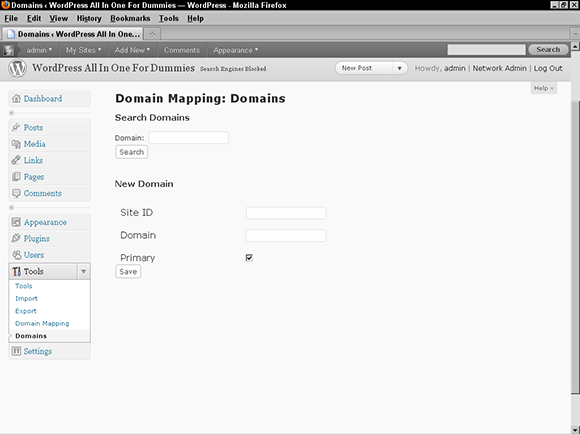
Figure 6-9: The Domain Mapping: Domains page maps domains from a single location.
Mapping a Large Volume of Domains
For some enterprises, you may need to map a large volume of domains (10 or more) to the WordPress network. Adding each domain to the server with a ServerAlias directive is time consuming. Also, as the list grows, the server slows while reading all the domains.
The time necessary to add these domains can be shortened considerably by using a wildcard host. To use a wildcard host, you need to access your website via a terminal or via SSH with the root user. This is available only on VPS or dedicated hosts. The ideal situation for using a wildcard host is when the main installation of WordPress is the default domain on the server. A quick way to check whether your WordPress main installation domain is the default domain on your web server is to type your IP address in your browser address bar. If your main WordPress site displays in your browser, you can proceed with using a wildcard host. If it does not, you need to obtain a dedicated IP address from your web hosting provider — contact your provider to set that up for you.
Apache configuration
Adding a wildcard host to your web server requires that you access the Apache configuration files on your web server. This section assumes that you have access to those files; if you do not, ask your web hosting provider either to provide you with the access you need or to complete the steps for you to add the wildcard host to your account.
Here’s how you set this feature up:
1. Log in to your website with the root user via a terminal.
2. Navigate to the configuration files in the folder located at /etc/httpd/ by typing
cd /etc/httpd/
3. Open the httpd.conf file by typing
vi httpd.conf
Page down in the file until you see the vhost section. Find the vhost section that contains the information about your WordPress installation and the main domain of your network. (Depending on the number of domains hosted on your server, there may be several vhost entries in the httpd.conf file — be sure that you're editing the vhost that contains the main domain of your WordPress install.)
4. Press the Insert key to begin editing the file.
5. Comment out the lines and place the wildcard as shown.
<VirtualHost *:80>
6. Save the changes by pressing the Esc key, typing :wq, and then pressing Enter.
7. On the command line, restart Apache by typing
/etc/init.d/apache restart
You can now map domains in volume by using the following steps:
1. Log in to your domain name registrar.
2. Click the domain name management tools for the domain you want to map.
3. Click the Total DNS records; refer to Figure 6-5.
4. Locate the A records at the top of the page.
Insert the IP address of your WordPress network. (I show you how to obtain this in the section “Obtaining your IP address,” earlier in this chapter.)
Figure 6-10 shows an A record and the web server’s IP address it points to. The domain is sent to that IP address regardless of nameserver.
5. Choose Network Admin⇒Domains from your WordPress Dashboard.
The Domain Mapping: Domains page appears, as shown in Figure 6-11.
6. Enter the ID of the site you want to map.
You can get the ID number from the Sites page (Super Admin⇒Sites).
7. Enter the domain name you want to map to this site.
8. Click Save.
The page refreshes and shows you a list of mapped domains.
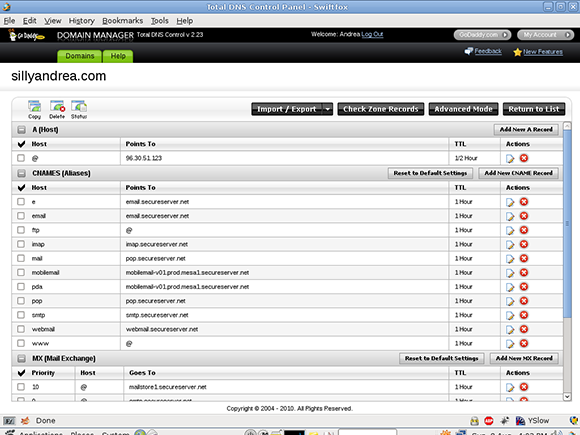
Figure 6-10: Domain A records.
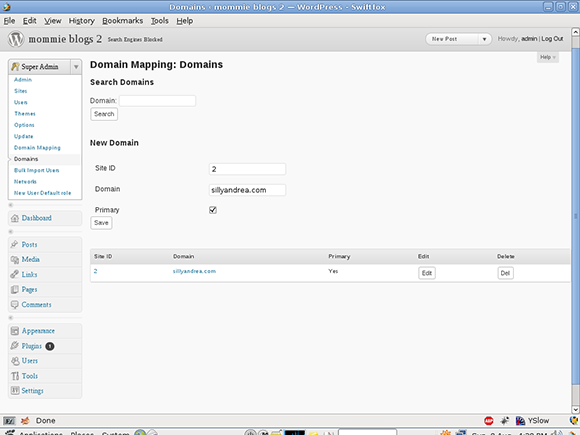
Figure 6-11: Mapping a domain from the Domain Mapping: Domains page.
There is no longer any need to park or point domains at the web host. The server is instructed to take any domain name request and send it to the WordPress network. WordPress associates the mapped domain with the correct site.
Hiding the original installation domain
The domain mapping plugin mentioned earlier in the “Installing the Domain Mapping Plugin” section lets you access the child site by the original location regardless of whether it’s a subdomain site or a subfolder site, so you can use domain mapping no matter which set up you chose for your network (subdomains or subdirectories). The domain mapped for the child site is also the domain used on all uploaded media files, which maintains consistency for the site.
In some cases, you may want to hide the original installation domain. For example, if your main installation domain is an obscure-looking domain like http://00954-yourvpsdomain-ba.com, you want to hide that domain from showing, because your site visitors can't easily remember or use it. If you want to hide the original installation domain, here's how you can do so:
1. Choose Network Admin⇒Sites.
The Edit Site page appears in your Network Admin Dashboard.
2. Hover your pointer over the name of the site you want to edit and click the Edit link that appears, as shown in Figure 6-12.
The Edit Site page displays in your browser window.
3. Find all instances of the original domain name and change them to the new mapped domain.
Be sure to click each of the tabs on the Edit Site page (Info, Users, Themes, and Settings) to change the original domain name to the new mapped domain wherever it appears on the Edit Site page. Keep any folder names intact.
4. Save your changes by clicking the Save Changes button, as shown in Figure 6-13.
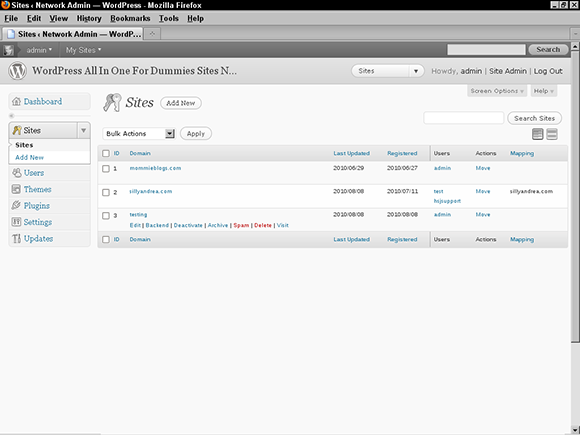
Figure 6-12: The Edit link for individual sites.
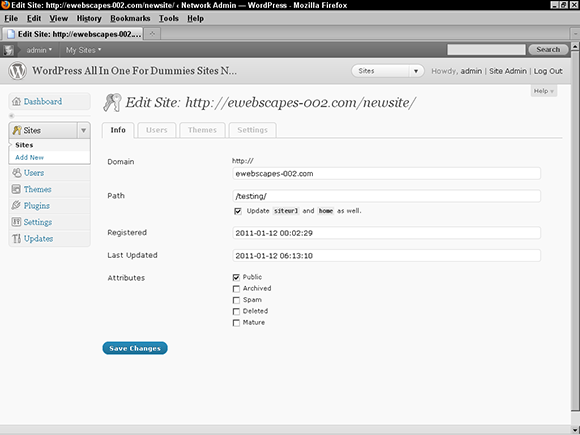
Figure 6-13: The Edit Site page on the Network Admin Dashboard.
Your mapped site is now inaccessible at the original child site name (the subdomain or subfolder) and any references to it have been changed. Previous links within the body of posts, however, aren’t updated automatically, so you need to edit the posts manually to change the links to reflect your newly mapped domain.
Setting Up Multiple Networks
Multiple networks are supported in the WordPress codebase, but there is no built-in menu or interface on the Dashboard. Running multiple networks in one install is an advanced feature that allows you to have another network in the same installation acting as a second independent network of sites. It can use its fully qualified domain name or a subdomain. The extra networks inherit the same type of sites. If your original network was installed by using subdomain sites, the extra network will also have subdomain sites. The network admin carries over to the new network, too. Additionally, you can add other network admins to the second network who will not have network admin access on the original network.
The plugin that helps you do this is WP Multi Network (available at http://wordpress.org/extend/plugins/wp-multi-network). You install and manage the WP Multi Network plugin in a way that's similar to how you install and manage the Domain Mapping plugin. The domain for the new network still needs to be parked on the install, but the creation of the network is done later on the Network options page after you install the WP Multi Network plugin. You cannot take an existing site on the network and turn it into a second network. You must set up a new site when the new network is created. Figure 6-14 shows the options screen for the WP Multi Network plugin.
To create a new network, fill in the fields shown on the Networks page in Figure 6-14:
![]() Network Name: This refers to the name of the network you are creating (example: My New Network).
Network Name: This refers to the name of the network you are creating (example: My New Network).
![]() Domain: The domain name you will use for this new network (example:
Domain: The domain name you will use for this new network (example: mynewnetwork.com).
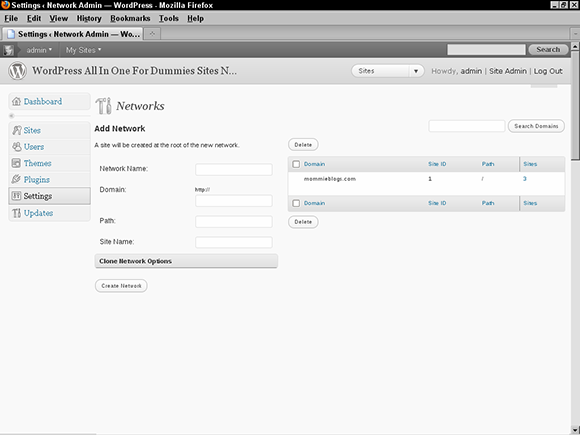
Figure 6-14: The Networks page on the Network Admin Dashboard.
![]() Path: The server path your new network will use (example:
Path: The server path your new network will use (example: /home/mynewnetwork/public_html/).
![]() Site Name: The name of the site that will serve as the main site in this network (example: Network Main Site).
Site Name: The name of the site that will serve as the main site in this network (example: Network Main Site).
When you’re done, click the Create Network button at the bottom of the Network page. WordPress creates your new network, and you can now assign child sites to it.