
C H A P T E R 17
Setting Up jQuery UI
Downloading and installing jQuery UI is slightly more complicated than for other JavaScript libraries. It is not burdensome, but it requires some explanation, which is what I cover in this chapter. For this book, you only need to get set up for development, but I have also included details of how to install the minimized files that are suitable for production deployment and details of how to use jQuery UI through a content distribution network.
Obtaining jQuery UI
The process for downloading jQuery UI is a little more complex than for other JavaScript libraries, but it is worth the effort. There are five main areas of functionality in jQuery UI, and you create a custom download that includes and configures each of them. In this part of the book, I'll be showing you all of the jQuery UI features, but for a real web application you can omit the parts you don't need and create a smaller library for browsers to download.
![]() Tip jQuery UI isn't the only UI toolkit that is based on jQuery, although it is by far the most popular. An alternative is jQuery Tools, which is open source and can be downloaded without any license or restrictions from
Tip jQuery UI isn't the only UI toolkit that is based on jQuery, although it is by far the most popular. An alternative is jQuery Tools, which is open source and can be downloaded without any license or restrictions from http://flowplayer.org/tools. There are also some commercial alternatives such as jQWidgets (www.jqwidgets.com) and Wijmo (http://wijmo.com). And, of course, there is jQuery Mobile, which I describe in Part V of this book.
Deciding on a Theme
Before you build your custom jQuery UI library, you need to decide on a theme. jQuery UI is endlessly configurable, and you can change the appearance of every aspect of every feature that you use. In fact, there are so many choices that it can be somewhat overwhelming. The jQuery UI web site includes a tool for creating custom themes, but there is also a gallery of predefined themes that you can choose to make life easier.
To start, go to http://jqueryui.com and click the Themes button. This loads the ThemeRoller page, which consists of a display of jQuery UI widgets and a panel on the left that lets you configure the theme settings, as shown in Figure 17-1.
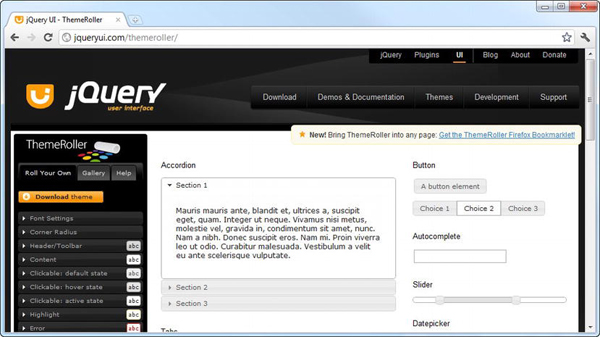
Figure 17-1. The jQuery UI web site theme page
If you have a certain visual style that you need to follow to make jQuery UI fit in with the rest of a site or application, then the Roll Your Own tab (which is selected by default) is for you. You can change every aspect of the CSS that is used by jQuery UI.
The predefined themes are available on the Gallery tab. As I write this, 24 themes are available in the gallery, and they range from the understated and subtle to the bright and garish. As you click each gallery theme, the widgets in the rest of the page are updated to show you what your application will look like, as shown in Figure 17-2.
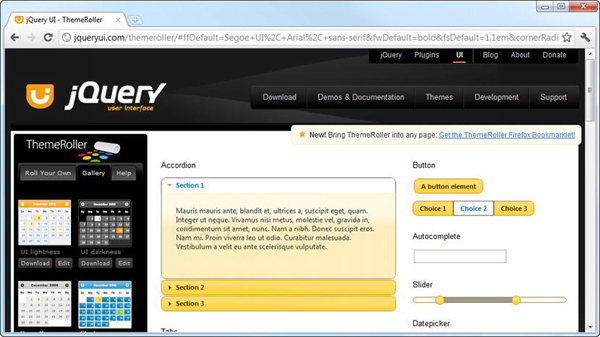
Figure 17-2. The gallery showing the Sunny theme
The default theme for jQuery UI is called UI lightness, but it doesn't have enough contrast to show up well on a book page, so I will be using the Sunny theme, which shows up a little better. You don't need to do anything with the theme at the moment, other than to remember which one you want to use. The themes don't look that good when printed, but they have a very different appearance on the screen, and I recommend you look through the list until you find one you like.
![]() Tip You don't have to select the same theme that I will be using, but if you pick a different one, you will obviously get results that look different from mine.
Tip You don't have to select the same theme that I will be using, but if you pick a different one, you will obviously get results that look different from mine.
Creating the jQuery UI Custom Download
Now that you have a theme in mind, you can create your jQuery UI download. Click the Download button at the top of the page to move to the Build Your Download page. This page has a list of jQuery UI components, broken into four functional groups: UI Core, Interactions, Widgets, and Effects.
By selecting only the features that you require for a project, it is possible to create a set of smaller files for the browser to download. I think this a nice idea, but it is something that I tend not to use. My view is that the best way to reduce the bandwidth required to deliver jQuery UI is to rely on a content distribution network, which I show you how to do later in this chapter.
For this chapter, you will need all of the components, so make sure that all of the components are checked.
![]() Tip Some of the components in the list depend on others, but you don't have to worry about this when you build a custom jQuery UI library. When you enable a component, any other component it depends on is also loaded.
Tip Some of the components in the list depend on others, but you don't have to worry about this when you build a custom jQuery UI library. When you enable a component, any other component it depends on is also loaded.
The next step is to select the theme you want. The selector for this in on the right side of the page, as shown in Figure 17-3.

Figure 17-3. Selecting the theme
![]() Tip You can also choose the version of jQuery UI to include in the library download. You will need the stable release for this chapter, which works with all versions of jQuery after 1.3.2.
Tip You can also choose the version of jQuery UI to include in the library download. You will need the stable release for this chapter, which works with all versions of jQuery after 1.3.2.
Once you have selected all of the components, selected the theme you want, and selected the stable version, click the Download button to download the customized jQuery UI library.
Installing jQuery UI for Development
The jQuery UI download contains all the files that you need for development and production. For this book, you will use the development files that include the uncompressed source code. This makes it easy to look into the internals of jQuery UI if you have a problem. You need to copy the following into the folder that contains your example files:
- The
development-bundleuijquery-ui-1.8.16.custom.jsfile - The
development-bundle hemessunnyjquery-ui-1.8.16.custom.cssfile - The
development-bundle hemessunnyimagesfolder
You will notice that there are JavaScript and CSS files for individual components and features in the ui and themes folders. You don't need to use them, but they can be helpful if you need to work with only a limited set of jQuery UI features.
![]() Tip The name of the JavaScript and CSS files include the version number of the release that was downloaded. For me, this is version 1.8.16. jQuery UI is actively developed, and you may have downloaded a later release than 1.8.16.
Tip The name of the JavaScript and CSS files include the version number of the release that was downloaded. For me, this is version 1.8.16. jQuery UI is actively developed, and you may have downloaded a later release than 1.8.16.
Adding jQuery UI to an HTML Document
All that remains is to add jQuery UI to your HTML document. You can do this by adding script and link elements that refer to the JavaScript and CSS files that you just copied, as shown in Listing 17-1. You don't need to refer directly to the images directory. As long as the images directory and the CSS file are in the same place, jQuery UI will be able to find the resources it needs.
Listing 17-1. Adding jQuery UI to an HTML Document
<!DOCTYPE html>

<html>

<head>

    <title>Example</title>

    <script src="jquery-1.7.js" type="text/javascript"></script>

    <script src="jquery-ui-1.8.16.custom.js" type="text/javascript"></script>

    <link rel="stylesheet" type="text/css" href="styles.css"/>

    <link rel="stylesheet" type="text/css" href="jquery-ui-1.8.16.custom.css"/>

    <script type="text/javascript">

        $(document).ready(function() {

            $('a').button();

        });

    </script>

</head>

<body>

    <a href="http://apress.com">Visit Apress</a>

</body>

</html>
![]() Tip jQuery UI depends on jQuery. You must have added jQuery to a document in order to use jQuery UI. jQuery UI is not a stand-alone library.
Tip jQuery UI depends on jQuery. You must have added jQuery to a document in order to use jQuery UI. jQuery UI is not a stand-alone library.
The document shown in the listing includes a simple test that allows you to check that jQuery UI has been added properly. If you view this in the document, you should see a distinct button like the one in Figure 17-4. Don't worry about the call to the button method in the script element in the listing. I'll explain what this does and how it works in Chapter 18.
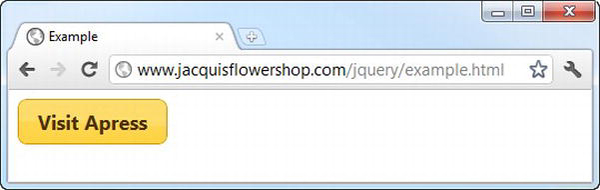
Figure 17-4. Checking that jQuery UI has been added to the document correctly
If you have not properly specified the path to either of the two files, then you will see a simple a element instead, as illustrated by Figure 17-5.

Figure 17-5. Identifying a problem importing jQuery UI into a document
Installing jQuery UI for Production
When you have finished developing your web application and are ready to deploy it, you can use the minimized files that are included in the download. These files are smaller but harder to read for debugging purposes. To use the production files, you must copy the following into your web server directory:
- The
jsjquery-ui-1.8.16.custom.min.jsfile - The
csssunnyjquery-ui-1.8.16.custom.cssfile - The
csssunnyimagesfolder
The images directory and CSS file are the same as for the development version; only the JavaScript file changes. You only have to copy these files for a clean installation.
Using jQuery UI via a Content Distribution Network
I touched upon using a CDN for jQuery in Chapter 5. If this is an approach that appeals to you, you will be pleased to learn that you can do the same with jQuery UI. Both Google and Microsoft host the jQuery UI files on their CDNs. For this example, I'll use the Microsoft service, because it hosts the standard themes as well as the jQuery UI JavaScript.
To use a CDN, you just need the URLs to the files you want. For the Microsoft service, go to www.asp.net/ajaxlibrary/cdn.ashx to get started. If you scroll down the page, you will see a link for jQuery UI releases, broken down by version. Click the link for the version you are using (for me, the latest version is 1.8.16). You will see the URLs for the regular and minimized version of the jQuery UI library file. For my version, the URL for the minimized file is as follows:
http://ajax.aspnetcdn.com/ajax/jquery.ui/1.8.16/jquery-ui.min.js.
The rest of the page shows each of the predefined jQuery UI themes, with the URL for the theme CSS shown underneath. The URL for the Sunny theme is as follows:
http://ajax.aspnetcdn.com/ajax/jquery.ui/1.8.16/themes/sunny/jquery-ui.css
To use these files on the CDN, you simply place the URLs in the script and link elements that refer to the local jQuery UI files, as shown in Listing 17-2.
Listing 17-2. Using jQuery UI via a CDN
<!DOCTYPE html>

<html>

<head>

    <title>Example</title>

    <script src="jquery-1.7.js" type="text/javascript"></script>

    <script src="http://ajax.aspnetcdn.com/ajax/jquery.ui/1.8.16/jquery-ui.min.js"

      type="text/javascript"></script>

    <link rel="stylesheet" type="text/css" href="styles.css"/>

    <link rel="stylesheet" type="text/css"

      href="http://ajax.aspnetcdn.com/ajax/jquery.ui/1.8.16/themes/sunny/jquery-ui.css"/>

    <script type="text/javascript">

        $(document).ready(function() {

            $('a').button();

        });

    </script>

</head>

<body>

    <a href="http://apress.com">Visit Apress</a>

</body>

</html>
Once again, you can tell whether you have the correct URLs by loading the document and seeing whether the browser displays a button similar to the one in Figure 17-4.
Summary
In this chapter, I showed you the steps required to create a jQuery UI download. There is a lot of flexibility in the features you include and the default appearance jQuery UI imparts on your web application. I particularly like the ThemeRoller application. It is an elegant way of creating a completely customized theme to fit into an existing visual scheme, which is ideal for adding jQuery UI to corporate-branded sites.
In the next chapter, you'll start to look at the different jQuery UI features, starting with the most popular functional area: widgets.