
Chapter 10. LightSwitch with SharePoint Data
At this point in your adventure, you have a working application. You can add new users via the admin screens. You can assign profile information to your users, create and edit your help desk queues, and assign and manage tickets against each of those queues. It’s a great start and was written with very little code. In this chapter, you’ll add a SharePoint-based knowledge base where users can search for help directly from the portal. You’ll automatically publish case notes to SharePoint when a ticket closes.
Up to this point in the book, you’ve been able to accomplish everything with just a basic developer workstation and Visual Studio LightSwitch installed. You’ll need a server with at least SharePoint Foundation installed in order to accomplish the tasks in this chapter. If you don’t have a SharePoint environment already, the configuration section of this book (Chapter 30) will walk you through options around creating and building out your own SharePoint farm.
Note
You may be tempted to leverage the free trial of SharePoint Online, but you will discover as we did that LightSwitch is not currently able to connect to SharePoint Online without third-party data source extensions. Future releases of LightSwitch and SharePoint Online plan to address this. Connecting LightSwitch to Office 365 requires Visual Studio Update 2. Previous versions are compatible with only on premise deployments of SharePoint.
Logical SharePoint Architecture
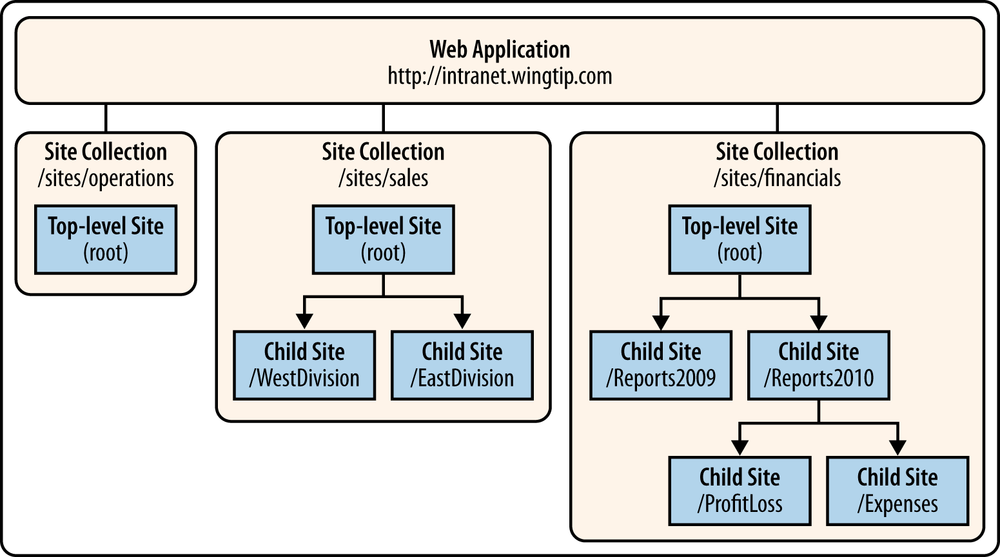
The logical architecture of SharePoint 2010 is described in Figure 10-1 regardless of the size and scale of your SharePoint farm. While Chapter 31 discusses in detail physical architecture, server roles, and scaling of SharePoint, we must first understand the logical architecture before building a portion of our application on SharePoint.
The website hosted in Internet Information Server (IIS) is fully managed by SharePoint and known to us as a “web application.” There is not much special about this IIS website, but it’s fully managed by SharePoint down to the configuration settings in the web.config file. Each web application runs in a single instance of the w3wp.exe Windows process. This is a very good reason to only talk to SharePoint via its web service APIs rather then running local code, as our local code could easily impact the performance and upgradability of SharePoint. We will follow this best practice in all our examples and not run our locally executing code on the SharePoint web application.
A “managed path” such as “sites” shown below is used as a parent to each of the SharePoint Site Collections. This managed path is really nothing more than a directory that SharePoint manages, which will be the parent for each of the SharePoint Site Collections you create. You can have multiple managed paths as part of your taxonomy to help you organize your sites. Some common examples include sites, apps, and mysites.
Continuing down the hierarchy, a Site Collection is the logical security boundary for sites or teams within SharePoint. If you were building a solution for your help desk knowledge base, you would place it in its own Site Collection. This enables it to have its own administrator and to be moved between databases as needed.
A Site Collection is usually assigned to each team or major application that one would build on SharePoint. The Site Collection is assigned one or more Site Collection administrators who have unlimited rights within this scope. A Site Collection is also the smallest unit that can be assigned to a given content database, which is a SharePoint-managed SQL Server database used for storing files and metadata.
Within a Site Collection, you can create sites in order to help logically organize your content. Sites can also contain other sites, but they are really just there to help you organize your content. The Site Collection is the primary administrative and security boundary in SharePoint.
Assuming we have a SharePoint 2010 server, we want to start with a new Site Collection. Site Collections can be created from many different templates, including a blank site or a basic team site. In this case, we’re using a SharePoint Foundation team site. We will need to have Owner or Site Collection Administrator rights for this exercise, as we’ll be creating a new SharePoint list and defining the schema of that list.
We are going to walk through the creation of a custom list to store information about our closed help desk tickets. Because this is just normal SharePoint content, SharePoint will automatically index this data, making it searchable throughout our environment. Let’s get started.
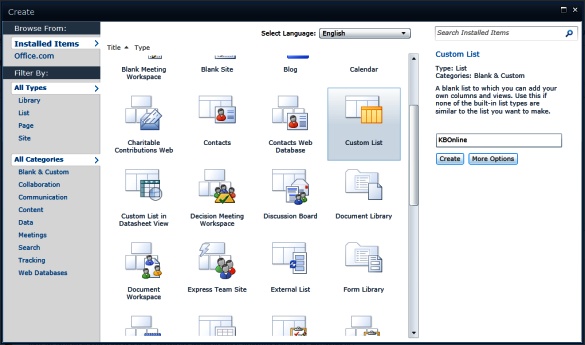
From the Site Actions menu, select More Options, as shown in Figure 10-2, and create a new Custom List. Name the list KBOnline (as shown in Figure 10-3) and click Create. SharePoint will quickly provision your new list.

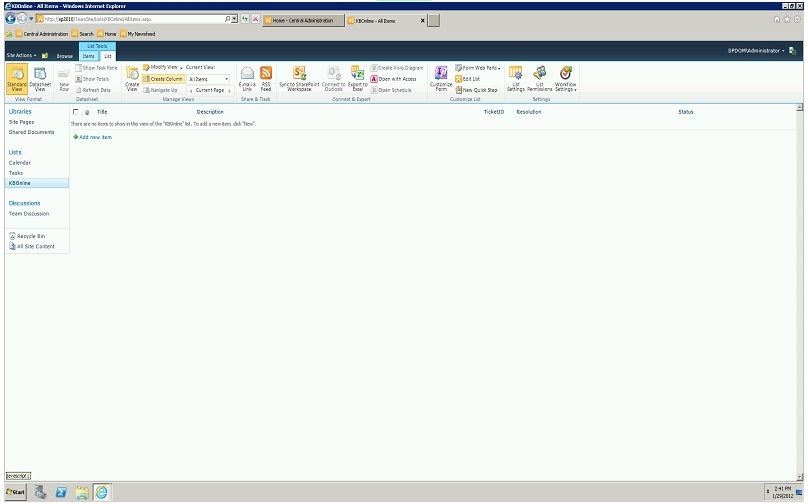
Our custom list has only one column called Title right now, as you can see in Figure 10-4. We can easily add new columns to our list by toggling the ribbon on the List Tab and selecting Create Column.
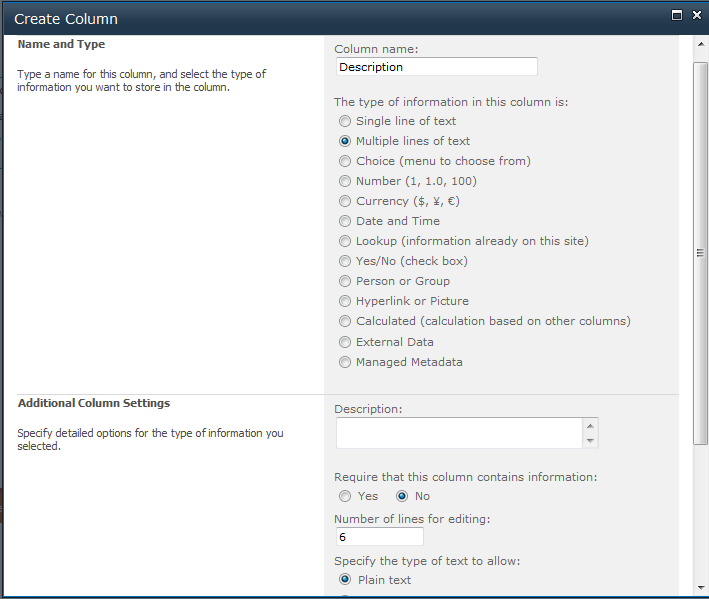
Next, we need to describe each of the columns that we want to be available in SharePoint. In this case, let’s make the column name: Description and select the data type of multiple lines of text. We also need to specify that we want to allow only plain text under Additional Column Settings, as shown in Figure 10-5.
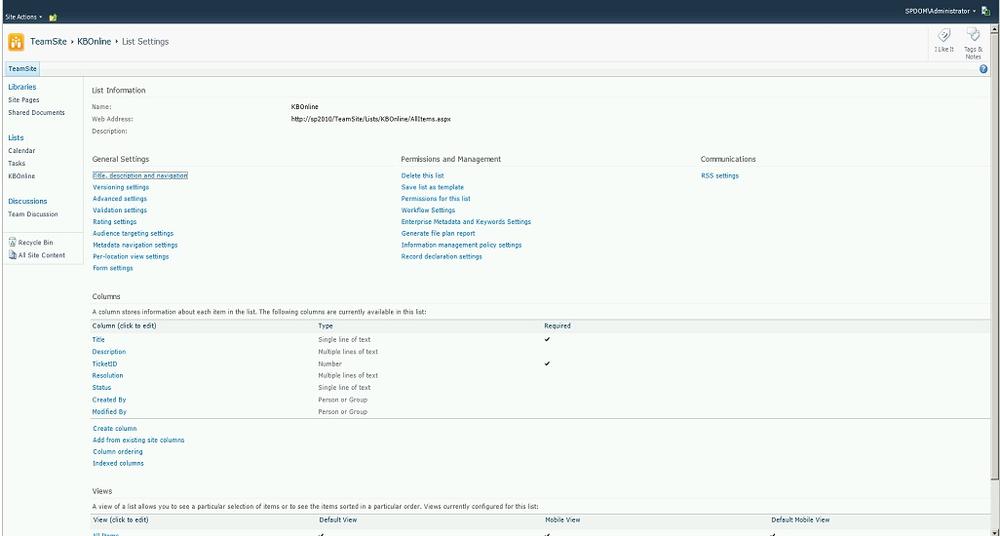
By default, SharePoint lists will automatically store hidden properties for the ID of the list item—as well as the Date Created, Date Modified, and the user that performed those activities—so you won’t need to add those. You will need to add additional properties for TicketID (Number), Resolution (Multiple lines, Plain Text), Status (Single line of text), Requestor (Single line of text), Assigned (Single line of text), and Queue (Single line of text).
Once you’ve added these columns to your list, you can click List Settings on the ribbon and review the columns you’ve added. Your list should look similar to Figure 10-6.
Make sure to fully define the schema of your SharePoint list before adding it as a data source in our LightSwitch project. When you add a SharePoint list as a data source to LightSwitch, it generates code based on the structure of the list, so be sure to add any columns you’re going to need before proceeding.
Adding a SharePoint Data Source
In many ways, adding a SharePoint data source to LightSwitch is no different to adding any other external data source. When we add the data source reference, Visual Studio will generate code that abstracts the data source and makes it available in our project.
In Solution Explorer, right-click on Data Sources and select Add Data Source.
The Choose Data Source Type dialog appears, prompting you to choose a data source. Out of the box, LightSwitch 2011 supports three data source types: Database, SharePoint, and WCF RIA Service. The next version of LightSwitch adds support for OData Services, which are discussed in Chapter 5.
Third-party extensions can provide additional data source types for connecting to Facebook, QuickBooks, Google Services, SalesForce.com, PowerShell, and SharePoint Online. In this case, we’re using the out-of-the-box SharePoint support, so select SharePoint and click Next.
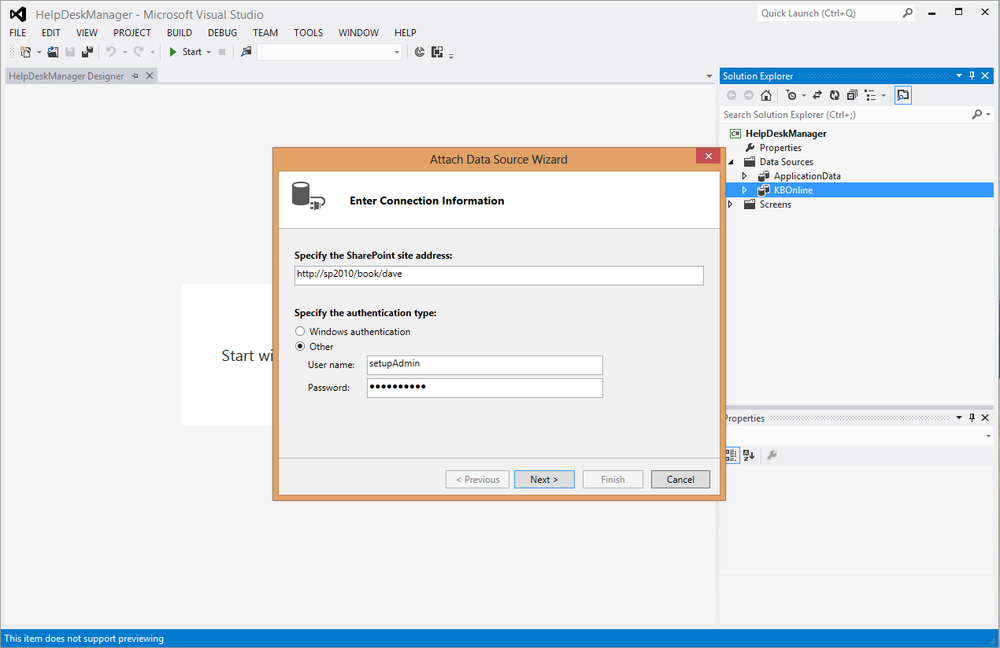
Now simply enter the URL of your SharePoint site, as shown in Figure 10-7. This is not the URL of the list itself, but of the site that hosts it. You will likely just use your Windows credentials, but you can provide alternate credentials as needed to connect to the SharePoint site.
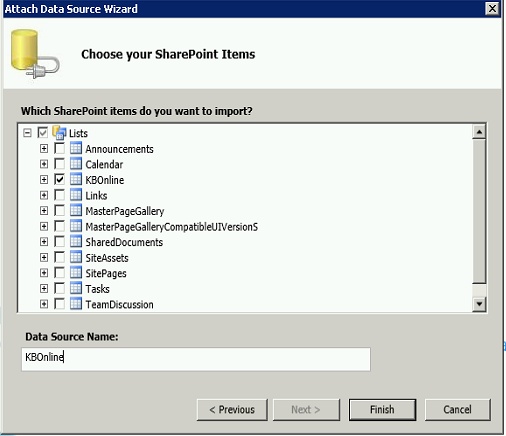
The Attach Data Source Wizard then connects to the specified SharePoint site supplied credentials and allows you to select the lists you’d like to expose as entities within LightSwitch. Let’s select the KBOnline list we created earlier (Figure 10-8).
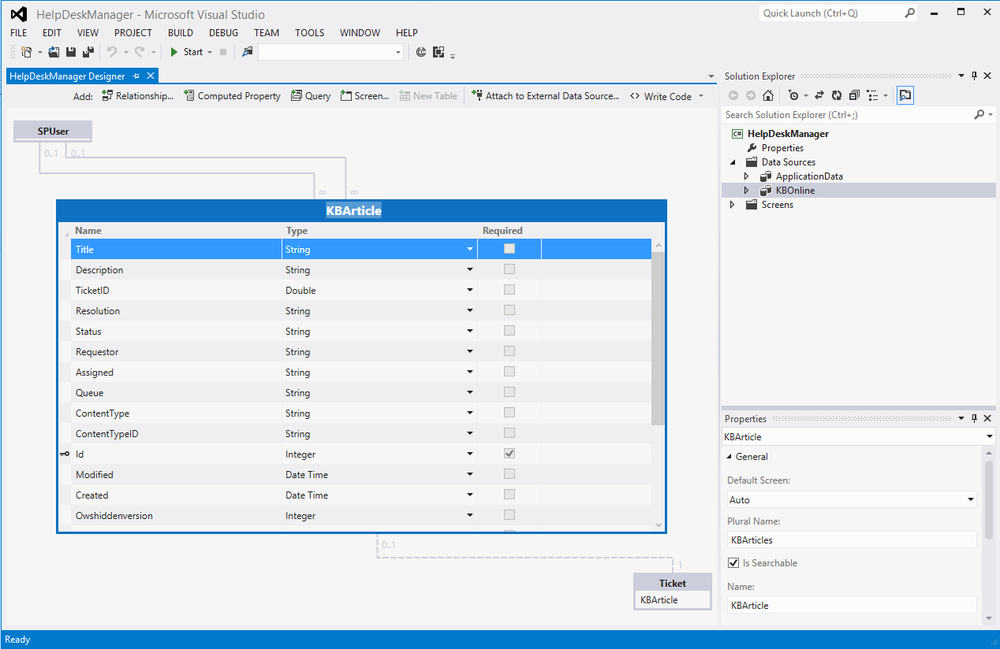
After finishing, you will see that LightSwitch imported a new entity named KBOnline1 because the entity set was already named KBOnline. You can also see that an additional list with user information was added.
To make this a bit neater, we’ll just rename the generated KBOnline1 entity to KBArticle and we’ll name the UserInformationList entity to a SPUser entity. To do this, double-click on the title of the entity in the designer and type in the new name. We’ll also make the table in the Solution Explorer match our naming by calling it KBArticles. As you can see in Figure 10-9, it’s easy to do this in the Properties window by just updating the names, or you can type F2 as a shortcut to rename whatever you have selected.
These steps are very simple to perform, but behind the scenes we’ve just connected to SharePoint’s web services, retrieved the lists on a site, and created code to model out those entities within LightSwitch.
Relating to SharePoint Data
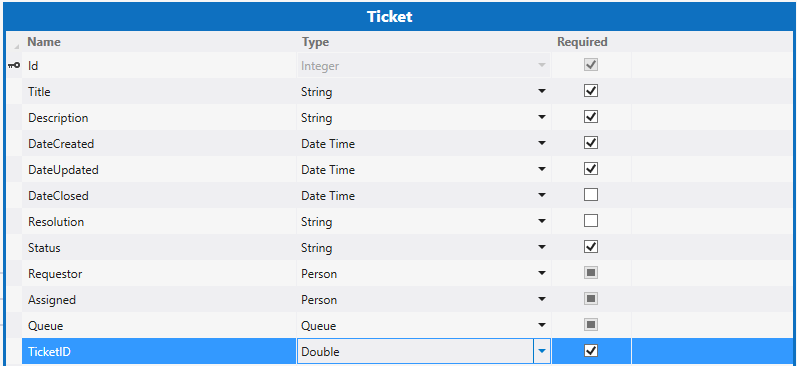
We are going to want to be able to relate the information in our LightSwitch application to the data in our new SharePoint list. To do this, we’re going to use the TicketID column that we created in our SharePoint list. If you closely examine Figure 10-10, you’ll notice that when we brought in our list from SharePoint, TicketID was imported using the data type “Double” rather than “Integer,” which we might have expected. The real difference between an Integer and Double is that an Integer is a whole number and a Double stores decimal information as well.
In order to create a relationship, we’ll need to have a property with the same data type on both sides of the relationship: the SharePoint list and on the Ticket entity in our application.
To make this possible we’re going to add an additional property on our Ticket in our application that is of the data type Double to match the way that SharePoint stores its number column.
Because the ID will never change after it is first created, we
were able to just assign a value to this during the Inserted event,
which fires after the ticket is saved to the database. If you’ve already
added some data to your application, you may want to add the same line
of code to the Tickets_Updated event so that the
TicketID will be set whenever you update records you’ve already
added.
partial void Tickets_Inserted(Ticket entity)
{
entity.TicketID = Convert.ToDouble(entity.Id);
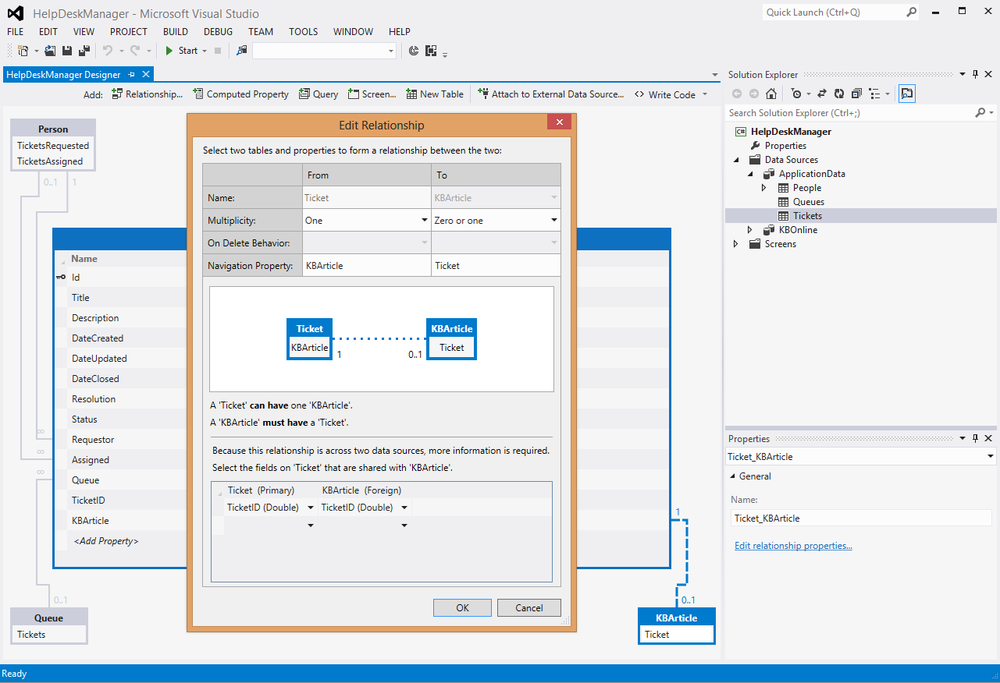
}After modifying Ticket to have a property with Double data type, it’s easy to create a relationship in the same way we would between database tables that are in a single data source. This is one of the really powerful features of LightSwitch. Normally, one can only enforce a relationship between tables in a single data source; LightSwitch lets us create these relationships across data sources.
Let’s go ahead and add the relationship:
Click on +Relationship on the toolbar.
Create the relationship from Ticket to KBArticle.
Set the Multiplicity as One to Zero or One.
Choose the field TicketID (double) on both entities.
Click OK. The result should look like Figure 10-11.
The only clear identifier that this relationship is special is that it is rendered as a dashed line, which indicates that it’s a join across data sources. Within LightSwitch, the navigation properties will function exactly as you’d expect.
Populating the Knowledge Base
As we discussed at the start of the chapter, the goal of this SharePoint list is to provide a searchable knowledge base. When we created the relationship, we defined that one Ticket has zero or one KBArticles.
When a new Ticket is created in our application, we can create a KBArticle in SharePoint so people can see information about the Ticket. Every time we update the Ticket, we’ll push updates to SharePoint. Finally, when we close the Ticket, we’ll push a Resolution across to SharePoint.
We will return to our Tickets_Inserted event
handler and add some code to create the KBArticle. Because we know up
front that we’re going to need to update SharePoint in the
Tickets_Updated event handler as well, let’s put that
logic in a new method we can call from multiple places instead of copying
it. You’ll notice as well that as a good programming practice, our
updateSharePointKB method is scoped as a private method
because we only expect it to be called from within this
class.
partial void Tickets_Inserted(Ticket entity)
{

entity.TicketID = Convert.ToDouble(entity.Id);

updateSharePointKB(entity);

}


private void updateSharePointKB(Ticket entity)
{

//if no list item exists for this ticket, create one
if (entity.KBArticle == null)
  entity.KBArticle = new KBArticle();


entity.KBArticle.Title = entity.Title;
entity.KBArticle.Description = entity.Description;
entity.KBArticle.Status = entity.Status;
entity.KBArticle.Queue = entity.Queue.Name;
entity.KBArticle.Requestor = entity.Requestor.FullName;
entity.KBArticle.Assigned = entity.Assigned.FullName;
entity.KBArticle.Resolution = !String.IsNullOrWhiteSpace(entity.Resolution) ?
entity.Resolution : "The ticket is still pending resolution";

DataWorkspace.KBOnline.SaveChanges();
}
The updateSharePointKB method
takes an instance of the Ticket entity, making it reusable in any of our
event handlers. The last line of that method calls out to DataWorkspace.KBOnline.SaveChanges, which tells
the data connection to SharePoint to go ahead and send the
changes.
When looking at the code used to determine the resolution, you may not be familiar with the C# conditional operator that we used. It lets us have a conditional expression on one line and it works as follows:
conditional expression ? true expression : false
    expression
We know that we already have validation that requires a resolution if the status of a ticker is Closed or Cancelled. Based on that, we know that if the Resolution property is not populated, we should have our knowledge base display a note that the ticket is still pending resolution.
partial void Tickets_Updating(Ticket entity)
{

entity.DateUpdated = DateTime.Now;

//if the status is closed, and it wasn't closed before,
set the date closed to Now
if (entity.Status == "Closed" && entity.Details.Properties.Status.OriginalValue !=
"Closed")
{
entity.DateClosed = DateTime.Now;
}

//if the status is cancelled, and it wasn't cancelled before,
set the date closed to Now
if (entity.Status == "Cancelled" &&
entity.Details.Properties.Status.OriginalValue !=
"Cancelled")
{
entity.DateClosed = DateTime.Now;
}

adjustStatusForAssignment(entity);

//assign a ticketID if it's null
if (entity.TicketID == null)
entity.TicketID = Convert.ToDouble(entity.Id);

updateSharePointKB(entity);
}
We may have some tickets that were created before we added the
Ticket_Inserted event handler to save a
TicketID, so we add a line of code to assign a TicketID if it’s currently
null. We will also add this logic to our Tickets_Updating event handler so that it runs
before we’ve updated our database. As you can see, we’re adding only a
couple of lines to the end of Tickets_Updating. It’s
that easy to bridge the gap between our data stored in SQL Server and our
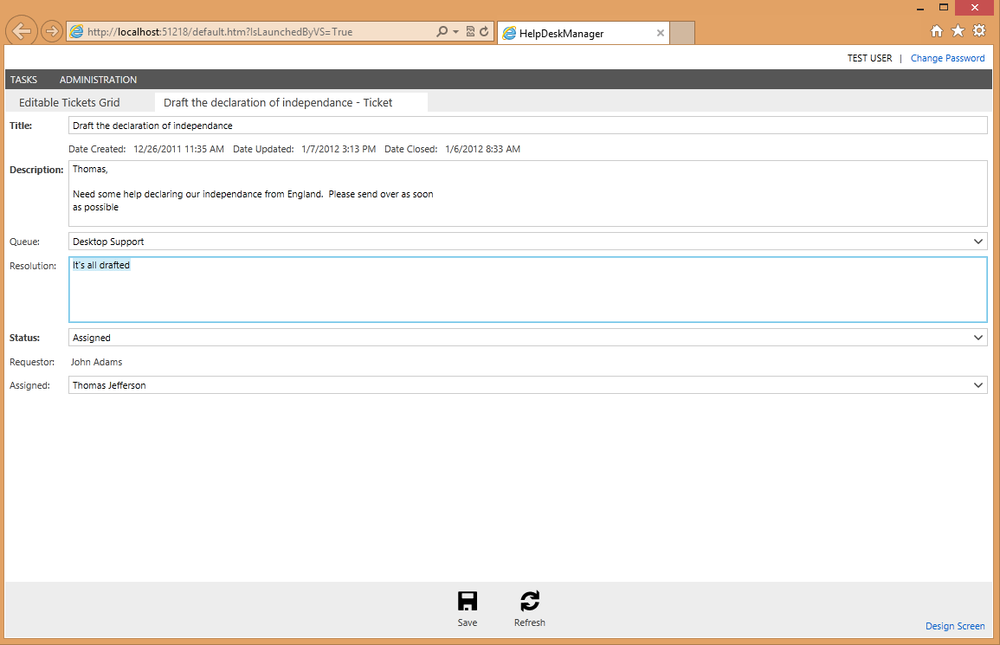
List stored in SharePoint. Let’s go ahead and run the application. See
Figure 10-12 for a draft ticket screen.
Remember that when running the LightSwitch application, we need to perform an update or an insert to fire the event handlers. After updating a record, go back to the SharePoint list (Figure 10-13) and you can see the knowledge base articles that are available. These items will become searchable as soon as your next incremental crawl completes just using the SharePoint out-of-the-box search engine.
Summary
You have now developed a complete LightSwitch business application. You built a database, service layer, and a Silverlight user interface with an MVVM architecture. You application incorporates robust validation and automatically updates a SharePoint-based knowledge base that is completely searchable. All that’s left to do is to deploy the application.