
Chapter 14. Populating Sample Data into Our Database
In Chapter 12 and Chapter 13, we discussed the history of business intelligence on the Microsoft platform and talked about the evolution of the toolset over the past several releases. It’s just about time for us to jump into the fun part: building our solution.
In Part II, we built a help desk manager application using Visual Studio LightSwitch. We ended that section by deploying the system to our SharePoint application server and our SQL Server database server. To build our business intelligence solution, we’re going to need some sample data.
If you have a team of interns with nothing to do and you’ve decided to have them spend a week or two keying sample data into your application, then you can skip this chapter and move directly to Chapter 15 where we will be creating our tabular cube using PowerPivot. If you would like to save some time and generate some sample data, then this chapter will have some great techniques for you to use.
Downloading Adventure Works Data from Microsoft
Dating back to at least SQL Server 2005, the product team has consistently released sample databases designed to show off the features of each major SQL release based upon a mythical company named Adventure Works. Adventure Works is a bicycle retailer whose database contains information about employees, products, and sales and is used to show off the transactional, reporting, business intelligence, and reporting features of SQL Server. Each release of SQL Server has a version-specific release of the Adventure Works databases. We’ll pull our data from those databases when we populate our help desk manager. You’ll want to grab the Adventure Works data file depending on what version of SQL Server Database Engine you are running.
| 2012 Samples (AdventureWorks2012 Data File) |
| 2008R2 Samples (AdventureWorks2008R2 Data File) |
You’ll want to download the data file to your computer and then copy or move it to a folder on your SQL Server (Figure 14-1). When attaching a database, SQL Server will only allow you to browse folders that are on the server even if you are running Management Studio from your local computer.
![Downloading Adventure Works database from CodePlexComment [GM2]: Figure still needs xref in text.](http://imgdetail.ebookreading.net/software_development/6/9781449324667/9781449324667__developing-business-intelligence__9781449324667__httpatomoreillycomsourceoreillyimages1715425.png)
Attaching the Database
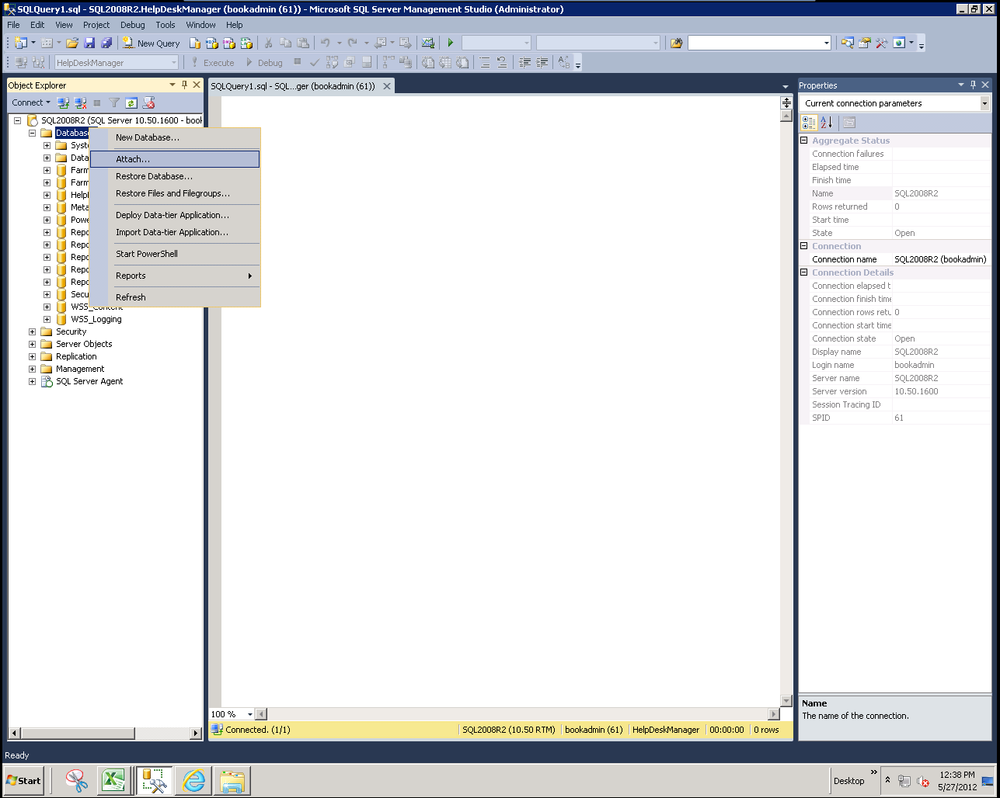
Once you’ve copied the file to the server, open Management Studio, right-click on the Databases node in Object Explorer, and select Attach, as shown in Figure 14-2.
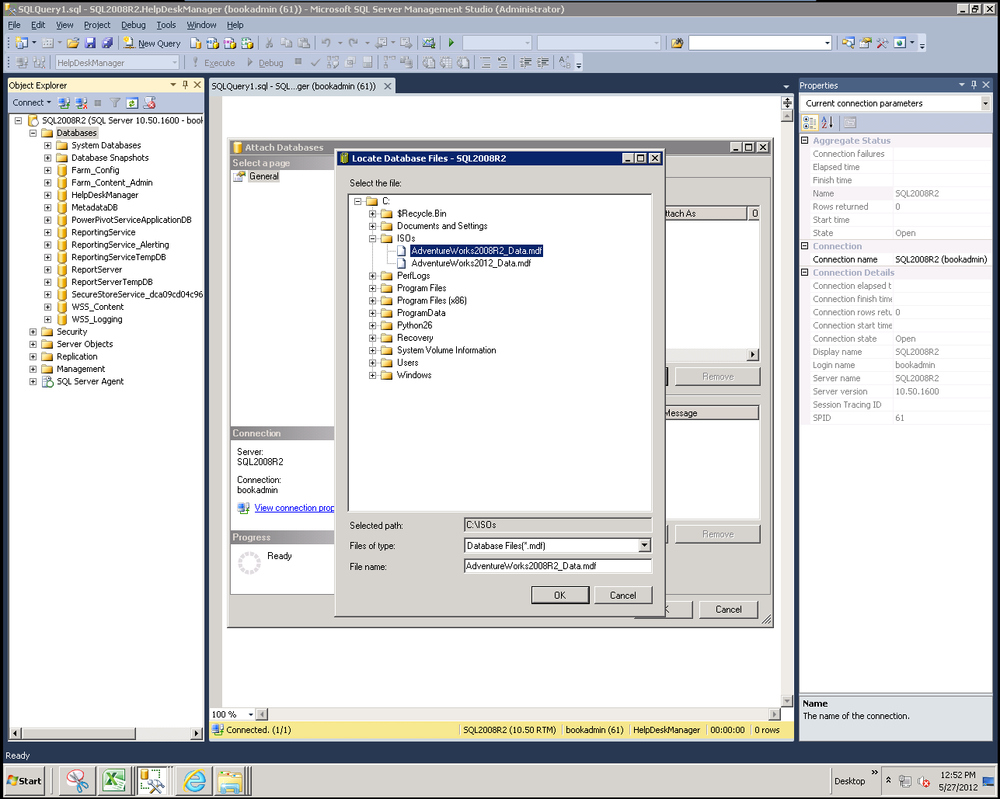
This will launch the Locate Database Files dialog box and allow you to find the MDF data file on the server, as seen in Figure 14-3.
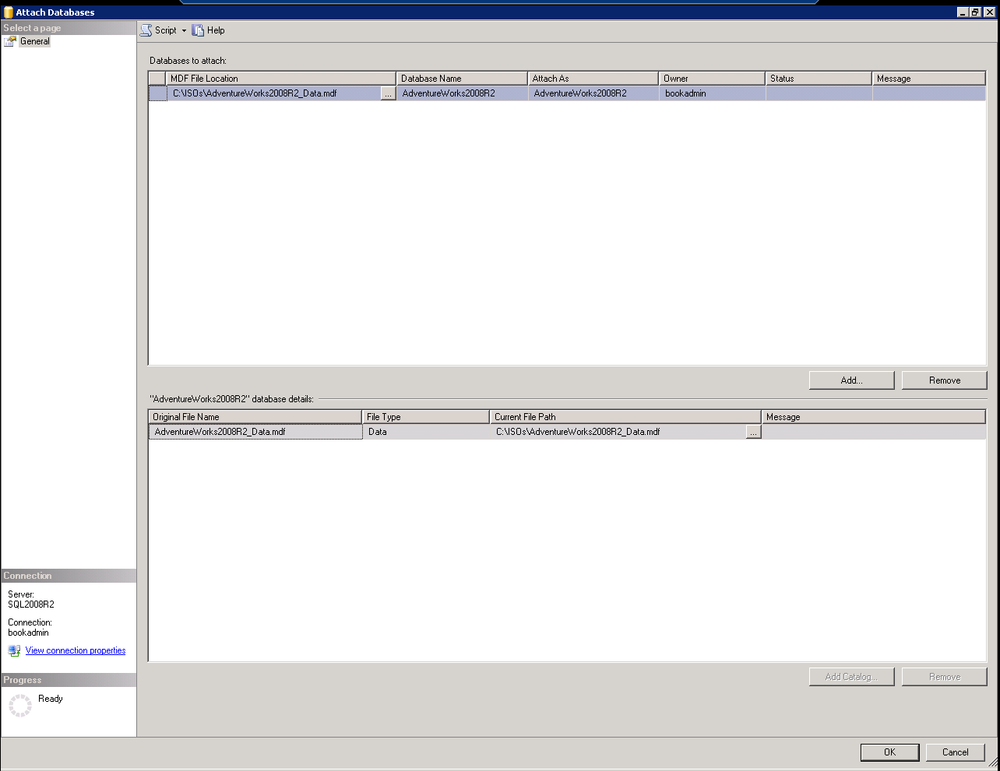
After selecting the MDF file, the Attach Databases dialog box appears showing the database to attach in the top and the details (such as file names) in the bottom pane, as seen in Figure 14-4. Let’s review a few details about SQL Server database files. Any database in SQL Server is composed of two or more physical files. The MDF is the actual database file, and the LDF is the log file. When data is written to the database, it is written to the log, then the database, then the log is marked as committed ensuring integrity in the case of a hardware or power failure. You’ll notice that we were only provided the MDF file via the download from Microsoft. In fact, when you selected your MDF file, you probably saw two rows in the bottom pane, the second one stating that the log file is missing. Before clicking OK on this screen, highlight the missing log file and click Remove. The log file will automatically be re-created as the database is attached.
If you get an error message when you hit OK, check to make sure that the account running the SQL Server database engine has rights to the folder where you placed your MDF file. If you don’t have rights, you may see an error saying that it was unable to connect the database.
Once you have successfully attached the Adventure Works database, you’ll see a large number of tables that make up the database as shown in Figure 14-5. We are going to use the data that Microsoft ships in the sample database to create sample data for our Help Desk Manager application.
Looking at the database we created in Part II, the Help Desk Manager solution focuses around People, Queues, and Tickets, so we will extract data from Adventure Works to fill those entities.
![Comment [GM3]: AU: Insert figure title.Exploring the database](http://imgdetail.ebookreading.net/software_development/6/9781449324667/9781449324667__developing-business-intelligence__9781449324667__httpatomoreillycomsourceoreillyimages1715429.png)
Importing People from Adventure Works
The People table (dbo.People) from our application is shown in Figure 14-6. We’ll want to provide all the columns in this table with the exception of Id, which is an auto-incrementing identity column.
![Comment [GM4]: AU: Please insert figure tutle.The People table](http://imgdetail.ebookreading.net/software_development/6/9781449324667/9781449324667__developing-business-intelligence__9781449324667__httpatomoreillycomsourceoreillyimages1715430.png)
The fastest way to insert many rows of data into a table is to leverage the Insert/Select pattern. The general concept of this pattern is
INSERT INTO TABLENAME (Column1, Column2, Column3)
SELECT Column1, Column2, Column3 FROM TABLE WHERE Condition=Value
When accessing a table that is stored in another database on the
current server, it is possible to access that database from within a SQL
statement by fully qualifying the name of the database and the schema to
which the table belongs. For example, if we were currently connected to
the AdventureWorks2008R2 database and wanted to select from the People
table for the HelpDeskManager, we would
qualify the people table as shown here.
SELECT * from [HelpDeskManager].[dbo].People
With these two concepts in place, we’re ready to import the people from Adventure Works into our People table. Let’s walk through the example T-SQL statement.
The USE statement sets the currently selected database.
We set this to the Adventure Works database because there are more tables in this database and it allows us to only fully qualify the People table into which we’re inserting.
INSERT INTO the fully qualified database name.
Within the parentheses, we define the columns and their order. You’ll notice that the Id is not listed here because we are not assigning a value to Id; the database will take case of that.
Next is our SELECT statement; each of the rows returned by this statement will be inserted into the columns defined in the People table.
We are limiting the results from our query to the top 100 rows.
The full name is a combination of the First Name, a space, and the Last Name.
The other columns are mapped from the tables that Adventure Works stores them in.
We limit our query to return People from the United States.
Feel free to also run just the select portion of the query to preview the results and tweak the query before running it with the INSERT statement to populate data into our People table. While we are using these techniques to import the data from the Microsoft Adventure Works database, you can use these techniques to transform data from any existing systems to which you have access.
USE [AdventureWorks2008R2]
GO


INSERT INTO [HelpDeskManager].[dbo].[People]
           ([FullName]
           ,[EmailAddress]
           ,[Address1]
           ,[Address2]
           ,[City]
           ,[State]
           ,[Zip]
           ,[Phone]
           ,[AccountName])

SELECT     TOP (100) P.FirstName + ' ' + P.LastName AS FullName, E.EmailAddress,
Address_1.AddressLine1, Address_1.AddressLine2, Address_1.City, ST.Name AS State,
                      Address_1.PostalCode, PH.PhoneNumber, E.EmailAddress AS
                      AccountName
FROM         Person.Person AS P INNER JOIN
                      Person.EmailAddress AS E ON P.BusinessEntityID =
                      E.BusinessEntityID INNER JOIN
                      Person.BusinessEntityAddress AS Address ON
                      P.BusinessEntityID = Address.BusinessEntityID INNER JOIN
                      Person.Address AS Address_1 ON Address_1.AddressID =
                      Address_1.AddressID INNER JOIN
                      Person.StateProvince AS ST ON Address_1.StateProvinceID =
                      ST.StateProvinceID INNER JOIN
                      Person.PersonPhone AS PH ON P.BusinessEntityID =
                      PH.BusinessEntityID
WHERE     (ST.CountryRegionCode = 'US')

GO
Synthesizing Help Desk Queues from Adventure Works
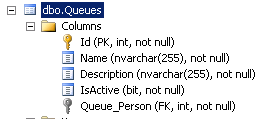
The Queues table (dbo.Queues) is comparatively short in length, containing only Name, Description, IsAction, and a Foreign Key to the People table that will store the default owner or manager of the Queue (Figure 14-7). Once again our data transformation script will need to provide all the columns other than the ID.
In this example, we’re going to use a couple of additional techniques to generate our sample data. In addition to getting some sample data to play with, these are good techniques to know.
The first pattern is used to randomly select a row from the People table as the owner of our queue. We do this by using the following:
use HelpDeskManager
GO

SELECT TOP(1) Id
FROM  dbo.People
ORDER BY NEWID()
If you grab that query and run it against our newly populated People
table, you’ll find that each time you run it, a different person ID will
be returned. This is great for cases where you want to randomly select a
row from a table. It works by generating a NEWID() GUID for each row and the table is then
sorted by it. The first record is returned (i.e., the record with the
“lowest” GUID).
In our case, where we want to generate an owner for each help desk
queue, we’re going to implement this as a subquery within our query that
generates queues. The problem is that the same set of GUIDs are returned
each time we run the subquery, which would give the same owner to each
queue. We want this to look a bit more random so we are going to force the
subquery to return different results by passing the CategoryName from the full outside query into
our subquery. Because a subquery can only return a single result, we’re
going to append the owner and the category name into a single string as
follows:
use AdventureWorks2008R2
GO
SELECT TOP (200)
Cat.Name + ' : ' + SubCat.Name AS Name
, CAST(COUNT(DISTINCT P.Name) AS varchar) + ' products supported' AS
Description
,(
SELECT TOP(1) CAST(Id AS varchar) + '|' + Cat.Name
FROM HelpDeskManager.dbo.People
ORDER BY NEWID()) AS Owner
FROM
Production.ProductCategory AS Cat INNER JOIN
Production.ProductSubcategory AS SubCat
ON Cat.ProductCategoryID = SubCat.ProductCategoryID INNER
JOIN Production.Product AS P
ON SubCat.ProductSubcategoryID = P.ProductSubcategoryID
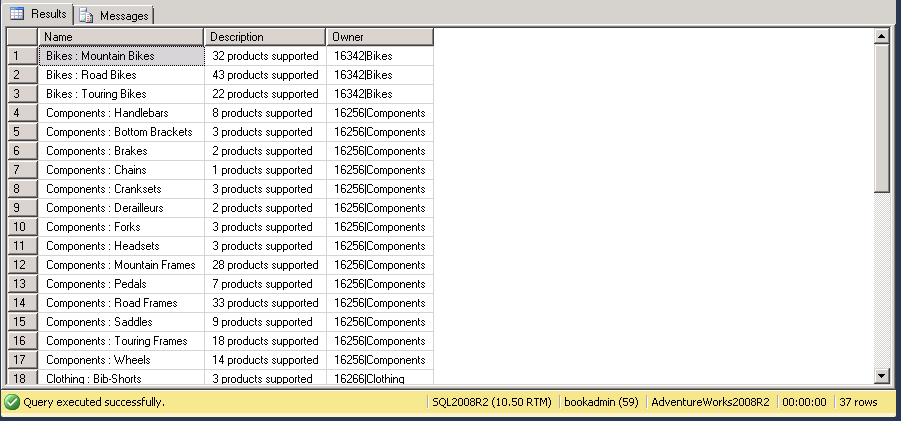
GROUP BY Cat.Name, SubCat.NameNow we have the basic query that we’re going to use to populate our help desk queues. If you run this query, you’ll get the output shown in Figure 14-8. You see that the name of the queue is a combination of the category and subcategory from the Adventure Works database and the description was generated based on the count of products that Adventure Works had in that subcategory. Most interesting is the Owner column, where we have a combination of an owner that is consistent across a category, then a pipe (|), and then the name of the category that we used to force uniqueness.
We’re going to need to clean up the Owner column before we insert it into the Queues table because that column has a foreign key constraint to the People table and the entries are not currently IDs that match the People table.
For our final trick, we will use a common table expression (CTE) to clean up the owner information. Common table expressions were introduced in SQL 2008 and are often used when traversing a hierarchy or any other operation where you want to define a virtual table with a query, and then execute another query against it. The basic syntax for a CTE is as follows:
WITH

cteName (Column1, Column2, Column3)

AS

(
    SELECT Column1, Column2, Column3
    FROM SomeTable
)

Select * from cteName
Define the name and the columns of the virtual table.
Write the query that populates the virtual table, returning the same number of columns as above.
Select the rows you wish to return from the virtual table.
With this final step, we’re ready to put all the parts together and
write our query to import the queues from Adventure Works. As we did
previously, we’ll define the name of our common table expression, in this
case cteQueue. We define the columns of
our virtual table as Name, QDescription, and QOwner. Then we use the SELECT query we authored
above that generates the random owner|category for the owner
column.
Finally, we have a standard INSERT/SELECT statement in which we
select from the common table expression and take the characters to the
left of the “|” in the QOwner
column.
use AdventureWorks2008R2
GO

WITH
cteQueue (Name, QDescription,QOwner)

AS
(
    SELECT TOP (200)
      Cat.Name + ' : ' + SubCat.Name AS Name
    , CAST(COUNT(DISTINCT P.Name) AS varchar) + ' products supported' AS Description
    ,(
        SELECT TOP(1) CAST(Id AS varchar) + '|' + Cat.Name
        FROM  HelpDeskManager.dbo.People
        ORDER BY NEWID()) AS Owner

    FROM
            Production.ProductCategory AS Cat INNER
            JOIN Production.ProductSubcategory AS SubCat
            ON Cat.ProductCategoryID = SubCat.ProductCategoryID INNER
            JOIN Production.Product AS P
            ON SubCat.ProductSubcategoryID = P.ProductSubcategoryID

    GROUP BY Cat.Name, SubCat.Name
)

INSERT INTO [HelpDeskManager].[dbo].[Queues]
           ([Name]
           ,[Description]
           ,[IsActive]
           ,[Queue_Person])

SELECT Name, QDescription, 1, LEFT(QOwner,CHARINDEX('|',QOwner)-1)
FROM cteQueue
This particular example certainly has some tricky spots, but by using these same techniques, you can solve a great many SQL puzzles. Next we’ll move onto our final data import, the Tickets.
Importing Tickets from Adventure Works
I hope you’re enjoying all these tips and tricks for generating some good test data. In this example, we’re going to reuse the techniques from our last example and make one addition to generate a random date. In the next example we generate a random date between 1/1/2003 and 1/1/2013. Each time you run this query, it will return a new random date between your start and end date.
SELECT DATEADD(d, CAST(- (1 * DATEDIFF(d, '1/1/2003', '1/1/2013') *
      RAND(checksum(NEWID()))) AS int), '1/1/2013')
Tickets are a little bit tricky in that we can choose any random
date for our DateCreated, but we’ll
want our DateUpdated and DateClosed to be after the creation date. To do
this, we’re going to use a CTE again and we’ll handle the updated and
closed dates during the query against our virtual table. Finally, we’ll
update the tickets in 2012 to have a status of Open so we have some
variety in our data.
use AdventureWorks2008R2
GO

with

cteTickets (Title, Description, DateCreated, DateUpdated, DateClosed, Resolution,
Status,Person_Ticket,Person_Ticket1,Queue_Ticket)

AS
(

SELECT
    'Need assistance with ' + P.Name AS Title,

    (
        SELECT TOP (1) ' I purchased a ' + P.Name + ' from ' + FullName + '
        and I have a question.'
        FROM HelpDeskManager.dbo.People
        ORDER BY NEWID()
    ) AS Owner,

    (
        SELECT DATEADD(d, CAST(- (1 * DATEDIFF(d, '1/1/2003', '1/1/2013') *
        RAND(checksum(NEWID()))) AS int), '1/1/2013')
    ) AS TicketDate,

    GETDATE()  AS DateUpdate,

    GETDATE() AS DateClosed,

    'Resolution is as follows' AS Resolution,

    'Closed' AS Status,

    (
        SELECT TOP (1) CAST(Id AS varchar) + '|' + P.Name
            FROM HelpDeskManager.dbo.People
            ORDER BY NEWID()
    ) AS Creator,

    Q.Queue_Person,

    Q.Id AS QueueID

FROM

    Production.ProductSubcategory AS SubCat
    INNER JOIN Production.Product AS P ON SubCat.ProductSubcategoryID =
    P.ProductSubcategoryID
    INNER JOIN Production.ProductCategory AS Cat ON SubCat.ProductCategoryID =
    Cat.ProductCategoryID
    INNER JOIN HelpDeskManager.dbo.Queues AS Q ON Q.Name = Cat.Name +
    ' : ' + SubCat.Name

)

INSERT INTO  [HelpDeskManager].[dbo].[Tickets]
           ([Title]
           ,[Description]
           ,[DateCreated]
           ,[DateUpdated]
           ,[DateClosed]
           ,[Resolution]
           ,[Status]
           ,[Person_Ticket]
           ,[Person_Ticket1]
           ,[Queue_Ticket])

select
    Title,
    Description,
    DateCreated,

    (select dateadd(d, cast(-1 * datediff(d, DateCreated,
    DATEADD(m,6,DateCreated)) * rand(checksum(newid())) as int),
    DATEADD(m,6,DateCreated))) as DateUpdated,

    (select dateadd(d, cast(-1 * datediff(d, DateCreated,
    DATEADD(m,6,DateCreated)) * rand(checksum(newid())) as int),
    DATEADD(m,6,DateCreated))) as DateClosed,

    Resolution,
    Status,
    Left(Person_Ticket,CharIndex('|',Person_Ticket)-1) as Person_Ticket,
    Person_Ticket1,
    Queue_Ticket

from  cteTickets

--Set tickets in 2012 to be open
update  Tickets set  Status='Open'
FROM         Tickets
WHERE     (DateClosed > '1/1/2012')
Review the Results
That should just about do it for the fancy T-SQL statements. Like any project you work on, you’ll want to preview the results and make sure you achieved what you expected. When we go to our application, this time we see it is full of data. You can see that tickets have been entered by many different people and that they are assigned to different employees based on the product category (Figure 14-9). Not only did we save time doing data entry, we learned some great techniques for manipulating data with T-SQL.
In the next chapter we’ll take this new data and build our tabular BISM cube, which will allow us to analyze the data and leverage Microsoft’s business intelligence tools.
