Before you can send a picture by email, you need to set up an email account and make sure your iPad has an Internet connection. After you have set up an email account, you can email single pictures or send a whole group of photos.
To send a single picture by email, follow these steps:
From the Home screen, tap Photos. The Photos screen appears.
Tap one of the tabs at the top of the screen (Photos, Albums, Events, Faces, or Places). If you tap Photos, you’ll see thumbnail images of all your pictures. If you choose any of the other options, you’ll need to choose an album, event, face, or place to view thumbnail images of your pictures.
Tap a picture that you want to send. Your chosen picture fills the screen.
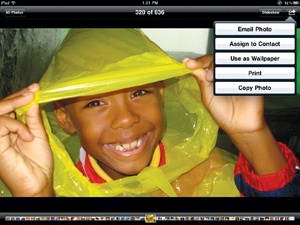
Tap the screen to display controls at the top and bottom of the screen. Then tap the Send icon that appears in the upper-right corner of the screen. A menu appears, as shown in Figure 21-9.
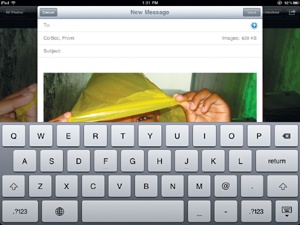
Tap Email Photo. An email message appears with the virtual keyboard at the bottom of the screen, as shown in Figure 21-10. Your chosen photo is included as an attachment.
Tap the To text field, and type an email address to receive your photo. (If you tap the plus sign icon to the far right of the To text field, a Contacts window appears, letting you choose a name of someone whose email address you have already stored in the Contacts app.)
(Optional) Tap the Subject and Message text fields to type a subject and any text you want to send along with your photo.
Tap Send to send your email message with your chosen photo.
If you want to send someone two or more pictures, it’s easier to send a group of pictures as a file attachment by following these steps:
From the Home screen, tap Photos. The Photos screen appears.
Tap one of the tabs at the top of the screen (Photos, Albums, Events, Faces, or Places). If you tap Photos, you’ll see thumbnail images of all your pictures. If you choose any of the other options, you’ll need to choose an album, event, face, or place to view thumbnail images of your pictures.
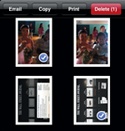
Tap the Send icon in the upper-right corner of the screen. Email and Copy buttons appear in the upper-left corner of the screen. (If you tapped the Photos tab, you’ll also see a red Delete button next to the Copy button.)
Tap one or more pictures that you want to send by email. Each time you select a picture, a check mark appears to let you know which pictures you’ve already selected, as shown in Figure 21-11.
Tap Email in the upper-left corner of the screen.
An email message appears with the virtual keyboard at the bottom of the screen (shown earlier in Figure 21-10).
Tap the To text field, and type an email address to receive your photos. (If you tap the plus sign icon to the far right of the To text field, a Contacts window appears, letting you choose the name of someone whose email address you have already stored in the Contacts app.)
(Optional) Tap the Subject and Message text fields to type a subject and any text you want to send along with your photos.
Tap Send to send your email message with your chosen photos.