When you have a lot of data and a lot of computation, you might start to crave for more computing power. Amazon (aws.amazon.com/) allows you to rent computing power by the hour. Thus, you can access a large amount of computing power without having to precommit by purchasing a large number of machines (including the costs of managing the infrastructure). There are other competitors in this market, but Amazon is the largest player, so we briefly cover it here.
Amazon Web Services (AWS) is a large set of services. We will focus only on the Elastic Compute Cluster (EC2) service. This service offers you virtual machines and disk space, which can be allocated and deallocated quickly.
There are three modes of use: a reserved mode, whereby you prepay to have cheaper per-hour access; a fixed per-hour rate; and a variable rate which depends on the overall compute market (when there is less demand, the costs are lower; when there is more demand, the prices go up).
For testing, you can use a single machine in the free tier. This allows you to play around with the system, get used to the interface, and so on. However, this is a very slow CPU machine. Thus, doing heavy computation using it is not advised.
On top of this general system, there are several types of machines available with varying costs; from a single core to a multicore system with a lot of RAM, or even graphical processing units (GPUs). We will later see that you can also get several of the cheaper machines and build yourself a virtual cluster. You can also choose to get a Linux or Windows server, with Linux being slightly cheaper. In this chapter, we will work our examples on Linux but most of this information would be valid for Windows machines as well.
The resources can be managed through a web interface. However, it is also possible to do so programmatically and by setting up scripts which allocate virtual machines, setting up disks, and all the operations that are possible through the web interface. In fact, while the web interface changes very frequently (and some of the screenshots that we show in the book may be out-of-date by the time it goes to the press), the programmatic interface is more stable and the general architecture has remained stable since the service was introduced.
Access to AWS services is performed through a traditional username/password system, although Amazon calls the username an access key and the password a secret key. They probably do so to keep it separate from the username/password you use to access the web interface. In fact, you can create as many access/secret key pairs as you wish and give them different permissions. This is helpful for a larger team where a senior user with access to the full web panel can create other keys for developers with less privileges.
Note
Amazon regions
Amazon.com has several regions. These correspond to physical regions of the world: West Coast U.S., East Coast US, several Asian locations, a South American one, and a European one. If you will be transferring data, it is best to keep it close to where you will be transferring to and from. Additionally, if you are handling user information, there may be regulatory issues if you transfer it to another jurisdiction. In that case, do check with an informed counsel on what the implications of transferring data about European customers to the US or vice versa are.
Amazon Web Services is a very large topic, and there are various books exclusively available which cover AWS entirely. The purpose of this chapter is to give you an overall impression of what is available and what is possible with AWS. In the practical spirit of this book, we do this by working through examples, but we will not exhaust all possibilities.
The first step is to go to http://aws.amazon.com/ and create an account. These steps are similar to any other online service. If you want to have more than a single low-powered machine, you will need a credit card. In this example, we will use a few machines, so it may cost you a few dollars if you want to run through it. If you are not ready to take out a credit card just yet, you can certainly read the chapter to learn what AWS provides without going through the examples. Then you can make a more informed decision on whether to sign up.
Once you sign up for AWS and log in, you will be taken to the console. Here you will see the many services that AWS provides:
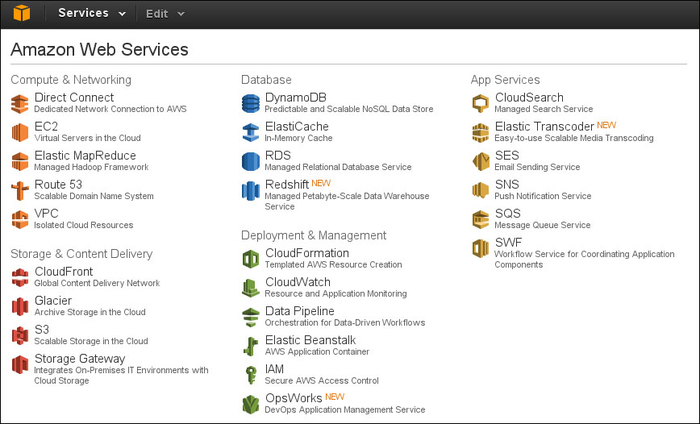
We pick and click on EC2 (the second element on the leftmost column—this panel is shown as it was when this book was written; Amazon regularly makes minor changes, so you may see something slightly different). We now see the EC2 management console as shown in the following screenshot:
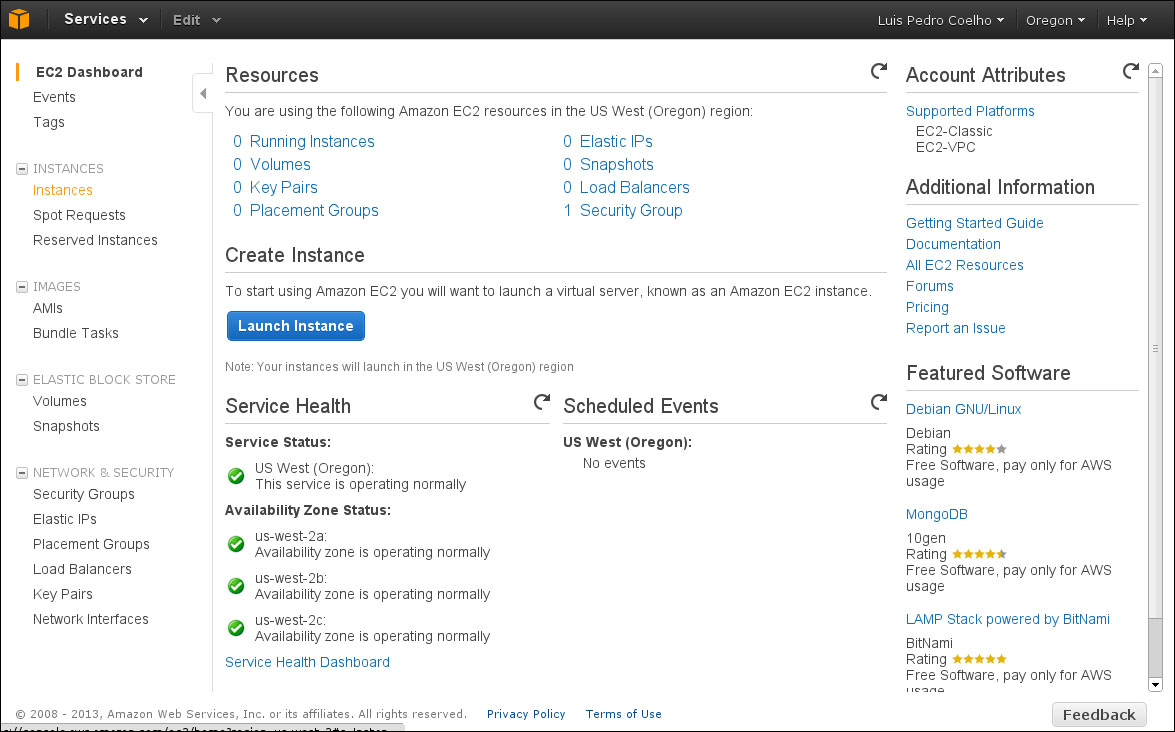
In the top-right corner, you can pick your region (see the Amazon regions information box). Note that you will only see information about the region that you have selected at the moment. Thus, if you mistakenly select the wrong region (or have machines running in multiple regions), they may not appear (from casual conversations with other programmers, this seems to be a common pitfall of using the EC2 web management console).
In EC2 parlance, a running server is called an instance. So now, we want to select Launch Instance. Now, follow the classic wizard. Select the Amazon Linux option (if you are familiar with one of the other offered Linux distributions, such as Red Hat, SuSe, or Ubuntu, you can also select one of those, but the configurations will be slightly different). We will start with one instance of the T1.micro type. This is the smallest possible machine, and it is free. Accept all of the defaults until you come to the screen mentioning a key pair:
We will pick the name awskeys for the key pair. Then, click on the Create & Download your Key Pair button to download the awskeys.pem file. Save that file somewhere safe! This is the Secure Shell (SSH) key that will enable you to log in to your cloud machine. Accept the remaining defaults and your instance will launch.
You will now need to wait for about a minute for your instance to come up. Eventually, the instance will be shown in green with the status "running." Right-clicking on it and selecting the Connect option will bring up instructions on how to connect. The following will be a standard SSH command of the form:
ssh -i awskeys.pem [email protected]
Therefore, we will be calling the ssh command and passing it the key files that we downloaded earlier as the identity (using the -i option). We are logging in as user ec2-user at the machine with the address ec2-54-244-194-143.us-west-2.conompute.amazonaws.com. This address will, of course, be different in your case. If you choose another distribution for your instance, the username may also change. In any case, the web panel will give you the correct information.
Finally, if you are running an Unix-style operating system (including Mac OS), you may have to tweak its permissions by calling the following code:
chmod 600 awskeys.pem
This sets the read/write permission for the current user only. SSH will otherwise give you an ugly warning.
Now, you should be able to log in to your machine. If everything is OK, you should see the banner as shown in the following screenshot:
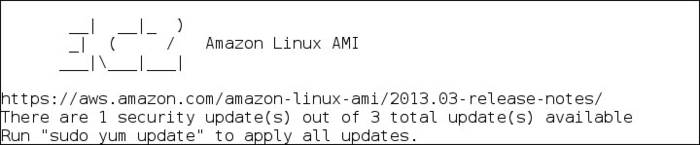
This is a regular Linux box where you have the sudo permission; you can run any command as the super user by prefixing it with sudo. You can run the update command it recommends to get your machine up to speed.
If you preferred another distribution, you can use your knowledge of that distribution to install Python, NumPy, and others. Here, we will do it on the standard Amazon distribution. We start by installing several basic Python packages as follows:
sudo yum -y install python-devel python-dev python-pip numpy scipy python-matplotlib
For compiling mahotas, we will also need a C++ compiler:
sudo yum -y install gcc-c++
In this system, pip is installed as python-pip. For convenience, we will use pip to upgrade itself. We will then use pip to install the necessary packages:
sudo pip-python install -U pip
sudo pip install scikit-learn jug mahotas
At this point, you can install any other package you like using pip.
We can now download the data and code from Chapter 10, Computer Vision–Pattern Recognition Finding Related Posts, as follows:
wget FIXME-LET'S-BUILD-A-TAR-GZ-PACKAGE
tar xzf chapter10.tar.gz
cd chapter10
Finally, we can do the following:
jug execute
This would work just fine, but we would have to wait a long time for the results. Our free tier machine (of type t1.micro) is not very fast and it only has a single processor. So we will upgrade our machine.
We go back to the EC2 console and right-click on the running instance to get the pop-up menu. We need to first stop the instance. Stopping an instance in a virtual machine is equivalent to powering it off. You can stop your machines at any time. At that point, you stop paying for them (you are still using disk space, which also has a cost that is billed separately).
Once the machine is stopped, the change instance type option becomes available. Now we can select a more powerful instance, for example, a c1.xlarge instance, which has eight cores. The machine is still off, so you need to start it again (the virtual equivalent to booting up).
Tip
AWS offers several instance types at different price points. Because this information is constantly being revised as more powerful options are introduced and prices are changed (generally getting cheaper), we cannot give you many details in this book; however, you can find the most up-to-date information on Amazon's website.
We need to wait for the instance to appear once again. Once it has, right-click on Connect as described earlier to get the connection information as it will almost surely have changed. When you change instance types, your instance will get a new address assigned to it.
With eight cores, you can run eight jug processes simultaneously, as illustrated in the following code:
jug execute &
jug execute &
    (repeat to get 8 jobs going)
Use jug status to check whether these eight jobs are in fact running. After your jobs are finished (which should now happen pretty fast), you can stop the machine and downgrade it again to a t1.micro instance to save money; the micro instance is free, while the extra large one costs 0.58 dollars per hour (as of April 2013—check the AWS website for up-to-date information).
As we just learned, we can spawn machines using the web interface, but it quickly becomes tedious and error prone. Fortunately, Amazon has an API. This means that we can write scripts which perform all the operations we discussed earlier automatically. Even better, others have already developed tools which can be used for mechanizing and automating many of the processes you want to perform with AWS.
A group at MIT developed exactly such a tool called starcluster. It happens to be a Python package, so you can install it with Python tools:
sudo pip install starcluster
You can run this from an Amazon machine or from your local machine. Either option will work.
We will need to specify what our cluster will look like. We do so by editing a configuration file. We generate a template configuration file by running the following code:
starcluster help
Then, pick the option for generating the configuration file in ~/.starcluster/config. Once this is done, we will manually edit it.
Tip
Keys, keys, and more keys
There are three completely different types of keys that are important when dealing with AWS:
- A standard username/password combination, which you use to log in to the website
- The SSH key system, which is a public/private key system implemented with files; with your public key file, you can log in to remote machines
- The AWS access key/secret key system, which is just a form of username/password, which allows you to have multiple users on the same account (including adding different permissions to each one, but we will not cover those advanced features in this book)
To look up our access/secret keys, we go back to the AWS console and click on our name in the top-right corner; then select Security Credentials. Now at the bottom of the screen, there should be our access key that may look something like AAKIIT7HHF6IUSN3OCAA, which we will use as an example in this chapter.
Now edit the configuration file. This is a standard .ini file: a text file where sections start by having their names in brackets and options are specified in the name=value format. The first section is the aws info section and you should copy and paste your keys there:
[aws info]
AWS_ACCESS_KEY_ID =  AAKIIT7HHF6IUSN3OCAA
AWS_SECRET_ACCESS_KEY = <your secret key>
Now, we come to the fun part that is defining a cluster. Starcluster allows you to define as many different clusters as you wish. The starting file has one called smallcluster. It is defined in the cluster smallcluster section. We will edit it to read as follows:
[cluster mycluster]
KEYNAME = mykey
CLUSTER_SIZE = 16
This changes the number of nodes to 16 instead of the default of two. We can additionally specify which type of instance each node will be and what the initial image is (remember, an image is the initial disk, which defines what operating system you will be running and what software is installed). Starcluster has a few predefined images, but you can also build your own.
We need to create a new ssh key with the following:
starcluster createkey mykey -o .ssh/mykey.rsa
Now that we have configured a 16 node cluster and set up the keys, let's try it out.
starcluster start mycluster
This may take a few minutes as it allocates 17 new machines. Why 17 when our cluster is only 16 nodes? We always have a master node. All of these nodes have the same filesystem, so anything we create on the master will also be seen by the slaves. This also means that we can use jug on these clusters.
These clusters can be used as you wish, but they come pre-equipped with a job queue engine, which makes them ideal for batch processing. The process of using them is simple:
- You log in to the master node.
- You prepare your scripts on the master (or better yet, have them prepared before hand).
- You submit jobs to the queue. A job can be any Unix command. The scheduler will find free nodes and run your job.
- You wait for the jobs to finish.
- You read the results on the master node. You can also now kill all the slave nodes to save money. In any case, do not forget that your system is running over the long term. Otherwise, this will cost you (in the dollars and cents meaning of the word).
We can log in to the master node with a single command:
starcluster sshmaster mycluster
We could also have looked up the address of the machine that was generated and used an ssh command as we did earlier, but when using the preceding command, it does not matter what the address was, as starcluster takes care of it behind the scenes for us.
As we said earlier, starcluster provides a batch queuing system for its clusters; you write a script to perform your actions, put it on the queue, and it will run in any available node.
At this point, you will need to repeat the actions to install the needed packages on the cluster. If this was a real project, we would set up a script to perform all the initialization for us, but since it is a tutorial, you should just run the installation steps again.
We can use the same jugfile.py system as before, except that now, instead of running it directly on the master, we schedule it on the cluster. First, write a very simple wrapper script:
#!/usr/bin/env bash
jug execute jugfile.py
Call it using run-jugfile.sh and use chmod +x run-jugfile.sh to give it an executable permission:
For c in 'seq 16'; do qsub run-jugfile.sh; done
This will create 16 jobs, each of which will run the run-jugfile.sh script, which will simply call jug. You can still use the master as you wish. In particular, you can at any moment run jug status and see the status of the computation. In fact, jug was developed in exactly such an environment, so it works very well in it.
Eventually, the computation will be finished and we can kill off all the nodes. Be sure to save the desired results somewhere and run the following:
starcluster terminate mycluster
Note that terminating will really destroy the filesystem and all your results. Of course, it is possible to change this default. You can have the cluster write to a filesystem which is not allocated and destroyed by starcluster but is available to you on a regular instance; in fact the flexibility of these tools is immense. However, these advanced manipulations could not all fit in this chapter.
Starcluster has excellent documentation online at http://star.mit.edu/cluster/, which you should read for more information about all the possibilities of this tool. We have seen only a small fraction of the functionality and used only the default settings here.