
A label is used to display text on screen. Let's create one and see its parameters.
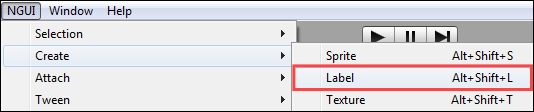
In order to create a label, navigate to NGUI | Create | Label, as shown in the following screenshot:
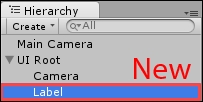
Look at your Hierarchy view; you'll see a new GameObject called Label, as shown in the following screenshot:
Great, we have a label in the scene. But nothing is displayed. Why? Because we have to choose with which font we want to render the text. Let's do that!
Select this new Label GameObject. Now, in your Inspector view, you'll see that it has a UILabel component attached to it as shown in the following screenshot:
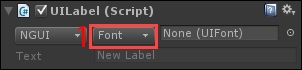
Currently, the Font field is set to None (UIFont). This means that no font is selected for this label. That's why most of its parameters are grayed out.
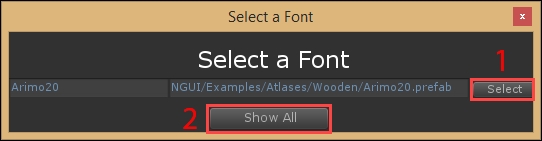
In order to select a font, click on the Font button (1) as shown in the preceding screenshot. By doing so, a new pop-up window appears, letting you choose a font by clicking on the Select button (1) in the next screenshot. For now, select the Arimo20 font, as shown in the following screenshot:
Once the font is selected, switch to the Game scene. You should see text like this:
It's great that we have our first NGUI text label. Now, we'll see how we can configure it.
The UILabel component attached to our new Label GameObject has some parameters. Let's see what they are and what they affect. The parameters are shown in the following screenshot:

- You can choose between two font types:
NGUI(Bitmap): This gives the best performance. The font can be embedded in an atlas, thus saving a draw call. Compatible with pre-rendered effects. It is necessary to have different font sizes to avoid pixelation with large text.Unity(Dynamic): This gives the best quality. These are flat, simple fonts. Increasing or reducing font size will never pixelate; the text will stay crispy. Will add one draw call for every different font displayed onscreen.
- Font Size: Select your font size here.
- Text: Enter the text to be displayed here.
- Overflow: This shows the following four different behaviors when text exceeds the allowed space:
ShrinkContent: Text size is shrunk to fit the label's dimensionsClampContent: Hide text that doesn't fit the label's dimensionsResizeFreely: Label's dimensions adapt to the textResizeHeight: Adjust label's height only if text overflows
- Alignment: Select the text alignment out of the following types:
Left,Center,Right, orJustifiedAutomatic: Takes the horizontal parameter of thePivot
- Gradient: This checkbox enables/disables the gradient effect on this label. Top and Bottom parameters let you choose the two colors for the gradient.
- Effect: From the following, add a nice effect to your text label:
- None: No effect—best performance.
- Shadow: This has a shadow effect. This increases performance cost slightly by doubling the amount of triangles required to display the label.
- Outline: This has an outline effect. This impacts performance by multiplying the number of triangles for this label by five; use with caution.
- Color: This is the color of the selected effect.
- X, Y: This shows how far in pixels the effect is from the text. These offsets are relative from the top-left corner of the label; positive values for X and Y will place the effect on the right and bottom respectively, while negative values will set it on the left and top of the label.
- Outline 8: Outline effect that looks better on very small fonts. Impacts performance by multiplying the number of triangles for this label by 8; use only if Normal outline doesn't look good.
- Float Spacing: By default, a label's spacing is defined by integers to make sure the characters can be snapped to pixels and remain pixel-perfect. This option overrides the spacing to be defined with
floatvalues to let you have smaller steps. If you wish to create an expansion text animation by changing the X spacing from-10to0, it will be smoother with this option enabled. - Spacing: This is the distance in pixels between each character for both X and Y.
- MaxLines: This it the maximum number of lines. Set it to
0for unlimited. - BBCode: This enables/disables
BBCodein labels. For example:[FF0000]Red [-]Back to previous color [b]Bold[/b], [s]Strikethrough[/s], [u]Underline[/u] [url=http://google.fr/][u]Link[/u][/url]
- Color Tint: Set here a global color tint for the entire label's characters.
Tip
In order to have a nice result with gradients, I recommend that you always leave the gradient colors as grayscale colors and change the label's color tint to give color to it. If specific words must ignore the label's color tint defined in the Inspector, you can simply use
[c]keyword[/c]asBBCode.
We've reviewed the label's parameters. Let's configure them so they look good!
Before we study more parameters, let's configure this label correctly for later! Please set its parameters as shown in the following screenshot (changes are highlighted in the screenshot):
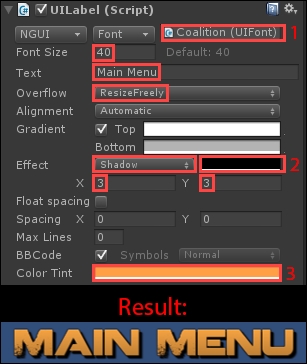
- In order to find the Coalition font, click on the Font button next to the font field, and then click on the Show All button in the font selection window.
- Effect: Set a Shadow effect with X and Y values of 3. Leave the shadow's color black.
- Set these values for the Color Tint: (R: 255, G: 170, B: 70, A: 255).
Ok, our label is configured. Below these parameters, you might have noticed more Widget parameters. We are now ready to see what they are.