
NGUI has a built-in localization system that allows you to easily define strings for each label in different languages.
The localization system works with a Localization.txt file with this structure:
KEY,English,Francais
For example, if we wanted to localize our main menu's title, we would add this line in the Localization.txt file:
MainMenu_Title, "Main Menu", "Menu Principal"
Let's create this localization file. Navigate to your project's Assets folder and create a new Resources folder. Inside this new folder, create a new Localization.txt file and open it. Add these lines in it:
KEY,English,Francais
Francais, "French", "Francais"
English, "English", "Anglais"
MainMenu, "Main Menu", "Menu Principal"
On the first highlighted line, we define our two languages. The next three lines define our localization keys and their two different values: one in English and the other in French.
OK, the localization file is ready. Now, let's see how to assign a key to a label.
In order to easily localize a label, we can simply add the UILocalize component to it. Let's see how this works:
- Select our
UI Root|Main|Title|LabelGameObject. - In the Inspector view, click on the Add Component button.
- Type
locto search for components with that word. - Select Localize and hit Enter or click on it with your mouse.
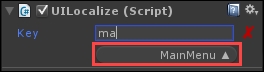
We have added the UILocalize component to our label. It has only one Key parameter. Start typing the first two letters of MainMenu in the Key field. This button will appear:
It's an auto-completion. Click on it. You now have this preview for each language:
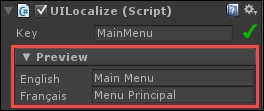
We just assigned the MainMenu localization key to our label. The label's text value will be changed depending on the current language. Let's see how to define the language.
There is a simple way to select the current language for our UI: we just have to add the Language Selection component to our language pop-up list!
Let's do it now:
- In the Hierarchy view, select
UI Root|Options|Language|List. - In the Inspector view, click on the Add Component button.
- Type
langto search for components with that word. - Select Language Selection and hit Enter or click on it with your mouse.
And that's it! Hit Unity's play button. You can see that if you change the game's language with the pop-up list, the main menu's title changes accordingly!
Now, let's add all these remaining keys for our menu to our Localization.txt file:
Play, "Play", "Jouer"
Options, "Options", "Options"
Exit, "Exit", "Quitter"
Language, "Language", "Langue"
Subtitles, "Subtitles", "Sous-titrage"
Nickname, "Nickname", "Pseudo"
Confirm, "Confirm", "Confirmer"
Sound, "Sound", "Son"
Volume, "Volume", "Volume"
SFX, "SFX", "Effets"
Music, "Music", "Musique"
Enabled, "Enabled", "Activé"
None, "None", "Aucun"
Welcome, "Welcome! You can change language, subtitles, volume and enter your name on the Options page.", "Bienvenue ! Tu peux changer la langue, les sous-titres et entrer ton pseudo dans les Options."
Now that we've added all necessary keys, we need to add the UILocalize component to all labels in the scene. If you have named all GameObjects as recommended in previous chapters, all labels that require localization are named Label. Let's do a search for label, as follows:
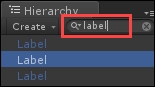
Now, only GameObjects with their name containing the word label are displayed. We must add the UILocalize component to all of them:
- Select one of the GameObjects in the Hierarchy view to have it focused.
- Select all displayed results with Ctrl + A.
- In the Inspector view, click on the Add Component button.
- Type
locto search for components with that word. - Select Localize and hit Enter or click on it with your mouse.
So, we now have added the UILocalize component to all required labels. Normally, we should set a Key parameter for each of them to know which string to retrieve.
Fortunately for us, since we've entered text values in the Text parameters of UILabel, they will be automatically used by the UILocalize component to find the correct string.
In other words, you can simply hit Unity's play button, and you'll find that all our UI's labels are now localized! Great!
We still have three small tasks to finalize our UI's localization. First, since we have already localized the main menu's title, it now has two UILocalize components. Before we continue, select UI Root | Main | Title | Label and remove its second UILocalize.
The welcome text is not localized. That's because the Key parameter is automatically set to the actual welcome phrase we entered in UILabel. We must manually set it to Welcome:
- Select
UI Root|Welcome|Text|Label. - Set the Key parameter of
UILocalizetoWelcome.
Finally, our Subtitles pop-up list is not localized. We simply have to request that:
- Select
UI Root|Options|Subtitles|List. - Check the Localized option of
UIPopup List.
That's it! Now that all our UI is localized, let's talk about anchors before we move on to the next chapter.