
Unity Remote, sometimes called Unity Remote 4, allows you to use your target device as a remote control for your project within Unity Editor. It's a huge time-saver since you no longer have to build and run on your device at each change you make.
The Game view is streamed to your device's screen, while the touch input, accelerometer, gyroscope, and device camera streams are streamed back to the editor.
Of course, you should still build and run regularly on your device to detect performance issues early and test your game with the real feel and reactivity.
Unity Remote requires that you connect your device to your computer via USB while it's running the Unity Remote 4 app. It works both for Android and iOS, on Windows or OSX. For iOS devices, the iTunes software must be installed.
First, you must download and install the Unity Remote 4 app on your device from the following links:
- Android: http://goo.gl/Q7rZ19
- iOS: http://goo.gl/U7eMCz
Download and install the corresponding app on your device, and then we can move on to setting up the remote.
Once you have installed the Unity Remote 4 app on your device, follow these steps:
- Launch the Unity Remote 4 app on your device.
- Connect your device to your computer through a USB.
- In Unity, navigate to Edit | Project Settings | Editor.
- Under Unity Remote, select which device to use, either Any Android Device or Any iOS Device.
- Save the scene and project.
- Restart Unity 3D.
- Hit Unity's play button.
And that's it. Your game view is now streamed to the device! The visual content is a compressed stream—so the quality isn't exceptional and the resolution is poor:
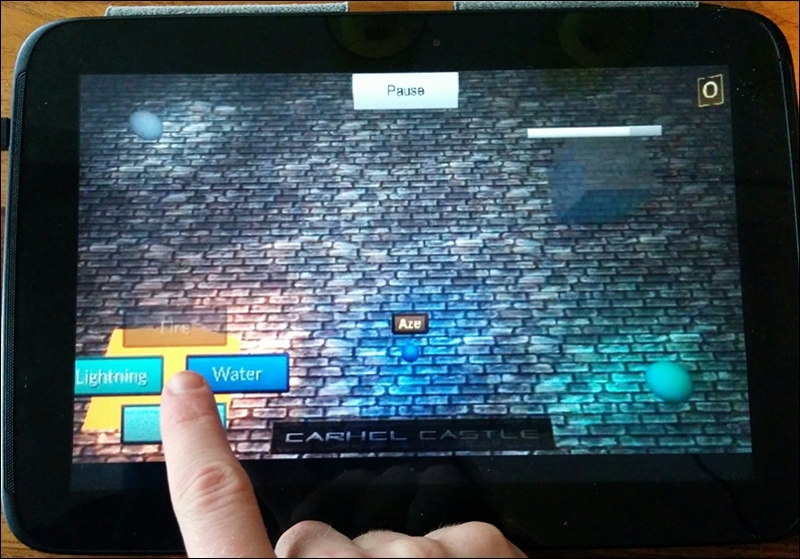
That's normal, and there's nothing we can do about it, but it's enough for testing and debugging purposes.
With our game's current code, the game cannot be tested through Unity Remote because within the editor, the game works with mouse clicks instead of touches. You can change that by removing these lines from the ApproachOnClick.cs script:
// If we're in the editor
if(Application.isEditor)
{
  // Set idToCheck to left click
  idToCheck = -1;
}
Also, remove these lines from the PowerSource.cs script:
//If in editor
if(Application.isEditor)
{
  // If it's a right click
  if(UICamera.currentTouchID == -2 && available)
  {
    // Request to display the elemental switch
    GameManager.Instance.ShowElementalSwitch(transform);
  }
}
// If we're on the final build
else
{
Finally, you must remove the closing bracket of the highlighted else statement to avoid a syntax error.
After applying these code modifications, the game runs in the editor as if it were the final build, taking touches into account, and is fully testable through Unity Remote!
Ok, it's time to talk about performance now. That's where the profiler comes in.