
In this chapter, we will talk about C# scripting with NGUI. We will learn how to handle events and interact with them through code. We'll use them to:
- Play tweens with effects through code
- Implement a localized tooltip system
- Localize labels through code
- Assign callback methods to events using both code and the Inspector view
- Add keyboard keys and controller navigation
- Save user interface options like checkboxes, sliders and popup lists states
- Create a singleton pattern to have a persistent UI through scene changing
We'll learn many more useful C# tips throughout the book. Right now, let's start with events and their associated methods.
When scripting in C# with the NGUI plugin, some methods will often be used. For example, you will regularly need to know if an object is currently hovered upon, pressed, or clicked. Of course, you could code your own system—but NGUI handles that very well, and it's important to use it at its full potential in order to gain development time.
When you create and attach a script to an object that has a collider on it (for example, a button or a 3D object), you can add the following useful methods within the script to catch events:
OnHover(bool state): This method is called when the object is hovered or unhovered. Thestatebool gives the hover state; ifstateistrue, the cursor just entered the object's collider. Ifstateisfalse, the cursor has just left the collider's bounds.OnPress(bool state): This method works in the exact same way as the previousOnHover()method, except it is called when the object is pressed. It also works for touch-enabled devices. If you need to know which mouse button was used to press the object, use theUICamera.currentTouchIDvariable; if thisintis equal to-1, it's a left-click. If it's equal to-2, it's a right-click. Finally, if it's equal to-3, it's a middle-click.OnClick(): This method is similar toOnPress(), except that this method is exclusively called when the click is validated, meaning when anOnPress(true)event occurs followed by anOnPress(false)event. It works with mouse click and touch (tap).OnDrag(Vector2 delta): This method is called at each frame when the mouse or touch moves between theOnPress(true)andOnPress(false)events. TheVector2deltaargument gives you the object's movement since the last frame.OnDrop(GameObject droppedObj): This method is called when an object is dropped on the GameObject on which this script is attached. The dropped GameObject is passed as thedroppedObjparameter.OnSelect(): This method is called when the user clicks on the object. It will not be called again until another object is clicked on or the object is deselected (click on empty space).OnTooltip(bool state): This method is called when the cursor is over the object for more than the duration defined by the Tooltip Delay inspector parameter ofUICamera. If the Sticky Tooltip option ofUICamerais checked, the tooltip remains visible until the cursor moves outside the collider; otherwise, it disappears as soon as the cursor moves.OnScroll(float delta): This method is called when the mouse's scroll wheel is moved while the object is hovered—the delta parameter gives you the amount and direction of the scroll.
Now that we've seen the available event methods, let's see how they are used in a simple example.
To illustrate when these events occur and how to catch them, you can create a new EventTester.cs script with the following code:
void OnHover(bool state)
{
  Debug.Log(this.name + " Hover: " + state);
}

void OnPress(bool state)
{
  Debug.Log(this.name + " Pressed: " + state);
}

void OnClick()
{
  Debug.Log(this.name + " Clicked");
}

void OnDrag(Vector2 delta)
{
  Debug.Log(this.name + " Drag: " + delta);
}

void OnDrop(GameObject droppedObject)
{
  Debug.Log(droppedObject.name + " dropped on " + this.name);
}

void OnSelect(bool state)
{
  Debug.Log(this.name + " Selected: " + state);
}

void OnTooltip(bool state)
{
  Debug.Log("Show " + this.name + "'s Tooltip: " + state);
}

void OnScroll(float delta)
{
  Debug.Log("Scroll of " + delta + " on " + this.name);
}
The above highlighted lines are the event methods we discussed, implemented with their respective necessary arguments.
Attach our Event Tester component now to any GameObject with a collider, like our Main | Buttons | Play button. Hit Unity's play button. From now on, events that occur on the object they're attached to are now tracked in the Console output:
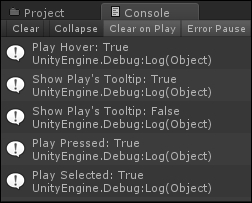
I recommend that you keep the EventTester.cs script in a handy file directory as a reminder for available event methods in the future. Indeed, for each event, you can simply replace the Debug.Log() lines with the instructions you need.
Now we know how to catch events through code. Let's use them to display a tooltip!