
Dragging elements can be very useful and intuitive. That's where the UIDragObject component comes in handy.
UIDragObject easily makes any UI element or other GameObject in the scene draggable with both mouse and touch.
Just like all NGUI interactive components, it requires a collider to detect the mouse or touches. That collider defines the area in which the player must click to start the drag.
Let's add the
UIDragObject and Box Collider components to our two windows. In Hierarchy, select both our UI Root | Main and Options GameObjects, and then:
- Click on the Add Component button.
- Type
objectwith your keyboard to search for components with that word. - Select Drag Object and hit Enter or click on it with your mouse.
- Click once again on the Add Component button.
- Type
boxwith your keyboard to search for components with that word. - Select Box Collider and hit Enter or click on it with your mouse.
OK, we've just added the UIDragObject and Box Collider components to our main menu and options windows. First, let's configure Box Collider so that the area initiating the window drag corresponds to the title bar.
With both Main and Options GameObjects selected, set the following parameters:
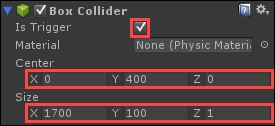
OK, the colliders are configured to fit the title bar for both windows. Let's see what the UIDragObject parameters are.
Now added to our windows, the UIDrag Object component has six parameters, as follows:

- Target: Drag here the target GameObject you want to be dragged.
- Movement: Drag movement factor for each axis. A value of 0 disables movement for the concerned axis.
- Scroll Wheel: This is the movement factor for each axis when the player uses the scroll wheel while the attached collider is hovered.
- Drag Effect: Choose one of these three drag effect behaviors:
None: No effect, simple, and rough drag.Momentum: The object is subject to inertia and decelerates smoothly when it's dropped. It cannot go outside its container.Momentum and Spring: When the window is dropped outside the screen or container it is constrained in, it will return smoothly within its authorized area.
- Momentum: This is the momentum amount. The higher the momentum, the more inertia it will have.
- Keep Visible: Check this option to limit movement within an area.
- Content Rect: This only appears if Keep Visible is checked. Drag here any other UI element that has
Sizedefined to define the dragged object's bounds. If this parameter is left to None (UI Rect), the dragged object will be constrained to remain onscreen. - Panel Region: This only appears if Keep Visible is checked. Drag here the panel that must act as the container for this draggable element. The corresponding
UIPanelshould have clipping enabled or set toConstrain But Dont Clip.
Now, let's configure them to enable drag on both windows.
Let's configure our UIDrag Object components to enable drag on our windows:
- Select our
MainGameObject. For its attachedUIDrag Object:- Drag it (the
MainGameObject) inside the Target field - Check the Keep Visible option
- Drag it (the
- Select our
OptionsGameObject. For its attachedUIDrag Object:- Drag it (the
OptionsGameObject) inside the Target field - Check the Keep Visible option
- Drag it (the
Hit Unity's play button. You can now drag both windows by clicking on their title! We have checked Keep Visible and left its Content Rect to None, so when you drop the window out of the screen, it smoothly comes back.
We have a slight glitch right now. If you drag-and-drop the window far from the center and hit the options button, you'll see that our main menu jumps to the center of the screen. That's because the tween's From position is always set to {0, 0, 0}.
To resolve that issue, we simply have to update the From position to be the same as the window's current position.
The Tween Position component has a SetStartToCurrentValue() method that we can call when the appropriate buttons are clicked.
Select our UI Root | Main | Buttons | Options GameObject, and configure the On Click event for its attached UIButton component, as follows:
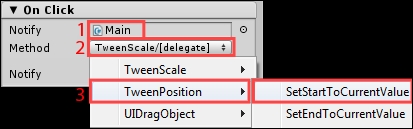
- Drag the
UI Root|MainGameObject in the Notify field. - Click on the Method dropdown list.
- Select the TweenPosition | SetStartToCurrentValue method.
Let's do the same for our options' Confirm button, but this time updating the tween's end instead of the start position:
Select the Options | Confirm button. For On Click of UIButton event:
- Drag the
UI Root|OptionsGameObject in the Notify field. - Click on the Method drop-down list.
- Select the TweenPosition | SetEndToCurrentValue method.
Hit Unity's play button. Now, both windows' positions are updated before the tween's start, making them stay where the player moved them as if they were saved. Great!
Now, let's move on to see how we can create scrollable text.