
When using bitmap fonts, it is necessary to create fonts of different text sizes. Otherwise, we'll run into the following issue:
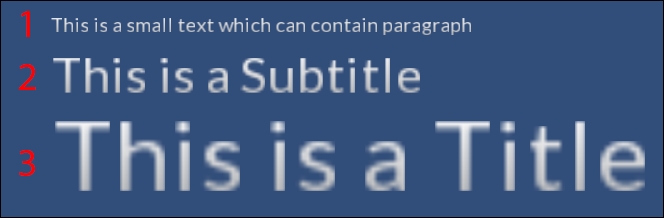
As you might notice from the preceding screenshot, the text is crisp for small text (1), but for a large title (3), it becomes aliased, blurry, and looks terrible. So, we need bigger fonts for larger text sizes. In this section, we'll create three different fonts of typical sizes.
Follow these steps to create the standard definition font used for small text. Open Font Maker by navigating to NGUI | Open | Font Maker.
Configure Font Maker as follows:

- Make sure Type (1) is set to Generated Bitmap.
- Click on the Source button (2) of Font Maker:
- If needed, click on the Show All button of the window to show all fonts
- Select the Lato.ttf font
- Set Size (3) to 30.
- Set the Characters set to Latin to support special characters.
- Click on the Atlas button (4) of Font Maker:
- If needed, click on the Show All button of the window to show all atlases
- Select the Game atlas
- Click on the Create the Font button (6).
- Within the window that appears, go to
Assets/Resources/Fonts. - Enter
SmallLatofor the new font's name. - Click on the window's Save button.
Okay. We now have a SmallLato font, which will be used for normal text. We can move on to creating an intermediate font, which will be called MediumLato.
Follow these steps to create the medium size font, which can be used for small titles. Open Font Maker by navigating to NGUI | Open | Font Maker. Then, perform the following steps:
- Make sure that Type is set to Generated Bitmap.
- Click on the Source button of Font Maker:
- If needed, click on the Show All button to show all fonts
- Select the Lato.ttf font
- Set Size to 60.
- Click on the Atlas button of Font Maker:
- If needed, click on the Show All button to show all atlases
- Select the Game atlas
- Click on the Create the Font button.
- Within the window that appears, go to
Assets/Resources/Fonts. - Enter
MediumLatofor the new font's name. - Click on the window's Save button.
Okay. We now have a MediumLato font, which will be used for small titles and notification texts for example. We can finally create a large font for big titles.
Finally, follow these steps to create the large size font, which can be used for large titles. Open Font Maker by navigating to NGUI | Open | Font Maker. Then, perform the following steps:
- Make sure that Type is set to Generated Bitmap.
- Click on the Source button of Font Maker:
- If needed, click on the Show All button to show all fonts
- Select the Lato.ttf font
- Set Size to 100.
- Click on the Atlas button of Font Maker:
- If needed, click on the Show All button to show all atlases
- Select the Game atlas
- Click on the Create the Font button.
- Within the window that appears, go to
Assets/Resources/Fonts. - Enter
LargeLatofor the new font's name. - Click on the window's Save button.
The LargeLato font is now ready to display large titles. Let's create labels and see how they look.
We will now create three labels to try out our three different font sizes:
- Select our
UI RootGameObject. - Create a new label with Alt + Shift + L.
- Select our new
LabelGameObject, and then:- Rename it new to
SmallText - Set its font type to NGUI with the SmallLato font
- Set its Size value to
30 - Set its Overflow parameter to ResizeFreely
- Change its text to
This is a small paragraph text - Change Alignment to Center
- Set Pivot to center (middle bar + middle bar)
- Rename it new to
- Change its Transform position to {
0,-315,0}. - Set Anchors Type to Unified.
- Drag our
UI RootGameObject in its Target field.
Good. The small text displayed looks good and remains crisp on any kind of aspect ratio or resolution. Let's try out the intermediate size now:
- Select our
UI Root|SmallTextGameObject. - Duplicate it with Ctrl + D.
- Rename this new duplicate to
MediumText, and then:- Change Font to the MediumLato font
- Set Size to
60 - Set Anchors Type to None
- Set its Overflow parameter to ResizeFreely
- Change its text to
Medium Title
- Change its Transform position to {
0,240,0}. - Set back Anchors Type to Unified.
Good. The medium title that we've added looks crisp too. Let's see for the large title now:
- Select our
UI Root|SmallTextGameObject. - Duplicate it with Ctrl + D.
- Rename this new duplicate to
LargeText, and then:- Set Size to
100 - Set Anchors Type to None
- Set its Overflow parameter to ResizeFreely
- Change its text to
Large Title
- Set Size to
- Change its Transform position to {
0,335,0}. - Set back Anchors Type to Unified.
For now, we have left the SmallLato font, so it should look blurry and aliased like this:

As you can see in the preceding screenshot, the font doesn't look good for now. Let's change it for the LargeLato font now:
- Select our
UI Root|LargeTextGameObject. - Change Font to the LargeLato font.
And that's it! We now have a beautiful and crisp large title without aliasing:

Great! Now that we have experimented multiple bitmap font sizes and know how to avoid pixelation, we can move on to learn about multiple atlases.