
The fonts used for our UI are default NGUI bitmap fonts. With NGUI, it is possible to import any other custom font—in either bitmap or dynamic format. We'll see how we can do both using Font Maker and fonts from our Assets.zip file.
Within the .zip file, two new fonts were included and added to the Assets/Resources/Fonts folder. We'll use Gooddog as the dynamic font and Lato as the bitmap font. Let's start with dynamic fonts since they are easy to use.
Tip
If you need fonts, you can download them from www.fontsquirrel.com, www.google.com/fonts, or www.dafont.com.
Dynamic fonts can be displayed at any size and remain crisp without pixelation. Since they are not contained in any atlas, using them in the scene adds at least one draw call.
They use the .ttf or .otf font source file—no manipulation is required: you simply have to add them to your Assets folder, and they will be automatically added to the font selection window for your labels. We'll use a dynamic font now.
Navigate to UI Root | Main | Buttons | Play | Label. For its attached UI Label component:
- Click on the NGUI button, and change the type to Unity.
- Click on the Font button.
- On the font -election window, click on the Show All button.
- Select the GoodDog.otf font that just appeared.
- Change Font Size to 80.
- Change the Effect parameter from None to Outline.
- Make sure the color of Outline is set to black.
- Set both Outline option's X and Y values to
1.
You should now have a Play button that looks like this with the new font:
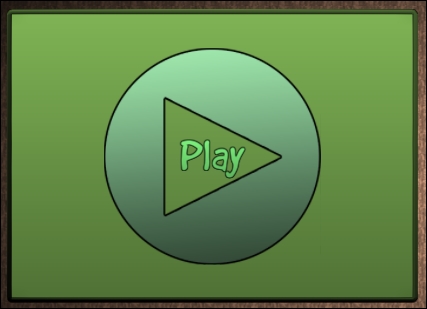
As you can see, dynamic fonts are easily imported; we simply refreshed the font list in the font selection window, and our new font appeared. Now, we'll see how we can create a bitmap font.
Bitmap fonts are contained in an atlas, resulting in no supplementary draw call when rendered—considering the atlas is already used at least once in the scene, by displaying a sprite for example.
All characters are contained in a sprite within the atlas; we'll use Font Maker to create this sprite and add it to our Game atlas.
We need to convert a dynamic font into a bitmap font using
Font Maker. This tool adds each of the fonts' characters into a single sprite within the atlas. We'll use it to convert the Lato.otf dynamic font into a bitmap font contained within our Game atlas.
The NGUI plugin comes with Font Maker. This tool helps us create new fonts by creating a font prefab from a source font file. This resulting font prefab has the UIFont component attached to it and is also naturally called UIFont.
Open it by navigating to NGUI | Open | Font Maker, or with a right-click in the Project view and navigating to NGUI | Open Bitmap Font Maker. The following window appears:
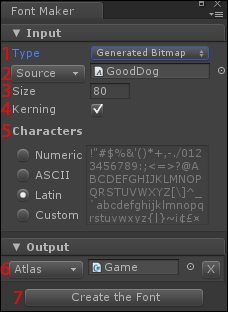
Let's see what the parameters of Font Maker are:
- Type: Select one of the three input types to create a new font prefab:
Generated Bitmap: In this mode, the bitmap font will be created from an existing dynamic font.Imported Bitmap: In this mode, the bitmap font will be created from a specific bitmap and.FNTfiles, which can be generated with a software such as BMFont or GlyphDesigner.Dynamic: In this mode, the output file is a dynamic font prefab. As we have seen with theGoodDogfont, it is not necessary to create a font prefab for dynamic fonts—you can reference it directly onUILabel.
- Source: Choose here the source font file to convert.
- Size: Since it will be a bitmap font, it will have a specific default font size. Remember that increasing the label's font size over its default value will result in text pixelation.
- Kerning: Import kerning values from the font. Check this if you want to import the font's specific amount by which to adjust the cursor position given the previous character.
- Characters: Select one of the available characters' sets to import. You can also select
Customand only import the ones you specify. - Atlas: Select here the atlas that will contain your font's characters.
- Create the Font: Clicking this button will open a browser window for you to save the output font prefab at your desired location.
Now that we've seen the Font Maker parameters, let's create our first bitmap font:
- Set the Font Maker Input Type to Generated
Bitmap. - Click on the Source button, and select the
Lato.ttffont file as source. - Set Size to
50. - Check the Kerning option to import character-spacing values.
- Change the characters type to Latin in order to have special characters.
- For the output, click on the Atlas button, and select our Game atlas.
- Click on the Create the Font button.
- In the save as window, access the
Assets/Resources/Fontsfolder. - Enter the name
Lato, and click on the Save button.
That's it. The Lato font prefab has appeared in the Resources/Fonts folder and is automatically selected. The Game atlas now has a Lato sprite containing all characters.
You can also notice that in the Inspector view, our new font prefab has the UIFont component attached to it. It has been automatically configured for us.
The new Lato font prefab we just created has the UIFont component attached to it, as shown in the following screenshot:
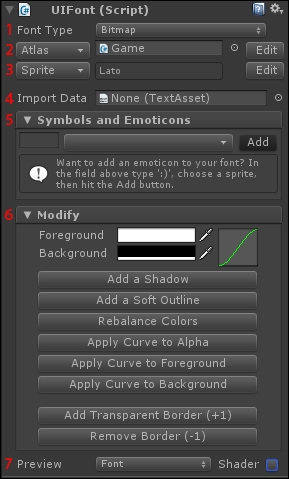
Its role is to have all necessary elements to print text. Let's see its parameters, which are as follows:
- Font Type: Select the appropriate type for this font prefab.
Bitmap: Suitable for thisLatobitmap font.Reference: This means this font will point to another one. For example, thisLatofont could initially point to anotherLato_HDfont with a size of 70 for high resolution mobile devices, and you could easily switch to theLato_SDfont of size 30 if you're on a small resolution mobile device.Dynamic: This is suitable for theGoodDogdynamic font we used previously.
- Atlas: You must indicate here in which atlas the font's bitmap is stored.
- Sprite: Select here the bitmap font's sprite containing all characters.
- Import Data: If you use Glyph Designer or BMFont to create your font, drag the exported
.FNTfile here to import font data. - Symbols and Emoticons: Use these fields to add emoticons to your font. Simply enter characters in the first field, and select a sprite with the button. Finally, click on the Add button, and you're done!
- Modify: Similar to what we did with sprites, you can add effects to your fonts, such as a
Shadow,Outline, and more. - Preview: Select here what you want to see in the preview window at the bottom of the Inspector view: nothing (
None), theFont, or the entireAtlas.
Ok, we've understood how the font prefab works. Let's use our new font.
Tip
You can use BMFont (free) Glyph Designer (paid) to import/create your own bitmap font characters and edit them. These pieces of software also let you edit the characters' sprite so that you can integrate effects and edit characters one by one through image processing software, such as Adobe Photoshop.
Now that we have our new Lato font, let's apply it to our tooltip's label:
- Select the
UI Root|Tooltip|LabelGameObject. - Click on the Font button and select our new Lato font.
- Set Font Size to
50to match theLatofont size.
That's it! We now have our tooltip with our newly added Lato font. Now, we can discuss how to display large textures, which aren't stored within our atlases.