
Our windows are draggable pop ups; we should add a close button in the top-right corner:

In order to do this quickly and easily, we can use a component called UIForward Events. It's a legacy component—it is now recommended that you use UIEvent Trigger instead. We'll try both because it's good that you understand how they work.
Before we continue, let's create the close button for our main menu:
- Select our
UI Root|Main|Buttons|ExitGameObject. - Hit Ctrl + D to duplicate it.
- Rename the new duplicate to
Close. - Remove its attached
UIPlay Tweencomponent. - Change the
UISpriteSize to 100 x 100. - Set its Transform position to {800, 400, 0}.
- Select our
UI Root|Main|Buttons|Close|LabelGameObject. - Rename it to
X. - Set its
UILabelText to a lowercasexcharacter to look like a cross. - Change its
UILabelFont Size to 55.
The close button is ready. Let's see how the UIForward Events component works.
This (legacy) component is very simple to use. You just have to select which events you want to forward to another target GameObject.
Let's create the close button for our main menu:
- Select our
UI Root|Main|Buttons|Closebutton GameObject. - In the Inspector view, click on the Add Component button.
- Type
forwardto search for components with that word. - Select Forward Events (Legacy) and hit Enter.
We've added the Forward Events component to the close button. Configure it like this:
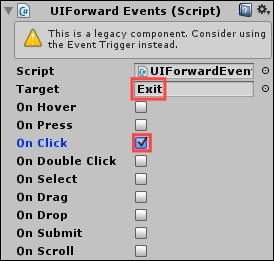
In this configuration, we've dragged our main menu's Exit button in the Target field and checked the On Click option.
Consequently, when the Close button is clicked, the OnClick() event is forwarded to our Exit button.
If you hit Unity's
play button and click on the Close button (cross), you'll see that it's exactly the same as if you clicked on the Exit button. That's an easy event forwarding!
The UIEvent Trigger component gives us the possibility of notifying (call functions within) other components when an event occurs on the object it's attached to.
Currently, we have a slight problem with our input field for the nickname: the entered name is only saved when the user hits the Enter key. To be honest, most of our players won't do that. We need the nickname saved even if the Enter key is not pressed.
In order to do that, we can request UIInput to save its value when it's deselected.
Let's use the UIEvent Trigger component to force-save the input:
- In the Hierarchy view, select
Options|Nickname|Input. - In the Inspector view, click on the Add Component button.
- Type
triggerto search for components with that word. - Select Event Trigger and hit Enter or click on it with your mouse.
Configure the new UIEvent Trigger component like this:
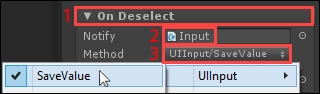
- Click on the On Deselect parameters group to show it.
- Drag our
Nickname|Inputchild GameObject in the Notify field. - Select the UIInput | SaveValue method for the Method field.
Hit Unity's play button. If you enter a nickname and click anywhere else, such as on the Confirm or the Close button, you'll see that the nickname is still saved. We successfully force-saved the input's value using the UITrigger Event component. It's time to see how NGUI's localization system works.