
Now that our main menu appears smoothly, let's make sure it disappears smoothly before it exits the game.
In order to make this window scale down, we can simply request the tween to play in reverse. That's where the UIPlay Tween component comes in: it lets us play any other tween in the scene on a specified event, with different behaviors.
Add the UIPlay Tween
component to our Exit button:
- In Hierarchy, select our
Button|ExitGameObject. - Click on the Add Component button.
- Type
playwith your keyboard to search for components with that word. - Select Play Tween
Ok, we just added the UIPlay Tween component to our exit button. Let's see what its parameters are before we configure it.
Now added to our exit button, the UIPlay Tween component has nine parameters, as shown in the following screenshot:
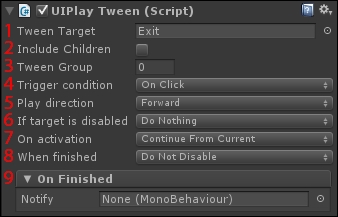
- Tween Target: Drag here the GameObject on which your tween component is attached.
- Include Children: If checked, the
Play Tweenwill search for tween components in the Tween Target children and play them too. - Tween Group: Specify which tween group you want to play on the target. All tween components with this group ID found on the target will be played.
- Trigger condition: Here, you can choose on which condition you want to play the target's tween.
- Play direction: Select one of these three play direction behaviors:
Toggle: Tween is played in the opposite direction each timeForward: The tween will only play in a forward directionReverse: The tween will only be played in reverse
- If target is disabled: Choose what to do if the Tween Target (1) is disabled:
- On activation: This is the behavior if the tween is already playing on target:
Continue From Current: Continue playing the current tweenRestart Tween: Interrupt current tween and restart it nowRestartIfNotPlaying: Restart the tween only if it's not playing
- When finished: Choose a behavior for when the tween is finished:
Do Not Disable: When the tween is finished, nothing happensDisable After Forward: Disable the target at the end of the tween when played in a forward directionDisable After Reverse: Disable the target when the tween ends when played in reverse
- On Finished: Choose here which method to call when the tween is finished.
Now, we can configure it to request the main menu window to play Tween Scale in the reverse direction to make it disappear on click.
Set our Exit GameObject's UIPlay Tween parameters as follows:
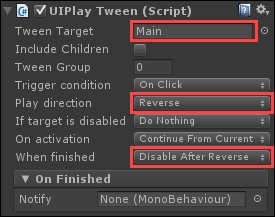
We can see that our UIPlay Tween on our Exit button requests our Main GameObject to play in Reverse its attached tweens of group 0. Also, the target (Main), will be disabled automatically when the tween finishes.
Hit Unity's
play button. Now, our main menu window scales down from {1, 1, 1} to {0, 0, 0} when the Exit button is clicked!
OK. Now, let's make sure we quit the game when the tween is finished.
For the game to exit, we will create a new C# script called MenuManager.cs in which an Exit() function will be added. This new Exit() method will be called at the end of the tween we just created.
Let's start by creating a new MenuManager.cs script that will hold useful methods:
- Select our
UI RootGameObject. - In the Hierarchy view, click the Add Component button.
- Type
MenuManageron your keyboard. No match will be found. - With the New Script option selected, hit Enter on your keyboard.
- In the next dialog box, make sure Language is in CSharp and hit Enter.
OK, now open our new MenuManager.cs script, and add this new Exit() method:
// Method called when we want to exit
public void Exit ()
{
  // If currently in Unity Editor
  #if UNITY_EDITOR
  // Stop play mode
  UnityEditor.EditorApplication.isPlaying = false;
  #endif
  // Exit the game
  Application.Quit();
}
This Exit()
method exits the game on its last line. The fourth—highlighted—line of code is only executed in Unity Editor. It makes sure the editor stops playing so that we still have feedback without having to build to check if the Exit() method works.
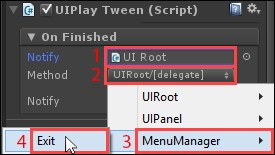
Now that we have our Exit() function, let's link it to the tween's OnFinished event:
- Select our
Exitbutton. - Drag our
UI RootGameObject in the OnFinished event's Notify field.
Now that we have dragged a GameObject in the Notify field, we can select which method to assign within its attached components. Select the Exit method of MenuManager:
Hit Unity's play button. As soon as the Exit button is pressed, the window disappears and the Exit()
method is called at the end of the tween, exiting the game or play mode! Now, let's move on to see how we can show the options.