
Now, we want to show the options page when the Options button is clicked. In order to do that, we will move the main menu towards the left and disable it when it's offscreen. Simultaneously, the options window will appear from the right part of the screen.
The
Tween Position component will help us to move these windows around smoothly. It works in a way similar to that of the Tween Scale component.
Add the
Tween Position component to our main menu window:
- In Hierarchy, select our
UI Root|MainGameObject. - At the bottom of the Inspector view, click on the Add Component button.
- Type
positionto search for components with that word. - Select the Tween Position and hit Enter or click on it with your mouse.
OK, we've just added the Tween Position component to our main menu window. I won't detail its parameters because they are exactly the same as the Tween Scale component, except that the From and To parameters are local positions instead of local scale coordinates. Let's move on to configuring it to hide our main menu.
We need to configure this new Tween Position component to make it move our Main GameObject offscreen. A position of {-2000, 0, 0} will work.
Select our Main GameObject and set its Tween Position component to these values:
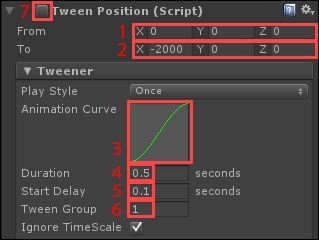
- Leave the From values at {0, 0, 0}.
- Set the To values to {-2000, 0, 0}.
- Change Animation Curve to have a smooth start and end:
- Click on the default linear animation curve (3).
- The Curve editing window appears.
- At the bottom of the window, you'll find curve presets. Click on the one that matches the one in the previous image (3).
- Close the Curve editing window.
- Set Duration to 0.5 seconds.
- Change Start Delay to 0.1 seconds.
- Change Tween Group to 1.
- Disable the Tween Position component to avoid automatic play at start.
In this configuration, the tween will move the window towards the left (-2000 for X coordinates), with a smooth start and end of the tween using Animation Curve. This is called an EaseInOut effect, as in "ease in and out".
The Tween
Group is set to 1 in order to differentiate it from the first Tween Scale component it already has in group 0.
Make sure you have disabled the component, as in the preceding screenshot. Otherwise, the tween will play at start and hide our menu without clicking the Options button.
We need
Tween Position to be played when the Options button is pressed:
- Select our
Buttons|OptionsGameObject (theOptionsbutton). - Click on the Add Component button.
- Type
playwith your keyboard to search for components with that word. - Select Play Tween
OK, now, configure the newly added UIPlay Tween component, as follows:
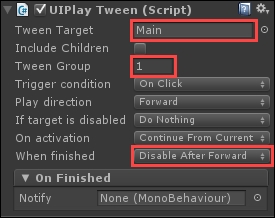
Once configured as displayed in the image, click Unity's play button. When you click on the Options button, our main menu moves towards the left of the screen and is automatically disabled when the tween is finished!
At start, we need the options menu to be hidden on the right-hand side of the screen. We can do this by setting its X coordinate to 2000, and then we'll disable it:
- Select our
UI Root|OptionsGameObject. - Set its Transform position to {2000, 0, 0}.
- Make sure the GameObject is disabled.
Now, we need to make sure it is enabled and moved to the center of the screen when the Options button is clicked. Let's do it!
Select our Options page, the UI Root | Options GameObject, and add a new Tween Position component to it. Configure Tween Position as follows:
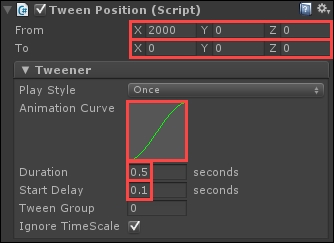
In the configuration, the tween will move the options window towards the center of the screen with an EaseInOut effect.
This tween component is enabled, so it will play as soon as the GameObject is enabled. In order to play it, we simply have to enable the Options GameObject.
In order to show our options page, we can use the UIPlay Tween component:
- Select our
Buttons|OptionsGameObject (theOptionsbutton). - Click on the Add Component button.
- Type
playto search for components with that word. - Select Play Tween and hit Enter or click on it with your mouse.
For the newly added UIPlay Tween component:
- Drag our
UI Root|OptionsGameObject in the Tween Target field. - Set the If target is disabled option to Enable Then Play.
Hit Unity's play button. Now, when you click the Options button, the options page appears at the center of the screen!
Great. Now, let's add a way for the player to confirm their options and return to the menu.