
In this section, we'll see how to add keyboard control to our UI. First, we'll see how to bind keys to buttons, and then we'll add a navigation system using keyboard arrows.
The UIKey Binding component assigns a specific key to the widget it's attached to. We'll use it now to assign the keyboard's Escape key to our menu's Exit button:
- Select our
UI Root|Main|Buttons|ExitGameObject. - Click the Add Component button in the Inspector view.
- Type
keywith your keyboard to search for components. - Select Key Binding and hit Enter or click on it with your mouse.
Let's see its available parameters.
We've just added the following UIKey Binding component to our Exit button, as follows:
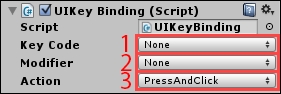
The newly attached UIKey Binding component has three parameters:
- Key Code: Which key would you like to bind to an action?
- Modifier: If you want a two-button combination. Select on the four available modifiers:
Shift,Control,AltorNone. - Action: Which action should we bind to this key? You can simulate a button click with
PressAndClick, a selection withSelect, or both withAll.
Ok, now, we'll configure it to see how it works.
The UIKey Navigation component helps us assign objects to select using the keyboard arrows or controller directional-pad. For most widgets, the automatic configuration is enough, but we'll need to use the override parameters in some cases to have the behavior we need.
The nickname input field has neither the UIButton nor the UIButton Scale components attached to it. This means that there will be no feedback to show the user it's currently selected with the keyboard navigation, which is a problem. We can correct this right now.
Select UI Root | Options | Nickname | Input, and then:
- Add the Button component (
UIButton) to it. - Add the Button Scale component (
UIButton Scale) to it. - Center Pivot of
UISprite(middle bar + middle bar). - Reset Center of
Box Colliderto{0, 0, 0}.
The Nickname | Input GameObject should have an Inspector view like this:

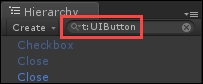
Ok. We'll now add the Key Navigation component (UIKey Navigation) to most of the buttons in the scene. In order to do that, type t:uibutton in the Hierarchy view's search bar to display only GameObjects with the UIButton component attached to them:
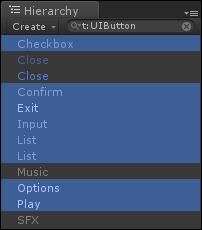
Ok. With the preceding search filter, select the following GameObjects:
Now, with the preceding selection, follow these steps:
- Click the Add Component button in the Inspector view.
- Type
keywith your keyboard to search for components. - Select Key Navigation and hit Enter or click on it with your mouse.
We've added the UIKey Navigation component to our selection. Let's see its parameters.
We've just added the following UIKey Navigation component to our objects:
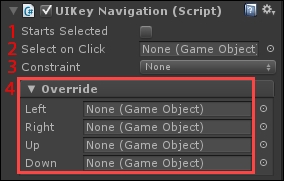
The newly attached UIKey Navigation component has four parameter groups:
- Starts Selected: Is this widget selected by default at the start?
- Select on Click: Which widget should be selected when this widget is clicked on — or the Enter key/confirm button has been pressed? This option can be used to select a specific widget when a new page is displayed.
- Constraint: Use this to limit the navigation movement from this widget:
None: The movement is free from this widgetVertical: From this widget, you can only go up or downHorizontal: From this widget, you can only move left or rightExplicit: Only move to widgets specified in the Override
- Override: Use the Left, Right, Up, and Down fields to force the input to select the specified objects. If the Constraint parameter is set to
Explicit, only widgets specified here can be selected. Otherwise, automatic configuration still works for fields left toNone.
Ok. Now, let's configure it to understand and test the above parameters.
First things first: we need to set our Play button as the default selected object at the start. In order to do this, simply select our UI Root | Main | Buttons | Play GameObject, and check the Starts Selected option of UIKey Navigation.
Now, let's try it. Hit Unity's
play button. You'll see that most of them work, but here's our first issue with automatic configuration: the Exit button cannot be selected. Let's see why and what we can do to fix this.
That's because it is not considered as being below the Play and Options buttons. We can use the Override parameters to correct this and force the selection on input:
- Select both our
UI Root|Main|Buttons|PlayandOptionsbuttons. - Drag our
Exitbutton to the Down field ofUIKey Navigation. - Now, select our
Exitbutton. - Drag our
Playbutton in the Up field ofUIKey Navigation.
Hit Unity's play button. That's it. The Override parameters are now taken into account and we can select our Exit button and go back to the Play button with the arrow keys!
Now, try hitting Enter while the Options button is selected. When the options page appears, we cannot move from a widget to another anymore. Let's talk about that.
When the Options button is clicked, nothing is selected on the options page. We can correct this using the Select on Click parameter:
- Select our
UI Root|Main|Buttons|Optionsbutton. - Drag
Options|Language|Listin the Select on Click field.
Hit Unity's play button. Now, when the options page is displayed, our language popup list is selected by default, letting us navigate through options using the arrow keys.
We also need the Play button to be selected as soon as the Confirm button is pressed:
- Select our
Options|Confirmbutton. - Drag
Main|Buttons|Playin its Select on Click field.
That's it. Now, when you select Options, the language list will be selected automatically. Now, the nickname input field has a small issue upon validation.
If you hit the Enter key while you're typing a new nickname, the input field is no longer selected, and you cannot navigate with the keyboard anymore.
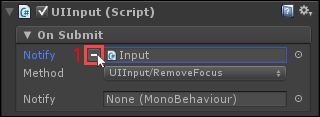
This occurs because, by default, the input field's On Submit event delegate is set to call the UIInput/RemoveFocus method. We'll change this now:
- Select our
UI Root|Options|Nickname|InputGameObject. - Click on the button (1) of the Notify field of On Submit, as shown in the following screenshot:
Hit Unity's play button. Great, we can now validate the nickname input field, and the focus is no longer removed from it.
That's it! We've solved all of our major issues with the key navigation for our UI. We can now see how to interact with the volume sliders separately.
Our last issue with key navigation is that our volume sliders aren't accessible with the arrow keys. Let's create a new depth of navigation and achieve the following behavior:
- The arrow keys let us select the
Volumebox. - If the user hits Enter, they enter the
Volumebox. - From now on, the user can move the sliders' values with the left or right keys.
- By hitting Enter again, they validate their changes.
First, we need to make our volume box a button like other options on the page:
- Select our
UI Root|Options|VolumeGameObject. - Add the Button Scale (
UIButton Scale) component to it. - Add a Key Navigation (
UIKey Navigation) component to it. - Drag
UI Root|Options|Volume|SFXin the Select on Click field.
Ok. Hit Unity's play button. We can now select the volume box with the arrow keys, and if you hit Enter while it's selected, the SFX slider is automatically selected.
We'll now make sure you can navigate through both sliders and go back to the normal navigation depth when you hit Enter again:
- Select both the
UI Root|Options|Volume|SFXandMusicGameObjects. - With both
SFXandMusicsliders selected:- Add the Button Scale component (
UIButton Scale) to them - Add a Key Navigation component (
UIKey Navigation) to them - Change their Constraint parameter to Vertical
- Drag
UI Root|Options|Volumein Select on Click
- Add the Button Scale component (
- Select our
UI Root|Options|ConfirmGameObject. - Drag
UI Root|Options|Volumein the Right field ofUIKey Navigation.
That's it! Hit Unity's play button, and you'll see that we can now edit the sliders' values using the right and left arrow keys after the Volume box has been selected with Enter.