
Until now, we have only created menus. In this chapter, we'll focus on in-game user interface elements in both 2D and 3D spaces. We'll see how to display the UI elements in the following ways:
- Player name on top of the main character, which follows his movement
- 2D progress bar above interactive 3D objects
- Drag-and-drop 3D objects in the world
- Move a player by clicking on the ground
- 2D buttons over 3D space objects
- Set 2D buttons as available/unavailable
We'll illustrate this with a simple game package that you can download and import in your project. Let's start by explaining the game.
In this chapter, we'll add user interface elements to an existing game project. First, we'll talk about the pitch of the game, and then we'll download and import the necessary assets to work on this chapter.
The player incarnates a small elemental probe. They can move around the 3D environment to gather four different elements—fire, water, lightning, or ice, as follows:
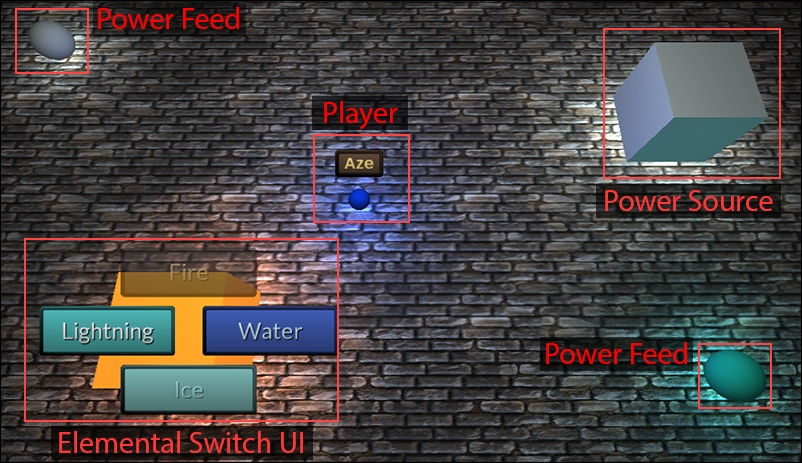
The player's objective is to gather elements from the Power Source and deliver them to the correct Power Feed that gradually appears on the scene. For example, he or she must gather water from a well and bring it to a small tree to make it grow, or must carry fire to a frozen waterfall to melt it and make it flow again.
Each Power Source can be moved by dragging-and-dropping, and a right-click makes the Elemental Switch UI appear. With that UI, the player can request the Power Source to change its current element to one of the other three available elements.
For example, in the preceding screenshot, if the player needs to gather lightning, he or she can switch the left-hand side power source from fire to lightning by clicking on the Lightning button. This elemental switch takes a few seconds to take effect, which is indicated by a progress bar.
For a Power Feed, the player has a limited time—that's where the movable Power Source is useful—it must be close to the Player and their Power Feed to save time!
OK, now let's get the necessary assets to start working on this game's UI.
Some game elements aren't linked to NGUI, and we don't need to learn here how they were created. Let's download and import the game's necessary assets.
First, download the Unity package from http://goo.gl/aJZbxq. Once it has finished downloading, open it by double-clicking on the Chapter6_Game.unitypackage file.
An import window will appear. Make sure that all files are checked, and click on the Import button.
That's it; we now have a new game scene and the necessary elements to create an in-game UI.
Open this new game scene before we continue.
Note
If you want to start clean and safe, you can download the entire project with progress up to this chapter, with Chapter6_Game.unitypackage already integrated, from http://goo.gl/dq6Ng0.
For legal reasons, the Assets/NGUI folder isn't included in the project, so you'll have to import your NGUI package inside the project if you want to use it (or copy and paste Assets/NGUI from your current project).