
In this chapter, you will learn how to create 3D widgets, both in the user interface and within the environment. We'll work at the following aspects:
- The 3D score counter
- The 3D pause button
- The 3D pause menu with a perspective 3D effect
- Interaction override to ensure a player cannot play while a game is paused
- The current level name displayed in 3D on the ground
- Lighting effects on UI elements
- Key bindings
By the end of this chapter, you'll know how to create 3D user interfaces and integrate in-game 3D elements in the environment with lighting effects.
Until now, we've created 2D user interface elements and flat widgets viewed with an orthographic camera, on which the z axis has no influence.
3D user interface elements are viewed with perspectives taken into account, which means that the z axis makes widgets feel "farther away" or "closer to" the camera. Rotation can also be applied, which will make them look like they are a part of the 3D environment.
In this section, we will create 3D user interface elements. First, we need to explain what the 3D UI Root is, and then create one.
It's interesting to separate our 2D and 3D layers in order to make sure you can easily hide or show one of them by simply enabling/disabling the camera that renders them.
Indeed, consider we have UI Root to hold the 2D UI and another to hold the 3D UI exclusively. If we need to hide the 2D UI and show a 3D pause menu, we can simply perform the following steps:
- Disable the 2D
UI Rootthat holds and renders the in-game 2D UI. - Enable the 3D
UI Rootthat holds and renders the 3D pause menu.
Since UI Root handles widget scaling depending on the screen, we should only have one UI Root instance running in the same scene. The NGUI plugin won't let us create a new 3D UI Root within a scene that already has a 2D UI Root. This is why we need to disable the InGame2DUI root for now:
- Select
InGame2DUIand disable it. - Create a new
3D UIby navigating to NGUI | Create | 3D UI. - Select a new
UI Root (3D)GameObject. - Rename it to
InGame3DUI. - For its attached
UI Rootcomponent, perform the following steps:- Set its Scaling Style to Constrained.
- Set its Content Width to 1920.
- Set its Content Height to 1080.
- Check its height Fit option.
Now, let's create a new layer to hold all 3D UI elements:
- Access Edit | Project Settings | Tags and Layers.
- Next to User Layer 10, enter 3DUI in the field.
- Select the
InGame3DUIGameObject. - Switch its layer to 3DUI.
Unity will prompt you with a popup, asking if you desire to change the layer for all child objects. Click on the Yes, change children button.
Now that we've set our InGame3DUI in the 3DUI layer, we need to make sure this layer is rendered by UICamera. Perform the following steps:
- Select our
InGame3DUI|CameraGameObject. - For the
Cameracomponent, set Culling Mask to display 3D UI only.
Now that our 3D UI Root is created and configured, we can re-enable our InGame2DUI root and make sure its culling mask hasn't been changed. We can do so by following the steps mentioned:
- Select the
InGame2DUIGameObject and enable it. - Select the
InGame2DUI|CameraGameObject. - For
Camera, make sure Culling Mask is set to InGame2DUI.
Ok, we're now ready to display 3D widgets!
What I call scale calibration for the 3D UI is the process of making sure a fullscreen 3D widget is actually taking the entire screen. We'll need to create a calibration sprite of 1920 x 1080 and see if it fits our Game view correctly:
- Select the
InGame3DUIGameObject. - Create a new child sprite with Alt + Shift +S.
- Set its Atlas to the SciFi atlas.
- Change its Sprite to the Dark sprite.
- Make sure its Type is set to Sliced.
- Set white for Color Tint.
- Change Size to 1920 x 1080.
We have a virtual screen of 1920 x 1080. With the current 3D UI configuration, you will notice that our 1920 x 1080 sliced sprite is much larger than the screen! This isn't good, and we need to find a way to calibrate our UI's scale.
In order to correct this, we can simply move the camera farther away from the widgets to reduce the UI's display size:
- Select the
InGame3DUI|Camera. - Set the Transform position to {
0,0,-935}.
Ok, that's better; our 1920 x 1080 sprite now fits the screen without getting out of bounds. You can now delete our calibration, Sprite, from the scene.
Your game scene's Hierarchy view should now have the elements shown in the following screenshot:

For Unity 4.5 and above, the order of the elements might be different since objects aren't sorted alphabetically anymore.
Now that our UI's scale is calibrated, we can move on and create our first 3D widget.
The first 3D widget we will create is a score counter at the top right of the screen:
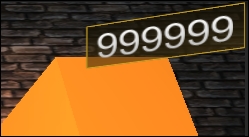
As you can see in the preceding image, our score counter has a slight 3D effect due to a y axis rotation of 20 degrees.
Let's start by creating the score counter's label:
- Select the
InGame3DUIGameObject. - Create a new empty GameObject with Alt + Shift + N.
- Rename this new child to
Score. - Create a new label with Alt + Shift + L.
Ok, we have our new label. Let's configure it now:
- Select our new
InGame3DUI|Score|LabelGameObject. - Set its font type to Unity, with a
Latofont. - Set its Font Size to 60, with a
Normal(notBold) style. - Change its Text value to
999999. - Change its Overflow parameter to ResizeFreely.
- Set a black Shadow effect with X and Y values as 1.
- Change Color Tint to {R: 255, G: 255, B: 150, A: 255}.
- Change Pivot to
Right(click on the right arrow followed by the middle bar). - Set Depth to 2.
Ok, now that we have our label with its pivot set to the right side, we can add a background sprite that will wrap around it.
Let's add a dark transparent background sprite to make this score counter more visible:
- Select our
InGame3DUI|ScoreGameObject. - Create a new sprite pressing on Alt + Shift + S.
- Rename this new child as
Background. - Change its Atlas value to the SciFi atlas.
- Change its Sprite value to the Dark sprite.
- Make sure its Type is set to Sliced.
- Set Depth to 0 to display behind the label.
- Change its Size to 235 x 80.
- Change Color Tint to {R: 160, G: 120, B: 30, A: 150}.
Ok, now let's configure the background's anchor to make sure it wraps around the label:
- Change Anchor Type to Unified.
- Drag our
Score|LabelGameObject to the Target field.
If you add or remove numbers in the score counter label, you'll see that the background adjusts itself to wrap it accordingly.
We can now add a border to this sprite to have more visible edges.
Let's use the background sprite as a base to create a border sprite:
- Select our
InGame3DUI|Score|BackgroundGameObject. - Duplicate it by pressing Ctrl + D.
- Rename this new duplicate to
Border. - Change Sprite to the Highlight sprite.
- Uncheck the Fill Center parameter.
- Set Depth to 1 to display over the background.
- Change Color Tint to {R: 255, G: 255, B: 0, A: 255}.
- Drag our
Score|Backgroundto the Anchor Target field.
Great, we now have our score counter. We can now place it where it should be.
Let's make sure it's anchored at the top-right corner of the screen and rotate it slightly:
- Select our
InGame3DUI|ScoreGameObject. - Set the Transform rotation to {0, 20, 0} to create a 3D effect.
- Click on the Add Component button in the inspector.
- Type in
ancto search for components with this name. - Select Anchor and hit Enter or click on it with your mouse.
Now, for the newly attached UIAnchor component of Score:
- Change Side to TopRight.
- Change its Relative Offset to {-0.09, -0.08}.
That's it; we now have our 3D score counter at the top-right corner of the screen! Now, let's see how we can make our score increase when needed.
In order to control the score counter's behavior, we'll create a new ScoreController component that will update the score label when a player's current score is changed.
The score modification feedback must be obvious. We'll make sure it uses a simple scale animation; the score first scales up, increases its value over time, and goes back to its initial scale when it has reached its final value.
First, let's create our new ScoreController component:
- Select our
InGame3DUI|ScoreGameObject. - Click on the Add Component button in the Inspector.
- Type in
ScoreControllerwith your keyboard and hit Enter. - Make sure Language is set to CSharp, and hit Enter again.
- Open the newly added
ScoreController.csscript.
Within this new ScoreController.cs script, declare the global variables, as shown in the following snippet:
// We'll need to store the score label
private UILabel label;
// We'll need to separate the displayed score
private int previousScore;
// The private _currentScore value
private int _currentScore;
Also, add a public currentScore variable with a custom setter method in order to make sure that each time the score is changed, the previousScore value is updated and the label's text is refreshed:
// The public currentscore with custom setter
public int currentScore
{
  get
  {
    return _currentScore;
  }
  set
  {
    // Update the previous score to current score
    previousScore = _currentScore;
    // Update the private _currentScore value
    _currentScore = value;
    // Update the label with new score
    UpdateLabel();
  }
}
Now, let's make sure variables are initialized correctly at the start. Replace the default Start() method with the following snippet:
// At start
private void Start ()
{
  // Get the score counter's label
  label = GetComponentInChildren<UILabel>();
  // Set the currentScore value to 0
  currentScore = 0;
}
Now that variables are initialized correctly, we can add the UpdateLabel() method, which is called at the last line of the currentScore getter method:
// Method to update the score label
public void UpdateLabel()
{
  // Launch the coroutine to update the label
  StartCoroutine(UpdateLabelRoutine());
}
The above Updat
eLabel() method starts the UpdateLabelRoutine coroutine. Let's add this coroutine, which actually updates the label:
// Coroutine that updates the label
private IEnumerator UpdateLabelRoutine()
{
  // Scale up the score label to 1.2
  UITweener tween =
    TweenScale.Begin(label.gameObject, 0.1f, Vector3.one * 1.2f);

  // Wait for the scale tween to finish
  yield return new WaitForSeconds(0.1f);

  // Calculate difference between old and new score
  int scoreDelta = currentScore - previousScore;

  // While previous score is below current score...
  while(previousScore < currentScore)
  {
    // ...Increase the previousScore value
    previousScore += Mathf.CeilToInt(scoreDelta * Time.deltaTime * 3.5f);
    // Set the label to the previousScore value
    label.text = previousScore.ToString();
    // Wait for next frame
    yield return null;
  }

  // When score has reached final score value
  // Update the score label with current score
  label.text = currentScore.ToString();

  // Wait a little
  yield return new WaitForSeconds(0.3f);
  // Re-scale down the score label
  TweenScale.Begin(label.gameObject, 0.1f, Vector3.one);
}
The preceding method first scales up the label, increases its value until it reaches the currentScore value, and then scales it back down again.
We can now make sure the score increases when the player brings the power source's correct element. Open the PlayerController.cs script and add this line of code in the UseElement() method just below the targetFeed.Feed() instruction:
// Increase Score
ScoreController.Instance.currentScore += 1000;
Hit Unity's play button. Your score will increase by 1,000 points each time a power feed is fed; for example, if you collect and deliver the lightning element to the lightning power feed.
Ok, great! We are now ready to start working on an in-game pause menu.
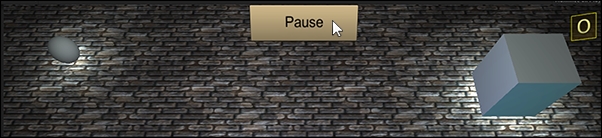
We'll now create a 3D pause button, as shown:

Ok, let's create this button now. We'll need a Buttons holder GameObject:
- Select the
InGame3DUIGameObject. - Create a new child by pressing Alt +Shift + N.
- Rename this new child to
TopButtons.
Now that we have our TopButtons holder, we can create the button:
- In the Project view, search for
button. - Drag
Control – Simple Buttonto our newTopButtonsGameObject. - Rename this new button to
Pause. - Reset the Transform position to {0, 0, 0}.
- In the Inspector view, click on the Add Component button.
- Type in
scato search for components with this name. - Select Button Scale and hit the Enter key or click on it with your mouse.
For the attached UISprite component, perform the following steps:
- Set Size to 320 x 100.
- Change Pivot to
Top(middle + up arrow).
For the attached UIButton component, perform the following steps:
- Set the Normal color to {R:
255, G:255, B:255, A:255}. - Set the Hover
225, G:200, B:150, A:255}. - Set the Pressed color to {R:
120, G:120, B:120, A:255}.
Now, select the child Label GameObject executing the following steps:
- Set the font type to Unity.
- Set Font to Arial.
- Set Color Tint to {R:
0, G:0, B:0, A:255}. - Change Font Size to
40. - Change Text to
Pause
Ok, our pause button is looking good. Now, we would like to add a slight 3D effect and position it at the top of the screen:
- Select our
InGame3DUI|TopButtonsGameObject. - Set its Transform rotation to {-15, 0, 0} for a slight 3D effect.
The TopButtons GameObject is just a container and not a widget; we cannot assign a size or pivot to it. We can correct this by adding the UIWidget component to it:
- Select our
InGame3DUI|TopButtonsGameObject. - In the Inspector view, type in
widgto search for components. - Select NGUI Widget and hit the Enter key or click on it with your mouse.
Our TopButtons is now considered as a widget. We can set its new UIWidget component's Size and Pivot and make sure it's placed at the top of the screen:
- Set its Size to 320 x 100.
- Change its Pivot to
Top(middle + up arrow). - Set the Transform position to {
0,540,0}.
That's it; you should now have the pause button attached to the top of the screen:
Now that we have a pause button, let's create the associated pause menu.
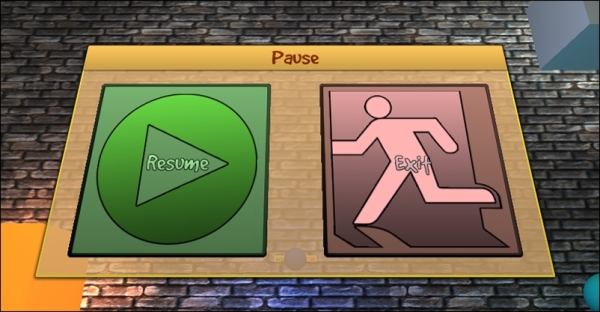
We will now create this specific in-game 3D pause menu:
Let's start by creating the container panel and box.
First, we need to create a new panel to contain the pause menu's background and border:
- Select the
InGame3DUIGameObject. - Create a new empty child GameObject by pressing Alt + Shift + N.
- Rename this new child to
PauseMenu. - Click on the Add Component button in the inspector.
- Type in
panelto search for components with this name. - Select NGUI Panel and hit Enter or click on it with your mouse.
- Set the Depth value of the newly attached
UIPanelto 1.
We can now create the pause menu's background:
- Select our new
InGame3DUI|PauseMenuGameObject. - Create a new child sprite pressing Alt + Shift + S.
- Rename the new sprite to
Background. - Change Atlas to Wooden Atlas.
- Set Sprite to the Window sprite.
- Make sure that the sprite type is set to Sliced.
- Set Color Tint to {R:
255, G:200, B:130, A:200}. - Set Size to
1100 x 600.
Now, let's add the box's border sprite:
- Select our
InGame3DUI|PauseMenu|BackgroundGameObject. - Duplicate it pressing Ctrl + D.
- Rename this new duplicate to
Border. - Uncheck its
UISpriteand the Fill Center option. - Set Color Tint to {R: 255, G: 230, B: 60, A: 255}.
- Change the Depth value to 2.
- Change Anchor Type to Unified.
- Drag our
InGame3DUI|PauseMenu|Backgroundin the Target field.
Now that we have a nice yellow border, we can create the title bar.
Let's create the title bar that displays the Pause label:
- Select our
InGame3DUI|PauseMenuGameObject. - Create a new empty child GameObject by pressing Alt + Shift + N.
- Rename this new child to
Title. - Select our
InGame3DUI|PauseMenu|BackgroundGameObject. - Duplicate it by pressing Ctrl + D.
- Drag this new duplicate inside the new
TitleGameObject. - Check the Fill Center option of
UISprite. - Set Color Tint to {R: 255, G: 200, B: 90, A: 255}.
- Set the Depth value to 1.
- Change Anchor Type to Unified.
- Drag our
InGame3DUI|PauseMenu|Backgroundin the Target field. - Change the Bottom anchor field to Target's Top.
- Set the Bottom anchor offset to -100.
The title bar's background is set up. Now, let's add the title bar's label:
- Select our
InGame3DUI|PauseMenu|TitleGameObject. - Create a new child label by pressing Alt + Shift + L.
- Set the Transform position to {
0,250,0}. - For the attached
UILabelcomponent, perform the following steps:- Change the font type to Unity.
- Set Font to GoodDog.
- Change Font Size
65. - Change its Overflow parameter to ResizeFreely.
- Change the label's Text
Pause. - Set a black Outline effect with the X and Y values as 1.
- Set Color Tint to {R:
255, G:200, B:150, A:255}.
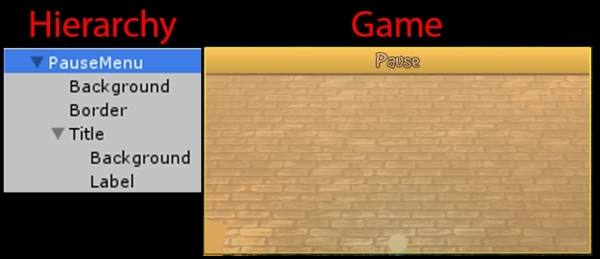
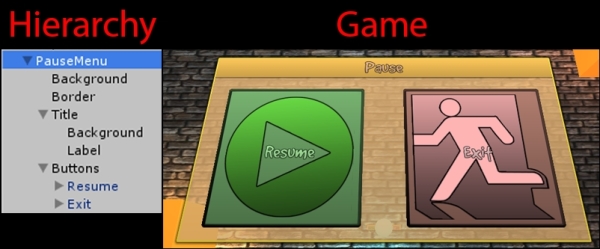
Ok, good. You should now have a window like this with the following hierarchy:
We can now move on to creating the two pause menu's buttons.
In this section, we'll create the Resume
and Exit 3D buttons.
We can first create the Resume button by executing the following steps:
- Select our
InGame3DUI|PauseMenuGameObject. - Create a new empty child GameObject by pressing Alt + Shift + N.
- Rename this new child to
Buttons. - Open the
Prefabtoolbar navigating to NGUI | Open | Prefab Toolbar. - Drag the Simple button by navigating to
InGame3DUI|PauseMenu|Buttons. - Rename this new button to
Resume. - Set the Transform position to {-270, -40, 0}.
Configure the attached UISprite executing the following steps:
- Change Atlas to the Game atlas.
- Set Sprite to the Background_Button sprite.
- Set Size to 420 x 420.
Now, for the attached UIButton component, perform the following steps:
- Set the Normal color to {R:
170, G:255, B:160, A:255}. - Set the Hover color to {R: 100, G: 255, B: 100, A: 255}.
- Set the Pressed color to {R: 25, G: 75, B: 0, A: 255}.
- In the Inspector view, type in
scato search for components with this name. - Select Button Scale and hit Enter or click on it with your mouse.
We can now configure the child label executing the following steps:
- Select our
PauseMenu|Buttons|Resume|LabelGameObject. - Set the font type to Unity with the GoodDog font.
- Change Font Size to
60. - Set Text to
Resume. - Set a black Outline effect with the X and Y values as 1.
- Set Color Tint to {R:
180, G:255, B:170, A:255}. - Change Depth to
6.
Now that everything is set for this button, we can create the resume sprite:
- Select our
PauseMenu|Buttons|ResumeGameObject. - Create a new child sprite by pressing Alt + Shift + S.
- Rename this new sprite to
Icon. - Change Sprite to the Game atlas.
- Set Sprite to the Icon_Play sprite.
- Change Type to Simple.
- Set Color Tint to {R:
115, G:240, B:75, A:255}. - Set Depth to 5.
- Change Size to 380 x 380.
Great! Now that we have our Resume button, we can move on to the Exit button.
Follow these steps to create the Exit button based on the Resume button:
- Select our
PauseMenu|Buttons|ResumeGameObject. - Duplicate it by pressing Ctrl + D.
- Rename this new duplicate button to
Exit. - Change the Transform position to {
270,-40,0}. - Set the Normal color to {R:
255, G:180, B:160, A:255}. - Set the Hover color to {R:
255, G:85, B:85, A:255}. - Set the Pressed color to {R:
75, G:0, B:0, A:255}.
We can now update the child label to red, similar to what we did in the background. Execute the following steps:
- Select our
PauseMenu|Buttons|Exit|LabelGameObject. - Set Text to
Exit. - Set Color Tint to {R:
255, G:210, B:210, A:255}.
We must now change the icon and make sure it's red too:
- Select our
PauseMenu|Buttons|Exit|IconGameObject. - Change Sprite to Icon_Exit.
- Set Color Tint to {R:
255, G:180, B:180, A: 255}.
Good! Now, let's add a 3D effect to give the impression that our pause menu is displayed on the level's ground:
- Select our
InGame3DUI|PauseMenuGameObject. - Change the Transform rotation to {
22,0,0}.
Great! Our pause menu is now ready. Your Game view and Hierarchy should look like this:
We need to display the pause menu when the pause button is pressed. Let's do this using an alpha tween to gradually change the pause menu's alpha value.
Follow these steps to configure a Tween Alpha component on PauseMenu:
- Select our
InGame3DUI|PauseMenuGameObject. - Click on the Add Component button in the inspector.
- Type in
alpto search for components with this name. - Select Tween Alpha and hit Enter or click on it with your mouse.
- Set the From value to 0 in the newly attached
Tween Alpha. - Change the Duration value to
0.5.
The alpha tween is configured. We must now request it to play when necessary.
We'll use
Play Tween to play the alpha tween when the Pause
button is clicked on:
- Select our
InGame3DUI|TopButtons|PauseGameObject. - Click on the Add Component button in the inspector.
- Type in
playto search for components with this name. - Select Play Tween and hit Enter or click on it with your mouse.
- Drag our
InGame3DUI|PauseMenuin the Tween Target field. - Set the If target is disabled field to EnableThenPlay.
The pause menu will be faded in when the pause button is clicked on. We need to make sure it fades out when the resume button is clicked on, using Play Tween again:
- Select our
InGame3DUI|PauseMenu|Buttons|ResumeGameObject. - Click on the Add Component button in the inspector.
- Type in
playto search for components with this name. - Select Play Tween and hit Enter or click on it with your mouse.
- Drag our
InGame3DUI|PauseMenuin its Tween Target field. - Set the Play Direction field to Reverse.
- Set the When finished field to Disable After Reverse.
Good! The pause menu will now fade out and disable itself when the resume button is pressed. We can now hide the pause button when the pause menu is displayed, and display it again when the resume button is pressed. Perform the following steps:
- Select our
InGame3DUI|TopButtons|PauseGameObject. - Click on the Add Component button in the Inspector view.
- Type in
actito search for components with this name. - Select Button Activate and hit Enter or click on it with your mouse.
- Drag
InGame3DUI|TopButtons|Pause(itself) in the Target field. - Uncheck the State option to make it disable itself upon clicking.
The Button Activate component enables or disables the state of Target, depending on the State bool's value. In the previous steps, we unchecked the State checkbox, so the pause button will be disabled as soon as it's clicked on.
Now, we can use the same component to re-enable the pause button when the resume button is pressed. Perform the following steps:
- Select our
InGame3DUI|PauseMenu|Buttons|ResumeGameObject. - Click on the Add Component button in the inspector.
- Type in
actito search for components with this name. - Select Button Activate and hit Enter or click on it with your mouse.
- Drag our
InGame3DUI|TopButtons|Pausebutton in its Target field. - Leave the State option checked.
Now, the pause button will be re-enabled when the resume button is clicked on. We need our pause menu to be disabled at the start. Let's do this by executing the following steps:
- Select our
InGame3DUI|PauseMenuGameObject. - Disable it in the Inspector checkbox.
Hit Unity's play button. You can now hit the Pause button. PauseMenu fades in as if it were displayed on the level's ground. When you hit the Resume button, the menu fades out and the Pause button reappears.
We can now link the buttons to methods to handle the actual pause and exit behaviors.
We'll first add the necessary methods, and then link our buttons to them.
Open the GameManager.cs script and add the following methods:
// Method called when pause button is pressed
public void PausePressed()
{
  // Request pause
  SetPause(true);
}

// Method called when resume button is pressed
public void ResumePresssed()
{
  // Request unpause
  SetPause(false);
}

// Method called when Exit button is pressed
public void ExitPressed()
{
  // Request to return to main menu
  ReturnToMenu();
}
The above methods will be linked to the buttons shortly. Before we do this, we need to add the required ReturnToMenu() and SetPause() methods:
// Use this method to return to the main menu
public void ReturnToMenu()
{
  // Unpause the game
  ResumePresssed();
  // Destroy the player instance
  Destroy(PlayerController.Instance);

  Transform mainMenu = null;
  mainMenu = MenuManager.Instance.transform.FindChild("Main");
  if(mainMenu != null)
  {
    // Set the MenuManager | Main scale to 1
    mainMenu.localScale = Vector3.one;
  }
  // Launch the EnterMenu couroutine
StartCoroutine(EnterMenu());
}

// EnterMenu Coroutine
private IEnumerator EnterMenu()
{
  // Show the main menu UI by enabling cam
  MenuManager.Instance.uiCamera.enabled = true;
  // Fade in the UI background
  TweenAlpha.Begin(MenuManager.Instance.background, 0.5f, 1);
  // Wait for the tween to finish
  yield return new WaitForSeconds(0.5f);
  // Load the Menu scene now
  Application.LoadLevel("Menu");
}

// Use this method to pause / unpause game
public void SetPause(bool state)
{
  // Set the timescale to appropriate value
  Time.timeScale = (state ? 0 : 1);
}
Good! The preceding code pauses the game when SetPause(true) is called, and resumes it on SetPause(false).
The ReturnToMenu() method destroys the player, shows our main menu by resetting its scale to 1, and launches the EnterMenu() coroutine.
This coroutine re-enables the main menu's camera and fades back the UI background before loading the Menu scene.
We can now move on to linking our buttons to their appropriate methods.
Follow these steps to link our pause, resume, and exit buttons to their respective methods:
- Select our
InGame3DUI|TopButtons|Pausebutton. - For the attached
UIButtoncomponent:- Drag
GameManagerto the On Click Notify field. - Navigate to GameManager | PausePressed.
- Drag
- Select our
InGame3DUI|PauseMenu|Buttons|Resumebutton. - For its attached
UIButtoncomponent:- Drag
GameManagerto the On Click Notify field. - Navigate to GameManager | ResumePressed.
- Drag
- Select our
InGame3DUI|PauseMenu|Buttons|Exitbutton. - For its attached
UIButtoncomponent:- Drag
GameManagerto the On Click Notify field. - Navigate to GameManager | ExitPressed.
- Drag
Now, load the Menu scene and hit Unity's play button. You can launch the game and hit the pause button. The game pauses, and you can either resume the game or go back to the main menu using the two buttons!
We can add a simple feature; when the player hits the Escape key, the game pauses or resumes. We'll do this using the UIKey Binding
component:
- Open the
Gamescene - Select both our
InGame3DUI|TopButtons|PauseandPauseMenu|Buttons|Resumebuttons. - Click the Add Component button in the inspector.
- Type in
keyto search for components with this name. - Select Key Binding and hit Enter or click on it with your mouse.
- Set the Key Code field of the newly added
UIKey Bindingto escape.
You can now hit Unity's play button; you'll see that hitting Escape will pause and resume the game anytime!
Great! We have a slight problem; interactive elements are still active while the game is paused. We need to find a way to easily prevent the player from moving or right-clicking on a power source, or changing the character's destination while the game is paused.
We will create what can be referred to as an interaction override. Here, a trigger collider is placed over our game's interactive elements, which will prevent them from being hit by the interaction raycast of UICamera. Since the 3D UI with NGUI uses the Depth value to check collisions, we should also add the UIWidget component to the interaction override.
We can create it right now for the pause menu:
- Select our
InGame3DUI|PauseMenuGameObject. - Create a new empty child GameObject by pressing Alt + Shift + N.
- Rename this new child to
Override. - Click on the Add Component button in the inspector.
- Type in
boxto search for components with this name. - Select Box Collider and hit Enter.
- Click the Add Component button again.
- Type in
widto search for components with this name. - Select NGUI Widget and hit Enter or click on it with your mouse.
We now have a box collider and UI Widget on our Override GameObject. Configure them as follows in order to make sure they take up the entire screen:
- Select our new
InGame3DUI|PauseMenu|OverrideGameObject. - Set the Transform rotation to {-22, 0, 0}.
- For the attached
UIWidgetcomponent:- Check the Collider auto-adjust to match option.
- Set Size to 1920 x 1080.
- Set Depth to 3.
- For its attached
Box Collidercomponent:- Check the Is Trigger option.
Good! Hit Unity's play button. When you pause the game, interactive elements such as power sources and the ground become inactive because the raycast of UICamera first touches the collider of Override.
Now that we have our nice 3D pause menu, let's see how we can add a 3D text or sprites directly onto the environment's objects.