
While testing, we stated the following issues:
We will correct them one by one. Let's start with the autorotation in the Player settings.
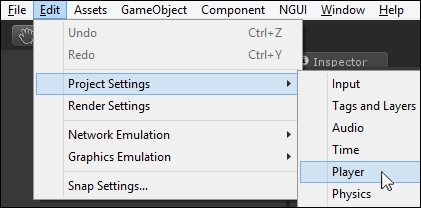
Open the Player settings window by navigating to Edit | Project Settings | Player, as shown in the following screenshot:
In the Inspector panel, enter your name and set the Default Orientation value to Landscape Left:
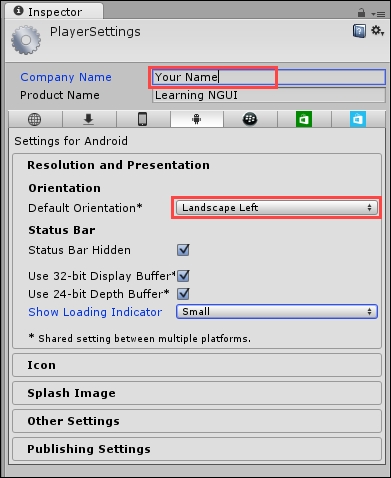
Good. The game will now be forced in the landscape left orientation. Let's correct the Android back button issue now.
The fact that the game exits when the back button is pressed comes from our main menu; the UI Root | Main | Buttons | Exit button is active with UIKeyBinding enabled.
Consequently, when you hit the Esc button, which is the back button on Android devices, it's as if you clicked on the main menu's Exit button.
The simplest way to correct this is to disable the UI Root | Main GameObject as soon as the Game scene is loaded, and re-enable it when the player returns to the main menu.
Let's take care of this now. Open the MenuManager.cs script, and add these lines at the very beginning of the LoadGameScene() method:
// Disable all objects in enableAtAwake array
foreach(GameObject currentGO in enableAtAwake)
{
  currentGO.SetActive(false);
}
The preceding code disables all objects in the enableAtAwake array, which contains the UI Root | Main GameObject.
We should now make sure that the main menu's Main GameObject is re-enabled when we go back to the main menu. Open the GameManager.cs script, and add these lines at the end of the EnterMenu() coroutine, just below the Application.LoadLevel("Menu") line:
// Enable all objects in enableAtAwake array
foreach(GameObject currentGO in MenuManager.Instance.enableAtAwake)
{
  currentGO.SetActive(true);
}
// Destroy the GameManager on game exit
Destroy(this.gameObject);
The preceding code enables all objects in the MenuManager method's enableAtAwake array when we return to the main menu and makes sure that GameManager is destroyed, as we won't need it anymore in the main menu.
Save the script, and that's it! The main menu is now disabled when the game is launched and re-enabled when the player returns to the main menu.
Now, let's see why the character movement doesn't work.
The character movement is triggered by the Approach On Click component. Open the ApproachOnClick.cs script now.
You will notice that inside the OnPress() method, we used UICamera.currentTouchID == -1 to check whether the click event was triggered with a left-click. That's the source of our issue: on mobile devices, touchID is an int value to identify the current touch. This int value is equal to 0 for the first touch, 1 for the second touch if there are two simultaneously, and so on—which means that it can never be equal to -1.
Here, we can use the Application.isEditor Boolean variable to check whether it's a left-click while we're playing inside the editor, but simply check whether it's a single-finger tap otherwise.
Replace the content of the if(pressed) statement instructions with the following code:
if(pressed)
{
  // Declare a default ID to check
  int idToCheck = 0;
  // If we're in the editor
  if(Application.isEditor)
  {
    // Set idToCheck to left click
    idToCheck = -1;
  }

  // Check if touchID is the one to check
  if(UICamera.currentTouchID == idToCheck)
  {
    // Set it to be a valid movement request
    validMoveRequest = true;
  }
  // If it's not
  else
  {
    // Set it to be an invalid movement request
    validMoveRequest = false;
  }
}
Save the script. The preceding code checks whether the click was a left-click while in editor and simply checks whether it's the first finger tap in the final build. The character movement will now work correctly in both the editor and the final Android build. Now, let's talk about the elemental switch UI.
The issue we have here is that right-click is an impossible input on mobile devices. A good alternative is to set a touch and hold system on power sources to display the elemental switch UI after a 0.5-second wait.
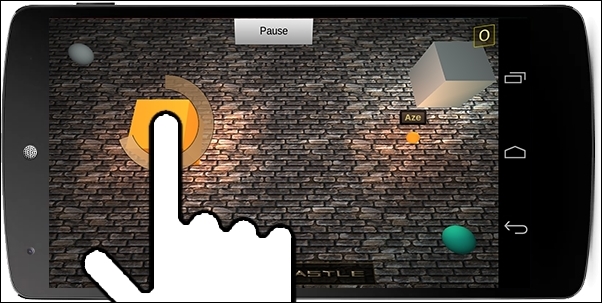
We need the player to know that they are currently holding their finger on an interactive element, which will trigger an event as soon as the wait is complete.
We'll display a circle around the player's finger that fills up gradually to represent the wait status:
A filled sprite can be used to achieve the preceding sprite configuration. Before we create it, we need to add the Circle sprite to our Game atlas, as follows:
- Open Atlas Maker by navigating to NGUI | Open | Atlas Maker.
- Within the Project view, select our
Assets/Resources/Textures/Circletexture file. - Click on the Add/Update button in our Atlas Maker window.
Ok, good. We now have the new Circle sprite in the Game atlas. We can now create the hold feedback icon, as follows:
- Open our Game scene.
- Select our InGame2DUI GameObject.
- Create a new empty child with Alt + Shift + N:
- Rename this new child to
HoldFeedback
- Rename this new child to
- With
HoldFeedbackselected, hit Alt + Shift + S to create a new sprite:- Change its Atlas value to the Game atlas
- Change its Sprite value to the Circle sprite
- Set Type to Filled
- Change Fill Dir to Radial360
- Check the Invert Fill option
- Change Color Tint to {R:
255, G:200, B:140, A:210} - Set its Size to
400 x 400
Ok. We'll need this sprite to display over the currently touched power source. We'll use the FollowObject component. Let's add and configure it now:
- Select our InGame2DUI | HoldFeedback | Sprite GameObject.
- In the Inspector panel, click on the Add Component button.
- Type
follto display components with that name. - Select Follow Object and hit your keyboard's Enter key.
- Drag the GameCamera GameObject to its Main Camera field.
- Drag InGame2DUI | Camera in its Ui Camera field.
Good. Now that we have our filled sprite ready, we need to implement the touch and hold feedback code to fill it gradually before the elemental switch UI is displayed.
In order to fill our HoldFeedback sprite gradually, we'll modify the PowerSource, Approach On Click, and GameManager components. Unity preprocessor instructions will be used to make sure that the game works both on Windows and mobile devices.
Open the PowerSource.cs script and replace the OnPress() method with this one:
// If the power source triggers the OnPress event
void OnPress(bool pressed)
{
  // If the power source is pressed
  if(pressed)
  {
    // Re-enable all buttons
    GameManager.Instance.EnableAllButtons();
    // Disable this power source's element button
    GameManager.Instance.SetButtonState(type, false);
    // Request to hide the elemental switch
    GameManager.Instance.ShowElementalSwitch(null);

    //If in editor
    if(Application.isEditor)
    {
      // If it's a right click
      if(UICamera.currentTouchID == -2 && available)
      {
        // Request to display the elemental switch
        GameManager.Instance.ShowElementalSwitch(transform);
      }
    }
    // If we're on the final build
    else
    {
      // If it's a one-finger touch
      if(UICamera.currentTouchID == 0 && available)
      {
        // Parameters to pass to the Coroutine
        object[] parameters = new object[2]{transform, 0.5f};
        // Cancel hold feedback if there is one
        GameManager.Instance.CancelHoldFeedback();
        // Start the HoldFeedback
        GameManager.Instance.StartCoroutine("HoldFeedbackRoutine", parameters);
      }
    }
  }
  // If power source is released
  else
  {
    // Cancel hold feedback if there is one
    GameManager.Instance.CancelHoldFeedback();
  }
}
In the preceding code, a right-click displays the elemental switch UI when the game runs within the editor.
If the game runs on the final build, a touch starts the GameManager component's HoldFeedbackRoutine() coroutine with the clicked power source and necessary hold duration as parameters. The HoldFeedbackRoutine() coroutine will gradually fill the HoldFeedback sprite.
If the power source receives the OnPress(false) event, the hold feedback process is cancelled.
Now, we must add the following new OnDrag() method to cancel the hold feedback process if the power source is dragged:
// If the power source is dragged
void OnDrag(Vector2 delta)
{
  // Cancel the hold feedback process
  GameManager.Instance.CancelHoldFeedback();
}
Save the script. Let's see what we need to update within the GameManager component.
We need to add the necessary methods and coroutines in the GameManager.cs script. Open GameManager
.cs and declare these global variables:
// We need the HoldFeedback filled sprite
public UISprite holdFeedback;
// We need the HoldFeedback's FollowObject
private FollowObject holdFeedbackFollowObject;
OK. At the start, we need to both retrieve the holdFeedback routine's FollowObject component and hide the HoldFeedback sprite. Add these instructions to the Start() method of GameManager:
// Retrieve the HoldFeedback's FolloObject
holdFeedbackFollowObject =
  holdFeedback.GetComponent<FollowObject>();
// Hide the HoldFeedback sprite
holdFeedback.enabled = false;
Good. Now, add this new HoldFeedbackRoutine coroutine:
// Routine that displays the touch hold feedback
public IEnumerator HoldFeedbackRoutine(object[] parameters)
{
  // Current fill amount to set
  float currentFillAmount = 0;
  // Retrieve concerned object's transform
  Transform concernedObject = parameters[0] as Transform;
  // The touch hold duration
  float holdDuration = (float)(parameters[1]);
  // Delay before the hold process starts
  float delay = 0.2f;

  // Retrieve concerned object's ApproachOnClick
  ApproachOnClick approachOnClick =
    concernedObject.GetComponent<ApproachOnClick>();
  // Retrieve concerned object's PowerSource
  PowerSource powerSource =
    concernedObject.GetComponent<PowerSource>();

  // Set filled sprite's fill amount to zero
  holdFeedback.fillAmount = 0;
  // Show the hold feedback sprite
  holdFeedback.enabled = true;

  // Make the hold feedback follow the power source
  holdFeedbackFollowObject.target = concernedObject;

  // Wait before starting sprite filling process
  yield return new WaitForSeconds(delay);

  // Make sure the release doesn't move the player
  if(approachOnClick != null)
  {
    approachOnClick.CancelMovementRequest();
  }

  // While holdFeedback sprite isn't filled...
  while(currentFillAmount< 1)
  {
    // Increase the currentFillAmount
    currentFillAmount += (Time.deltaTime / holdDuration);
    // Update the holdFeedback's filled sprite
    holdFeedback.fillAmount = currentFillAmount;
    // Wait for next frame
    yield return null;
  }

  /* ...Once the currentFillAmount>= 1
   Hide the holdFeedback sprite */
  holdFeedback.enabled = false;

  // If the hold concerns a power source
  if(powerSource != null)
  {
    // Show the elemental switch UI now
    ShowElementalSwitch(concernedObject);
  }
}
In the preceding code, the highlighted lines are the most important steps for the HoldFeedback sprite's filling process.
First, we wait for a 0.2-second delay, then the HoldFeedback sprite is displayed empty. The sprite's fill amount increases each frame in order to be full in the timespan defined by the second parameter in the object array. Once it's filled, the elemental switch UI is displayed above the concerned power source.
Now, we can add the required CancelHoldFeedback() method that was called from the PowerSource component:
// Method that cancels the hold process
public void CancelHoldFeedback()
{
  // Stop the coroutine
  StopCoroutine("HoldFeedbackRoutine");
  // Hide the holdFeedback sprite
  holdFeedback.enabled = false;
}
Good. We can move on to the last script edit, which concerns ApproachOnClick.cs.
Finally, we need to add the CancelMovementRequest() method within the ApproachOnClick.cs script. This will help us prevent the character from moving towards the power source on which the player wanted to display the elemental switch UI.
Open the ApproachOnClick.cs script and add the following method:
// Method that cancels the movement request
public void CancelMovementRequest()
{
  // Cancel the movement request
  validMoveRequest = false;
}
Great. Save all the scripts and return to Unity. We can assign the holdFeedback variable as follows:
- Select our GameManager GameObject.
- Drag InGame2DUI | HoldFeedback | Sprite in its Hold Feedback field.
Hit Unity's play button. The game still works as before within the editor: a right-click displays the elemental switch UI instantly.
Build the game, install it, and run it on your mobile device. Now, holding your finger on a power source displays a waiting feedback sprite around it. When the feedback sprite is filled entirely (2 seconds later), the elemental switch UI appears!
Tip
If you don't have any mobile device to test the game with, simply remove the entire if(Application.isEditor) statement (with its else line and associated closing bracket) from the PowerSource.cs script.
Then, change the if(UICamera.currentTouchID == 0) line just below it to if(UICamera.currentTouchID == -1).
With the preceding modifications, the touch-and-hold process will work with a left mouse button on a power source. Remember to undo these script modifications as soon as you're finished testing.
Good. Now that we have adapted some controls to mobile devices, we can talk about customizable user interface.