
One problem we'll have when scaling up our UI is that the images' quality will be decreased. A 256 x 256 pixels sprite scaled up to 512 x 512 will look blurry.
In order to avoid having blurry sprites, we could simply have all our assets in high-definition sizes. On the one hand, they will always look good, even on high-resolution displays. On the other hand, displaying a 1024 x 1024 sprite on a small screen with an effective final size of 128 x 128 will result in a waste of the device's memory.
Hence, it is useful to create, for example, three atlases for different resolution ranges:
SDAtlas: This is for screens up to 800 x 480. Example devices include:- iPhone 3G and 3GS 480 x 320
HDAtlas: This is for screens from 800 x 480 to 1600 x 1200. Example devices include:- iPhone 4 and 4S: 960 x 640
- iPhone 6: 1334 x 750
- iPad 2: 1024 x 768
- Galaxy S2: 1280 x 720
SHDAtlas: This is for screens from 1600 x 1200 and above. Example devices include:- Nexus 5: 1920 x 1080
- iPad 3: 2048 x 1536
- Nexus 7: 1920 x 1200
- Nexus 10: 2560 x 1600
The preceding three atlases will contain the same sprites of different resolutions. We can then switch the used atlas at runtime depending on the device's screen resolution. If you are using bitmap fonts, they also have to be created with different sizes so that we don't end up with aliased and blurry text for large titles.
We will now create three atlases: SDAtlas, HDAtlas, and
SHDAtlas. They will contain the Button sprite in its appropriate resolution: standard definition, high definition, or super high definition.
A fourth, ScreenAtlas, which we call a reference atlas, will also be created. ScreenAtlas will simply point to the correct atlas depending on the screen's resolution.
Tip
Remember that an atlas should:
- Always have a power-of-two size
- Minimize wasted space
- Contain small images, such as buttons, scrollbars, icons, and so on
- Not contain large background images or textures
Remember to use the UITexture component to display backgrounds or large textures instead of adding them to atlases.
Let's start by creating the standard definition atlas. Follow these steps to create it now:
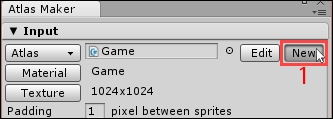
- Open Atlas Maker by navigating to NGUI | Open | Atlas Maker.
- Click on the New button (1) of Atlas Maker, as shown in the following screenshot:
- In the Project view, go to the
Assets/Resources/Texturesfolder:- Select the
ButtonSDtexture file
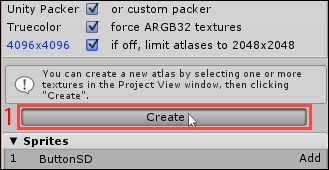
- Select the
- Click on the Atlas Maker window's Create button, as follows:
- In the window that appears, go to
Assets/Resources/Atlas:
Okay. We have SDAtlas with the button's sprite in standard definition. We can do the same for the high-definition atlas.
- Open Atlas Maker by navigating to NGUI | Open | Atlas Maker:
- Click on the New button of Atlas Maker
- In the Project view, go to the
Assets/Resources/Texturesfolder:- Select the
ButtonHDtexture file
- Select the
- Click on the Atlas Maker window's Create button:
- Go to
Assets/Resources/Atlas - Enter
HDAtlasfor the new atlas's name - Click on the window's Save button
- Go to
HDAtlas has been created, containing the button sprite in high definition. Let's finally create the super high definition atlas.
Follow these steps to create SHDAtlas:
- Open Atlas Maker by navigating to NGUI | Open | Atlas Maker:
- Click on the New button of Atlas Maker
- In the Project view, go to the
Assets/Resources/Texturesfolder:- Select the
ButtonSHDtexture file
- Select the
- Click on the Atlas Maker window's Create button:
- Go to
Assets/Resources/Atlas - Enter
SHDAtlasfor the new atlas's name - Click on the window's Save button
- Go to
SHDAtlas is ready and has the button sprite in super high definition. We can now create the last ScreenAtlas reference atlas.
This fourth atlas is special; it isn't at atlas, really. It only points to the desired atlas. We'll use that to change the selected atlas to use through code. Let's create it now:
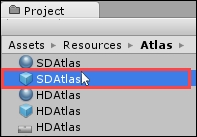
- In the Project view, go to the
Assets/Resources/Atlasfolder. - Select the SDAtlas prefab file, as follows:
- Duplicate it with Ctrl + D.
- Rename the new duplicate from
SDAtlas 1toScreenAtlas. - Select our new ScreenAtlas prefab file.
The Inspector view displays the following content:
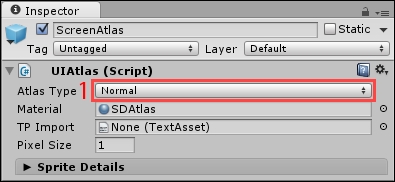
The ScreenAtlas prefab's Atlas Type (1) value is currently set to Normal. Switch it to Reference now. The Inspector panel now looks like this:
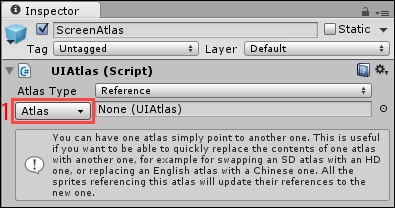
You might notice that all atlas information has disappeared; it's currently empty and points to nothing. Let's make it point to SDAtlas by default:
- Click on the Atlas button (1).
- Select SDAtlas in the pop-up window.
Good. Now, when we configure our widgets in the editor, we'll use ScreenAtlas instead of any other. By default, it will point to SDAtlas, and we'll need to make sure that it points to HDAtlas or SHDAtlas depending on the device's screen resolution.
We can create a test button right now and see how it works by changing the reference manually.
Follow these steps to create a button using the button sprite through ScreenAtlas:
- Navigate to NGUI | Open | Prefab Toolbar.
- Drag Simple Button inside our
UI RootGameObject in the Hierarchy view: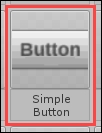
- Rename
Control – Simple ButtontoButton. - Select our new
UI Root|ButtonGameObject. - Click on its attached
UISpriteGameObject's Atlas button:- Select ScreenAtlas in the pop-up window
- Click on its attached
UISpriteGameObject's Sprite button:- Select the ButtonSD sprite in the pop-up window
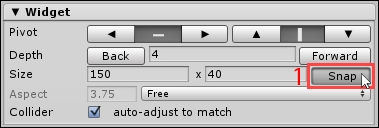
- Make sure its Transform position is at {
0,0,0}. - Click on the Snap (1) button to make it pixel perfect, as follows:
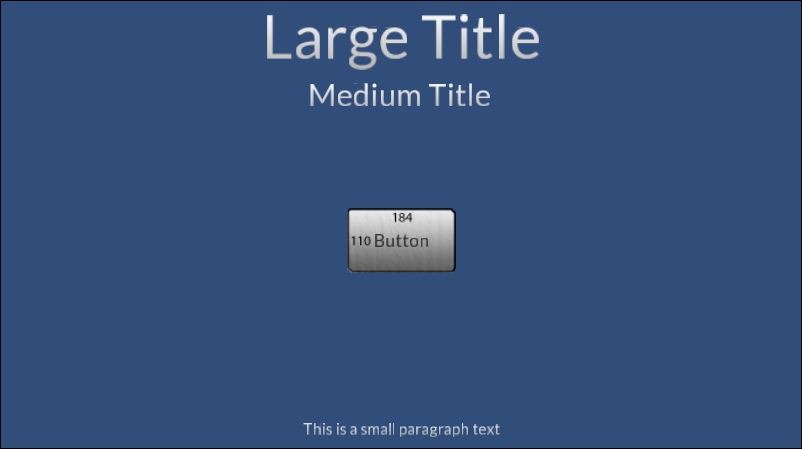
Good. You should now have our button centered on the screen as shown in the following screenshot:
Good! We can now see what happens when the reference atlas points to another one.
Let's change the ScreenAtlas reference atlas so that it points to HDAtlas instead of SDAtlas:
- In the Project view, go to
Assets/Resources/Atlas. - Select the
ScreenAtlasprefab. - In the Inspector view, click on the Atlas button.
- Click on the Show All button at the bottom of the pop-up window.
- Select HDAtlas.
Now that the reference atlas points to HDAtlas, our button should automatically change to the button's high-definition sprite.
If you look at your Game view, you'll see that our button has disappeared! Why is that? In SDAtlas, the button sprite is called ButtonSD, whereas it is called ButtonHD in the HDAtlas sprite.
The reference atlas is trying to retrieve the ButtonSD sprite that doesn't exist within HDAtlas. In order to fix that, we must rename our sprites so that they have the same name throughout all three atlases.
We have added our different files for each atlas. If we want the reference atlas to find the sprites within all atlases, we must make sure that they have the same name. Let's do it for our button sprite now:
- In the Project view, go to
Assets/Resources/Atlas. - Select the
SDAtlasprefab, and look for Sprite Details in the Inspector panel. - Change the sprite's name to
Button(1) and hit the Rename button (2), as follows: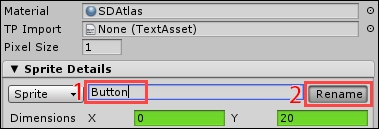
Now, let's do the same for the HDAtlas prefab's ButtonHD sprite:
- In the Project view, go to the
Assets/Resources/Atlas/HDAtlasprefab. - Change the sprite's name to
Buttonand hit the Rename button.
Finally, we can follow the same steps for the SHDAtlas prefab's ButtonSHD sprite:
Now that our Button sprite has the same name within all atlases, we can change our button to display it instead of the previous ButtonSD sprite:
- Select our
UI Root|ButtonGameObject. - Click on the Sprite button.
- In the sprite selection pop-up window, double-click on the Button sprite.
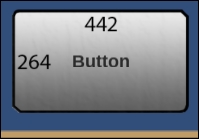
The displayed Button sprite in the pop-up window was actually the sprite from HDAtlas, since we have set ScreenAtlas to point to it instead of SDAtlas.
In the game view, we now have the HD button of 442 x 264 pixels, as follows:
Now, we can test the manual atlas switching to check whether it works:
- In the Project view, go to
Assets/Resources/Atlas. - Select the
ScreenAtlasprefab. - In the Inspector view, click on the Atlas button.
- Click on the Show All button at the bottom of the pop-up window.
- Select SHDAtlas.
Good. If you look at the Game view, you'll notice that with the changing of the reference atlas to point to SHDAtlas, the button sprite has been updated and now displays a 588 x 351 sprite instead of the previous 442 x 264 version:
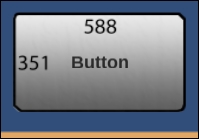
This means that by simply changing the atlas the ScreenAtlas points to, we can display different sprites depending on the screen resolution.
We can now work on a script to automatically switch atlases at runtime.