
Now that our multiple atlases are ready with different qualities, we can write the code to switch between them at runtime. In order to achieve this, we will create a new AtlasSwitchController component, attached to our scene's UI Root.
Follow these steps to create the new AtlasSwitchController component:
- Select our
UI RootGameObject. - In the Inspector panel, click on the Add Component button.
- Type in
AtlasSwitchControllerand hit the Enter key. - Make sure that Language is set to CSharp and hit Enter again.
Open our new AtlasSwitchController.cs script, and declare these global variables:
// The reference atlas
public UIAtlas referenceAtlas;

// Screen width thresholds
public int HDFromWidth = 800;
public int SHDFromWidth = 1600;

// Atlases for all qualities
public UIAtlas SDAtlas;
public UIAtlas HDAtlas;
public UIAtlas SHDAtlas;

// This will store the replacement atlas
private UIAtlas replacementAtlas;
Now, add the following Awake() method that will switch atlases:
// Before anything happens
void Awake ()
{
  // Retrieve the screen's width
  int screenWidth = Screen.width;

  // Set replacementAtlas to SDAtlas by default
  replacementAtlas = SDAtlas;

  // If the screen width exceeds SHD threshold
  if(screenWidth >= SHDFromWidth)
  {
    // Set the SHDAtlas as replacement
    replacementAtlas = SHDAtlas;
  }
  // If the screen width exceeds HD threshold
  else if(screenWidth >= HDFromWidth)
  {
    // Set the HDAtlas as replacement
    replacementAtlas = HDAtlas;
  }

  // Update the referenceAtlas with the replacement
  referenceAtlas.replacement = replacementAtlas;
}
Save the script. The preceding code first retrieves the screen's width and height. It then loads the corresponding atlas if the screen's width exceeds HDFromWidth and/or SHDFromWidth threshold values.
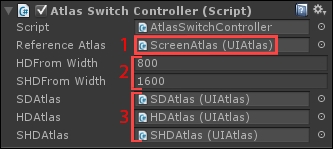
Okay, we have the code to switch atlases. Go back to Unity, select our UI Root GameObject, and configure its AtlasSwitchController component, as follows:
Perform the following steps:
- Drag
Assets/Resources/Atlas/ScreenAtlasas Reference Atlas. - Set HDFrom Width to
800and SHDFromWidth to1600. - Drag the correct atlases in the fields: SDAtlas, HDAtlas, and SHDAtlas.
The preceding configuration results in the following behavior:
- Screen width below 800 pixels:
SDAtlasis used - Screen width over 800 and below 1600 pixels: The script switches to
HDAtlas - Screen width over 1600 pixels:
ScreenAtlaspoints toSHDAtlas
Good. Let's try this out. Make sure that your Game view is maximized and its resolution setting is on WVGA Landscape (800x480). Now, hit Unity's play button.
The button displays the 442 x 264 sprite from HDAtlas. Now, change the Game view's resolution to HVGA Landscape (480x320), and hit Unity's play button.
You can notice that the button has been updated and now displays the 184 x 110 sprite! SDAtlas is now used.
Now, switch the Game view's resolution 1920x1080 (you might need to add this one since it isn't a default preset), and hit Unity's play button again. You will now have the 588 x 351 sprite for the button.
Okay, so that means our three atlases are correctly switched depending on the screen's resolution. Great!
The current configuration works as intended: depending on the screen's resolution, different sprites can be displayed.
However, if we want these sprites to always be as crisp as they can be, we should make them pixel-perfect once the correct atlas has been loaded. Making them pixel-perfect will display them at their actual original size.
In order to achieve this, open the AtlasSwitchController.cs script, and then add the following MakeAllWidgetsPixelPerfect() method:
private void MakeAllWidgetsPixelPerfect()
{
  // Declare a widget array to store them
  UIWidget[] allWidgets;
  // Retrieve all widgets in scene
  allWidgets = Object.FindObjectsOfType<UIWidget>();

  // For each of these widgets
  foreach(UIWidget widget in allWidgets)
  {
    // Make th widget pixel perfect
    widget.MakePixelPerfect();
  }
}
Now, add these lines at the very end of the Awake() method, just below the referenceAtlas.replacement = replacementAtlas; instruction:
// Make all widgets pixel perfect now
MakeAllWidgetsPixelPerfect();
That's it—we now make sure that all the widgets are pixel perfect just after the atlas has been changed. Now, if you hit Unity's play button, you'll notice that the sprite changes and is displayed at this original size.
We can now move on to see how we have a similar system for fonts.