
16
Avoiding Sleepless Nights – Moodle Backup and Restore
Your Moodle application will contain important data such as coursework, assignments, grades, and all administrative data, for example, users, cohorts, and roles. Therefore, you must have a good backup strategy in place.
Preparing for the unexpected is always a good strategy when dealing with information systems, and having well-preserved backups allows for full application recovery upon unexpected hardware or software failures. Systems are not expected to fail, but there’s always a possibility for failure, and a good strategy for fast recovery ensures a low impact on users. This chapter presents strategies and options for managing backups and auto-backups of your data.
Moodle itself supports two types of backups:
- Course-level backups: Course backups are usually ad hoc and only archive the selected course. You will learn how to create course backups, restore courses, and copy course content using the related course import facility.
- Site-level backups: The site backup option saves all courses and related data to a specified location at regular intervals. You will learn how to set this up and recover data from it.
Both mechanisms will be covered in detail before we look at system-level backups, including Moodle backups (covering the Moodle software and the data stored in it) and snapshot creation (full system images). The three backup types are shown in the following diagram and are at the core of this chapter:
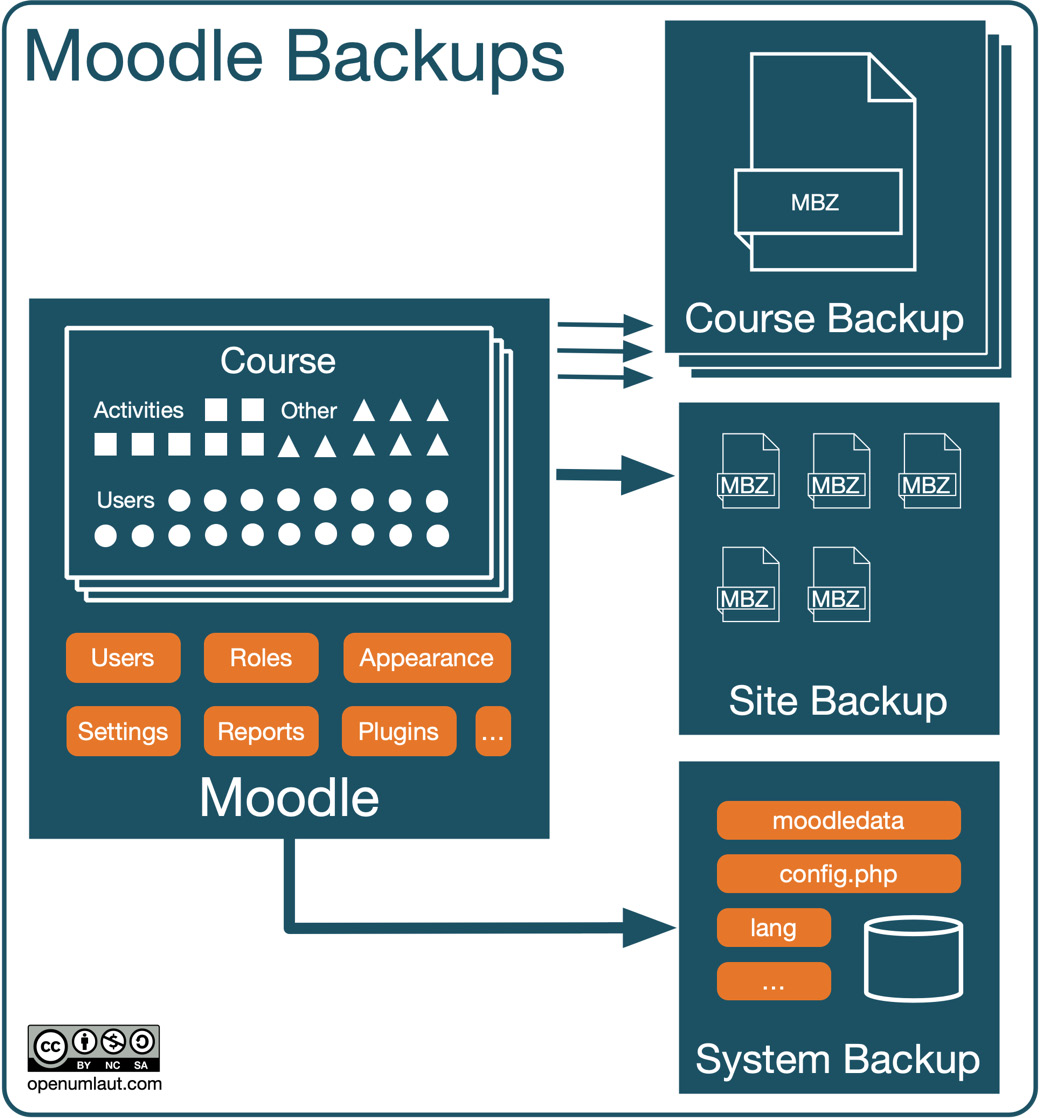
Figure 16.1 – Moodle backups
We will conclude this chapter by looking at two applications that use backup and restore facilities: planning year-end procedures and implementing course templates.
We will cover the following main topics in this chapter:
- Managing course-level backups
- Managing site-level backups
- Managing system-level backups
- Using backup and restore for alternative tasks
Managing course-level backups
Course-level backups allow teachers and administrators to create copies of courses for safekeeping or to pass on to colleagues. If configured appropriately, course backups can save an administrator a lot of hassle and time.
Important note
Course backups include some or all of the items of a course.
First, we will look at the backup procedure before going into the details of recovering data during the restore operation.
Creating course backups
To back up an individual course, it is best if you are inside that course, where you have to select the Course reuse option in the course menu and then select Backup from the dropdown.
The backup procedure comprises five steps, illustrated in the following workflow:
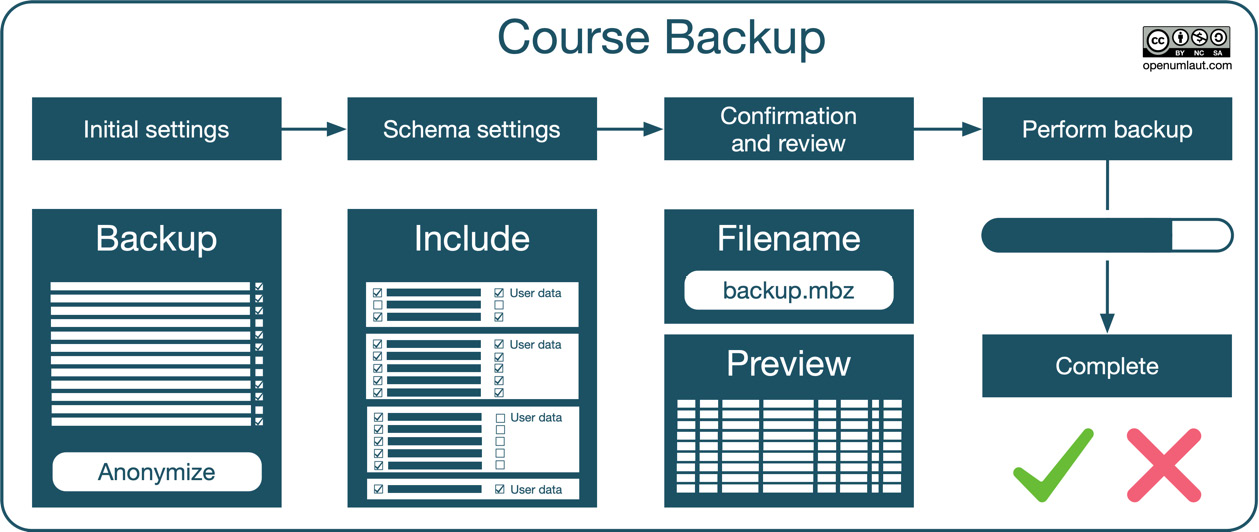
Figure 16.2 – Course backup workflow
You can navigate back to any step via the process links at the top of the screen or the navigation buttons at the bottom. We will go through the steps one by one in the following subsections.
Initial settings
Several settings determine how the backup will be performed and what type of information will be included:
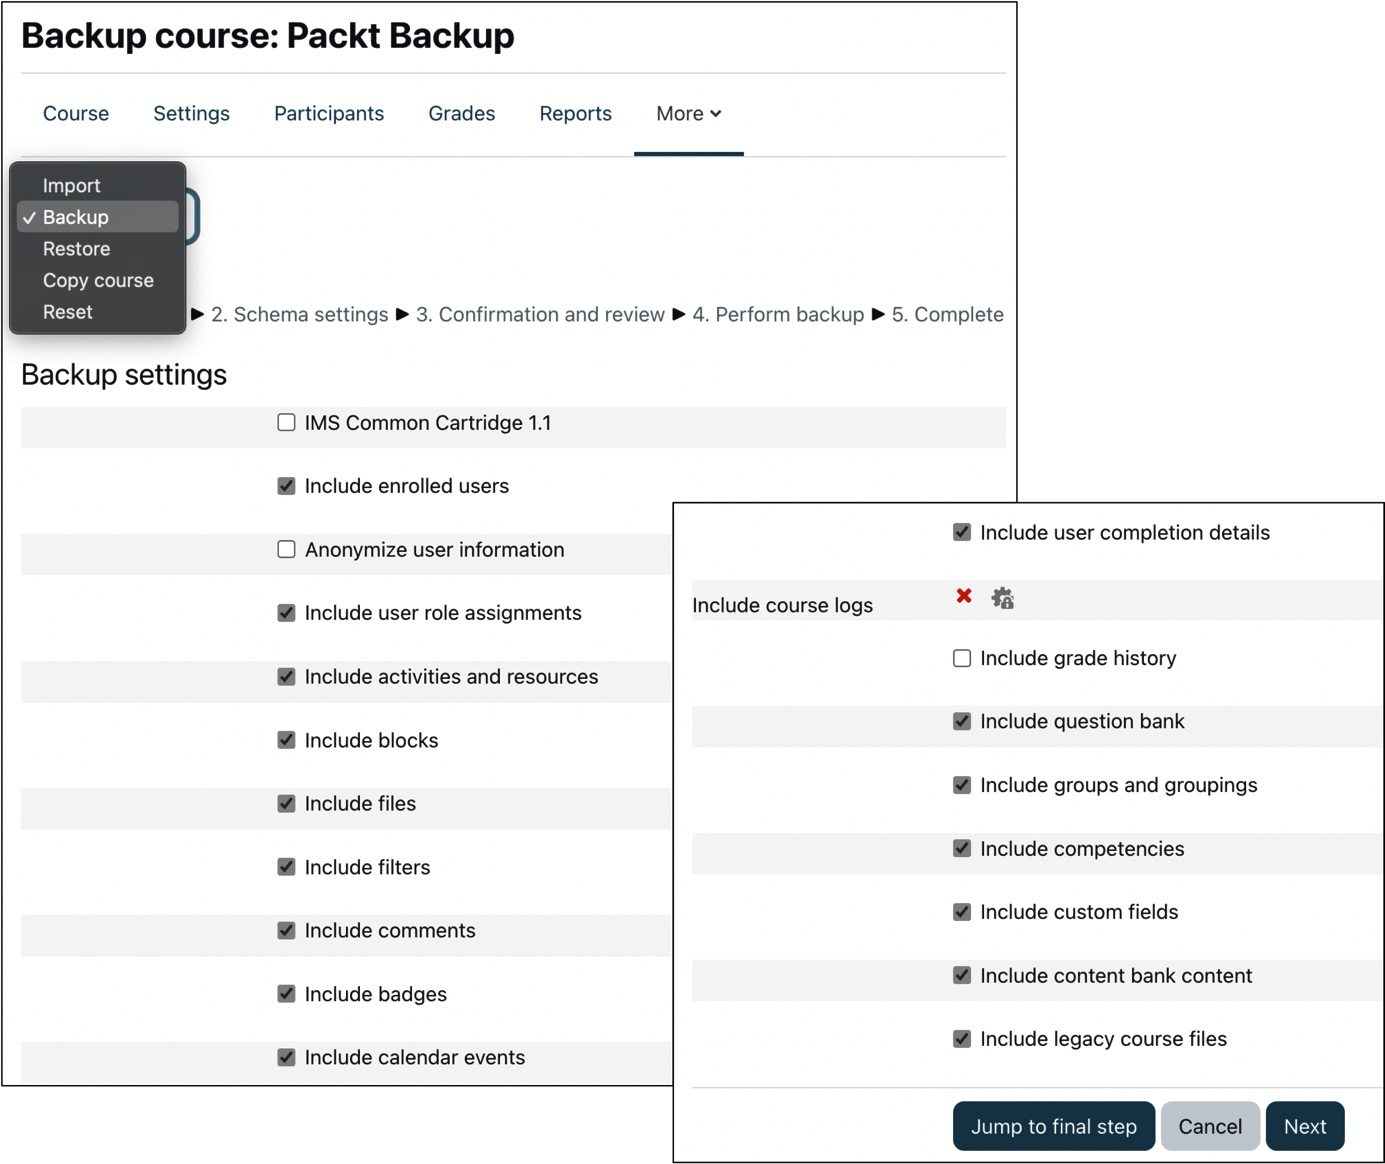
Figure 16.3 – Course backup – Initial settings
Some settings are only available if other settings have been activated; for example, Include user role assignments can only be ticked if enrolled users are included. Most options are self-explanatory, but two options require some commentary:
- If Anonymize user information is selected (Include enrolled users is a prerequisite), user data (username, first name, last name, and email address) will be substituted by aliases. For example, Jonny Walker might become anonfirstname69 anonlastname69.
- In addition to the standard Moodle backup format, IMS Common Cartridge 1.1 is a special format that’s supported. For more information on IMS CC, please consult the Moodle Docs at docs.moodle.org/en/IMS_Common_Cartridge_import_and_export.
By default, all options can be selected for all users who have the appropriate permissions in the course context. If you wish to change the default values and/or lock specific settings (such as Include course logs, as shown in the previous screenshot), go to Site administration | Courses | Backups | General backup defaults:
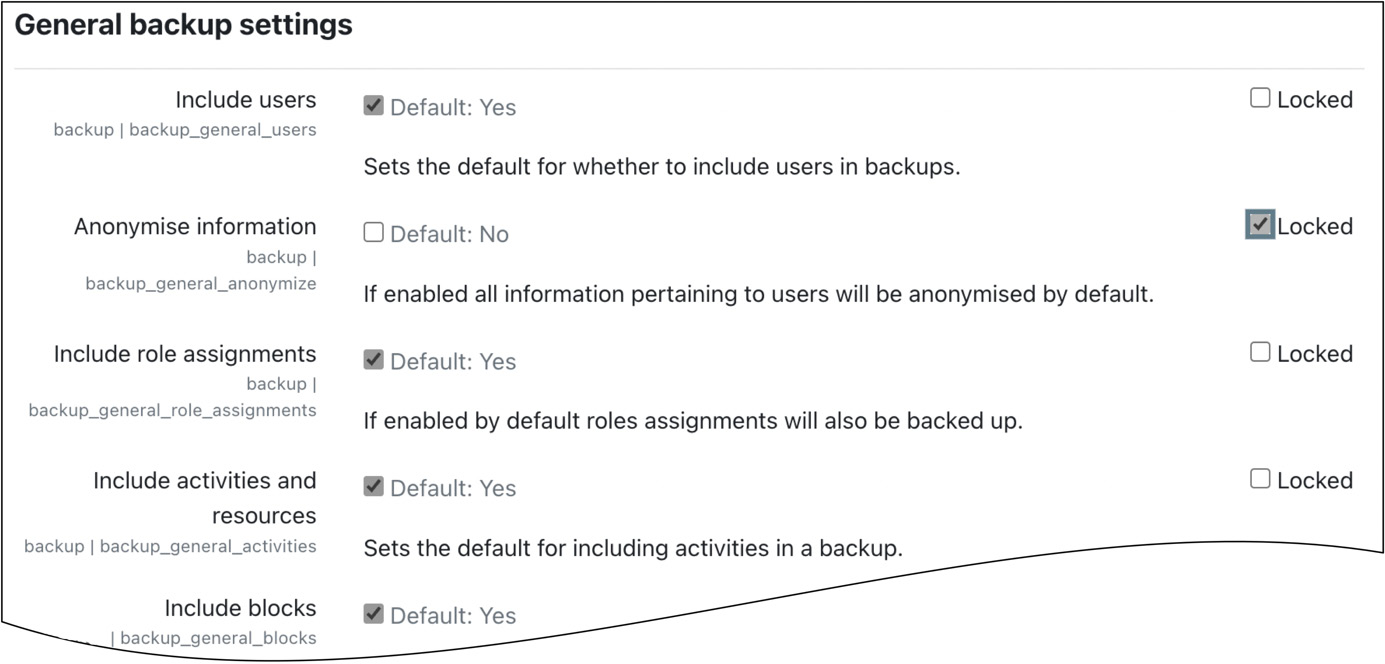
Figure 16.4 – Course backup default settings
For every setting, there are two checkboxes. The first represents the parameter’s default, whereas the second value indicates whether it is locked or not. Locking allows you to force specific settings, for instance, the exclusion of users.
There are usually two types of course backups that you are likely to perform:
- Content-only backups
As the name suggests, this type of backup only contains content that can be passed on to another person without transferring any information about its users, roles, grades, and so on. To perform a content-only backup, you must deselect Include enrolled users, which is a prerequisite for all user-related backup options.
A content-only backup is the best option if you wish to pass a course on to other educators or make it available for download. Another use case is to create a new instance of a course for yourself, for example, taking a course backup from one semester to use in a different semester. When you publish courses on a community hub or MoodleNet (refer to Chapter 19, Setting Up Moodle Networking), you will also create a content-only backup.
Important note
By default, users with teaching rights can only perform content-only backups. This restriction can be changed via the moodle/backup:userinfo capability, but it should be done carefully.
- Full-course backups
If you wish to back up a course for potential recovery purposes, you should create a full-course backup, which includes user data (for example, forum posts), course data, and user information. To do this, you can leave all the settings at their default values and use the Jump to final step button.
If you wish to back up the course logs, the Include course logs setting must be enabled. Remember that logs can be massive and often exceed multiple gigabytes when you’re backing up several courses.
Before we move on to the next screen, a note of caution: some third-party course-level plugins (activities, blocks, or filters) might not support backups. If you encounter any issues, you will have to exclude items created by these from the backup or, better, avoid the plugin altogether.
Schema settings
All learning resources and activities are shown in the order in which they appear in the course. Resources are only available if the Include activities parameter has not been deactivated on the previous screen. By default, all the available elements are selected; if you wish to exclude any individual items, you have to deselect them. Additionally, you can exclude/include all the items of a section by selecting/deselecting the section name itself:
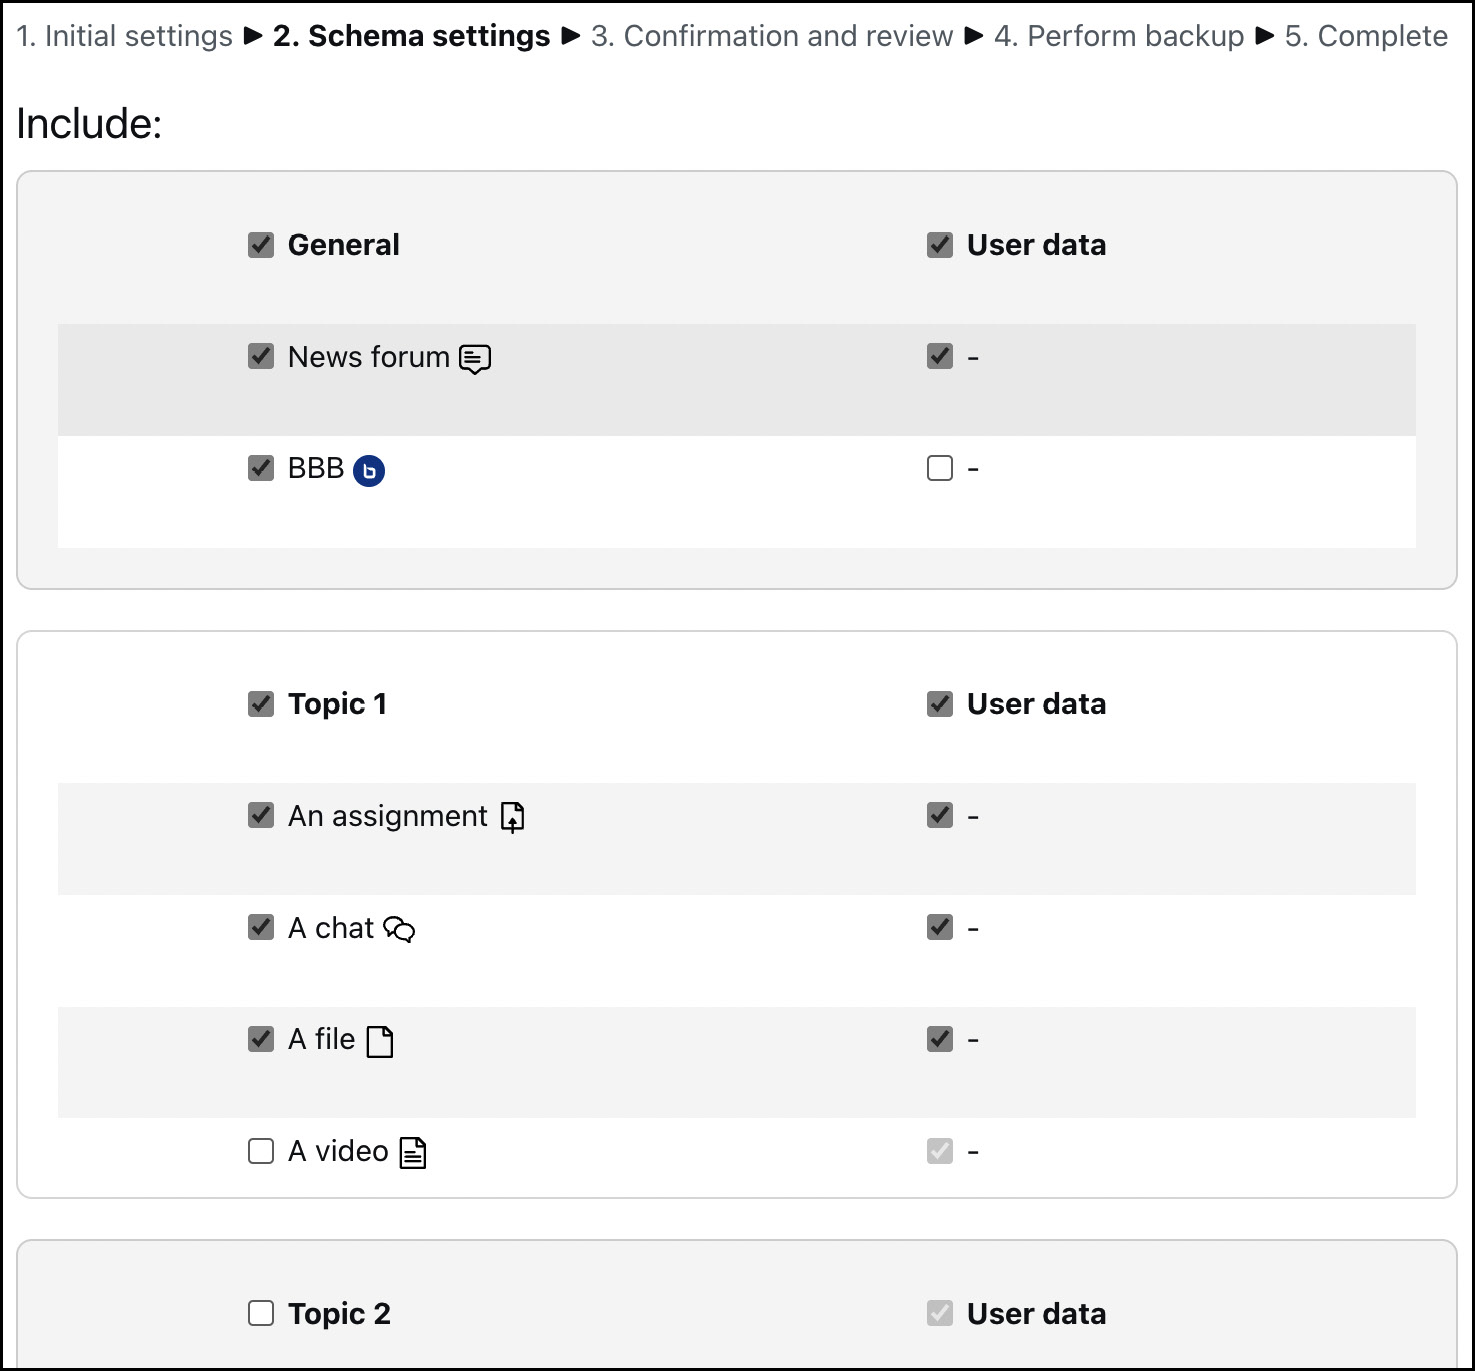
Figure 16.5 – Course backup – Schema settings
Moodle distinguishes between course content and user data. For example, the forum description and all its settings are classified as course content in a forum activity. In contrast, all topics, posts, and replies to a forum are classified as user data. If the Include enrolled users option has been left activated on the initial setup screen, user data can be included/excluded for each selected activity and resource.
Selecting the Next button will take you to the last course backup configuration screen.
Confirmation and review
The third screen lets you choose the backup filename and review the items to be included in the archive. The format of the default Filename is as follows:
backup-<type>-<format>-<course name/id>-<date>-<time>[-nu|-an].mbzAt the time of writing, <type> is always set to moodle2, and the only value supported for <format> is course. The optional –nu parameter stands for no users, and -an is an indicator for anonymous users.
If you have opted to create IMS Common Cartridge as the backup form, the .imscc extension will be used instead of .mbz:

Figure 16.6 – Course backup – Confirmation and review
Moodle creates a bespoke file format for backups, known as the Moodle Backup Format, using the .mbz extension. A Moodle backup file is a compressed file (in .tgz format) that consists of an XML file (which describes the file’s content) and the actual content, users, log data, and so on.
The additional Backup settings section shows which item has been selected and deselected on the initial settings screen. The Included items section indicates, with a green tick, all resources and activities that will be included, as well as any user data that will be part of the course backup. A red cross means that the item has been deselected, whereas a red cross followed by a lock indicates that it wasn’t possible to select the item since a prerequisite has not been fulfilled.
Once you press the Perform backup button, the Moodle course archive will be created.
Finalizing the backup
The created archive file is saved in the Course backup area. This process can take a few minutes, depending on the volume of data being backed up. If the Anonymize user data setting was chosen at the beginning, the backup file will be placed in the User private backup area.
Important note
Moodle backups include the course configuration, which contains course settings, activity arrangements, and block positions.
After completion, a brief status message is shown; you will have to take appropriate actions if this contains any errors or warnings.
Backups sometimes fail on large courses, and the cause is usually that the backup process runs out of time or memory. If this happens, you have two options that are not mutually exclusive:
- First, you can increase the Extra PHP memory limit setting by going to Server | Performance.
- Second, you can choose Enable synchronous backups by going to Site administration | Courses | Backups | Asynchronous backup/restore, which triggers Moodle to execute backups (and restores) as a separate background process:
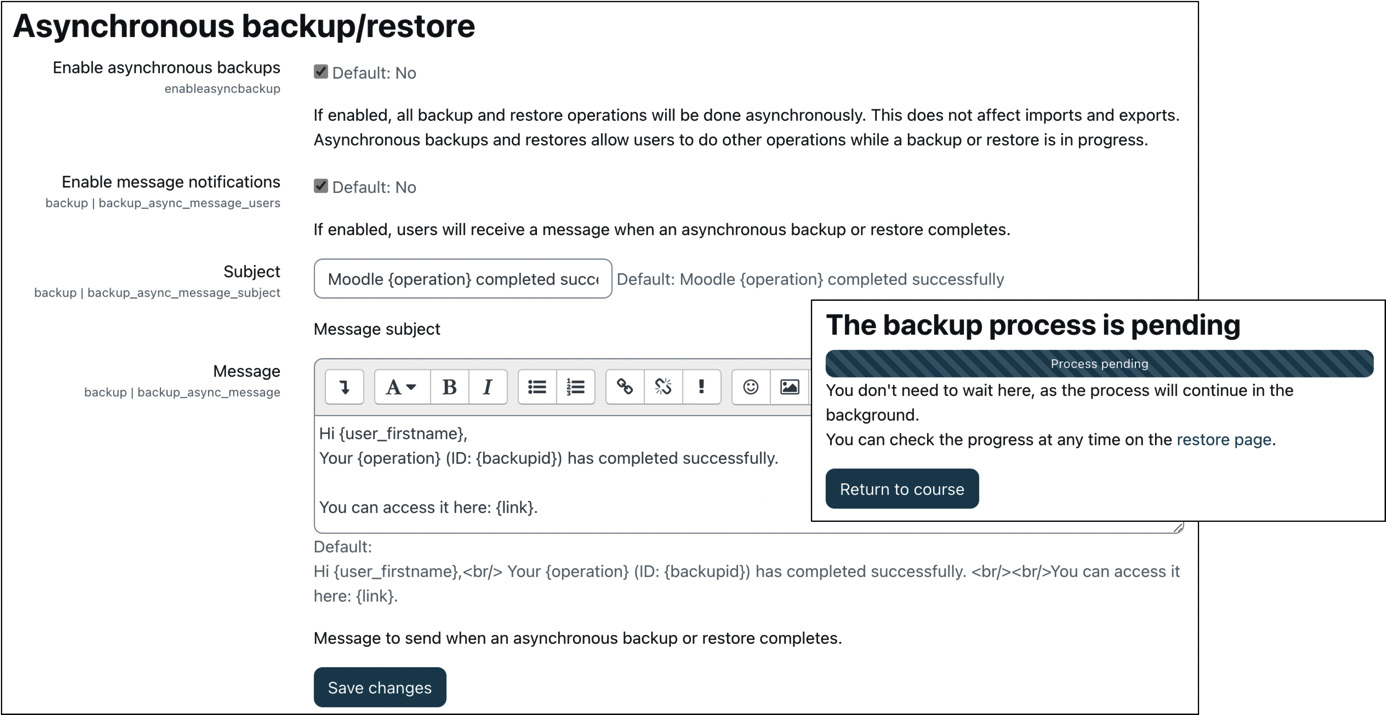
Figure 16.7 – Asynchronous backup/restore
Asynchronous backups only allow a user to have one pending backup for a resource at a time. Multiple asynchronous backups of the same resource can’t be queued, as this would likely result in multiple backups that contain the same content.
If you wish to notify the user who initiated the course backup when the process is completed, choose Enable message notifications and customize the Subject and Message properties of the notification that will be sent out.
This concludes this section on creating course backups. The reverse operation – restoring course backups – is the topic of the following section.
Restoring course backups
To wholly or partly restore a previously backed up course, it is best if you are inside that course, where you have to select the Course reuse option in the course menu and then select Restore from the dropdown. Alternatively, you can navigate to Site administration | Courses | Restore course.
Once you have selected a .mbz file, the restore procedure comprises seven steps, illustrated in the following diagram:
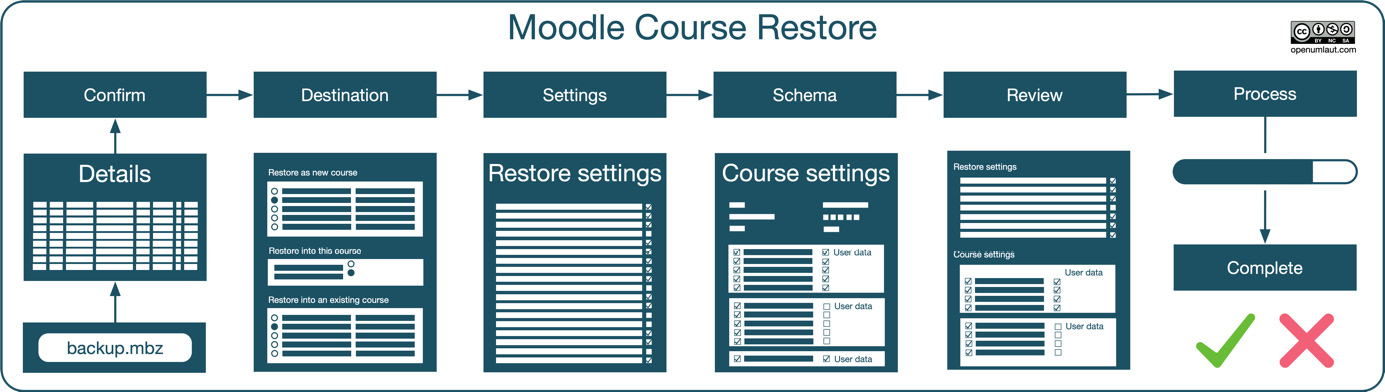
Figure 16.8 – Course restore workflow
As with the backup workflow, you can navigate back to any step via the process links at the top of the screen or using the navigation buttons at the bottom. We will go through the steps one by one in the following subsections.
File selection and confirmation
Moodle stores its backup files in different backup areas. There are four locations where you can choose a .mbz file to be restored, as shown in the following screenshot:
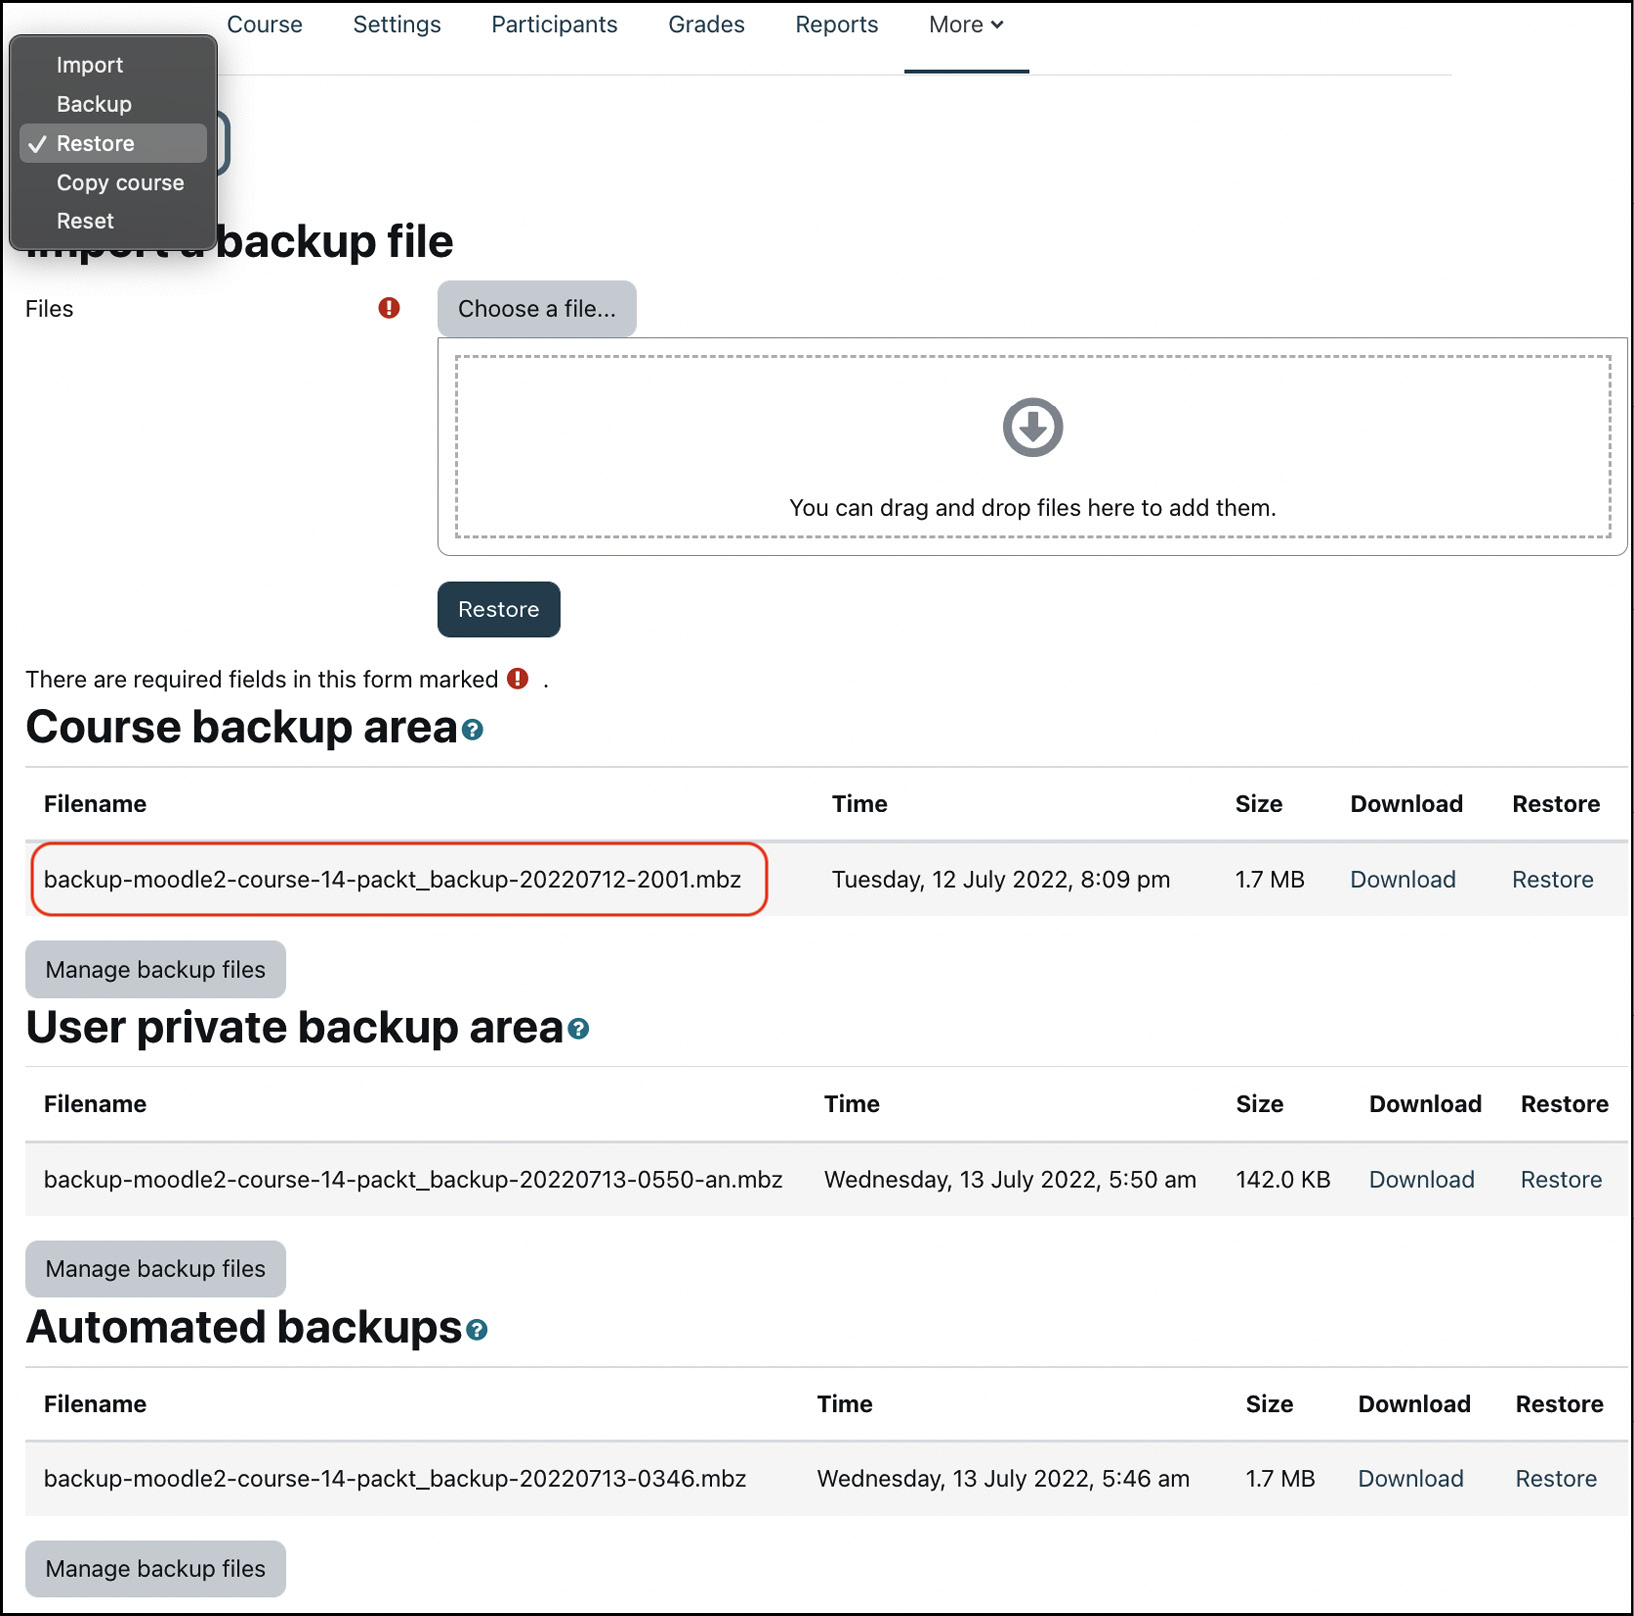
Figure 16.9 – Course backup areas
The four locations for Moodle archives are as follows:
- Import backup file: Archives that are usually stored outside of Moodle and selected via the file picker or drag’n’drop
- Course backup area: Archives created using default settings are stored in this area
- User private backup area: Archives with anonymized users are stored here
- Automated backups: Archives that are created automatically (see the Site backups section)
In the preceding example, a single course is present in the course backup area, called backup-moodle2-course-14-packt_backup-20220712-2001.mbz. From its filename, we already know that the course ID is 14, its name is Packt Backup, and that it was backed up on July 12, 2022, at 20:01.
Select the Restore link beside a backup file to start the recovery process. The first screen displays Backup details (type, format, mode, backup date/time, Moodle version, backup version, and the URL of the .mbz file), Backup settings (identical to the initial settings in the backup), and Course details. Once you have confirmed this information-only screen, you have to specify where you wish to recover the backup.
Selecting the restore destination
There are various options for restoring a course backup:
- Restore as a new course
- Restore into this course and merge the backup into this course
- Restore into this course, delete the contents of this course, and then restore it
- Restore into an existing course and merge the backup into the selected course
- Restore into an existing course, delete its contents, and then restore:
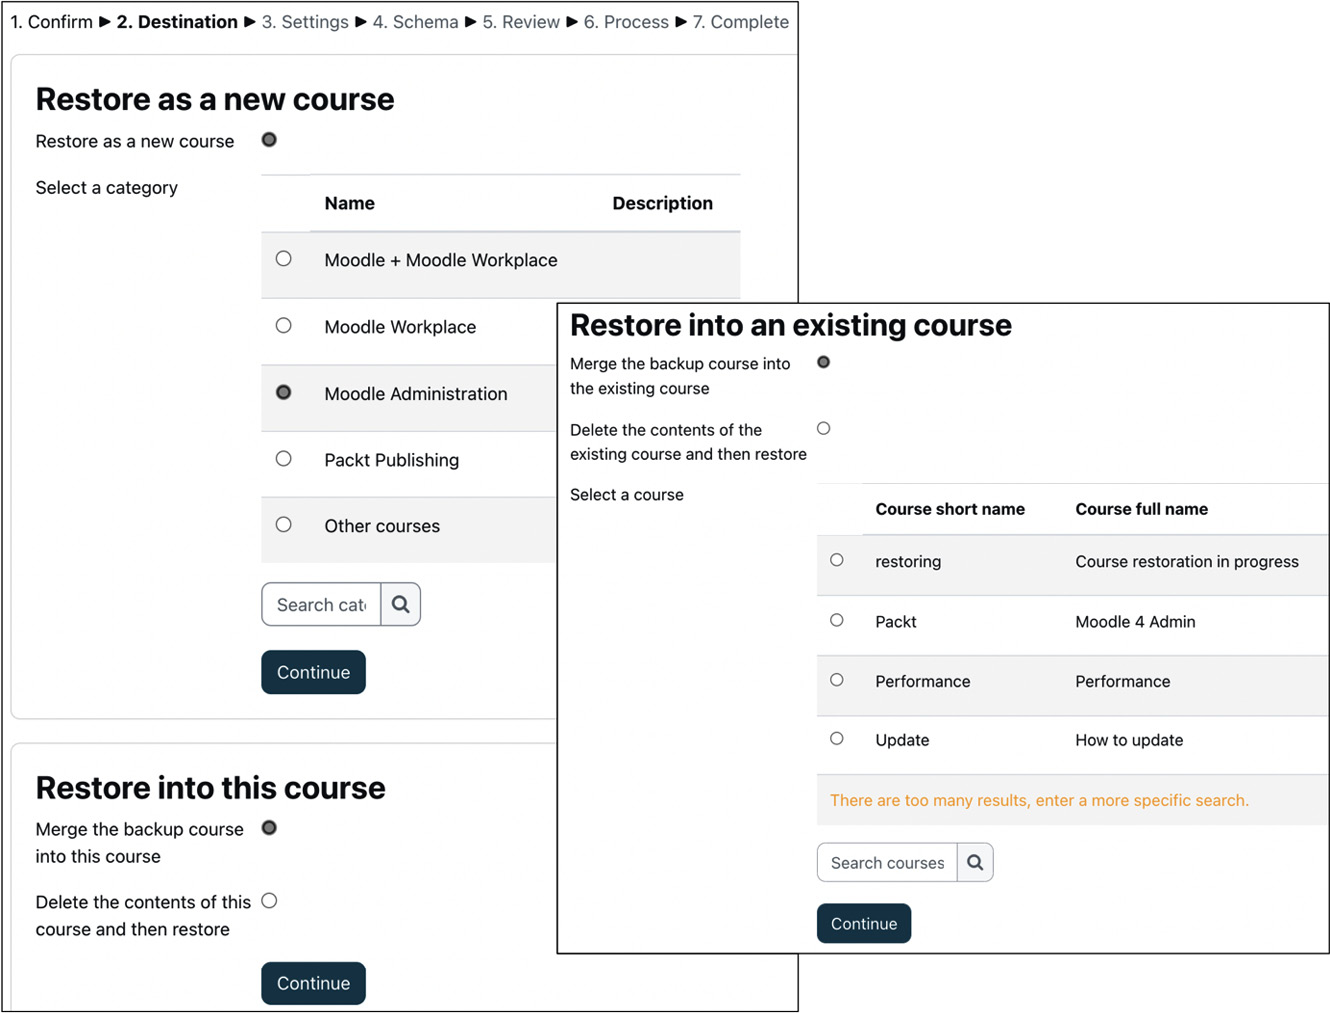
Figure 16.10 – Course restore – Destination
If you wish to Restore as a new course, you will have to select a category in which the new course will be created. You must use the provided search facility if the number of categories exceeds 20. Alternatively, you can choose the current course as the destination (Restore into this course). You can either combine the current course content with the backup (Merge the backup course into this existing course) or replace it (Delete the contents of this course and then restore). If you choose the merging option and an activity or resource with the same name exists, both will be kept and not overridden. The third option is to restore the course to another existing course, which you have to select. The same options (merge and replace) exist to restore the backup in the current course. Make sure you click on the correct Continue button before you proceed.
Restore settings
The Restore settings screen shows all the available options that were selected during the backup process (refer to the preceding Initial settings section). As shown earlier, the choices made here determine the types of data that will be recovered, and which type of content will be offered for further selection. Also, most options have prerequisites that are identical to their backup counterparts.
If you wish to change the default values and/or lock specific settings, go to Site administration | Courses | Backups | General restore defaults. For every parameter, there are two checkboxes. The first represents the setting’s default, whereas the second value indicates whether it is locked or not. Locking allows you to force specific settings, for instance, the exclusion of users.
The backup schema
Depending on your choices on the previous two screens, the schema step lets you specify several course settings. If you restore the backup to an existing course, you have the option to overwrite its settings. These are Course name, Course short name, and Course start date. You can further choose to Keep current roles and enrolments (if these are part of the backup), Keep current groups and groupings (if stored in the backup), and use the course settings of the backup file instead of the current ones (Overwrite course configuration):
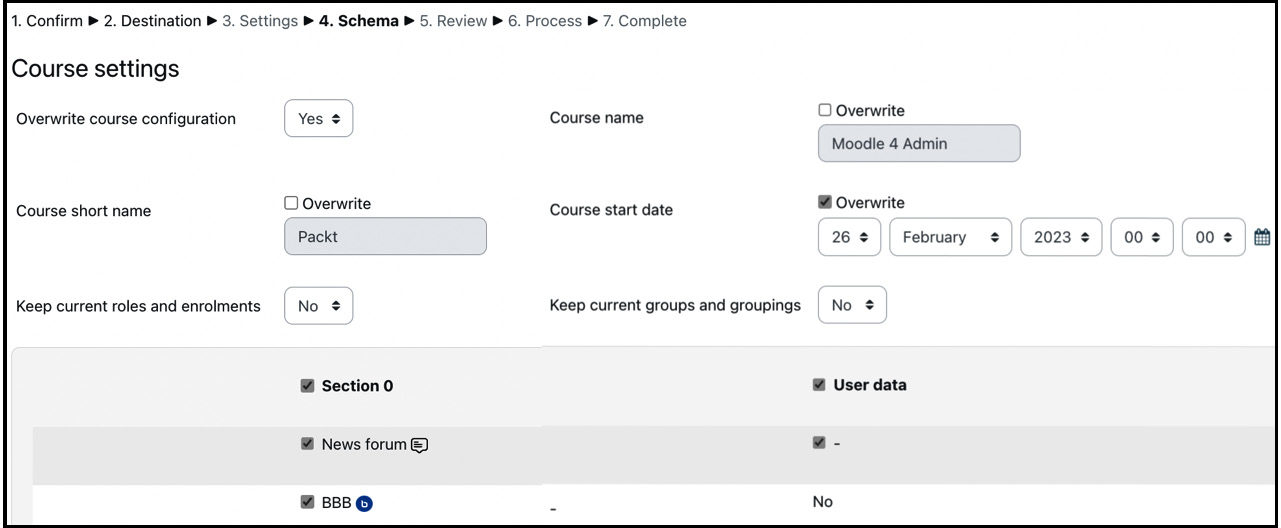
Figure 16.11 – Course restore – Schema
You must also choose which content and user data to include in the recovery procedure. The selection mechanism is very similar to the backup equivalent described earlier. By default, all the data that is present is selected. If you wish to narrow down the data to be restored, you must manually deselect items.
Finalizing restore
After the final familiar-looking Review screen, the restore process is initiated once the Perform restore button is pressed. Any selected data will be recovered to the chosen destination. After completion, a summary message is shown.
If the restored course contains any roles that do not exist on your Moodle system, a role mappings step will be shown, where you must map roles manually to ensure consistency:
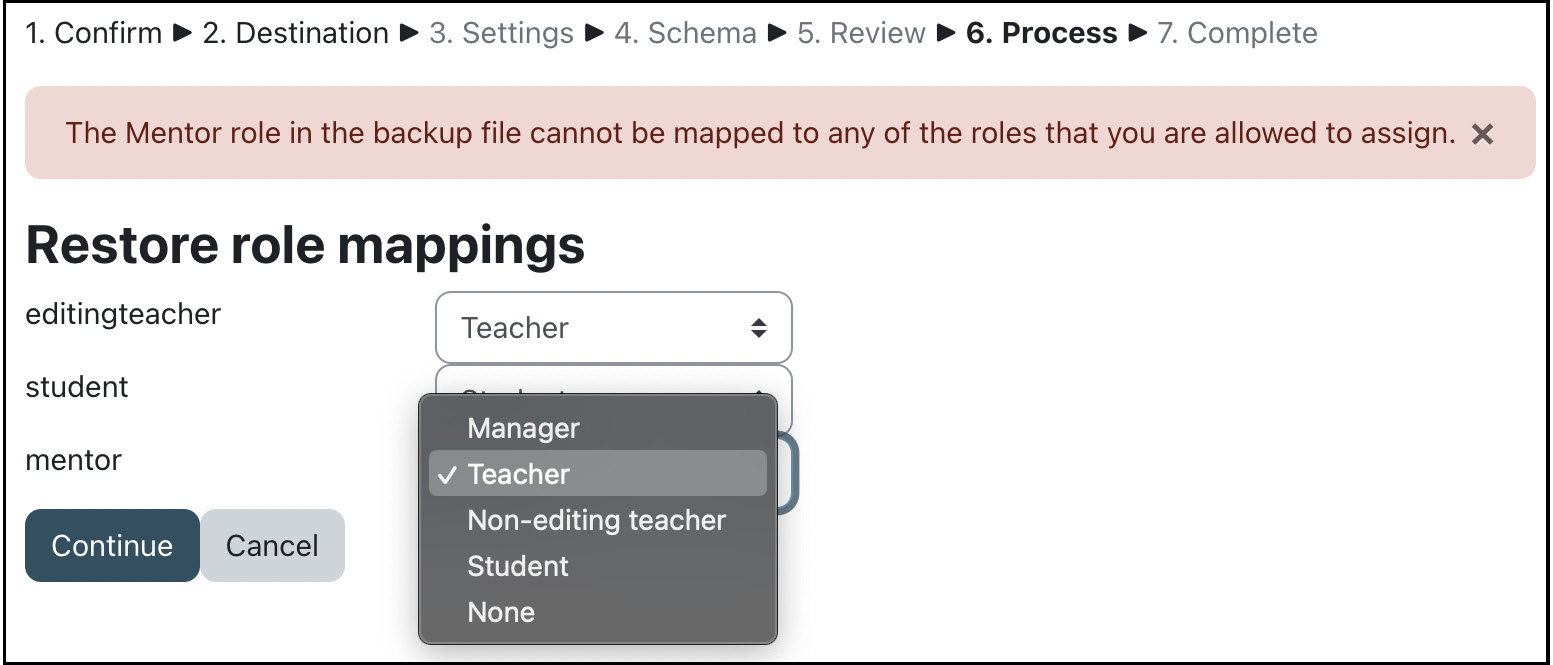
Figure 16.12 – Course restore – Restore role mappings
This completes this section on restoring course backups. Before we move on to site backups, let’s cover a feature closely related to course restore: course import.
Importing course data
It is sometimes necessary to copy data from one course to another. To achieve this, Moodle provides the import course data feature. However, unlike the backup function, it will not import user data, such as assignment submissions or forum posts – it will only import the structure of activities, blocks, and filters. For example, you might want to import a single quiz from one course to another.
Teachers can import content from courses for which they have editing rights; as an administrator, this restriction does not apply. This mechanism bypasses the requirement for a backup and restore procedure if you want to copy course content from one course to another and do not require user data.
To copy course data, you need to be inside the receiving course, where you have to select the Course reuse option in the course menu and then select Import from the dropdown.
The import procedure comprises six steps, as illustrated in the following workflow:
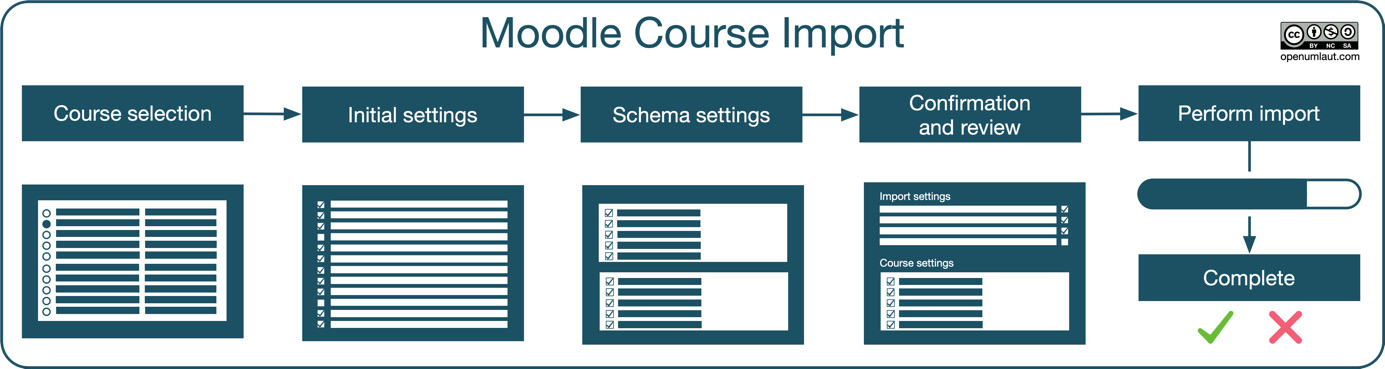
Figure 16.13 – Course import workflow
As with the backup and restore workflows, you can navigate back to any step via the process links at the top of the screen or the navigation buttons at the bottom. Since the course import feature is effectively a subset of the course backup and restore functionality, we will only briefly mention each step in the process:
- Course selection: You must select a course from which you wish to import content. Use the provided search facility if the list exceeds 10 courses (default value). You can also select the current course; this way, you can duplicate multiple activities.
- Initial settings: Choose which course items you wish to import. Note the absence of user-related options.
- Schema settings: A familiar screen for selecting topics and activities.
- Confirmation and review: Import settings and included items are shown.
- Perform import: Go, go, go!
- Complete: A summary message is shown.
If you wish to change the default values and/or lock specific settings, go to Site administration | Courses | Backups | General import defaults. There are two checkboxes for every setting, and the same logic applies as for the backup and restore defaults. On this screen, you can also specify the Maximum number of courses listed for import option.
Importing concludes this section on course-level archives, where the focus has been on creating and restoring individual course backups. To automate this process across courses, site-level backups are needed, which we will cover in the following section.
Managing site-level backups
So far, we have dealt with backing up single courses. Site-level backups perform the same operation for every course in your system, including hidden courses and the home page.
Before we look at backup reports and notifications, we will configure automated backups. We will conclude this section with some backup strategies.
Configuring automated backups
Go to Site administration | Courses | Backups | Automated backup setup to schedule site backups. Here, you will see the following settings:
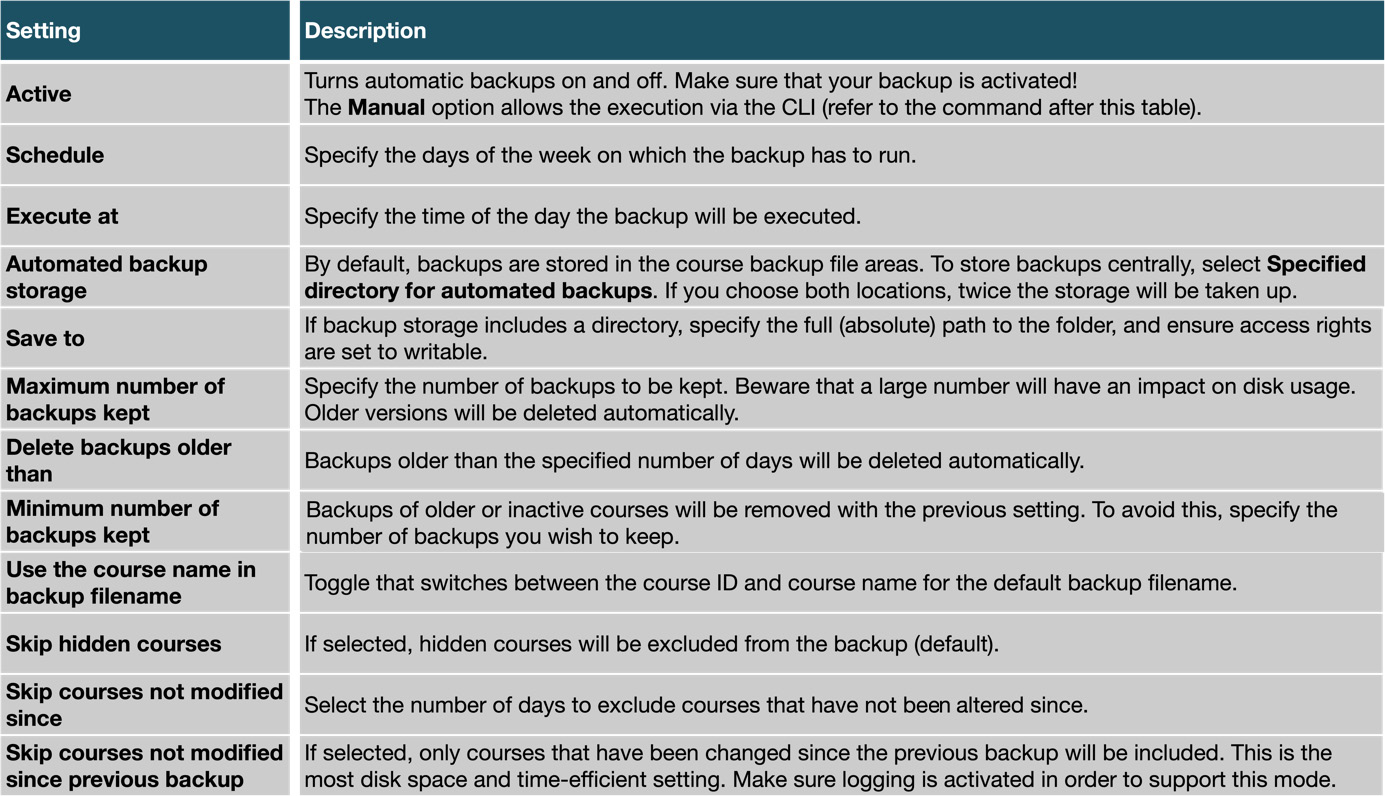
Figure 16.14 – Automated backup configuration
The remainder of the configuration page covers Automated backup settings, which specify which elements will be included in the backup. These are identical to the initial backup settings, except for the anonymize option, which has been excluded.
For the backup to start automatically at the specified time, the cron process must be configured correctly, which we covered in Chapter 1, Installing Moodle. Alternatively, you can initiate the backup process via the CLI, which executes the same script that’s called by the cron process. The command execution from the shell or for the inclusion in scripts is as follows (assuming the Apache user is www-data):
sudo –u www-data /usr/bin/php admin/cli/automated_backups.php
Recovering courses from an automated backup is identical to restoring data from course-level backup archives.
To ensure that the backups are running correctly, Moodle provides a backup report and notifications, which we will explain in the following subsection.
Backup reports and notifications
As a Moodle administrator, you must ensure that the backup execution has been successful. For this purpose, Moodle provides a backup report, which you can find by going to Site administration | Reports | Backups. It shows a log of the last execution:
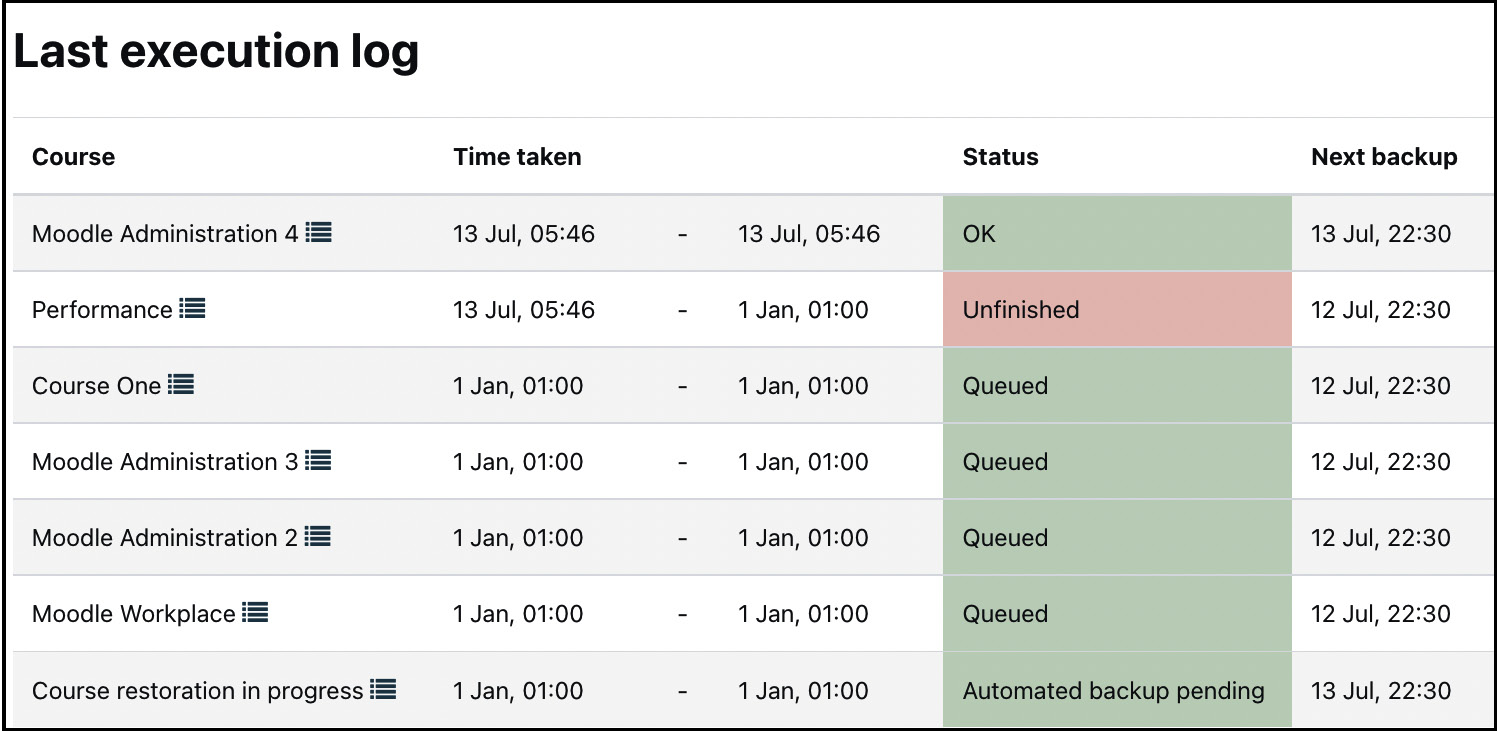
Figure 16.15 – Automated backup configuration
The report provides details for each Course being backed up, namely Time taken (start and end time), Status, and the date and time of its Next backup.
Courses in which there hasn’t been any activity for 30 days – that is, no changes have been made to the course content, and no users have used the course – are excluded from the automated backup, and the status is shown as Skipped.
As a Moodle administrator, you will receive an email after the scheduled site-level backup has been completed. It provides details on the total number of courses backed up and a split of how many course backups were okay, contained errors, were unfinished, and were skipped. Ensure your email settings have been configured correctly (refer to Chapter 10, Configuring Technical Features). It is highly recommended that you check the content of this email every day.
To ensure the smooth and reliable execution of your automated backups, you must have an adequate backup strategy in place, which we will discuss next.
The backup strategy
There are several issues to consider when running automatic site-wide Moodle backups:
- Backup content: Ensure that everything included in the archives is needed, and anything that is not required is excluded. Do you have to back up the entire logs and gradebook history every night?
- Backup size: The size of the backup files can be potentially huge (multiple gigabytes). Ensure that you only keep the number of backups that are required and your setup can cope with.
- Backup timing: The backup operation is a CPU and hard disk-intensive operation. Make sure you schedule its execution when the load on the site is relatively low. If you run multiple sites on the same server, it is recommended to time-stagger backups or create a script that uses the described CLI. An alternative approach is to set up a dedicated backup server.
- Backup frequency: Do you need seven daily backups, or are weekly backups sufficient? Are there periods (such as weekends) when you can switch off the backup facility altogether?
- Backup location: By default, all backup files are saved to the respective courses, which means that the backups are held on the same server as Moodle. If you have to recover multiple courses, you must locate each archive separately, a potentially mind-numbing and time-consuming exercise.
You might want to consider storing your backups on an external device (external disk, NAS drive, SAN, and so on). An alternative to this approach is to mount a backup device and include its content in the organization-wide backup.
Site-level backups are a great way to automate course backups and simplify educators’ lives. However, they only back up courses, not the entire system. While this is sufficient if you have to recover a single course or some activities, it is insufficient in a disaster scenario when the entire system has to be recovered.
Important note
You should not use the course backup facility as your sole backup system.
Instead, system-level backups should be used as a supplement, which we will look at next.
Managing system-level backups
System-level backups cannot be configured or executed from within Moodle. Instead, they must be set up at the system level. If your system is hosted externally, there is a possibility that you will not have access to the system level, which will prevent you from performing this type of backup. Unless the host already runs system-level backups on your behalf, it is time to change to another provider!
There are two types of system backups that are not mutually exclusive:
- Moodle backups: These create an archive of Moodle itself, the application data, and any application configuration
- Snapshots: These create an image of the system, which is used for disaster recovery if the system has to be rolled back in its totality
We will briefly cover both approaches in the following two subsections.
Moodle backups
Moodle distinguishes between the application software and the data stored in it. The advantage of this separation becomes apparent when creating backups: a software backup is only required when an update has been installed or customization is taking place, whereas data should be backed up more frequently.
Backing up the Moodle software itself is straightforward: you must create a copy of the directory and all its subdirectories where the Moodle software is installed (usually called moodle). Most administrators would create a single archive of the directory for easier handling (in Unix, simply use tar -cvf <backupfile>). This step is usually only required before a system upgrade or when you need to archive your entire system.
Moodle stores its data in two separate locations:
- Moodle database: Most content is stored in the Moodle database. You can either use the export feature of phpMyAdmin (if installed) or use the following mysqldump shell command for MySQL and MariaDB to create a single backup file:
mysqldump -u <username> -p [-h <databasehost>] -C -Q -e -a <database> > <backup-file>.sql
<username> has to be replaced with the database username, –p will ask you for a password, and –h <databasehost> is only required if the database is located on a separate server. The <database> option is the name of the database, and <backup-file> is the name of the archive to be created. It is common practice to use the .sql extension.
To recover the database dump, use the following mysql shell command:
mysql -p <database> < <backup-file>.sql
For other database types, refer to the respective administration guides.
- Moodle data directory ($CFG->dataroot): This is where all contributed files reside – for instance, submitted assignments, language customizations, user profile pictures, videos, and so on. Like the Moodle system, all you have to do is create a copy of the directory and all its subdirectories. It is crucial to stop Apache while performing the backup to guarantee that the content does not go out of sync.
The advantage of this approach is that it is less resource-intensive, can be scripted, and recovering the entire Moodle system is far more straightforward. However, it is impossible to retrieve individual activities without setting up a temporary server, as is possible with course backups.
Snapshot creation
Creating snapshots is only briefly mentioned here for completeness as it is not a Moodle administrator role but a system administrator task. However, you should ensure that such a mechanism is set up in case of hardware failures or other system issues.
A snapshot is an image of the entire partition(s) on the hard disk(s) that contain(s) the Moodle software itself, as well as all the data (database and data directory). The advantage of the snapshot is that the entire system can be rolled back to the point when the image was created. However, any data that has been added or modified since this point in time will be overridden. Snapshots cannot be used to recover a single course or parts thereof but to fully replace the system.
Important note
No matter what combination of backups you choose, frequently verify that the backup procedure is working. There is nothing worse than a false sense of security – that is, assuming that all your data is backed up when it isn’t!
This concludes this section on site-wide backups, which covered Moodle backups and snapshots. The following checklist provides a quick summary of the backup and restore configurations that should be taken care of:
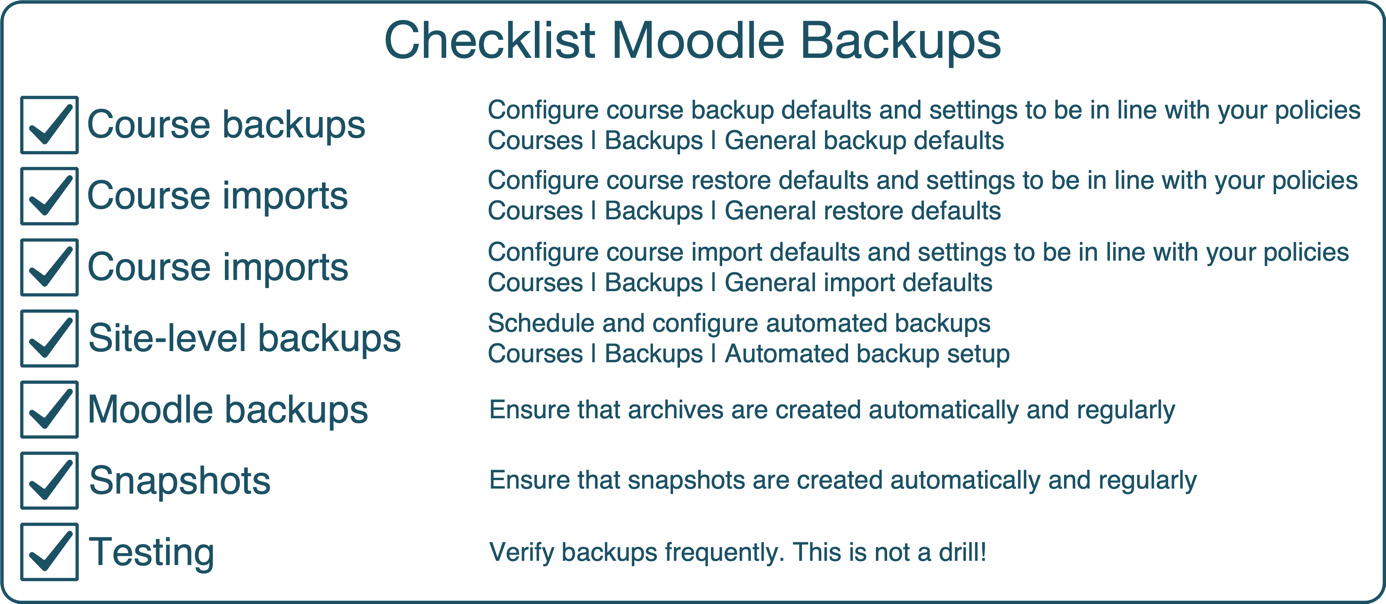
Figure 16.16 – Backup checklist
We will finish this chapter by looking at two use cases that utilize Moodle’s backup and restore features.
Using backup and restore for alternative tasks
While the prime purpose of backups is the recovery of data in case of loss, some applications can be carried out using the techniques covered in this chapter. We will briefly describe two of them: year-end procedure and course templates.
Planning the year-end procedure
Most organizations have some sort of year-end procedure in place, which might be at the end of an academic year, a term, the financial year, or, in the case of roll-on-roll-off setups, every month. Given the nature and importance of the procedure, each step should be planned well in advance. The key considerations are as follows:
- When do you run the year-end procedure?
- What has to be done?
- Who is involved?
- Where will the archives go?
The following is a list of typical steps that might or might not apply to your setup. It gives you an idea of how such a procedure may look and demonstrates the importance of the backup facility:
- Archive: Create full backups of all courses and consider including a system backup. Ensure archives are stored on a separate medium.
- Grade export: Export grades course by course to store them on your student management information system.
- Course reset: Use the reset feature at the course level to remove any user data. (Resetting courses can also be done in batch mode. Refer to the Managing courses in bulk section in Chapter 4, Managing Courses and Enrolments.)
- Delete users: Remove users who have left the organization or disable their accounts.
- Next-year preparation: Hide or delete obsolete courses and add new courses. Add new users and assign roles to courses.
This is only a crude outline of tasks to be considered. Ensure you have a detailed plan for this type of exercise before you kick off the year-end procedure.
Implementing course templates
There is often a requirement to create course templates, which are used as a basis to create multiple courses. This process might be in an organization that emphasizes the homogeneity of course structure and layout or an education establishment that wants to simplify the work of its course creators. The steps to achieve this are as follows:
- Create a course that will become your course template.
- Add all the elements (activities, resources, filters, blocks, and so on) to the course, change its settings, and arrange the content as required.
- Create a content-only backup of the course.
- You can now use the restore mechanism to create as many courses from this template as you wish. (This operation can also be done in batch mode. Refer to the Managing courses in bulk section in Chapter 4, Managing Courses and Enrolments.)
- Alternatively, use the Copy course feature in the Course reuse menu at the course level instead of performing Steps 3 and 4. However, course copying cannot be done in batch mode.
- Optionally, you can grant users appropriate rights to the course so that they can use the import facility.
The preceding list requires you to perform some manual steps to implement a course templating mechanism. You may find more user-friendly approaches in the Moodle plugin database at moodle.org/plugins, such as Kickstart (moodle.org/plugins/format_kickstart).
Summary
In this chapter, we dealt with various Moodle backup alternatives. You learned how to create course-level, site-level, and system-level backups, as well as how to perform data recovery from each type. Your Moodle backup strategy must fit in with your organization’s overall disaster recovery plan. We also saw some applications that use the covered backup and restore facilities.
Moodle offers a good range of backup and restore options. Ensure that they are configured correctly and run test recoveries to be on the safe(r) side. There is nothing worse than a false sense of security – that is, assuming that all your data is backed up when it isn’t!
In the next chapter, we will cover a collection of useful and not-so-useful Moodle admin tools.