
17
Working with Moodle Admin Tools
Moodle ships with several administration tools that have not been allocated to a particular topic; some are not even directly accessible via the familiar admin web interface.
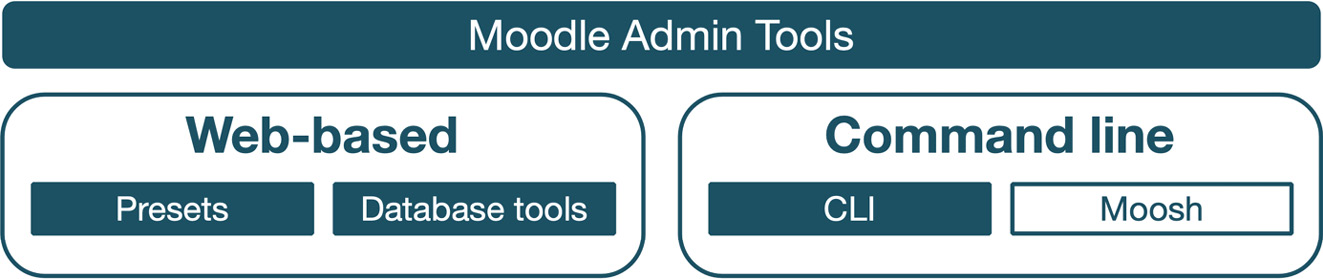
Figure 17.1 – Moodle admin tools
We have grouped the admin tools into the following categories, each presented in a separate section:
- Site admin presets: Presets allow you to create backups of site settings that can be rolled back in case something goes wrong.
- Database tools: These tools let you apply specific database actions. In addition to the tools part of Moodle core, we will cover a useful external tool called Adminer that lets you manage the underlying database directly from within Moodle.
- Command Line Interface (CLI): The CLI is a built-in mechanism that allows us to automate administrative processes via the command line or shell scripts.
- Moosh: A powerful alternative to the CLI, Moosh is the third-party Moodle Shell. We will learn how Moosh works and provide some practical examples.
Before we cover these admin tools in detail, let’s explore how they are organized in Moodle.
Exploring Moodle admin tools
Moodle’s classification of what constitutes an admin tool is a little vague. When you navigate to Site administration | Plugins | Admin tools | Manage admin tools, a long list of plugins is shown:
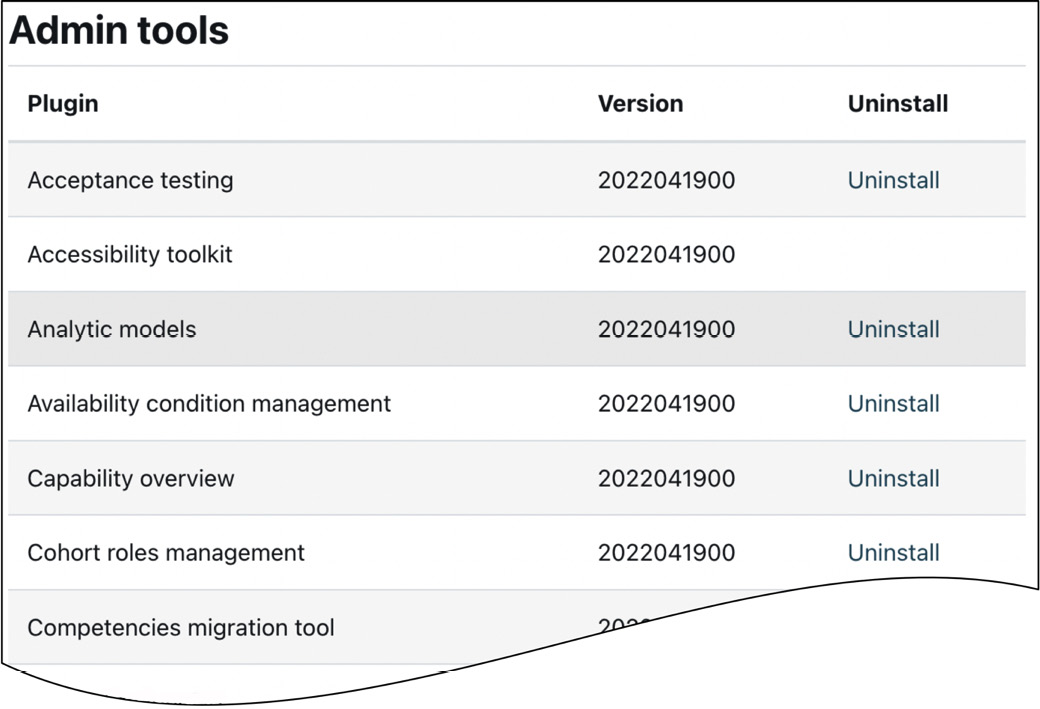
Figure 17.2 – Moodle admin tools
We can group admin tools into the following categories:
- Conversion tools: These tools are usually only applied once to migrate a feature from an old state to its current counterpart. Examples are the HTTPS conversion tool (see Chapter 13, Ensuring Moodle Security) and Multilang upgrade (see Chapter 10, Configuring Technical Features).
- Database tools: These are tools to work with Moodle’s underlying database. We have dedicated an entire section to database tools in this chapter.
- Development tools: These tools are aimed at Moodle programmers – for instance, Acceptance testing (Behat), PHPUnit tests, and the XMLDB editor. You came across a development tool in Chapter 15, Optimizing Moodle Performance, when we dealt with profiling and used the course generator. We are not going to deal with development tools here.
- Design tools: These tools are aimed at theme designers – for example, the Template library or the UI component library. We are not going to deal with design tools, either.
- Standard Moodle features: Some admin features have been implemented as admin tools, such as the recycling bin, learning plans, or the task scheduler. This way, they could be uninstalled from Moodle if not needed, though this is not recommended.
Many tools of the first four categories are hidden from the Moodle admin web interface and can only be accessed by calling them directly via the URL: <yoursite>/admin/tool/<tool>. All core admin tools are located in subdirectories in $CFG->dirroot/admin/tool. For details of mostly non-standard admin tools, refer to docs.moodle.org/en/Admin_tools.
We are not covering any admin tools classified as standard Moodle features, since they are either dealt with elsewhere in the book or are irrelevant in the administrator context. However, one exception are site admin presets, the only feature that does not belong to any category in the site administration menu. So, let’s get started with our first admin tool.
Site admin presets
Presets allow you to create backups of site settings that can then be restored. There are several use cases where this facility comes in handy:
- Experimenting with a set of system settings and rolling back in case they didn’t work
- Applying the same set of configurations to multiple sites
- Migrating one Moodle site’s settings to another – for instance, your test instance to your production system
The workflow of Moodle admin presets is illustrated in the following diagram – a straightforward but very powerful tool:

Figure 17.3 – Site admin presets workflow
You find the Site admin presets tool in the General section of the Site administration area. It is the only Moodle feature that has not been placed in a menu category, hence its coverage in this chapter.
Moodle ships with two preconfigured presets that have been labelled Starter and Full. Details about its content are provided in the respective descriptions, as shown in the following screenshot, which contains a third preset that we will create in this section.
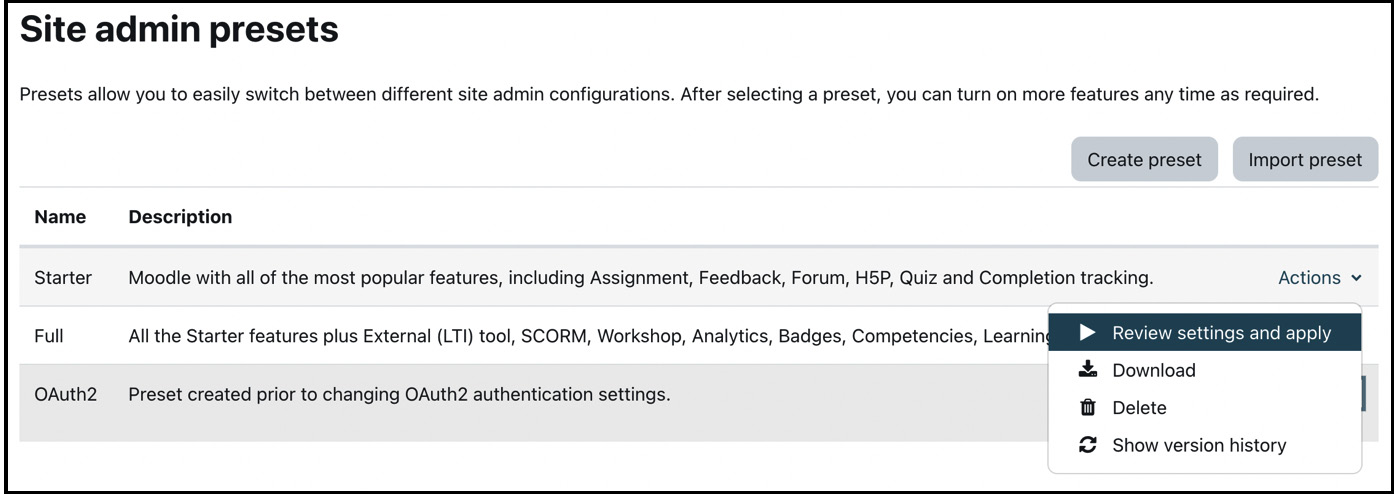
Figure 17.4 – Site admin presets
To make your first preset, click the Create preset button, and then you have to provide a name, an optional description, and an author, which is pre-populated with your name:
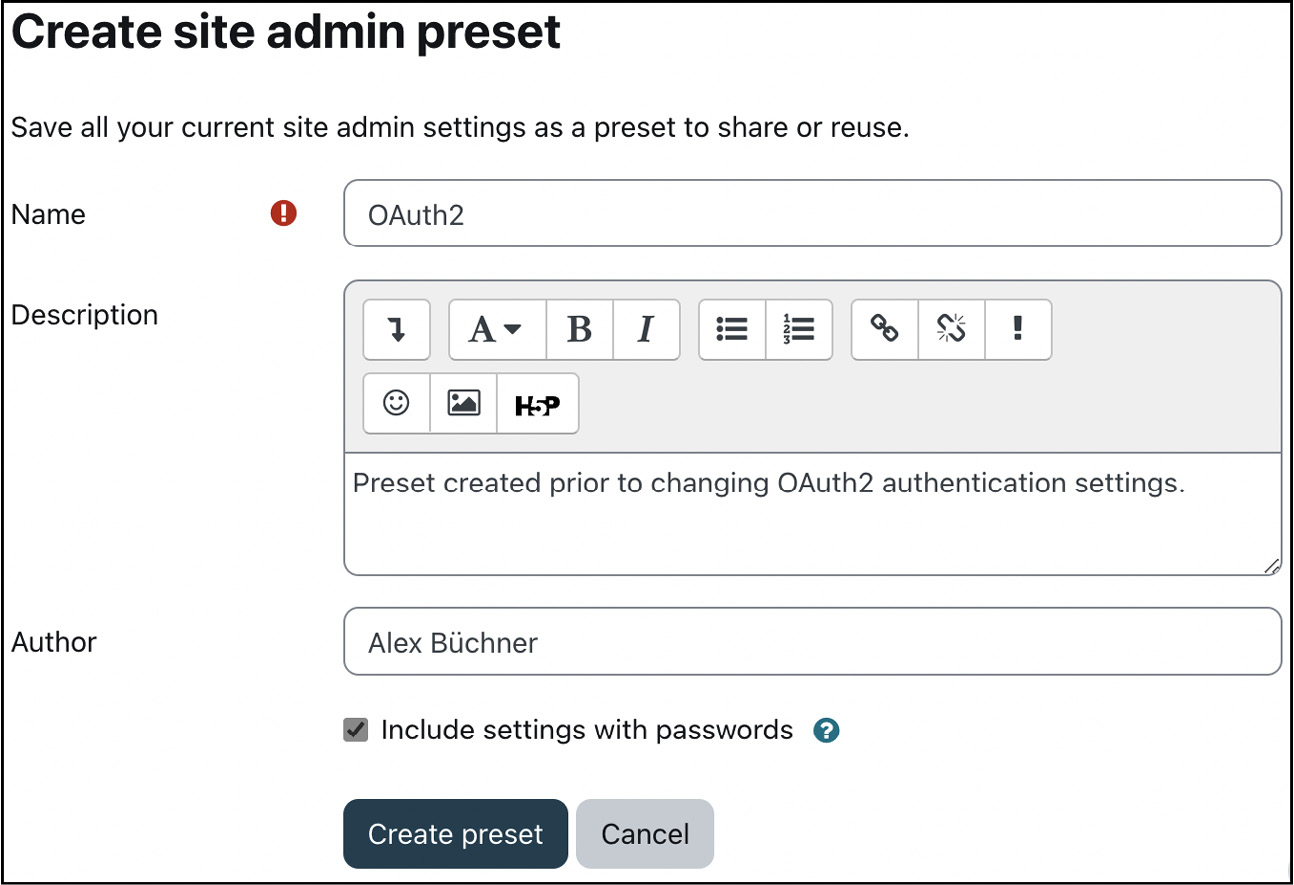
Figure 17.5 – Creating a site admin preset
The Include settings with passwords option will add any sensitive information – passwords, keys, and IPs – of your site to the preset, so ensure that this will only be applied internally. You can view and modify the list of fields to be excluded in the Settings with password field in Site administration | General | Security | Site security settings.
Once the preset has been created, it will appear in the list alongside the two default presets. The following actions are available for each preset:
- Review settings and apply: Details about the preset are shown, which include information on who created the preset (author), when (date and time), where (site URL), and on which Moodle version. As soon as you apply the admin preset, any site settings that differ from the preset will be applied, as shown in the following list of setting changes.
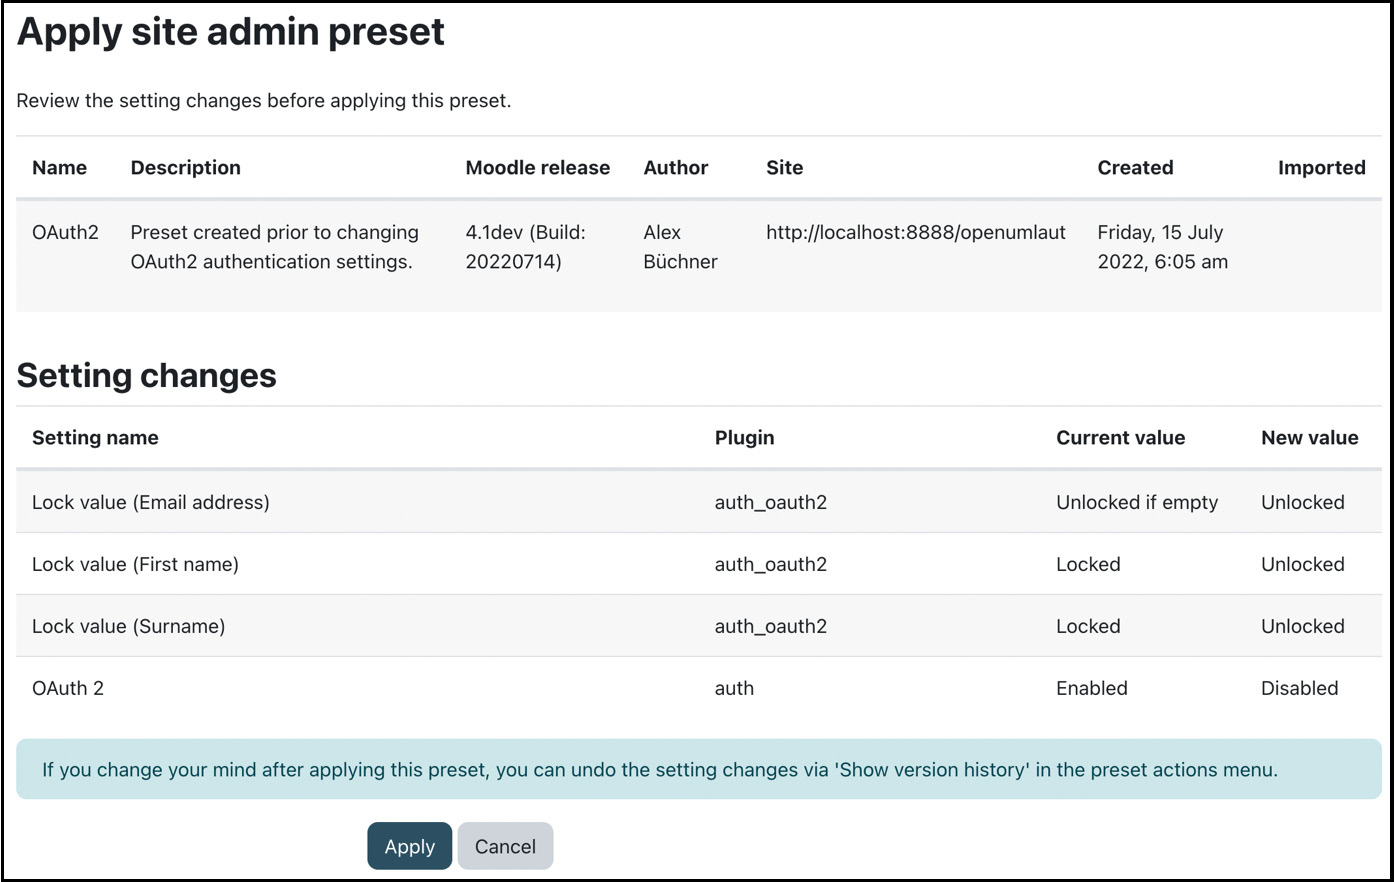
Figure 17.6 – Applying a site admin preset
- Download: Moodle exports the settings as an XML file. You can load an exported file via the Import preset button.
- Delete: Remove the preset permanently. The two default presets cannot be deleted.
- Show version history: If you change your mind after applying a preset, you can undo the setting changes via this action.
Site admin presets is a powerful tool during setup, maintenance, and when experimenting with new features.
Tip
It is good practice to store the presets of your production site as part of your system documentation.
Admin presets deal with your site’s configuration, stored in the underlying database. A number of dedicated database tools are discussed in the following section.
Database tools
Moodle’s database tools transfer databases from one server to another, perform search-and-replace operations on text strings in the entire database, and let you view or change any data in the database itself.
Transferring your Moodle database
If you have to move the database of a Moodle instance from one server to another or migrate to another Moodle system, you have two broad options. You can either create a database dump manually (or via the Adminer tool, which is covered later) or use the built-in database transfer facility.
The database migration tool is available at <yoursite>/admin/tool/dbtransfer. At the time of writing, the feature can also be accessed via Site administration | Development | Experimental | Database migration. As the category name suggests, the tool is experimental and might make it into core or might disappear again from the admin interface in future releases.
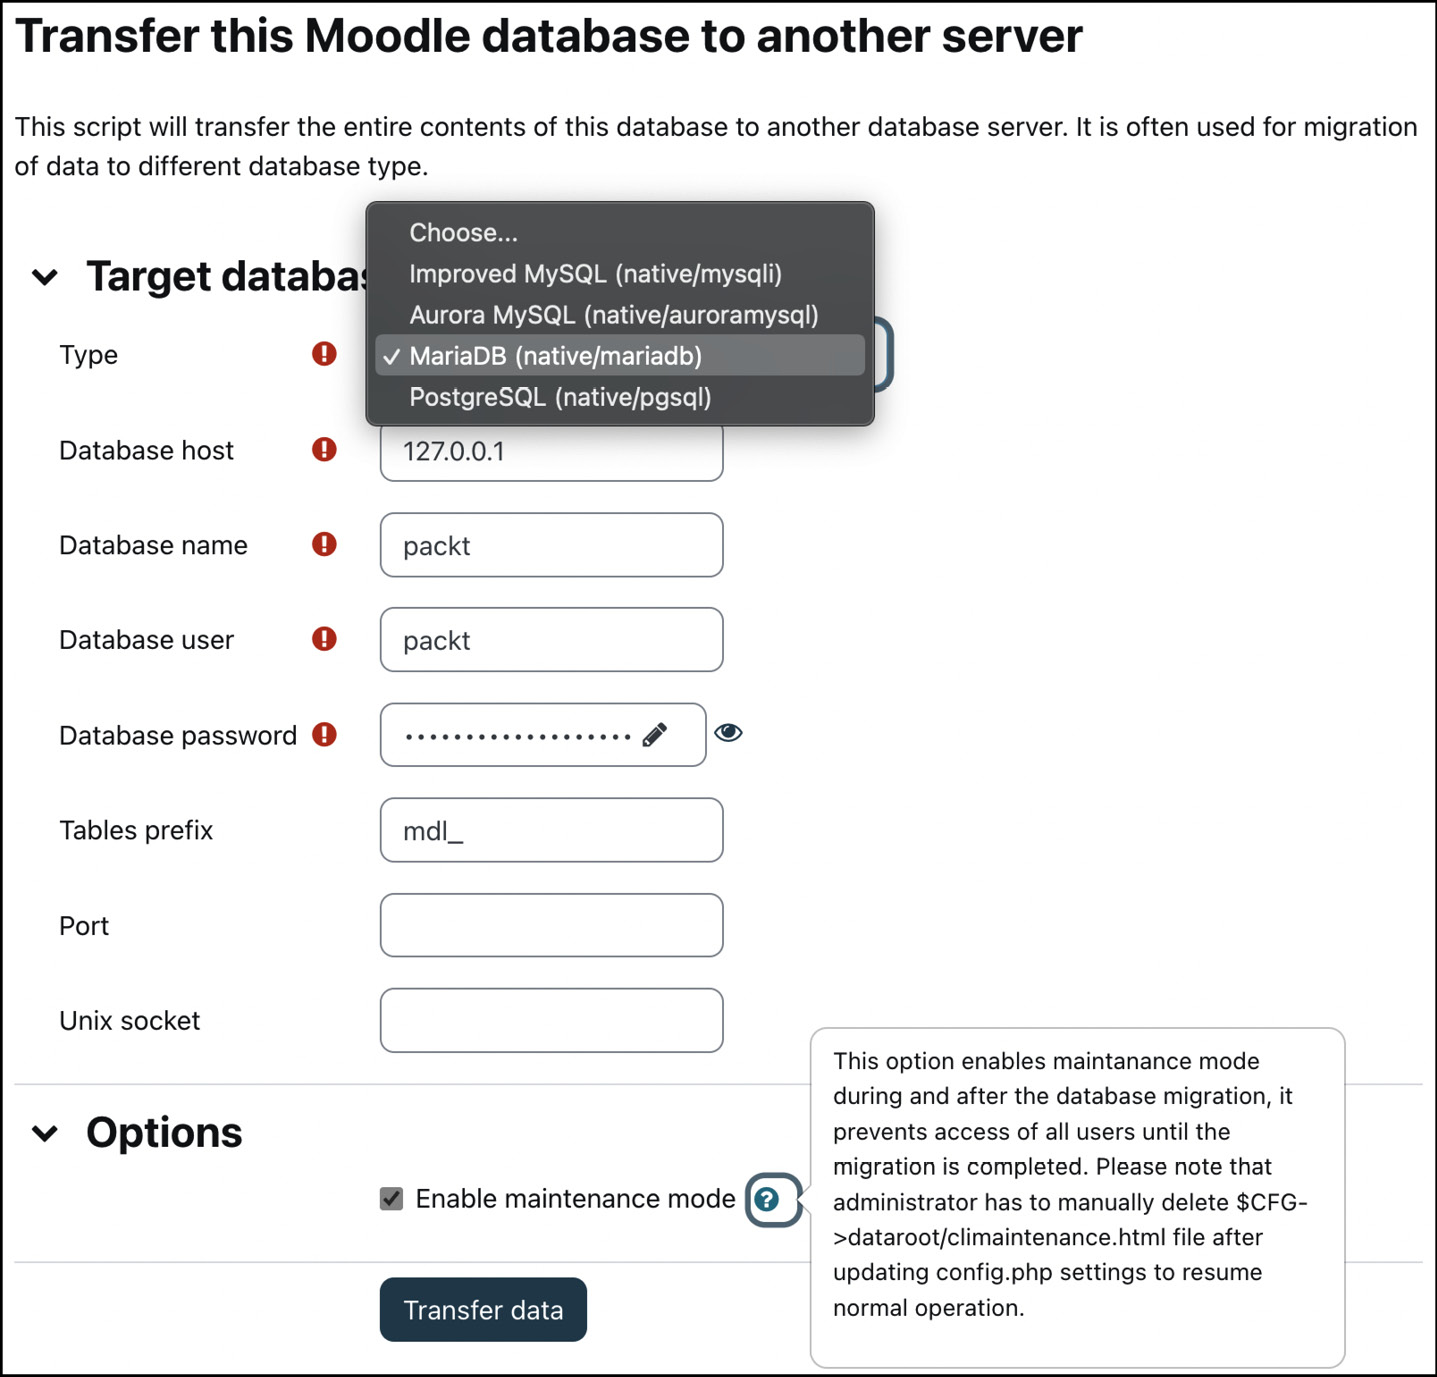
Figure 17.7 – Database transfer
You must provide the details of the database to which the content of the current database will be copied. These settings are identical to the ones applied during installation (see Chapter 1, Installing Moodle).
You further have the Enable maintenance mode option, which will turn on maintenance mode during and after migration. If used, you will have to remove the $CFG->dataroot/climaintenance.html file afterwards manually or via Site administration | Server | Server | Maintenance mode.
Searching and replacing database content
A tool related to the database migration facility is DB search and replace. After you have moved or copied your system to another location, your URL might have changed. Any user using fixed URLs anywhere in their content now faces dead links. As an administrator, you have a script at hand where you can replace any text in the underlying database, except a few tables, as noted in the second warning. You can find the script at <yoursite>/admin/tool/replace.
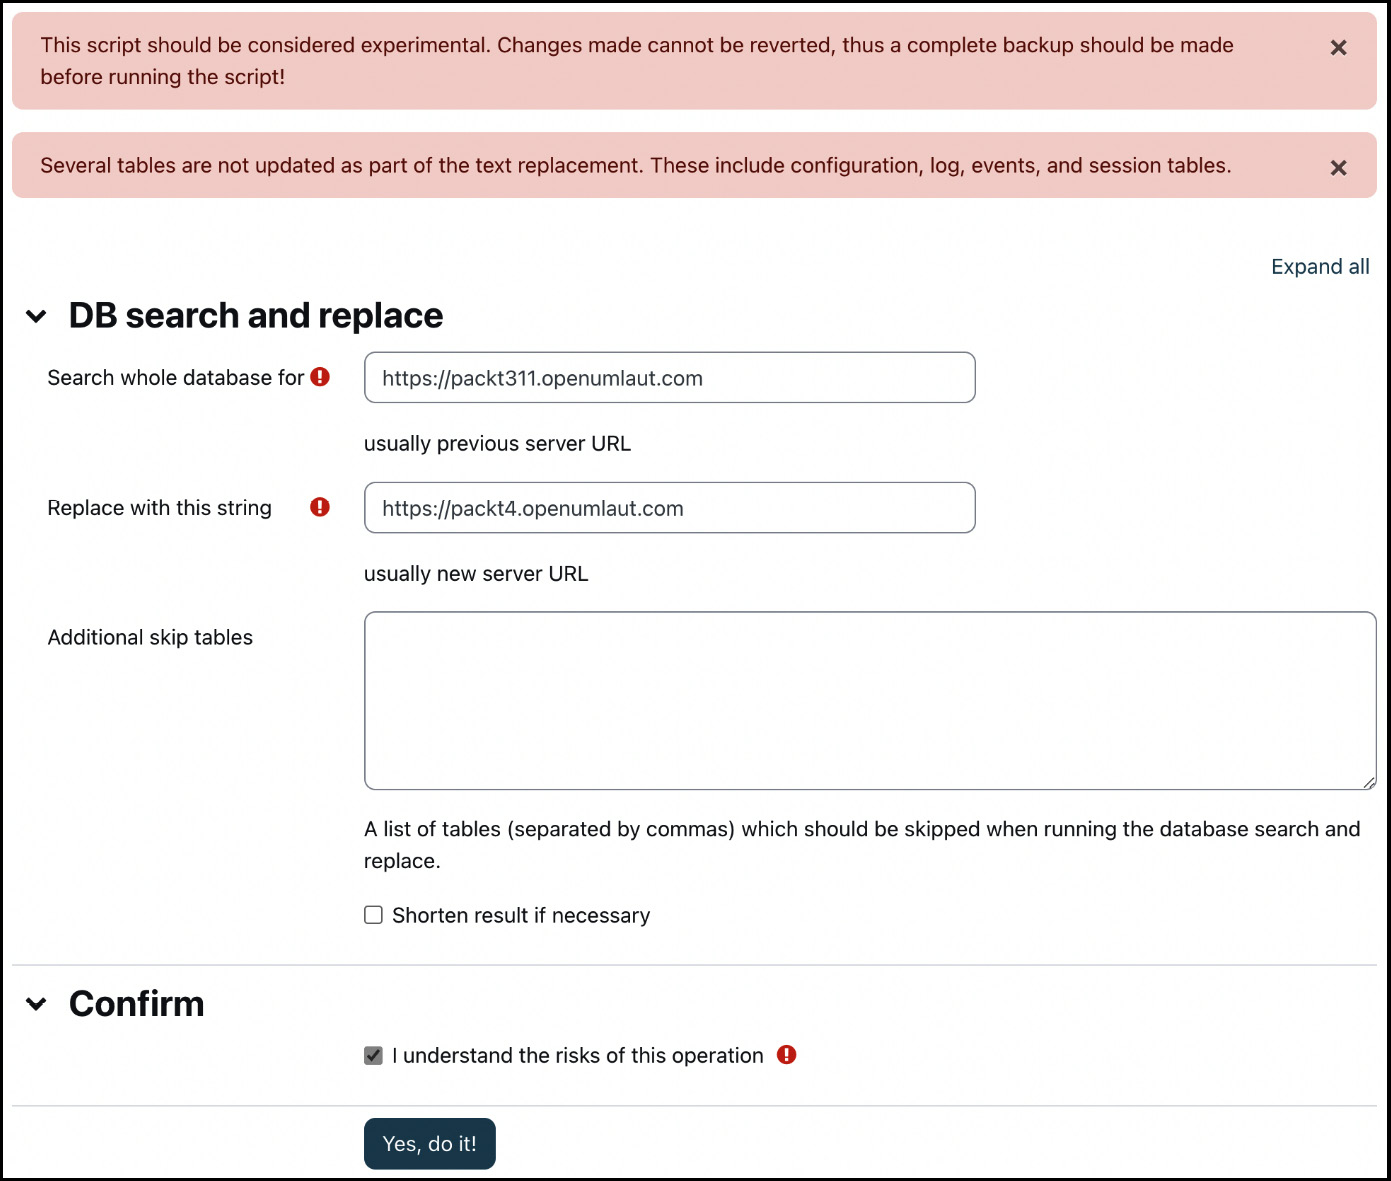
Figure 17.8 – Database search and replace
The last option, labeled I understand the risks of this operation, indicates the potential risk of the execution – unless you are 100% certain that the replacements will not have any impact on the system, you had better stay away from it. Once completed, the script will display all executed SQL queries.
Moodle Adminer
Adminer is an open source tool to administer different types of SQL databases. A wrapper has been created that lets you access the tool directly from within Moodle. Moodle Adminer must be installed in your local plugins section (see Chapter 8, Understanding Moodle Plugins for details). You will find the installer at moodle.org/plugins/local_adminer.
Once installed, you access the database management console via Site administration | Server | Moodle Adminer, which opens the tool in a modal window:
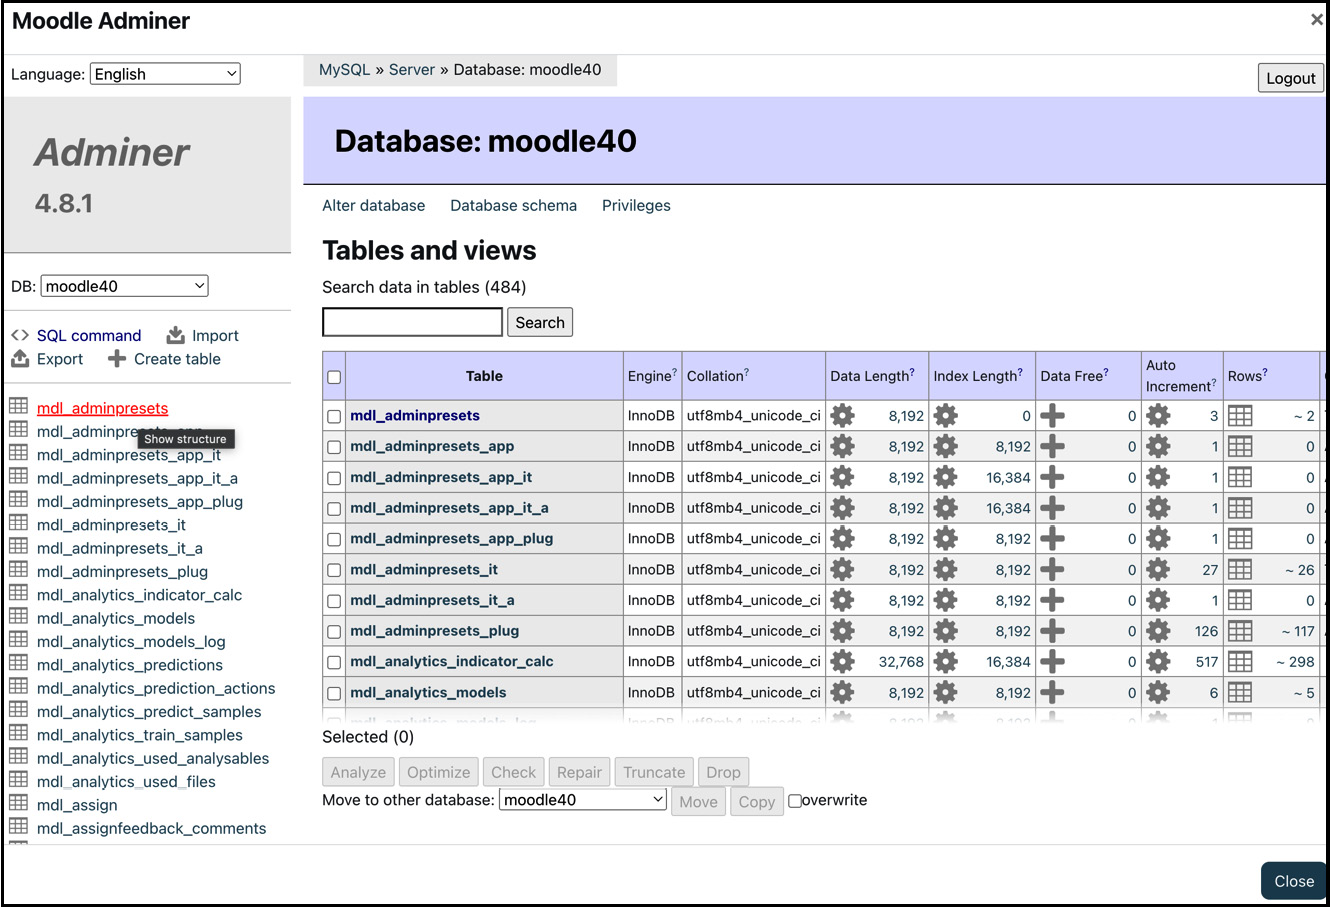
Figure 17.9 – The Moodle Adminer interface
By default, you must select a database. However, you can skip this step if you enable the Start adminer with current database setting in Site administration | Plugins | Local plugins | Moodle Adminer.
Once a (Moodle) database has been opened, you can perform operations (such as querying, altering data, or creating an SQL dump) without any SQL knowledge.
Important note
Ensure you only change data if you know what you are doing; otherwise, you might introduce database inconsistencies, and Moodle will not work as expected.
We will not go into using Adminer in detail since this is beyond the scope of this chapter. You can find all the information you are looking for at www.adminer.org.
This concludes the database tools section, where we covered database transfer, database search and replace, and Moodle Adminer. We ignored one tool that only applies to MySQL/MariaDB and is only needed when migrating a database still using the legacy MyISAM format. This tool can be found at <yoursite>/admin/tool/innodb, which converts any tables from MyISAM to the InnoDB storage engine.
There are also CLI scripts supporting database-related operations, such as mysql_engine and check_database_schema. What’s a CLI script? Find out in the following section.
CLI
We already encountered the CLI selectively throughout the book and during Chapter 1, Installing Moodle, when we dealt with Moodle upgrades. However, the CLI has a few more tricks up its sleeve, which we will deal with in this section.
First, let’s look at how you call CLI scripts, which are either located in admin/cli/* or in the sub-folder of plugins that offer a CLI option – for example, auth/ldap/cli. To call a CLI script, follow the following notation:
sudo –u <apache_user> /usr/bin/php admin/cli/<script>.php [--params]Your <apache_user> is usually www-data, httpd, or apache.
Important note
Always run Moodle CLI scripts under the identity of the web server user.
Every CLI script has a --help parameter that offers additional information and also describes calling options and parameters. The following is a list of some useful CLI commands and chapter numbers in which they have been covered. Look in their respective CLI directories or at docs.moodle.org/en/Administration_via_command_line for all other commands. We do not list any parameters here, as these are explained well in the --help options.
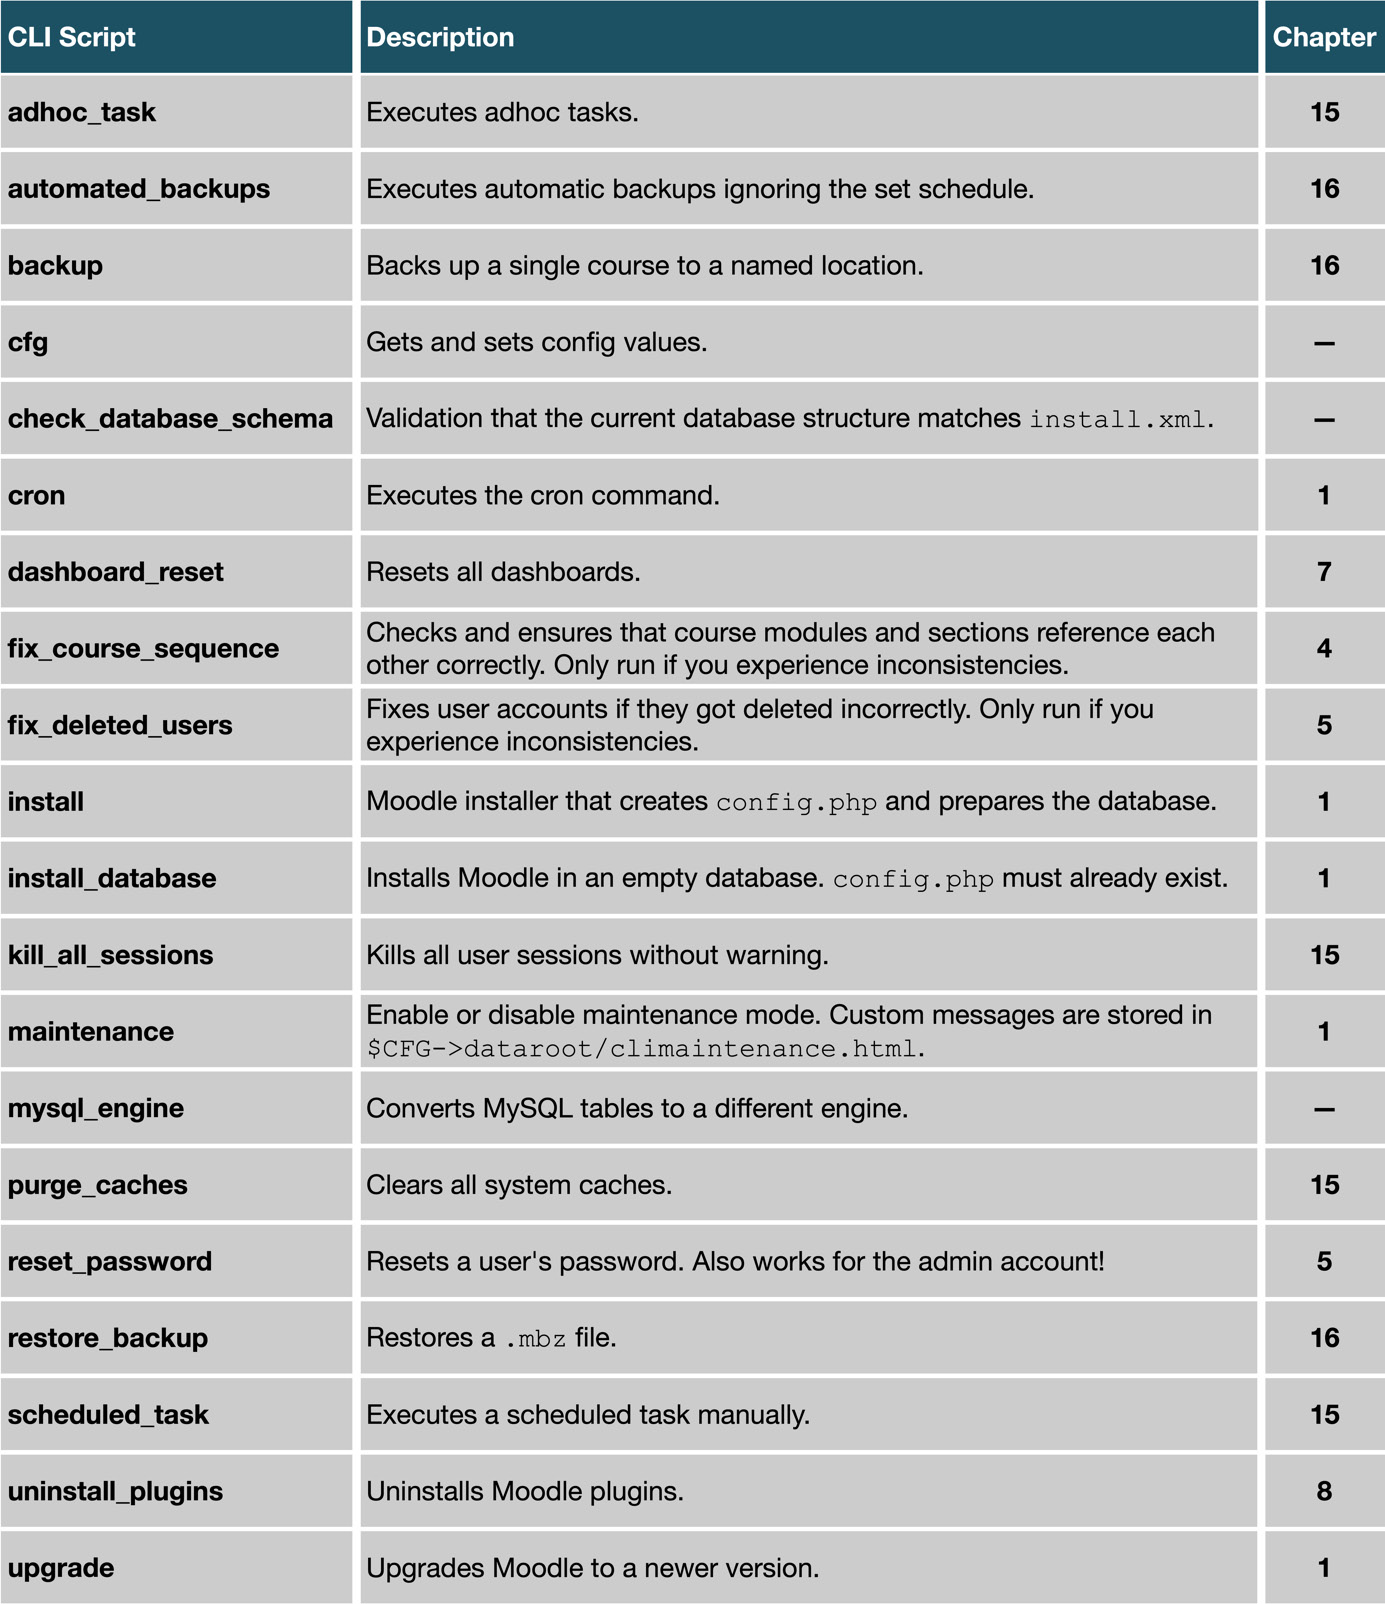
Figure 17.10 – A selection of Moodle CLI scripts
The real power of the CLI lies in the ability to embed CLI commands in shell scripts, which allows for powerful automation of otherwise time-consuming or error-prone routines. We presented a small installation script in Chapter 1, Installing Moodle. Here is another sample script that kills all user sessions and clears caches, utilizing some CLI scripts:
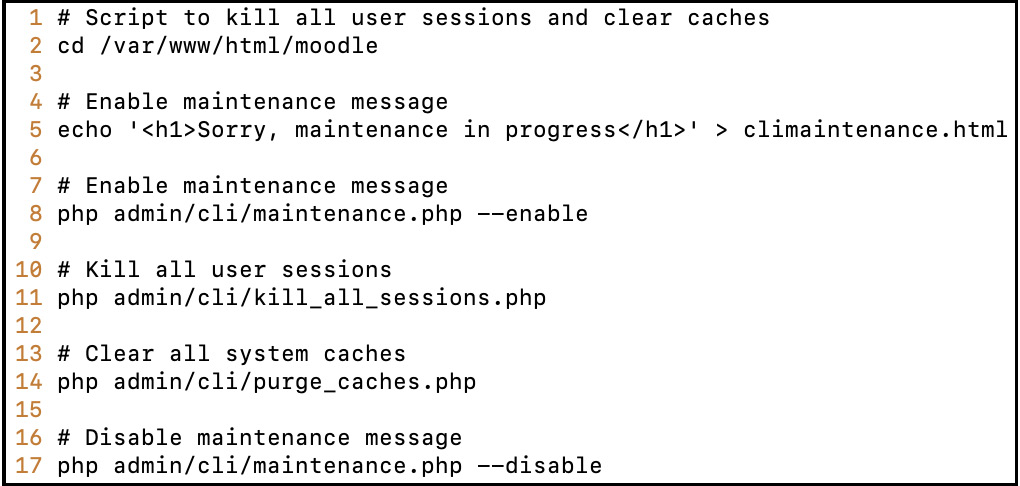
Figure 17.11 – A sample Bash script utilizing the Moodle CLI
While useful for the supported operations, the CLI provides a relatively restricted set of commands. Moosh, which we will cover next, overcomes this limitation.
Moosh – the Moodle Shell
Moosh stands for Moodle Shell and is a command-line tool that allows you to perform the most common Moodle tasks.
Before you can make use of Moosh, you have to install it (see Chapter 8, Understanding Moodle Plugins). Once installed, you will have a vast number of commands (at the time of writing, over 150!) at your disposal.
The general syntax of Moosh is as follows:
moosh <-params> <command> <options>To give you an idea of the types of things you can do with Moosh, here are a few examples:
- moosh user-create test: Creates a user with the username test.
- moosh user-create test{1..10}: Creates 10 users. This type of enumeration can be used with many Moosh commands.
- moosh user-create --email [email protected] --city "Heidelberg" --country DE --firstname "Alex" --lastname "Büchner" packt: All user profile values are supported; this is just a sample.
- moosh info-plugins: Displays a list of all plugins installed and their locations.
- moosh file-list course=42: Outputs information on all files in the course with the ID 42. There are more file-related commands, such as showing the system path of a file or the ability to upload files directly.
- moosh plugin-install mod_videotime: Downloads and installs the latest version of the versatile Videotime plugin. How cool is that?
Once you combine Moosh commands with standard shell commands via pipes and streams, you have a powerful arsenal of commands at hand. For example, you might want to find all backups that are larger than 10 GB, archive them, and reclaim the space.
The following example demonstrates the execution and output of three Moosh commands:
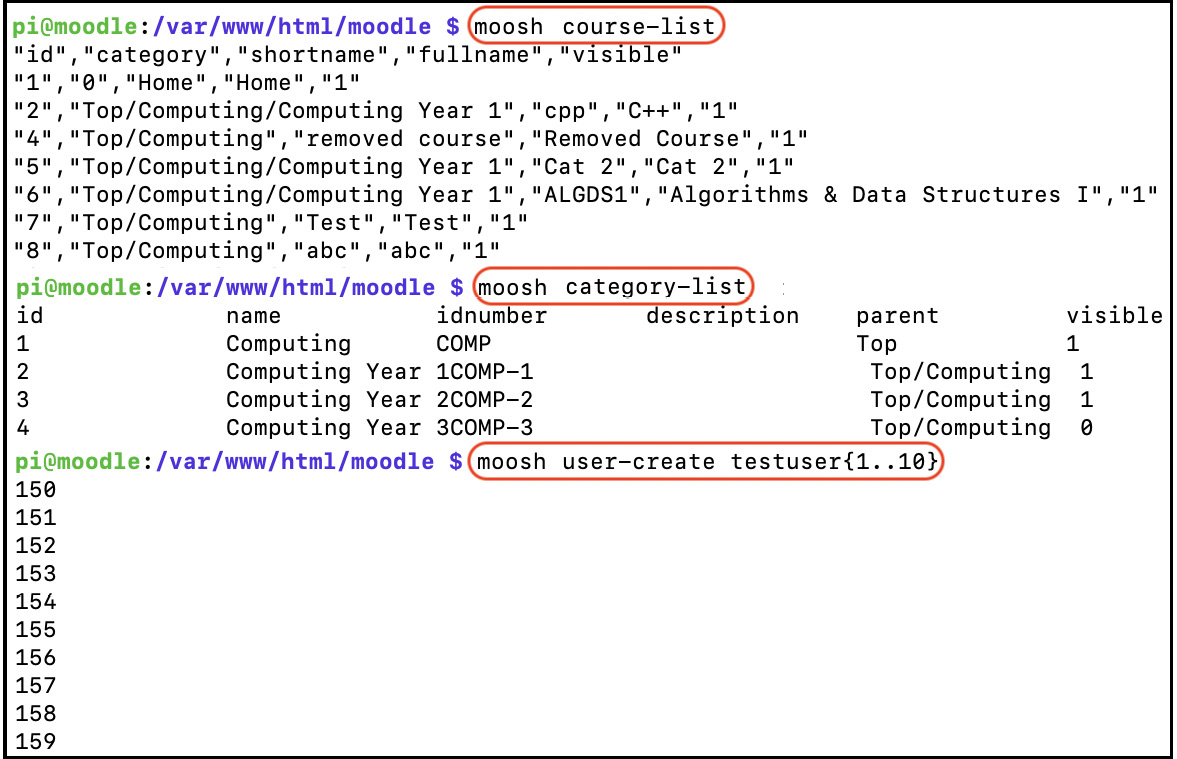
Figure 17.12 – Playing with Moosh
The first (moosh course-list) shows the information on all courses; the second (moosh category-list) does the same for categories; the last (moosh user-create test{1..10}) shows the IDs of the 10 user accounts after they have been created.
For a complete list of over 150 commands and hundreds of options, refer to the Moosh website at moosh-online.com/commands. The list is constantly growing, so ensure you have installed the latest version.
This concludes the section on Moosh and the chapter on Moodle admin tools. Hopefully, some facilities will streamline your day-to-day job and optimize some of the routine tasks you need to carry out.
Summary
In this chapter, we have covered a range of admin tools, some hidden and unsupported but nonetheless very useful. We first explored how admin tools are organized, before we covered site admin presets and some database tools, including the external Adminer, the Moodle CLI, and the powerful third-party Moosh tool.
Other ways to extend the reach of Moodle are web services, which we will cover in the following chapter.