This chapter looks at where SharePoint's functionality can be applied to give exceptional user experience with the following SharePoint features:
- Lists
- Libraries
- Notifications
- Search
- Pages
- Team sites
- My Sites
- Frequently used web parts and web part connections
- Dashboard design
Exceptional end user experience is about more than just deploying the SharePoint technology; it is about simplicity, empathy, listening, and measuring success so that improvements can be made.
In short, it is about users not only using the deployed SharePoint technology to assist with their work, but also with other unthought-of activities related their job. When this kind of enthusiasm occurs, SharePoint technology can be said to be making a difference, ultimately resulting in exceptional end user experience.
For this to happen, the following is needed:
- Simplicity: Just because you are familiar with SharePoint's interface does not mean other co-workers are. So, information must be presented in such a way that it is immediately obvious to the user what it is and how to navigate to it. This may require hand-holding and instruction manuals, but the key is simplicity. This idea should be applied to where to store content so there are fewer steps to perform simple operations such as uploading and editing content.
- Empathy: The user wants the comfort level of knowing that someone can address the concerns of SharePoint technology when they use it.
- Listening: This is much more than only asking for users' feedback. It is also observing the users and noticing how they use the interface, even if they can or do not verbalize their thoughts or response. Listening for unspoken cues in interaction or reaction is the key to understanding the impact of how SharePoint is working for them. In many ways, you actually need to be alert and in listening mode 24/7 to really hear the nitty gritty, the unspoken feedback; so, staying close to them during and after implementation is strongly recommended.
- Measuring: The value of SharePoint can be intangible, so defining key wins such as a percentage increase of completed daily orders, and so on will make it easier to build a business case for SharePoint.
Note
End users have a limited amount of time to spend visiting corporate intranet websites. So, if you don't make it easy for them, they're not going to come back.
As discussed in Chapter 4, lists have properties that determine their functionality:
Within this section are a few additions to lists functionality that enhances the end user experience.
With a project tasks list there is normally a status field on an item, such as Not Started, In Progress, Completed, Deferred, and Waiting on someone else.
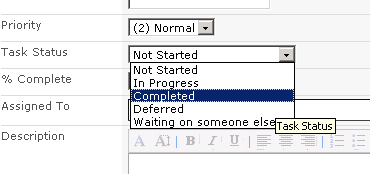
Project task items that are most important to a user are those that are In Progress as these are current and have most recently been created.
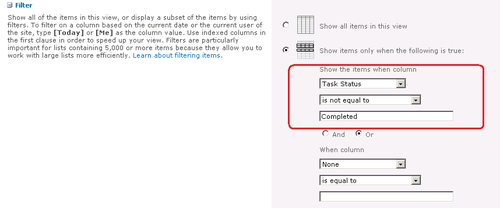
We recommend that you create a view with a filter with the Status set to Not Complete and make this the default view for the list, so every time this list is opened by the user, the active project tasks are displayed.
In Chapter 5, you were introduced to the SharePoint's libraries functionality to store documents. Apart from storing documents and making these accessible to users, SharePoint has some easy and interesting functionality to enhance the user experience of document management in libraries. These are explained in the following sections.
Document sets allow the user to bundle documents together. This is ideal for documents that are related that now can be associated and bundled together. The advantage of this is that certain actions can be done on a set of documents, rather than individually. These actions include:
- Sharing the same metadata
- Workflow management
- Permissions
- A single download and a single version control
Document Sets are a nice feature because a single document is rarely associated with a task or project, and now documents can be bundled together.
Documents can be tagged with metadata, which is now semi-automatic as the field has a Suggestions functionality, where keywords that can relate to the company's terminology have been defined in the site collection's Term Store Management.
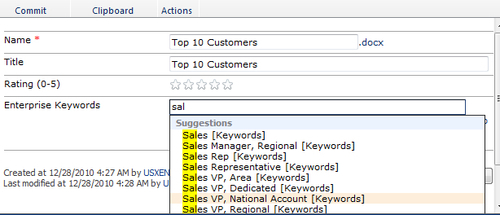
These keywords can be associated with entered content. SharePoint will intelligently make suggestions to which keywords you should choose.
By defining the keywords in the Term Store Management, there is one central place so keywords can be standardized.
With documents stored on the network drive, one option is to choose relevant filenames that relate to a document. Filenames such as Contract.docx do not describe the information in the document, and the user would need to open it to understand its contents. A better description would be ACMESalesContract2010.doc.
With SharePoint, this approach is still useful, but a better approach is that metadata should be applied to the document or document set. One of the advantages of using metadata over the file-naming technique is that multiple keywords can be applied to a single item making the item more searchable.
Note
SharePoint does not allow the following characters anywhere in a filename: Tilde, number sign, percent, ampersand, asterisk, braces, backslash, colon, angle brackets, question mark, slash, pipe, or quotation mark.
You cannot use the period character consecutively in the middle or at the start or end of a filename.
With alert notifications, the alert title that is the subject of the e-mail message is based on the document library and the filename.

This is not helpful as a list and filename such as the one shown in the preceding screenshot, which is the Alert Title, could be in a number of libraries across a site.
A better approach is to make the alert tile more descriptive, such as ACME Sales Contract Change alert. This alert title indicates the filename that will be in the recipient's e-mail, and the type of alert that is being received.
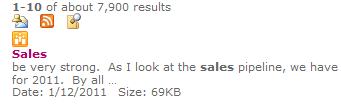
An alert can even be set up on a search page, so if there are any changes to the search results an alert can be sent out. This is a nice feature if, for example, you work in sales and want to know if there are any file additions to the SharePoint site that include any customer names. This is a good example of information being pushed to you when there is a change or addition to information that is of interest to you. The advantage of setting up an alert on a search is that it is relevant across an entire site collection, not just a list or a file.
An alert can be set up on a search page by performing the following steps:
- Perform a search on a desired search criterion.
- Click on the envelope icon at the top of the search page.
You will be directed to an alert setup page. This alert page is slightly different to the alert page discussed previously in the book because this relates to subscribing an alert to a search results page, rather than a list or an individual item.
The difference that you will notice is the Change Type setting.

- Complete the alert setup page and click OK.
You will now receive notifications related to content meeting the defined search results.
The SharePoint search feature is a quick way to find information fast. To make this process faster and more convenient for you, the following techniques could be applied when searching for information.
Note
Normally, when people wish to find information that is external to an organization, inputting a search into a search engine site is usually the first part of the process. SharePoint's search functionality should be viewed as a powerful tool to find internal company information.
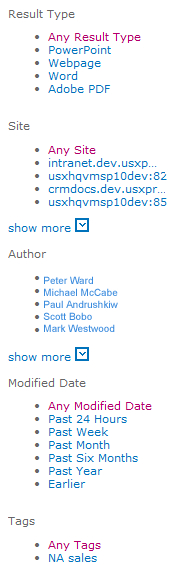
On a search results page there are refinement options to assist you in narrowing your search results. They will show up on the left column of the search results page. It will consist of category headings and a list of links below these headings. Each link will have a number in parentheses. The number represents how many products match the refinement.
The layout of a page in SharePoint is key to exceptional user experience as this makes information readable and quick to understand for the user. The attention to the layout of the information is often overlooked in a site design. This is unfortunate as the Page brings information from multiple sources in a site together.
Given that most users read from left to right, put the most frequently read information in the top left-hand web zone of the page.
If a view of a list or library is required to be displayed on a page, limit the number of items that can be displayed to five or ten. This will prevent the page scrolling down if there are too many items.
This feature can be set when the view is modified.

When a view has more than five items in it there is a tab button at the bottom of the web part:

When adding a web part to zones on a page, avoid putting a list or a web part into a web zone that is very large as this makes it difficult to view the information without using the browser's navigation bars, which are additional steps for the user. This can be a challenge if users in the company have different screen resolutions.
Professional-looking websites normally have all the displayed content clearly displayed on the page, with the user only having to scroll down to view information.
In Chapter 13, you were introduced to Pages and Web Parts. One of the most useful web parts to put on a page is the Relevant Documents.
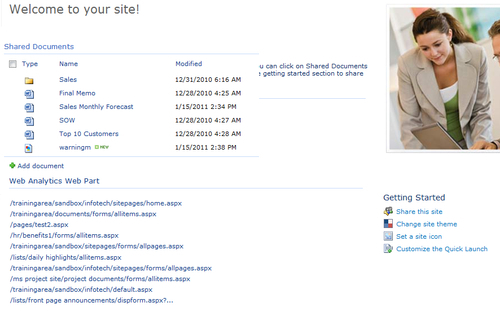
This web part displays all of the reader's recently authored documents. This is useful because what most people want to focus on for the day are documents they have recently worked on, and this web part is only displaying files that the reader authored on this site, so the information is targeted to the logged-in user.
The purpose of Team Sites was discussed in Chapter 3. To design and deploy a team site with minimal overhead, the following tips and techniques are recommended.
When adding users to a site, use the Send E-Mail feature. This makes the site setup process quicker as users are notified automatically via e-mail, with a link to the site team. Even with this, you can add a personal message in the e-mail stating what the site is and why you are inviting them to be a member.
While this might sound obvious, from our observations of the site creation process, most users create the site, add the users to it, and then send out a manual e-mail, even though this ultimately amounts to more work.
Team Sites inherit permissions from the parent site. To make security administration easier to manage, always try to keep the site inheritance on a Site, its libraries and lists, and documents and list items.
There is a tendency for the creator of a Team Site to feel that the site needs to be secure with access granted to a select few users, even when the information is not confidential. So, the site's security inheritance is broken, and they end up manually administrating the site for users rather than changing the setup of the parent site.
Each SharePoint site has a usage report in the site settings. This site feature displays key features of information, such as the number of users using the site, which website they came from, and the page they are going to.
These reports are web pages within a site and can be found in the Site Analytics Reports of site settings.
This information is often asked about by users and can be displayed on the home page of a site. This can be done by using the Web Analytics Web Part, on the home page.
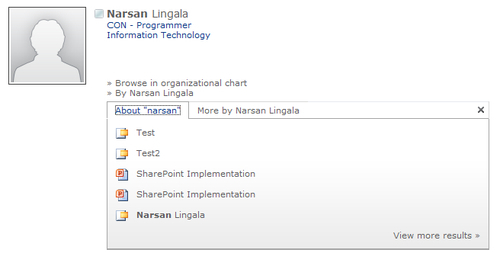
In Chapter 14, My Sites you were introduced to My Sites, the personal portal for users to consume information from colleagues and those with the same interests. Take a moment and fill out your personal details and your job description:
- Generic Details
- Interesting details
We recommend you create this information so that it really says something about you and your job role. Often, when someone searches for a document and they do not know the author and origin of it, they will most likely not open it. By having access to background information about the author, they can be sure of the value and legitimacy of the document.
Note
The main reason why people constantly update their personal details and connections on social websites such as LinkedIn is not because they are particularly friendly, but rather they want to raise the level of their profile in their peer group. Your personal details on your My Site aim at providing this functionality to your current co-workers.
In Chapter 13, Pages and Web Parts, web parts and pages were discussed. The main advantage of adding multiple web parts to a page is to display content such as lists, images, and PowerPoint files from multiple sources on a single page.
Obviously, the web parts of existing lists and libraries can be added to a page. Where user experience can really be enhanced is when the page filters data of different lists, or displays information from the same list, but with a different filter.
The web parts include:
- Filters: Choice Filter, Current User Filter, Date Filter, Filter Actions, Page Field Filter, Query String (URL) Filter, SharePoint List Filter, SQL Server Analysis Services Filter, and Text Filter
- Media and Content: Content Editor, Image Viewer, Media Web Part (embed video and audio media in web page), Page Viewer, and Silverlight Web Part (a Web Part to display a Silverlight application)
- Content Rollup: Content Query, HTML Form Web Part, Picture Library Slideshow Web Part, and RSS Viewer
- Social Collaboration: Note board, Tag Cloud, What's New, and Whereabouts
In this section of the chapter, we listed four web parts that we use often with SharePoint deployments. This is not a comprehensive list, but does give you a vision of what is capable with web parts and how Web Parts Connections work.
The Content Editor Web Part allows you to add formatted text, tables, hyperlinks, images, and even HTML to a web part page.
This web part gives the content worker a WYSIWYG (What You See Is What You Get) experience for editing text, similar to a word processer. There is also a source editor where HTML can be pasted into the web part to be displayed on a page.
Usually, a site's home page will have this web part on it with static introductory text about the site.
We found this web part useful for adding further instructions to custom forms. In the following screenshot, there is a custom form with a content editor web part at the top of the page providing further instructions to the users.
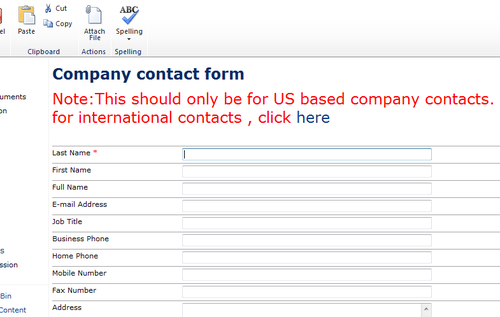
The additional information could include a company logo or a contact name.
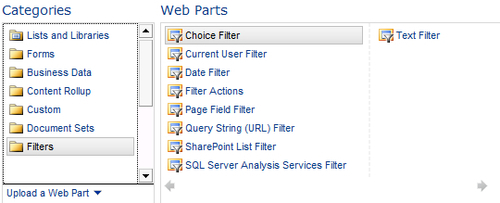
SharePoint's Data Filter Web Parts can filter a list based on the selection of another list. This is useful when working with large amounts of data in lists. The following screenshot lists the out of the box filters available:
A data filter web part can be added to a page by performing the following steps:
- Set the page in edit mode by clicking Site Actions and Edit Page.
- Click the Add a Web Part text from the web zone.
- Add an existing list web part to the page by clicking on Lists and Libraries and selecting the required list.
- Add a filter web part to the page by clicking Filters and the filter web part. In this example, select the SharePoint List Filter.
- Two web parts have now been added to the page. In this example, it is the SharePoint List Filter web part and the contacts list. The contacts list has a field that references another field in a list called Companies using the Company field.

- Edit SharePoint List Filter Web Part.

- Select the companies list from the list field.
- Select the company name as the value.
- Click OK.
To filter the displayed items in the contacts list web part from this filtered web part, you have to apply web part connections to join the information together. This is done by performing the following steps:

- From the data filter web part, select Connections and choose the web part to connect to.
- Select the field that both web parts have in common.
- Click Finish.
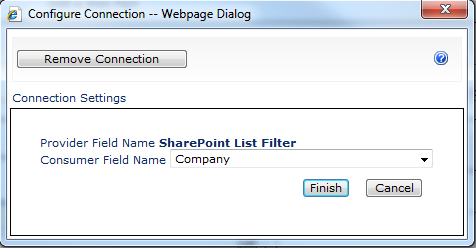
The contacts list is now being filtered by the end user selecting a company in the company list that is being displayed in the SharePoint list filter web part.
Through the Outlook Web App web parts there is the ability to display your Inbox, Calendar, and Tasks. This is useful if you are often working on workstations that are not your own and you need to check e-mail and do not have Outlook configured to retrieve your e-mail.
These web parts should be added to pages on your My Site rather than a shared team site.
In SharePoint, there are a number of charting web parts in the Business Data web part category that can be added to a page.
These web parts can retrieve data from lists, external data sources, and Excel files, and make a page look very aesthetically pleasing. When adding web parts to a page, partially with dashboards or graphs, the following considerations should be taken into account:
- Because business data web parts are retrieving information from a data source, there can be a delay in the page loading. If there are multiple web business data web parts, the time delay could be unacceptable.
- The more items in a list, the longer it will take for the web part to display on the page. When the web part is added to the page, there may only be a few items in the list; over time this list may grow.
- Graphs and dashboards do provide an immediate pop effect to a page's look and feel, but does the information really provide valuable information beyond this?
- Use the web part title to name the graphical information.
- Keep it simple! At least to begin with; don't overload people with information. If one chart is a thousand words, then ten charts is a dissertation!
- Make sure the data sources of the dashboard are up-to-date and accurate.