
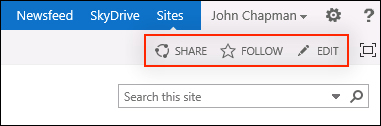
The out-of-the-box master pages included with SharePoint contain a series of promoted actions on the top-right corner of the page. These JavaScript-based actions are displayed as links and include functions such as FOLLOW and SHARE as shown in the following screenshot. The PromotedActions delegate control allows us to add additional actions, but does not replace the existing actions.
In this recipe, we will add a custom promoted action that fires a JavaScript alert. Promoted actions could be used for a variety of purposes related to the page or site the user is currently viewing. For instance, a promoted action could be created to post a link to the page on social network sites.
We should have already created our Visual Studio project in the Creating a Visual Studio solution for custom delegate controls recipe of this chapter before starting this recipe.
Follow these steps to add a promoted action with a delegate control:
- Open the project created in the Creating a Visual Studio solution for custom delegate controls recipe of this chapter in Visual Studio.
- Add a new class to our
Controlsfolder. - Set the access modifier of the class to
public, inherit from theUserControlbase class, and implement theIDesignTimeHtmlProviderinterface:public class CustomPromotedAction : UserControl, IDesignTimeHtmlProvider
- Implement the
GetDesignTimeHtmlmethod and return the HTML provided by theRendermethod in a monitored scope using the following code:public string GetDesignTimeHtml() { using (new SPMonitoredScope("Code6587EN.Ch07.Controls.CustomPromotedAction::GetDesignTimeHtml")) { StringWriter writer = new StringWriter(CultureInfo.CurrentCulture); HtmlTextWriter writer2 = new HtmlTextWriter(writer); this.Render(writer2); writer2.Close(); return writer.ToString(); } } - Override the
Rendermethod and add a monitored scope as follows:protected override void Render(HtmlTextWriter writer) { using (new SPMonitoredScope("Code6587EN.Ch07.Controls.CustomPromotedAction::Render")) { } } - Get the URL to the common SharePoint image sprite for the currently applied theme:
var iconUrl = SPUtility.GetThemedImageUrl("/_layouts/15/images/spcommon.png", "spcommon");We will use this image to display an icon for our promoted action. You can use a different image and modify the CSS accordingly for positioning.
- Add a
STYLEelement to provide the CSS styles that we will use to render our custom action as follows:writer.AddAttribute(HtmlTextWriterAttribute.Type, "text/css"); writer.RenderBeginTag(HtmlTextWriterTag.Style); writer.Write("#customPromotedActionIcon { height:16px; width:16px; position:relative; display:inline-block; overflow:hidden; background-image: url('" + iconUrl + "'), background-position: -218px -48px; }"); writer.RenderEndTag(); - Add the HTML link element to display our custom promoted action with its JavaScript handler to fire when clicked:
writer.AddAttribute(HtmlTextWriterAttribute.Id, "customPromotedAction"); writer.AddAttribute(HtmlTextWriterAttribute.Class, "ms-promotedActionButton"); writer.AddAttribute(HtmlTextWriterAttribute.Href, "#"); writer.AddAttribute("onclick", "alert('You clicked the promoted action.'),"); writer.RenderBeginTag(HtmlTextWriterTag.A); - Add the HTML
SPANelement to display our custom promoted action image:writer.AddAttribute(HtmlTextWriterAttribute.Class, "s4-clust ms-promotedActionButton-icon"); writer.AddAttribute(HtmlTextWriterAttribute.Id, "customPromotedActionIcon"); writer.RenderBeginTag(HtmlTextWriterTag.Span); writer.Write(" "); writer.RenderEndTag(); - Add the HTML
SPANelement to contain the display text for our custom promoted action:writer.AddAttribute(HtmlTextWriterAttribute.Class, "ms-promotedActionButton-text"); writer.RenderBeginTag(HtmlTextWriterTag.Span); writer.Write("Custom Action"); writer.RenderEndTag(); - Add the end tag for our HTML link element:
writer.RenderEndTag();
- Add a new Empty Element item to our project.
- In the
Elements.xmlfile of our new element, register our custom promoted action control with thePromotedActionsdelegate control:<?xml version="1.0" encoding="utf-8"?> <Elements xmlns="http://schemas.microsoft.com/sharepoint/"> <Control Id="PromotedActions" Sequence="90" ControlClass="Code6587EN.Ch07.Controls.CustomPromotedAction" ControlAssembly="$SharePoint.Project.AssemblyFullName$"> </Control> </Elements>
- Add a new safe control entry to the new element with the following details:
- (Name):
CustomPromotedAction(the name of the class for our custom control) - Assembly:
$SharePoint.Project.AssemblyFullName$ - Namespace:
Code6587EN.Ch07.Controls(the full namespace for the class, without the name of the class itself) - Safe:
True - Safe Against Script:
True - Type Name:
CustomPromotedAction(the name of the class)
- (Name):
- Open the feature created previously. Ensure that the new element is included in the feature.
- Click on Start from the toolbar to deploy the solution and attach the debugger.
- Once the SharePoint site is loaded in the web browser (after clicking on Start), observe the promoted action. The following screenshot shows how it will look:
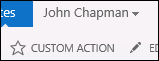
Promoted actions in SharePoint provide a series of JavaScript-based actions for end users. The default actions include FOLLOW and SHARE. Adding a custom promoted action adds actions rather than replacing the existing ones. The promoted action in our recipe simply fires the JavaScript alert function to display a message to the user.
- The SPUtility.GetThemedImageUrl method topic on MSDN at http://msdn.microsoft.com/en-us/library/microsoft.sharepoint.utilities.sputility.getthemedimageurl.aspx