
The default SharePoint 2013 master page, seattle.master, expands to fill the browser window. In this recipe, we will modify the seattle.master master page to have a fixed width using CSS.
Follow these steps to create a fixed width master page:
- Open SharePoint Designer.
- Select Open Site. Enter the complete URL to the SharePoint site and select Open.
- From the Navigation pane, select Master Pages.
- In the list of files in the Master Pages library, make a copy of
seattle.master(for our example, we have renamed itSeattle_FixedWidth.master). - Check out the new
Seattle_FixedWidth.mastermaster page. - Open the
Seattle_FixedWidth.mastermaster page. - Locate the
<head>element. - Add the CSS reference to the
FixedWidth.cssfile we will create.<SharePoint:CssRegistration ID="customCssRegistration" Name="<% $SPUrl:~Site/_catalogs/masterpage/resources/FixedWidth.css %>" runat="server"></SharePoint:CssRegistration>
- Save the master page.
- Check in and publish the master page using the Check In and Publish options.
- Set the master page as Site Master Page.
- From the Navigation pane, select All Files.
- In the All Files content pane, navigate to _catalogs | masterpage | resources.
- From the New section on the ribbon, navigate to File | CSS as shown in the following screenshot:
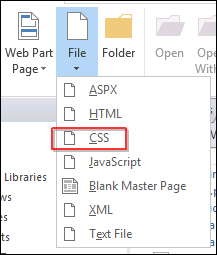
- Name the new CSS file as
FixedWidth.css. - Check out the new
FixedWidth.cssfile using the Check Out option. - Open the
FixedWidth.cssfile. - Specify a background color for the
#s4-workspaceelement using the following lines of code:#s4-workspace { background: #999999; } - Give the
#s4-titlerowand#contentRowelements a white background, a fixed width of1024px, and set the left-hand side and right-hand side margins to automatically center align the elements.#s4-titlerow, #contentRow { background: #FFFFFF; width: 1024px; margin-left: auto; margin-right: auto; } - Add a top margin to the
#s4-titlerowelement to separate it from the header controls on the page:#s4-titlerow { margin-top: 50px; } - Save the CSS file.
- Check in and publish the CSS file using the Check In and Publish options.
- Navigate to the site in your preferred web browser to observe the results. The result will be similar to the following screenshot:
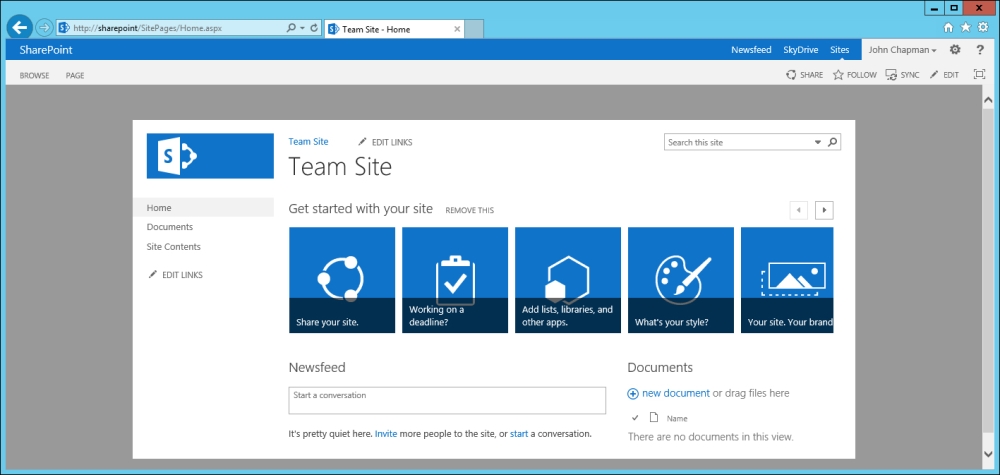
The page content for SharePoint pages is rendered within the s4-workspace DIV element. In our recipe, we used CSS to provide a grey background color for s4-workspace. We then used CSS to center align the content of the s4-workspace element in a white box with a fixed width. An HTML element that has its left and right margins set to auto will be centered in the element that contains it.
The #s4-workspace DIV element is used by SharePoint to contain the majority of the page content. The #s4-titlerow DIV element is used to contain the site logo, navigation, and search box in default configurations. The #contentRow DIV element is used to contain the quick launch navigation and page content.
- The CssRegistration class topic on MSDN at http://msdn.microsoft.com/en-us/library/microsoft.sharepoint.webcontrols.cssregistration.aspx