
The out-of-the-box master pages included with SharePoint 2013 provide a delegate control to place branding text in the top-left corner of the page. For standard SharePoint instances, the text SharePoint is displayed. For SharePoint on Office 365, Office 365 is displayed instead.
In this recipe, we will simply replace the control with a custom control that displays our own text. The text could also be replaced by editing the master page or by modifying the SuiteBarBrandingElementHtml property on the SharePoint web application. Using the custom control provides us the ability to add additional functionality if desired. For instance, the control could be used to add additional links, a menu, or other interactive content.
We should have already created our Visual Studio project in the Creating a Visual Studio solution for custom delegate controls recipe of this chapter before starting this recipe.
Follow these steps to replace the suite bar branding text using a delegate control:
- Open the project created in the Creating a Visual Studio solution for custom delegate controls recipe of this chapter in Visual Studio.
- Right-click on the subfolder we previously created in the
CONTROLTEMPLATESmapped folder. - Navigate to Add | New Item.
- Select User Control by navigating to Visual C# Items | Office/SharePoint.
- Provide the item a name,
CustomSuiteBarBranding.ascxfor example and then click on Add. - Open the newly created
ASCXfile if it is not already open. - In the body of the user control, add our custom branding text as follows:
<div class="ms-core-brandingText">Custom SharePoint Branding Text</div>
- Right-click on the project name in the Solution Explorer pane.
- Navigate to Add | New Item.
- Select Empty Element by navigating to Visual C# Items | Office/SharePoint.
- Provide the new item a name,
CustomSuiteBarBrandingfor example. - Click on Add.
- In the newly created
Elements.xmlfile from the new element, register our custom control with theSuiteBarBrandingDelegatecontrol as follows:<?xml version="1.0" encoding="utf-8"?> <Elements xmlns="http://schemas.microsoft.com/sharepoint/"> <Control Id="SuiteBarBrandingDelegate" Sequence="10" ControlSrc="~/_controltemplates/15/Code6587EN.Ch07/CustomSuiteBarBranding.ascx"> </Control> </Elements>
- Add a new safe control entry to the new element with the following details:
- (Name):
CustomSuiteBarBranding(the name of the user control we created without the.ascxextension) - Assembly:
$SharePoint.Project.AssemblyFullName$ - Namespace:
Code6587EN.Ch07.CONTROLTEMPLATES.Code6587EN.Ch07(the full namespace for the user control, without the name of the class itself) - Safe:
True - Safe Against Script:
True - Type Name:
CustomSuiteBarBranding(the name of the class for the user control)
- (Name):
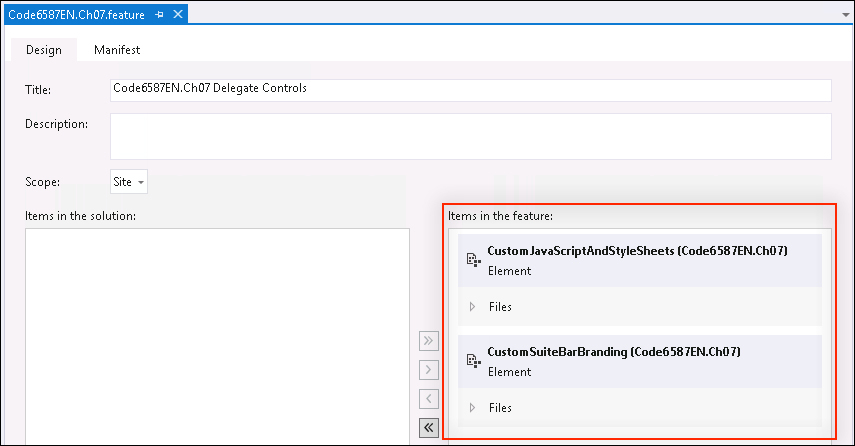
- Open the feature created previously. Ensure that the new element is included in the feature:
- Click on Start from the toolbar to deploy the solution and attach the debugger.
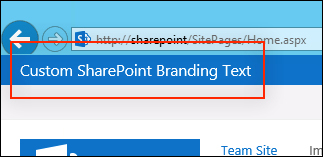
- Once the SharePoint site is loaded in the web browser (after clicking on Start), observe the new branding text as shown in the following screenshot:
The out-of-the-box control used by the SuiteBarBrandingDelegate delegate control displays the HTML snippet stored in the SuiteBarBrandingElementHtml property of the current SharePoint web application. In this recipe, we replaced the default control with our own delegate control that adds our text to the page.
We are using the same CSS class that the out-of-the-box text uses to allow the content to display with the standard style. Relying on the SharePoint classes allows the content to inherit the styles provided by the current SharePoint theme.
- The SPWebApplication.SuiteBarBrandingElementHtml property topic on MSDN at http://msdn.microsoft.com/en-us/library/microsoft.sharepoint.administration.spwebapplication.suitebarbrandingelementhtml.aspx
- The Delegate Controls article on MSDN at http://msdn.microsoft.com/en-us/library/sharepoint/ms478826.aspx
- The Control Element (Delegate Control) topic on MSDN at http://msdn.microsoft.com/en-us/library/sharepoint/ms469179.aspx