 Inserting an image rendition into page content
by John Chapman
SharePoint 2013 WCM Advanced Cookbook
Inserting an image rendition into page content
by John Chapman
SharePoint 2013 WCM Advanced Cookbook
- SharePoint 2013 WCM Advanced Cookbook
- Table of Contents
- SharePoint 2013 WCM Advanced Cookbook
- Credits
- About the Author
- About the Reviewers
- www.PacktPub.com
- Preface
- 1. Branding SharePoint with Composed Looks
- Introduction
- Applying a composed look
- Changing the site master pages
- Changing the site logo
- Uploading a custom color palette
- Uploading a custom font scheme
- Creating a custom composed look
- Using PowerShell to apply a composed look to all sites in a site collection
- Using PowerShell to apply master page and logo settings to all sites in a farm
- 2. Branding SharePoint with Device Channels and Design Packages
- 3. Branding SharePoint with Custom Master Pages and Page Layouts
- Introduction
- Editing a master page in SharePoint Designer
- Changing the site master pages in SharePoint Designer
- Hiding unwanted master page controls
- Restoring the Navigate Up button using a master page
- Adding JavaScript and cascading stylesheet references to a master page
- Creating a fixed width master page
- Creating an expanding width master page with content padding
- Creating a minimalistic master page
- Creating a responsive mobile master page
- Customizing the Windows 8 Start menu tile for pinning sites using a master page
- Customizing the shortcut icon (favicon) using a master page
- Creating a page layout with three columns of web part zones
- Creating a page layout with web parts added to the page
- Creating a page layout with a picture-library-based image carousel using JavaScript
- Displaying specific content only to authenticated users
- Displaying specific content only to anonymous users
- Displaying specific content only to site administrators
- Creating a master page with editing controls only available to editors
- 4. Packaging Branding Elements in a SharePoint Solution with Visual Studio
- Introduction
- Creating a Visual Studio SharePoint solution
- Including images, cascading stylesheets, and JavaScript resources in a SharePoint solution
- Including master pages in a SharePoint solution
- Including page layouts in a SharePoint solution
- Adding localization to a SharePoint solution
- Creating a site feature to apply branding
- Creating the site collection feature to apply the feature to new and existing sites
- Creating a timer job to ensure the site branding feature is activated
- Packaging and deploying the SharePoint solution
- Activating the site collection feature on all site collections with PowerShell
- 5. Enhancing the Content Creation Process with the SharePoint Publishing Architecture
- Introduction
- Setting up a new publishing site
- Enabling the publishing features on an existing site
- Setting up contributor and approver access for publishing content
- Configuring the versioning settings of the Pages library
- Creating a publishing web part page
- Checking out publishing content for editing
- Checking in edited publishing content
- Publishing checked-in publishing content
- Approving publishing content
- Reverting publishing content to a previous version
- Setting up a publishing site with workflow
- Creating a web part page and adding web parts with PowerShell
- Identifying all checked-out publishing pages in a site with PowerShell
- Creating an image rendition
- Inserting an image rendition into page content
- 6. Centralizing and Structuring Content with Cross-site Publishing and Managed Metadata
- Introduction
- Creating a new managed metadata service application
- Creating a categories term set for product catalog navigation
- Creating a product catalog authoring site collection
- Configuring the products list
- Creating a catalog document library
- Setting up a consuming site collection and connecting to the product catalog list
- Setting up a consuming site collection with separate branding
- 7. Customizing the SharePoint Experience with Delegate Controls
- Introduction
- Creating a Visual Studio solution for custom delegate controls
- Adding JavaScript and stylesheets with an AdditionalPageHead delegate control
- Customizing the suite bar branding with a SuiteBarBrandingDelegate delegate control
- Customizing the suite bar links with a SuiteLinksDelegate delegate control
- Adding Office 365-style drop-down menus to suite bar links
- Adding promoted action links with the PromotedActions delegate control
- Customizing header navigation with a TopNavigationDataSource delegate control
- Customizing quick launch navigation with a QuickLaunchDataSource delegate control
- Restoring the Navigate Up button with an AdditionalPageHead delegate control
- Adding meta tags to pages from custom library fields with an AdditionalPageHead delegate control
- Storing analytics tracking code with a site collection settings page
- Adding stored analytics tracking code to pages with an AdditionalPageHead delegate control
- 8. Enhancing User Input with InfoPath Forms
- Introduction
- Customizing the SharePoint list entry form templates with InfoPath
- Creating InfoPath forms that are submitted to the SharePoint form libraries
- Creating a SharePoint list to provide a drop-down menu data to InfoPath
- Adding a drop-down menu to InfoPath using SharePoint list data
- Paginating InfoPath forms with views
- Validating data in InfoPath forms
- Calculating field values in InfoPath based on the values of other fields
- Adding custom .NET code to an InfoPath form
- Preparing InfoPath forms for approval by SharePoint administrators
- Approving submitted InfoPath forms in SharePoint
- Creating libraries using approved InfoPath forms in SharePoint
- Creating a survey InfoPath form that gets locked after submission and populates the SharePoint fields
- 9. Configuring Search
- Introduction
- Provisioning a search service application
- Configuring a search content source
- Creating a search center site
- Connecting a site collection to a search center
- Creating a search scope
- Using a search query rule to promote an item in search results
- Configuring search engine optimization settings
- 10. Creating Multilingual Sites with SharePoint Variations
- Introduction
- Installing SharePoint language packs
- Configuring SharePoint with installed language packs
- Provisioning a machine translation service application
- Configuring machine translation timer jobs
- Configuring site collection variation settings
- Creating the primary language variation label
- Creating the secondary language variation labels
- Checking the status of the variation hierarchy
- Creating, publishing, and updating targets with a new publishing page
- Creating translation packages for human translation
- Uploading translation packages
- Translating content with the machine translation service
- 11. Configuring Content Deployment
- 12. Configuring Anonymous Access
- Index
Image renditions are applied to images inserted into SharePoint page content. In this recipe, we will insert an image into a page and apply an image rendition to it.
Follow these steps to apply an image rendition to an image in page content:
- In your preferred web browser, navigate to the publishing page and open it for editing.
- Place your mouse cursor in a content zone on the publishing page.
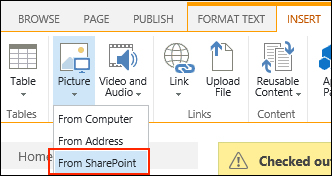
- Navigate to Picture | From SharePoint on the INSERT tab in the ribbon as shown in the following screenshot:
- Select the image you want to insert.
- Click on Insert.
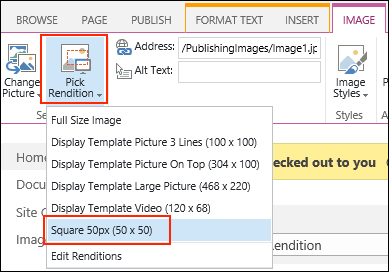
- Select Pick Rendition from the IMAGE tab in the ribbon.
- Select the image rendition to be applied.
- Save the publishing page.
Applying an image rendition to an image will create a cached version of the image based on the image rendition definition. When a web browser requests the image, the cached version will be returned instead of the original image. In addition, any changes to the image rendition will automatically update the cached images.
- The SharePoint 2013 Design Manager Image Renditions article on MSDN at http://msdn.microsoft.com/en-us/library/jj720398.aspx
- The Configure Cache Settings for a web application in SharePoint 2013 article on TechNet at http://technet.microsoft.com/en-us/library/cc770229.aspx
-
No Comment
..................Content has been hidden....................
You can't read the all page of ebook, please click here login for view all page.