
When Test Studio is installed, a plugin is added to Visual Studio, this section will exhibit how the previewed features in this chapter are integrated inside the Visual Studio IDE. The examples are also based on the File Comparer application.
Inside Visual Studio, the File Comparer solution contains only one WPF project. Test Studio projects can be added as any other project type by right-clicking on the solution node and choosing Add and then clicking on New Project. In the Add New Project window, select Telerik from the list displayed in the Installed Templates pane. Then expand the node and click on Test. Make sure that the .Net Framework 4 option is selected from the combobox at the top of the window:
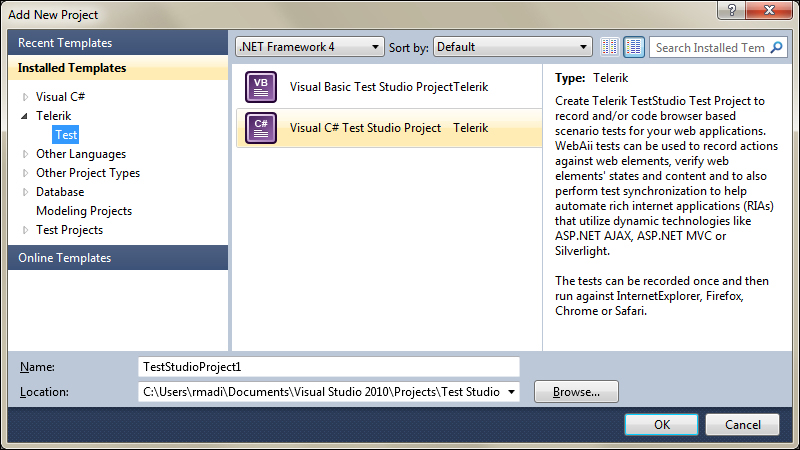
Creating a new project inside Visual Studio
Two templates are displayed to give the user a choice to develop the application either in Visual Basic or C#. We are going to continue our examples in C#, so select Visual C# Test Studio Project and name the project VSFileComparer.Test.
By default, a web test is created, but since our application is in WPF we are going to add a WPF test. Right-click on the VSFileComparer.Test node and choose Add and then New Test. From the Add new Test window, choose the Test Studio WPF Test template and rename the test to VS_MapFolder_Successful.tstest. A Test Studio WPF test file is added under the test project and it opens directly in the edit mode.
The test toolbar enables all the functionalities that we have already covered in addition to the feature supported to convert all steps to code.
Similar to the Test Studio's standalone version, set the configuration settings for the test by clicking on the Configure WPF Application button and browsing for the File Comparer.exe file.
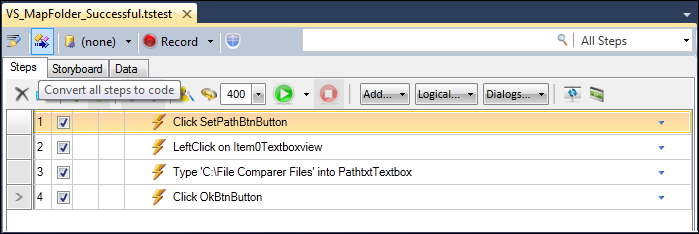
Let's record the test first inside Visual Studio. Record the Func-3_FileCompare_MapFolder_Successful test by clicking on the Set Path button, entering C:File Comparer Files inside the text field for the Set Path window, and then clicking on OK.
Click on the Convert all steps to code icon depicted in the following screenshot:
The Convert all steps to code button in the test toolbar
A window pops up and prompts us to choose the unit tests frameworks that we want the test steps to get converted to. Choose MSTest that corresponds to a Visual Studio unit test and click on OK. In the VS_MapFolder_SuccessfulUnitTest.cs file that we created, the VS_MapFolder_Successful method corresponds to the recorded test and is marked with the [TestMethod()] method attribute. The method's body contains the translation of the recorded steps into Test Studio's automation framework calls.
We don't need to create the tests all over again because this integration enables us to import existing tests. Right-click on the VSFile Comparer.Test node and choose Add and then Existing Item. Browse to the Test Studio's File Comparer.Test solution inside the Test Studio's Projects directory, then to the Functional Test folder, and select all the files after displaying files with all extensions. These tests are now accessible from the Test Studio's File Comparer.Test solution inside Visual Studio. In order to successfully compile these tests, add the using VSFileComparer.Test inside the .cs files.
Open the Test menu, click on Windows and then Test View to open the window with the Visual Studio tests. Right-click on the VS_Map_Sucessful test and choose Run Selection:
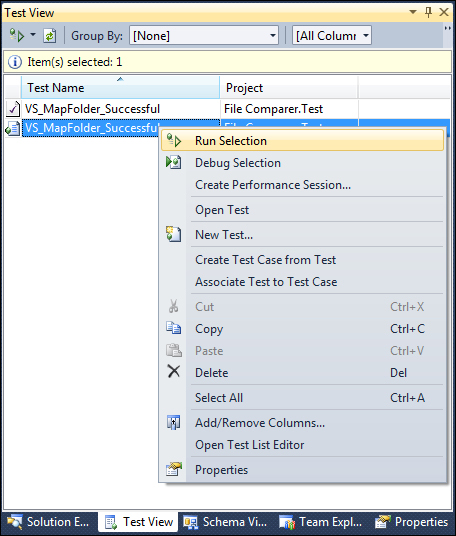
Running the tests of Visual Studio
After the test executes, enable the Test Results window through the Windows option of the Test menu again and verify the execution results:
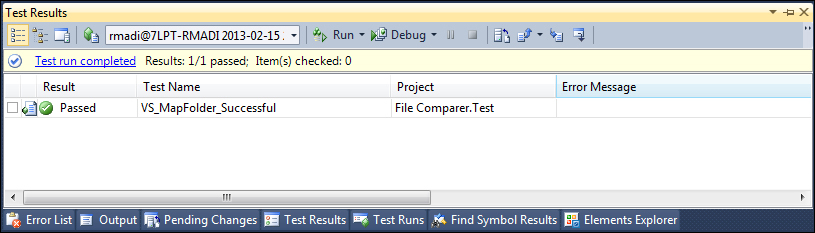
Test Results in Visual Studio