
In this section, we are going to see how to make database tables act as data sources for our tests. The previous examples revolved around one-level tests where none of them involved the Test as step feature. In contradiction, we are going to walk through three scenarios that use two-level tests. They will highlight how Test Studio interprets the execution of two embedded tests where at least one of them is data-driven. The cases we are going to tackle are as follows:
- Outer test is a regular test and comprises a data-driven embedded test
- Outer test is data-driven and comprises a regular test
- Outer test is data-driven and comprises also a data-driven test
Each of the preceding approaches is going to be demonstrated in the right context where we will see how to implement them and how they will execute.
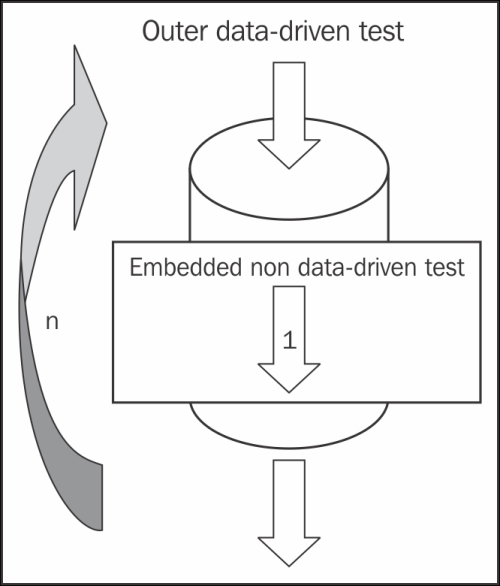
In this scenario, we want to create a situation where some operations are needed to perform before and after a data-driven test. The outer test will execute once and when the inner test is hit, it will execute for a certain number of iterations and then the outer test will continue again. The execution flow is as depicted in the following diagram:
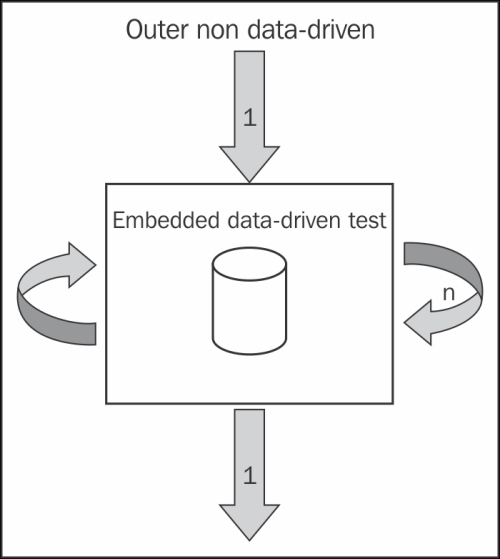
A non data-driven test comprising the data-driven test model
Let us assume that we want to test the acceptance of values in the File Name text field of the File Info tab. Well, the requirements state more restrictions on the filenames format to avoid the insertion of random data. The input is rejected if any of the following rules are violated:
- Input length must be less than 50 characters
- Empty values or only spaces are not allowed
- Special characters are not allowed
So now we know that values such as: Testing Design and Implementation Document for File Comparer Application, " ", or Test Reporting & Assessment are going to be declined by the application due to the violation of the preceding rules, respectively.
During the creation of the functional test cases, the preceding inputs are generated as part of the test data for the File Info data-driven tests. As a tester, running the test cases manually, you would input the preceding invalid values and set all the other UI elements to acceptable values. Otherwise, an error masking situation will emerge where another potential error on the form occurs and hides the error situation induced by the unacceptable input inside the File Name text field. So, in short, you don't need to care about the other values on the form as long as they are correct. This scenario exactly necessitates the execution flow depicted in the preceding diagram.
Technically, the parent test is going to contain some static steps that set the values for all the UI controls on the form except for File Name. The word static means that the steps will execute only once for the same hardcoded values. This test will call another data-driven test responsible for typing the text values inside the File Name field. To automate the data-driven test we are going to use the built-in data tables inside Test Studio.
Let us record the parent WPF test called Func-7_FileInfo_FileName_DDT as follows:
- Click on the File Info tab.
- Input
Mark Mooreinside the Creator Name text field. - Select DOC from the File Extension combobox.
- Check the Reviewed checkbox.
- Set the slider value to
3for the Effort field.
We stop here without filling any value for the File Name parameter. The test steps are as follows:
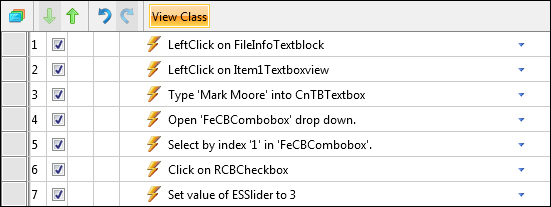
Steps of the Func-7_FileInfo_FileName_DDT test
The child test is also based on the WPF template. Create it under the Data-Driven Tests folder and rename it to Op_FileInfo-FilleName. The creation and population of the data table is going to take place as we record the test:
- Click on the Configure button in the Application ribbon.
- Browse for the
File Comparer.exeapplication. - Click on the Record button.
- Click on the Pause button from the recorder toolbar to be able to navigate to the File Info tab without inserting new recorded steps.
- Once you are there, enable the recording again by clicking on the Record button.
- Enter
Test Reporting & Assessmentinside the File Name text field. - Pause the execution again.
- In Test Studio, click on the Local Data button from the Test Views ribbon as shown in the following screenshot:
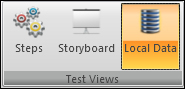
The Local data button
This panel allows us to craft the data table playing the role of the test data source.
Perform the following steps to end up having the table shown in the screenshot:
-
Click on the Create a new data table icon (
 ).
).
- Update the number of Columns to
1. -
Click on the Update Columns icon (
 ) and confirm the removal of the columns.
- Right-click on the column header and rename it to
FileName. - Enter the FileName values as shown in the following screenshot.

Local data table for the Op_FileInfo-FilleName test
Remember that, according to the preceding submission violation rules, the second value in the preceding table intentionally contains only one space.
Click on Steps button from the Test View ribbon to go back to the test steps again. To bind the File Name text field, perform the following steps:
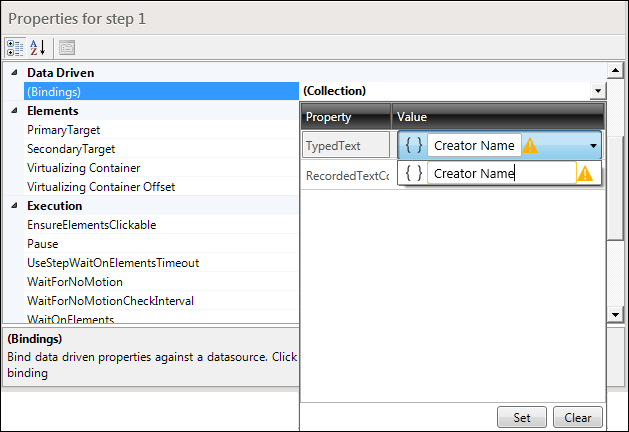
- Select the test step that was lastly added by Test Studio to preview its properties in the Properties pane.
- Click on the arrow of the Binding property in the Data Driven section.
- Bind its
TypedTextproperty to theFileNamecolumn we just created. - Click on the Set button.
Go to the application's window, enable the recording again, and perform the following steps:
- Click on the Create button.
- Add a verification step from the Quick Tasks element menu of the submission result label to verify that its content contains
File Name. - Click on the OK button in the File Info tab.
- Close the application.
The resulting test steps are as shown in the following screenshot:
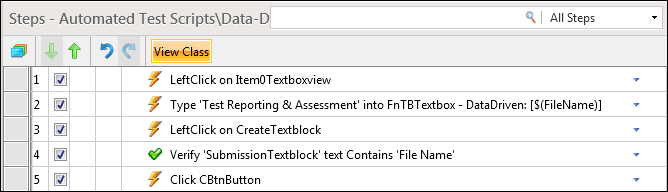
Steps of the Op_FileInfo-FilleName test steps
Go back to the parent test created in this example and click on the Test as Step button from the Add ribbon. In the Select Test(s) window choose Op_FileInfo-FillName and click on OK.
Make sure that the added step is the last one to be executed.
Click on the Run button and notice how the embedded test has executed three times for each value inside the data table while the outer test has executed only once. The logfile provides details about the verification step inserted inside Op_FileInfo-FillName as follows:
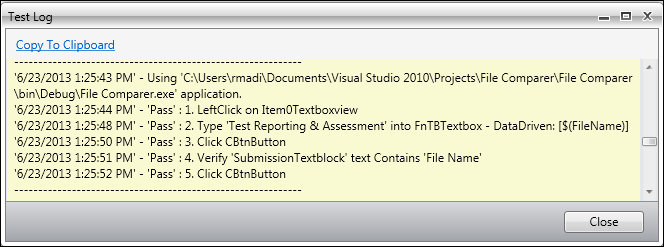
The Func-7_FileInfo_FileName_DDT test execution log
In this scenario, we have a regular test residing inside a data-driven test. The outer test executes the number of times it calls the inner test. The latter will perform the UI operations using the data passed from the parent. The execution flow is depicted in the following diagram:
Data-driven test comprising non data-driven test model
The scenario starts where you, as a tester, is responsible for automating the File Info feature, were asked to redesign the data-driven test for this tab. The new design consists of separating the subprocedures from the main test flow to enhance long-term component maintainability and reusability.
Note
Subprocedure is a term introduced in Chapter 2, Automating Functional Tests to refer to a block inside a test case procedure constituted from UI element verification, operations, and log steps.
So the solution states that you must create an independent WPF test for the subprocedures contained in the parent test. Thus, should you proceed by binding each of the resulting tests to a data source? What if in the future they decide to change the data source type? This will incur changes on all current test data bindings. So was it worth the trouble of dividing the parent test in the first place?
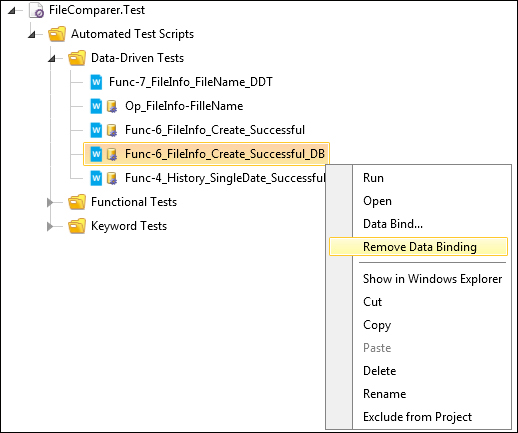
The solution starts with creating a copy of the Func-6_FileInfo_Create_Successful test under the Data-Driven Tests folder. Rename the newly added test to Func-6_FileInfo_Create_Successful_DB.
The copied test still reads from the Excel file, however, this time the data source happens to be a table inside MS SQL. To remove the binding, right-click on the test to open the context menu again and choose Remove Data Binding as shown in the following screenshot:
Removing data binding
The SQL table shares the same concept with the
FileInfo_DS.xls table. The following screenshot depicts a table called FileInfo:

The FileInfo SQL table
An additional column appears in the snapshot and is called Filter. The value inside this column is going to serve as the filtering criteria for the rows that will be assigned for execution. This notion will get clearer as we create the data source corresponding to the tblFileInfo table in the following manner.
In Test Studio, go to the Project tab and click on the Add button from Data Sources and choose Database Source. In the Create new data source window select SqlClient Data Provider from the Provider combobox. The Connection String text field should hold the data used by Test Studio to establish a connection to the destination database containing the table holding the test data. The communication will happen through a user already created on the database having read rights on it. So, insert the following text in the Provider text field:
Data Source=localhost;Initial Catalog=FC_DB;Persist Security Info=True;User ID=FC_DB_USER;Password=po0$wt
Click on the Test button to verify that the connection string is valid. You will not be able to continue with data binding if the connection is not successful.
Enter FileComparer_DB in the Friendly Name field and click on OK to finalize the creation of the data source.
It is time to bind the test to the database source, so right-click on the Func-6_FileInfo_Create_Successful_DB test and choose Data Bind from the context menu.
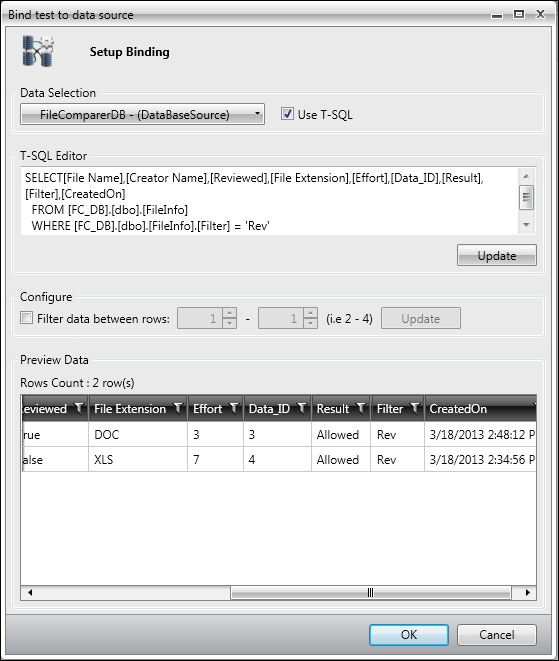
The Bind test data to data source window opens, choose FileComparer_DB from Data Selection combobox and select the Use T-SQL checkbox. This checkbox will show the T-SQL Editor text field to allow filtering out the unwanted table rows. We are going to input a query, which retrieves only the table rows having Run in the Filter column. Enter the following text inside the T-SQL Editor and click on Update:
SELECT[File Name],[Creator Name],[Reviewed],[File Extension],[Effort],[Data_ID],[Result],[Filter]
  FROM [FC_DB].[dbo].[FileInfo]
  WHERE [FC_DB].[dbo].[FileInfo].[Filter] = 'Run'
The Preview Data section displays only one row where the others were not returned since they failed to satisfy the query condition. The retrieved row is shown in the following screenshot:
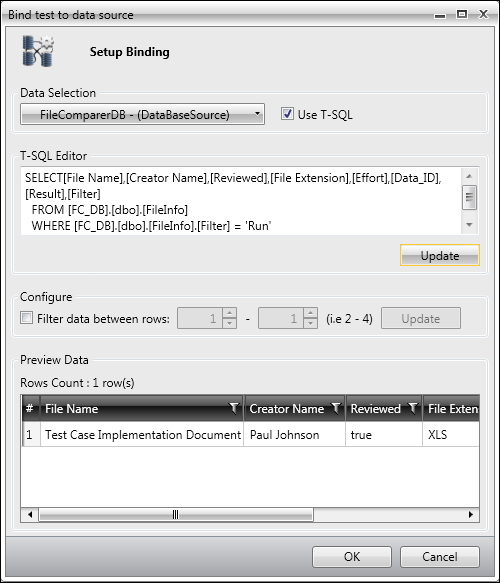
Binding to an SQL data source
Click on OK to confirm the data binding.
The Func-6_FileInfo_Create_Successful_DB test runs successfully without any modifications since the Excel table column header names are exactly the same as those in the database table. The shift to the second data source was almost effortless and is purely dynamic, since each time the test runs, the query of the test data binding is evaluated and the test executes according to the returned rows. So any update on the database table will be reflected the next time you run your test.
Back to our problem, as the data binding part is finished, we now need to separate the subprocedures from the test. Open the Func-6_FileInfo_Create_Successful_DB test and then right-click on the steps of the subprocedure responsible for entering data inside the Creator Name field, and choose Create Test as Step from the context menu as shown in the following screenshot:
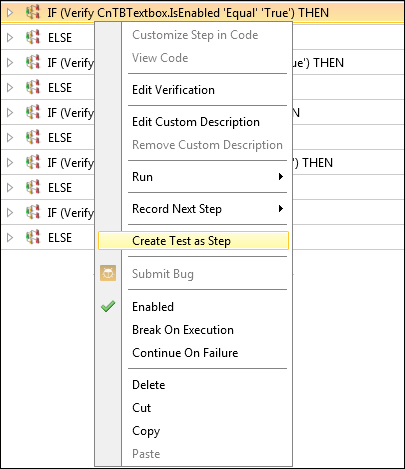
Creating a test as a step
This action will remove the steps and replace them with a call to a new test. The created test inherits the test template and location of its parent, so now it can be found under the Data-Driven Tests folder. In the Create Test as Step window, rename the test to Op_FileInfo-FillCreatorName and click on the Create button.
Notice how the steps are removed and replaced with the Execute test 'Op_FileInfo-FillCreatorName' step.
So what happened to the data-driven binding of the extracted steps? Go to the Project Files pane of the Project tab and double-click on the Op_FileInfo-FillCreatorName test to open it. Expand the steps and notice how the data entered inside the File Creator field still binds to the Creator Name value.
This means that the higher level test data is expected to propagate down to the lower level test. In order to instruct Test Studio to deal with the tests as such, go to Project tab, and then from Project Files panel click on the test to preview its properties in the Properties pane. Select the InheritParentDataSource option as shown in the following screenshot:
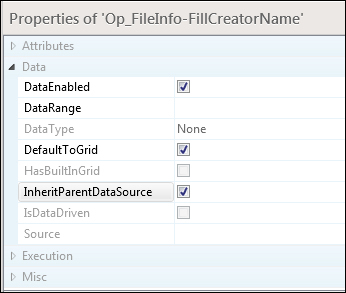
Setting the InheritParentDataSource option
Run the test and notice how the child receives the data from the parent in a transparent way. The test will run for as many rows in the database while calling the child test each time.
Note that the execution will equally work if the inner non data-driven test is created from scratch, because when binding a UI element property to a variable, Test Studio gives you the option to bind to a new nonexistent variable as shown in the following screenshot:
Binding to a new variable
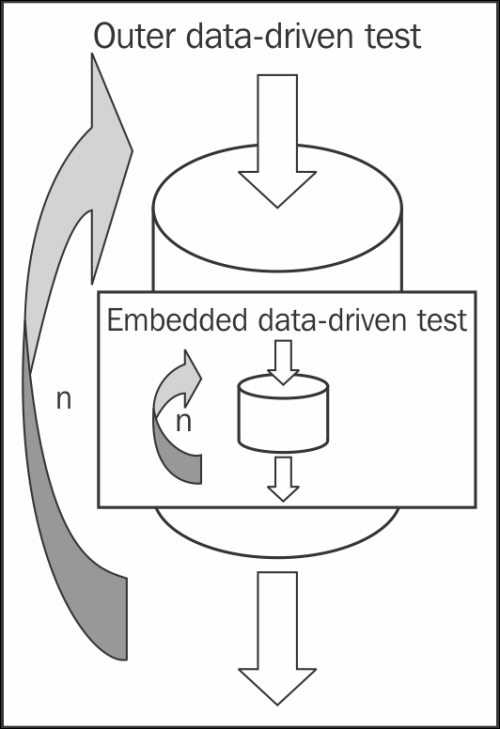
In this scenario, the outer data-driven test executes a fixed number of times, where for each iteration the inner data-driven test is called to execute its own number of times. In other words, if the parent test has four rows and the child has three, the child will execute 4 x 3 times. The execution flow is depicted in the following diagram:
Data-driven test comprising the data-driven test model
As new features are being added into the application, a new rule related to the File Info tab is also introduced. It states that some critical testing documents cannot be committed to the database if they are not reviewed. For example, documents created during the test planning phase must be rexamined at least once. Therefore, an additional verification has been introduced to the file creation source code upon submission. An update is also being made to the manual test scripts, where the test cases that involve creating a document belonging to the planning phase are now being doubled. But do you really want to duplicate the corresponding data-driven rows?!
Let's take for example, Func-6_FileInfo_Create_Successful. All the tests contained in the FileInfo table, which has
Rev in the Filter column, are required to run for both the Reviewed values, true and false.
The solution is going to be handled within Test Studio without having to add any row to the tblFileInfo table. Firstly, create a copy of this test and rename it to Func-6_FileInfo_Create_Successful_CN. Next, change the binding for the test to make it execute for all the rows having the Rev value inside the Filter column. So, right-click on the test and then from the context menu, choose Data Binding and fill the Bind test to data source window as follows:
Binding the Func-6_FileInfo_Create_Successful_CN to FileInfo SQL table
The subprocedure block that deals with setting the Reviewed checkbox is still integrated within the Func-6_FileInfo_Create_Successful_CN test. However, the solution consists of extracting that block and connecting it to another data table inside the database. This table is called tblReviewed, and it contains two rows holding the two possible values for the document review status: true or false.
Open the test and execute the following steps:
- Delete the two verification steps.
- Select the last two subprocedure blocks, which handle actions on the Reviewed checkbox, the Create button, and the OK button.
- Right-click on it and select Create Test as Step from the context menu.
- Name the new test
Op_FileInfo-SelectReviewed. - Go back to the Project tab, and then from
Project Filesselect theOp_FileInfo-SelectReviewedtest, right-click on it, and choose Data Bind from its context menu, and then fill the invoked window as follows: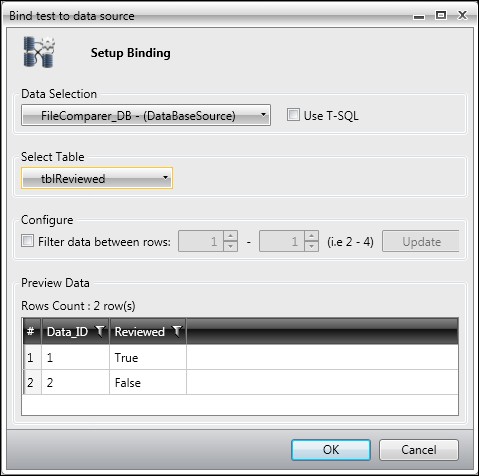
Binding the Op_FileInfo-SelectReviewed to tblReviewed SQL table
- Click on the Run button and notice how for each iteration of the
Func-6_FileInfo_Create_Successful_CNtest, two iterations of theOp_FileInfo-SelectReviewedtest are made for each valuetrueandfalse. So on the whole, the former test will be executed twice whereas the latter will be executed four times.