
In this section, we will convert manual functional test cases into automated tests using the record feature, edit these tests based on emerging automation needs, perform dynamic verifications, customize test steps in code, and log intermediate as well as overall test execution results. The application for testing is called File Comparer. It is a WPF application that does some basic file comparison and saving functionalities. So, let's open Test Studio and get started.
The largest unit of work to deal with inside Test Studio is a project. A project usually maps to the whole application under test and creating it is simple, just perform the following steps:
- On the startup window, click on Create New Project.
- From the New Project window, enter
FileComparer.Testin the Project Name text field. - Click on OK.
The project is created and Test Studio now displays three panes: Data Sources, Properties, Project Files as shown in the following screenshot:

Test Studio's project tab
To the upper left, Data Sources, designated with a red arrow, lists the database and file connections that are used in the project by the automated tests. Since none are created, the pane is currently empty.
To the right, the Project Files pane designated with a blue arrow shows the project folders and tests hierarchy. At the root of this hierarchy comes the project node as shown.
Finally, to the lower left of the window, the Properties pane designated with a green arrow is going to display the properties for any selected automation. The object can represent a project, folder, test, data source, or anything that appears inside the other panes. For example, clicking on the FileComparer.Test node will display its properties in this pane.
Before we jump on to create our first automated test, let's first shape things up by performing the following steps:
- Right-click on
FileComparer.Testand click on Create Folder. - Rename the created folder under the project node to
Automated Test Scriptsand press Enter. - Right-click on the previously created folder and choose Create Folder again from the context menu.
- This time rename the folder to
Functional Tests.
Nested folders provide the first way to neatly group tests based on a logical criterion, which is a type of test strategy in our case. This nested folder is going to contain all subsequent automated tests that we are going to create in this chapter.
No need to wait more, we are ready to start creating automated tests.
Right-click on the Functional Tests folder node and then Add New Test. In the Select Test Type window, we have an option to choose between the following test types:
- Web Test: It is used to automate functional tests for web applications encompassing ASP .NET, AJAX, Silverlight, and HTML5
- WPF Test: It is used to automate functional tests for WPF applications
- Manual Test: It is used to create tests having instructions to be executed manually by the tester
- Load Test: It is used to design tests, which involve virtual users and workloads in order to measure the application's performance during load testing
Since this chapter deals only with automated tests and our application is WPF, we are going to choose WPF Test. Change the test name to Func-1_FileCompare_Equal_Successful.
The Project Files pane now has the hierarchy shown in the following screenshot:
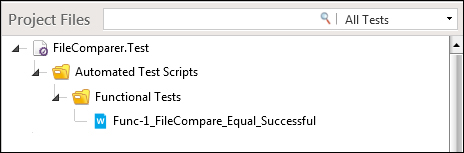
Creating a new test
In order to see the File Comparer application running, open Visual Studio and run the application. The interface shown in the following screenshot will be launched:
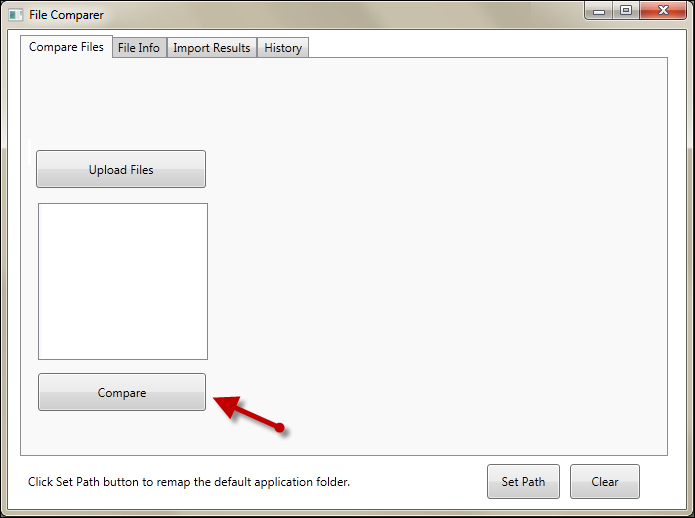
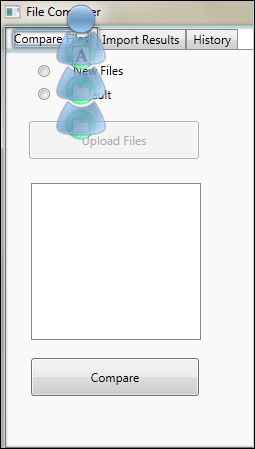
The File Comparer application
The first tab, Compare Files, has the functionality to compare two files with XML content depending on some criteria. For the time being we are not interested in the method of comparison so we will skip it.
The files to compare are fed after clicking on the Upload Files button. The Compare button designated with a red arrow launches the comparison and the result is displayed in a textbox above it. Close the application by closing the window and then create a folder called File Comparer Files under your C:. The purpose of this folder is to contain the files which the application will compare, so place all the files inside it.
The first test case we are going to automate is a test-to-pass generated to verify the comparison of two identical files. It ascertains that we get an output stating that the two files are equal in case if they are identical. The manual steps of test case one are as follows:
- Prerequisites are two XML files with same content
- Test procedure:
- Start the
File Comparerapplication. - Click on the Compare Files tab.
- Click on the Upload Files button.
- Enter
C:File Comparer Files"Func-1_FileCompare_Equal_Successful_In1.trx" "Func-1_FileCompare_Equal_Successful_In2.trx"in the File Name field of the Upload Files window and then click on the Open button. - Click on the Compare button.
- Close the application.
- Start the
- The expected result displayed is: The files resulted in equal comparison!
Now we know the feature to test and the test case, let's start automating the test case steps.
Double-click on the Func-1_FileCompare_Equal_Successful test node. Test Studio navigates you to its Test tab, where the following screenshot shows the Steps toolbar:

The Steps toolbar
Firstly, the test needs to be bound to the application under test, so click on the Configure button from the Application ribbon, which is the button on the right in the following screenshot. The Configure WPF Application Path window will take care of instructing Test Studio to attach its recorder to the File Comparer application once the test is started.
There are two configuration options, either browse for an executable application or choose from any of the running WPF applications. Since none are currently running, let's click on the Browse button and choose the File Comparer.exe file contained in the application's debug folder. Finally click on OK.
In the upper-left side of the screen, a button called Record appears in the Application ribbon, which corresponds to the left button in the following screenshot. We need to click on this button to start the recording:
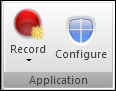
The Application ribbon
As you can see in the following screenshot, an instance of the File Comparer application is started with a recorder toolbar attached to it. The recording toolbar allows us to manage the recording of our test steps. Therefore, any action contained outside the application window will be disregarded by Test Studio.
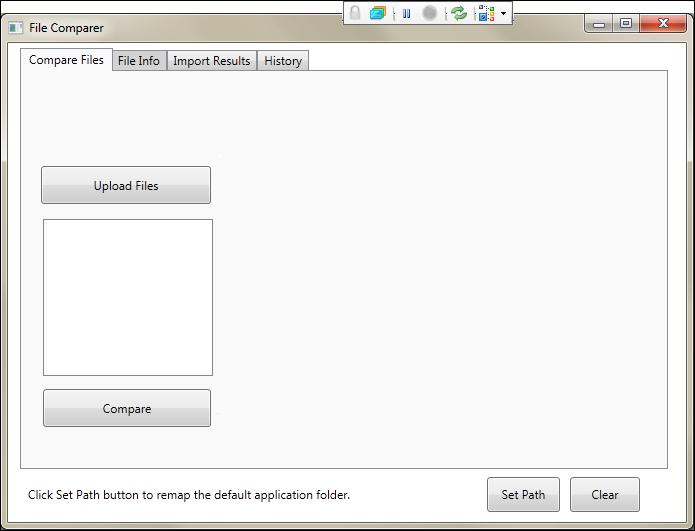
Test Studio's recording toolbar
On the launched application, execute the actions as listed in the manual test case procedure and then close the application. During test recording, Test Studio inserts an automated test step for each manual step that you are performing. The recording outcome is as follows:
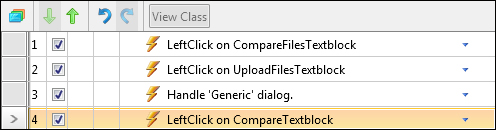
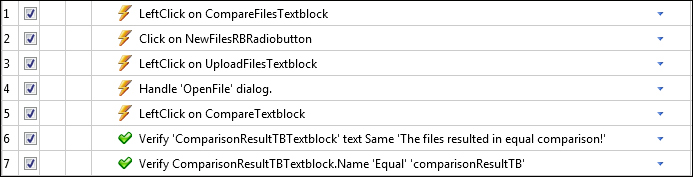
Steps of the Func-1_FileCompare_Equal_Successful test
Let's walk through the steps. The first step says LeftClick on CompareFilesTextblock; by decomposing this sentence we can map the following: LeftClick to the UI operation and CompareFilesTextblock to the UI object name as named inside Test Studio. In other words, the recorder detected a left click on a label containing the Compare Files text. If we follow the same logic on the other two similar steps 2 and 4, we find that there were two other left clicks on UploadFilesTextblock and CompareTextblock. Step 3, the Handle 'Generic' dialog, deals with handling file dialogs where this step waits for the appearance of a generic dialog. Test Studio has an internal mechanism for handling dialogs and one of them is managing Open File windows, which is exactly what is needed in this test case. Right-click on step 3 and choose Delete from the context menu. We will use the add step feature to handle the specific kind of dialog that we are dealing with.
From the Add ribbon, click on Dialogs and choose Open File. A step is added to the Steps pane and Test Studio notifies you that you should edit the properties of the step. Click on OK in the ensuing window, and then in the Steps pane click on the dropdown icon [![]() ], which is present at the end of the newly added Handle 'OpenFile' Dialog step to expand its properties. We will fill them in using the following values in order to cater to our situation:
], which is present at the end of the newly added Handle 'OpenFile' Dialog step to expand its properties. We will fill them in using the following values in order to cater to our situation:
- FilePath value:
C:File Comparer Files"Func-1_FileCompare_Equal_Successful_In1.trx" "Func-1_FileCompare_Equal_Successful_In2.trx" - DialogTitle value:
Upload Files - HandleButton value:
OPEN
While the step is still selected, click on this icon [![]() ] from the test toolbar to move it to the third position.
] from the test toolbar to move it to the third position.
It is time to see our first automated test running. Click on the Run button in the Quick Execution ribbon and watch Test Studio playing back the recorded steps.
The next day you come to work and retrieve the latest build of the File Comparer application. Proud of your automation efforts, you open Test Studio then you hover over the Func-1_FileCompare_Equal_Successful test until the Run button appears, and then you click on it. Crash! An error has occurred!.
The execution was interrupted because the Upload Files button is now disabled. After you inquire more about the issue, the result is as follows. File Comparer now supports a default file comparison for the file found under the application's default folder. To specify the default folder a button has been added to the bottom of the window. Consequently, the application now operates in two modes, either by providing two files for comparison or by using the newly added feature. For this purpose, two radio buttons have been added to the main window. As it turns out out, in order to make our test pass again we need to check the radio button corresponding to the New Files option.
In order to simulate the preceding story, open the solution in Visual Studio and go to the MainWindow.xaml file. Click on the Upload Files button and comment the statement that gets highlighted in the Design panel by wrapping it in a comment tag as follows:
<!--<Button Content="Upload Files" Height="38" HorizontalAlignment="Right" Margin="0,82,581,0" Name="uploadFilesBtn" VerticalAlignment="Top" Width="170" Click="uploadFilesBtn_Click" IsEnabled="True" Grid.ColumnSpan="2" />-->
Uncomment the block appearing in green as follows:
<Button Content="Upload Files" Height="38" HorizontalAlignment="Right" Margin="0,82,581,0" Name="uploadFilesBtn" VerticalAlignment="Top" Width="170" Click="uploadFilesBtn_Click" IsEnabled="False" />
                        <Grid Height="56"   HorizontalAlignment="Left" Margin="15,11,0,0" Name="grid1" VerticalAlignment="Top" Width="168" Opacity="1" ShowGridLines="False" Visibility="Visible">
                        <Grid.ColumnDefinitions>
                            <ColumnDefinition Width="44*" />
                            <ColumnDefinition Width="124*" />
                        </Grid.ColumnDefinitions>
                        <Label Content="New Files" Height="26" HorizontalAlignment="Left" Margin="9,2,0,0" Name="label1" VerticalAlignment="Top" Width="62" Visibility="Visible" Grid.Column="1" />
                        <Label Content="Default" Height="31" HorizontalAlignment="Left" Margin="10,25,0,0" Name="label2" VerticalAlignment="Top" Width="62" Grid.Column="1" />
                        <RadioButton Content="newFilesRB" Height="17" HorizontalAlignment="Left" Margin="28,9,0,0" Name="newFilesRBEdited" VerticalAlignment="Top" Width="16" Checked="newFilesRB_Checked" IsEnabled="True"/>
                        <RadioButton Content="defaultRB" Height="17" HorizontalAlignment="Left" Margin="28,31,0,0" Name="defaultRB" VerticalAlignment="Top" Width="16" Checked="defaultRB_Checked" />
                    </Grid>
From the MainWindow.xaml.cs file, uncomment the methods newFilesRB_Checked and defaultRB_Checked as follows and then build the applications to update solution's .exe:
private void newFilesRB_Checked(object sender, RoutedEventArgs e)
        {
            if ((bool)newFilesRBEdited.IsChecked)
                uploadFilesBtn.IsEnabled = true;
        }

       private void defaultRB_Checked(object sender, RoutedEventArgs e)
       {
           if ((bool)defaultRB.IsChecked)
               uploadFilesBtn.IsEnabled = false;

       }
Should we delete the automated test and start over again! Luckily, we can use Test Studio's add new steps feature to add functionality to an already created test by performing the following steps:
- Right-click on the first step and choose Record Next Step from the context menu.
- Since the radio button selection option comes after clicking on the Compare Files tab, we will choose the After Selected option.
- To record the step, click on the Record button.
- The latest application version is started and connected to the recorder toolbar, so all we need to do is select the radio button corresponding to the New Files option.
- Close the application.
As a result, a step is added with the Click on NewFilesRBRadiobutton description.
Until now we have seen how to mechanically convert manual procedure steps into automated ones. So far so good, however, automation is usually left to run without human monitoring, anyhow watching them is a boring sight especially after the tenth test onwards!
Given that tests should be autonomous as much as possible, the method that we applied to automate the first test case has no way to verify the result displayed by the File Comparer application following the comparison of any two files. So let's see what Test Studio has to offer!
In this section, we will see how to create evaluation points inside the automated tests in order to learn about the execution result without the need to actually watch the screen events.
This section explains how to add verification expressions around any UI element. Given that the portal to add any new automated step is through the Record button, click on it. After the application launches, enable the hover over highlighting feature by clicking on the second icon in the recorder toolbar [![]() ] to enable the surface highlighting feature. As you position the mouse on top of the
] to enable the surface highlighting feature. As you position the mouse on top of the File Comparer text, a blue nub appears, which fans out into what is called translators.
Translators around the Comparer Files text
We are now operating with a powerful Test Studio feature, which is at the core of UI components recognition. The translators show us how the UI components are open for Test Studio to work with. There is a specific translator for each element, which knows all about its actions and properties. Let's take the example of the preceding screenshot, traversing the translators from inside out dictates the UI object hierarchy starting from the leaf all the way up to the root level. Each translator is represented by a fin and thus the three depicted fins correspond to the following chained objects:
- Tab text content, Compare Files
- Tab item
- Tab control
Clicking on any of the translators will invoke verification steps and other automation actions specific to the involved object. Using the highlighting feature over any other UI object reveals the entire hierarchy from that object to the root in the manner of fanned out translators just as we have seen in this example!
Many advantages are brought and we are seamlessly benefited in our automation by this feature. Firstly, during execution, the UI element is retrieved based on its properties, which are transparent to Test Studio rather than its coordinates with respect to the application window. This fact brings up the idea of reliability where, for example, finding a button on the screen with its static ID confirms to us that this will work no matter how many times we repeat the scripts, or no matter the location to which this button will be moved to. Secondly, generally in automation, the object recognition is the first obstacle preventing UI element actions from taking place. So, at least the translators eliminate the cause for such malfunctioning. Thirdly, it is given that any required verification, which happens to be related to a screen object, is based on the profound knowledge of the automation test tool with the UI controls' internals. Provided that, we appropriately choose the verification expressions, and verification reliability inside Test Studio also comes to our advantage.
Going back to our test, as you place the mouse pointer on top of the translators of the tab, the tool tips will display the type of the corresponding object in the hierarchy. So, note that not only the focused object is translated but also all the objects hierarchy ending by that object. Hover over the Compare Files tab, and click on the translator that has the tabItem tool tip. An Element Menu window appears as shown in the following screenshot:
Element menu
While we are not on it, let's look at all the available icons:
-
Add To Project Elements

-
Locate in DOM

-
View 3D

-
Build Verification

-
Quick Tasks

-
Drag & Drop

-
Mouse Actions

-
Image Verification

-
Add a Manual Step

The Build Verification and Quick Tasks buttons relate to to verification steps.
Build Verification allows us to construct advanced verifications with composite expressions. A verification expression is composed from criteria and operators. The criteria are chosen from the UI element attributes whereas the operators are rendered based on the attributes' types. The attributes cover a wide area of UI elements content, visibility, UI rendering and styles, item selection, properties, and others.
Quick tasks, as its name suggests, has ready-made quick access to key tasks. Some of them are verification tasks also accessible through the advanced verification mode mentioned previously such as Verify – element visibility is visible. Others are Wait steps such as Wait - element visibility is visible. These steps will wait on the evaluation expression following the Wait keyword to be satisfied before resuming the execution such as waiting for a text field to become visible on the screen before typing inside it. From an automation design's perspective, these steps can be used for verifications prior to UI actions whereas the verification steps follow them later to indicate whether the execution status is pass or fail. Finally, the Extract steps are used to extract a property value for later usage such as Extract – Element Visibility is collapsed, which will make the collapsed value of the control's visibility property available for other test steps.
Let's shift our attention to the expected results. According to our manual test, after comparing files a text will appear in the File Comparer application textbox as: The files resulted in equal comparison! This is what we need to insert as a final verification in the test by performing the following steps:
- Right-click on any test step and choose Record next step and then After Last Step since post conditions' verifications should execute as the last step.
- Click on Record to launch the recorder.
In order to get the expected result label, we should execute all the steps listed in the test case procedure. However, we do know that as we execute the UI actions the corresponding test steps will be added and therefore the existing automated steps will be doubled! In order to instruct Test Studio to disregard the steps that we are about to perform, click on the Pause button from the recorder toolbar and execute the manual test case procedure again until you get the result, and then perform the following steps:
- Toggle on the hover over highlighting feature and place the mouse over the result label displayed in the textbox.
- Click on the translator for TextBlock to open the element menu.
- Click on the Quick Tasks button.
- Double-click on the Verify – verify text content's match 'The files resulted in equal comparison' to add it to the test steps.
- Hover over the result label again and enable the TextBlock element menu again.
- This time we will construct the text verification expression using the advanced verification feature by clicking on the Build Verification button.
- In the Sentence Verification Builder window, click on the Property button.
- For the added entry in the Selected Sentences section, open the Property combobox and scroll down to see the available properties.
- Choose Name while keeping the operator and the value intact.
The verification expressions are depicted in the following screenshot:
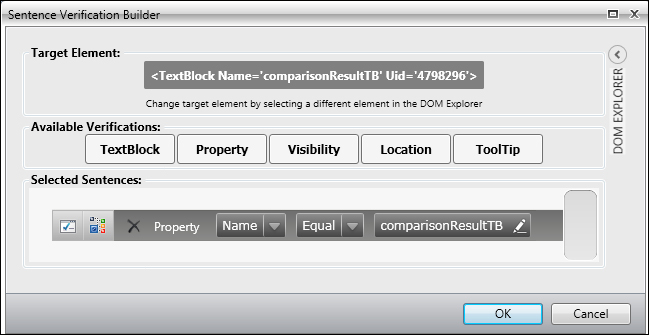
A new verification step based on the Name property
Before we confirm our verification, it is a good practice to go over it and verify that the expressions are correct. At the beginning of each step a Validate icon [![]() ] is available to actually execute and verify the step against the current object state. Click on the Validate icon for the verification step.
] is available to actually execute and verify the step against the current object state. Click on the Validate icon for the verification step.
Test Studio informs us that the evaluation is successful and a Validation Passed label is displayed. Change the operator to NotEqual and validate again.
The yielding result is failing with a Validation Failed label accompanied with an additional description about the cause. Let's revert the operator to Equal. Click on OK, toggle off the surface highlighting feature, and stop the recording by closing the application.
Let's look at these properties: textBlock and Name from another perspective. Open the File Comparer solution in Visual Studio and locate the properties of the text block's XAML tag, notice the Name property that appears in the following code:
<TextBlock Height="361" HorizontalAlignment="Left" Margin="248,7,0,0" Name="comparisonResultTB" Text="" VerticalAlignment="Top" Width="491" Opacity="3" Visibility="Visible" ToolTip="Execution results area" />
Hence, the verification expressions are another way of seeing the preceding object's attributes!
The final test steps are as follows:
Steps of the Func-1_FileCompare_Equal_Successful test
The overall test and step results can be directly accessed by clicking on the View Log link, which appears in the test toolbar after the test's execution completes.
Therefore, run the Func-1_FileCompare_Equal_Successful test and click on the View Log to open the Test Log window shown in the following screenshot:
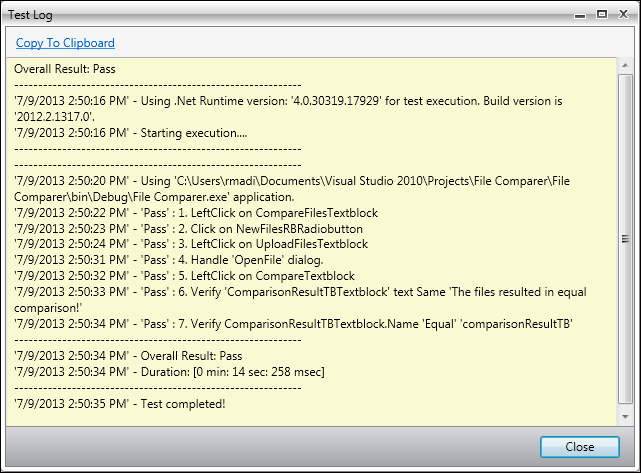
The log shows the following details:
- The overall status of the test cases which comes in the first line
- The components that were loaded initially comprising the executable application and the automated test class
- The execution status for each step comprising the test step's status, number, and description
- The overall test duration
- The time at which the test completed execution
So far we have seen how to record UI interactions, add verifications, execute the test, and access the automatically generated logfile. However, sometimes you might want to add some custom logging for many reasons, such as logging messages specific to the application's business rules. Hence, you want to collect this information while the test is running, log them in a file and access them afterwards. In this section, we will see how to create customized logfiles, which enable us to learn more about the execution flow.
In this example, we will permanently save the results of the verification steps in a customized log message. For this purpose, we are going to extend our steps with a coded step to log the result on a local file. As mentioned at the beginning of this chapter, a coded step extends the functionalities provided in the Test Studio IDE with others directly accessible from the underlying Telerik testing framework and .NET libraries. The code examples in this chapter are in .NET and C#.
From the Add ribbon, click on Script Step and choose C# from the combobox of the Select Scripting language window. A panel opens to allow editing of the routine name and signature. Edit the Routine and Description values to Func1_FileCompare_Equal_Successful_LogPCVerification and Log post-condition verification respectively. Click on the View Class button from the test steps toolbar and notice the method signature added to the underlying code class:
[CodedStep(@"Log post-condition verification")]
public void Func1_FileCompare_Equal_Successful_LogPCVerification()
   {

   }
Insert the following code inside the Func1_FileCompare_Equal_Successful_LogPCVerification test's body:
string data = "The files used in this test have the same content. The actual behavior is: " + Applications.File_Comparerexe.File_Comparer.ComparisonResultTBTextblock.Text + Environment.NewLine;

using (System.IO.FileStream fileStream = new System.IO.FileStream(@"C:File Comparer FilesLog.txt", System.IO.FileMode.OpenOrCreate, System.IO.FileAccess.ReadWrite, System.IO.FileShare.Read))
{
fileStream.Seek(0, System.IO.SeekOrigin.End);
byte[] buffer = new byte[data.Length];
buffer = Encoding.UTF8.GetBytes(data);
fileStream.Write(buffer, 0, buffer.Length);
fileStream.Close();
}
There are two things that we can denote in the preceding code snippet. The first thing is accessing code through the File Comparer result text block element, which holds the comparison result. The second thing is that while the test recording was in process, Test Studio was building a repository for the UI elements that were involved in the UI interaction. Each UI object participating in the definition of any test step under the File Comparer project has a unique entry under this element repository. Thus, elements for all tests belong to the same hierarchy and can be later on referred to from the test's code without having to redefine them. Some operations, for example editing element names are granted to the user in order to render the element's list more descriptively and comprehensively. This repository is refreshed as steps are recorded or deleted from the tests. The repository elements are listed inside the Elements pane as depicted in the following screenshot:
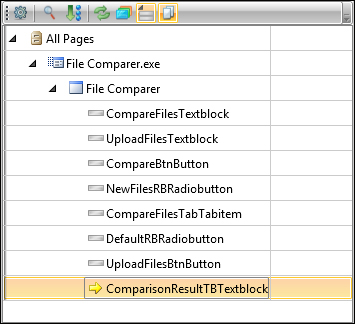
The Elements pane
The hierarchy starts with the All Pages node, which is going to be the parent for all the UI elements that are going to be eventually stored. Right under it comes the application node, FileComparerexe, and then the main WPF application window, FileComparer. The other UI objects that we dealt with so far are children of the FileComparer node including the result text block, which is in our current interest. It is the highlighted entry in the preceding screenshot and is called ComparisonResultTBTextBlock. We made use of this hierarchy in order to hold an instance of the text block object inside the coded step, where we accessed its text property.
In the preceding code, the line that initializes the data string takes care of referencing the ComparisonResultTBTextBlock object based on the hierarchy we just described.
The second thing that the code does is saving the content of the data string inside a file that is going to be created on your local C: under the File Comparer Files folder.
Make sure that the scripted step is the last one to execute and then click on the Run button. Open to see the content of the log text file, and verify that it contains the text displayed inside the textbox: The files resulted in equal comparison!
Let's imagine that we have used a replica of the code discussed previously to insert other customized log messages inside this and other tests. One day, we realize that the requirements have suddenly changed and, in order to support text formatting, the destination log text file should be replaced with an HTML file. This change will then incur changes on each and every log method!
Therefore, since we are devoted to developing automated scripts with maintainability in mind and in order to avoid duplicate code inside our class, we will do some refactoring first.
Click on the View Class button on top of the steps. In the class code panel, add the following method signature before the last two closing brackets:
private void LogResult (string text)
{
}
Edit the implementation of the Func1_FileCompare_Equal_Successful_LogPCVerification and LogResult methods to get the following code:
public void Func1_FileCompare_Equal_Successful_LogPCVerification()
{
string data = "The files used in this test have the same content. The actual behavior is: " + Applications.File_Comparerexe.File_Comparer.ComparisonResultTBTextblock.Text + Environment.NewLine;
    LogResult(data);

}
private void LogResult (string text)
{
text = text +  Environment.NewLine;
using (System.IO.FileStream fileStream = new System.IO.FileStream(@"C:File Comparer FilesLog.txt", System.IO.FileMode.OpenOrCreate, System.IO.FileAccess.ReadWrite, System.IO.FileShare.Read))
   	  {
                fileStream.Seek(0, System.IO.SeekOrigin.End);
                byte[] buffer = new byte[text.Length];
                buffer = Encoding.UTF8.GetBytes(text);
                fileStream.Write(buffer, 0, buffer.Length);
                fileStream.Close();
}
}
Instead of duplicating the same code that handles writing to the text file, we will call the LogResult method with the customized message passed in the text parameter.
The test case preconditions were satisfied early on when the two files with the same content were placed in the File Comparer Files folder under C:. Thus, for the time being, we will add manual steps to handle the preconditions, in case they were not executed, which is as follows:
- Click on the More button from the Add ribbon and choose Manual Step.
- Edit the added step description to instruct the tester, who is going to carry out the manual preconditions, what is supposed to be done.
- Move the step upward to the very beginning of the test and add a step to the log that the preconditions have been manually executed.
The following is a suggested model to use when designing a test for automation. It mainly aims at covering the different components of a test case during automation in addition to providing useful logging where needed:
- Preconditions' execution consists of executing necessary steps to guarantee an initial correct state of the test
- Preconditions logging takes care of logging the precondition status
- UI element verifications validates whether the UI elements are in a proper state before using them
- UI element actions consist of performing the actions on the UI elements, as appearing in the test case
- UI element action result logging takes care of logging the outcome of executing the operations against the UI elements in case they fail
- The third and fourth features are repeated
- Postcondition verification validates whether the expected application behavior after executing the test case steps is met
- Postcondition logging takes care of logging the outcome of the postcondition verification step
Properly automating a test to handle itself suggests a better understanding of a test case structure. So what is a typical test case? It starts by executing certain preconditions. The kind of preconditions could be related to creating initial data, resetting a form, navigating to a window, rolling back database to a previous state, or many others. Once we have passed this, we can log a custom message and then move to the subsequent steps contained in the test case procedure. These steps are somewhat identical in nature as we will see.
Generally procedure steps are going to perform an operation on a UI element. However, this operation should not be done blindly because it hides in itself some implicit preconditions depending on the test case context. These preconditions should be verified and logged in case if they fail. We are going to call the preconditions on a UI element with the corresponding UI action and custom message, a subprocedure block.
Lastly after a test finishes executing the procedure, we want it to make sure that the system is in the state that we want it to be in. These are the postconditions against which a final verification step should be added. The outcome of this verification will have the greatest weight in calculating the overall execution result of the test.
The following diagram illustrates an automated test case structure:
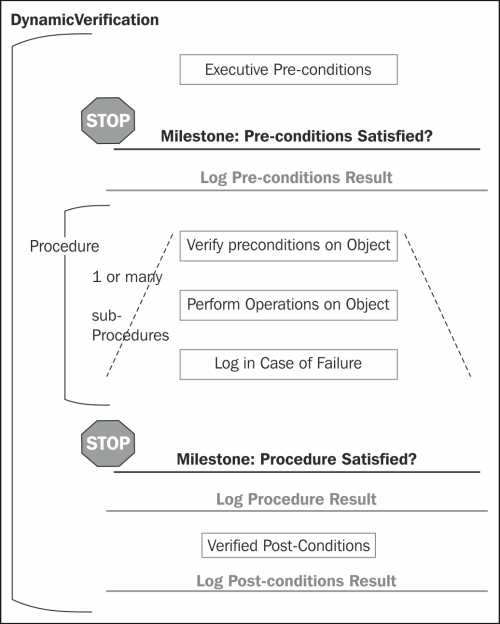
Automated test case design diagram
Following our preceding definition of a subprocedure block, a procedure is made of one or more subprocedure blocks. The diagram also has the notion of a Milestone. A Milestone is the point at which continuing the test case execution, in case the preceding block has failed, is useless. The first one appears after the preconditions. For example, if the preconditions responsible for logging into the application under test were not satisfied, what is the point of continuing the test case? Exactly, there is no point so we are fine to break the test here.
Similarly, if the UI element did not pass the verification criteria to ascertain that the object is entitled of receiving the UI actions required by the test cases, it is needless to continue the execution. Thus, again, we can break the execution at this point because recursively a subprocedure block is in itself a precondition for the next subprocedure block.
Provided that all the subprocedure blocks have successfully executed, we encounter another milestone. This milestone is generally important in automation, since if the execution has passed it and the overall result is failing, the chances that a bug resides in the application under test is high.
The milestones we have seen so far are static in a sense that we expect them to be important execution turning points. Other dynamic events could alter the execution flow and they constitute important verifications as well. We are talking about any unexpected situation such as an unplanned window that could disrupt UI actions.
Recognizing the critical test case milestones is not enough, so collecting information at these points is very useful. Therefore, logging can be used here to save results in a filesystem.
The main benefits that we get from this approach or any an adapted form of it are conformity and readability. When all of our functional tests map to one design they are, firstly, easily understood by new testers reading them where they also represent an automation guide for future manual test cases waiting on the automation list. Secondly, interpreting the log result becomes much easier since it will contain the critical information captured at the test case joints, knowing that the tests are in themselves smarter in interpreting the situations.
According to the preceding model, handling unexpected windows is still not covered in the test that we automated. Unexpected windows could pop up sporadically during execution. Their causes are unpredictable, otherwise we would target specific steps to handle them. They emerge because of a changing condition in the system state, which wasn't the same at the time of recording. Such unexpected windows will remove focus from the application windows, where the actions can no longer be applied on the UI elements and therefore interrupt the execution. What we practically want in such a situation is to gracefully solve it by closing the unexpected window, logging an error, and continuing the execution of the tests.
The Telerik team offers us a handy solution to the preceding problem. It can be found on their Test Studio online documentation page http://www.telerik.com/automated-testing-tools/support/documentation/user-guide/code-samples/general/log-error-dialogs.aspx.
Test Studio offers a powerful feature that allows using tests as steps. During execution, the inserted test is called to execute within the context of a parent test. As we will see, tests as steps also enhance test maintainability. In this section, we will continue with automating the second test-to-pass on the list, which deals with the default file comparison feature. The manual test steps of test case two are as follows:
- Prerequisites:
- Map the default application folder
- Check whether the folder contains identical XML files
- Procedure:
- Click on the Compare Files tab.
- Click on the Default radio button.
- Click on the Compare button.
- The expected result displayed is: The files resulted in equal comparison!
Before we can automate the test procedure we have to execute the preconditions section. We could execute them manually, similar to what we did in the previous test; however, this has a disadvantage. The preconditions are frequently shared between test cases. In our case, every scenario that involves a default comparison needs to make sure that the application already has a mapped folder. Now suppose for a second that in our agile environment, a requirement change comes to alter the way the application folder mapping is currently done. This change would require us to modify every automated test that uses this folder mapping feature and thus would cost a considerable time. It is true that changes always happen; however, it is essential that we anticipate such situations and design our tests in a loosely coupled way. This means not to tie scenarios and conditions which are not inherently related.
Having said that, let's automate the preconditions instead of executing them manually. So start by creating a separate WPF test and name it Func-3_FileCompare_MapFolder_Successful. Perform the following steps:
- Click on the Set Path button.
- In the window that pops up enter:
C:File Comparer Files. - Click on OK.
Notice that, during the recording when the Set Path window pops up, another recorder toolbar is attached to it. Therefore, we need to use the latter recorder in case we want to add UI element verification steps on the objects that the invoked window holds.
Also notice how the objects underneath the invoked window along with the window itself are added as children to the All Pages node, as shown in the following screenshot:

File Comparer UI objects inside the Elements pane
The resulting steps are shown in the following screenshot:
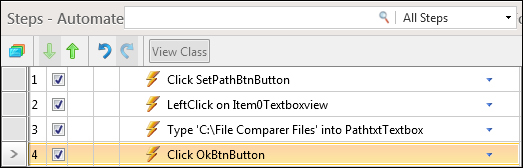
Steps of the Func-3_FileCompare_MapFolder_Successful test
Now let's record the default folder comparison. Create a WPF test and name it Func-2_FileCompare_DefaultComparison_Successful.
From the Add ribbon, click on the Test as Step option. A window pops up displaying all the available tests inside our project. Choose Func-3_FileCompare_MapFolder_Successful and click on Select. We can now add the other steps from our procedure, which will result in the test steps depicted in the following screenshot:
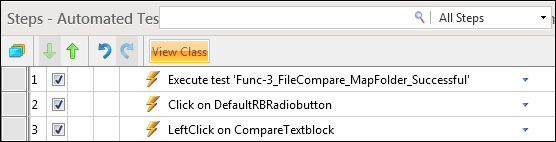
Steps of the Func-2_FileCompare_DefaultComparison_Successful test
Run the test and notice how the first step will call the map folder test to execute within the context of the parent.
Our test is passing but is not efficient because we are mapping the application's default folder regardless of whether the folder is actually already mapped. We can use the clue that the application gives us in this matter. If no folder is mapped, a label with the Click Browse button to map the default application folder content is displayed to the left of the Set Path button; whereas if the folder is mapped, the label changes to Click Browse button to remap the default application folder. Therefore, we need to introduce logical branching, which saves us from the trouble of mapping the default folder again in case it is already mapped. The time savings may seem small, but they will mount up when this test case has to execute 100 times overnight.
The branching will go as follows. If the displayed label is equivalent to C
lick Set Path button to map the default application folder, execute preconditions and jump to procedures, else log that the preconditions are satisfied and continue with procedures. The expression label Click Set Path button to map the default application folder is the equivalent of a verification step inside Test Studio. For this purpose perform the following steps:
- Add an if...else construct located in the Logical combobox at the top of the Add ribbon.
- Click on the Record button.
- Use the surface highlighting feature on the target label to build the expression depicted in the following screenshot.
- Close the application.
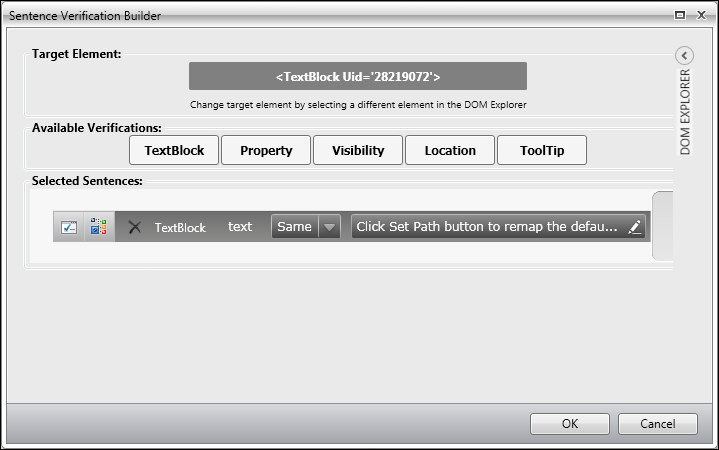
Verification on text content in verification builder
As any if-else block, Test Studio's if-else block comprises two elements: the condition and execution block for each branch. The condition corresponds to any verification step whereas the execution block can be a combination of any automated steps.
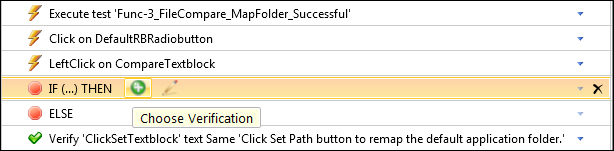
In order to combine a verification step to the condition of the If statement, hover over the If (…) THEN step and click on the Choose Verification button as follows:
Choosing verification for an If statement
Once clicked, all verification steps will have the same button enabled inside the column preceding the text description, but this time in the select verification mode. Click on the Verification button for the verification step shown in the preceding screenshot. Both the steps are merged and this verification step now constitutes the condition statement where the description is changed to: IF (Verify 'ClickSetTextblock' text Same 'Click Set Path button to remap the default application folder.') THEN. To complete the branching condition, drag the Execute test 'Func-3_FileCompare_MapFolder_Successful' step and hold it on top of the ELSE step until the Drop inside ELSE tool tip appears and then release it. Move the if-else block to the beginning of the test and add a log script step as follows:
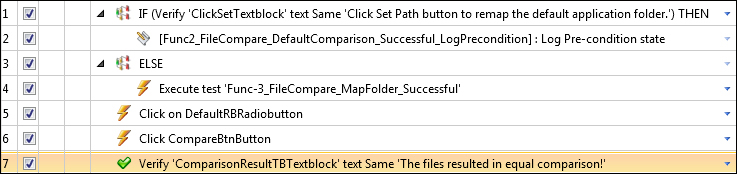
Steps of the Func-2_FileCompare_DefaultComparison_Successful test
Let's run to see the changes. Since the default folder is already mapped, the IF step implementation will not execute.
The purpose of the following test case is to discover the automation of another more complex WPF UI elements such as comboboxes and grids and to see how we can retain some values shared in variables between the test steps.
The comparison method has a byproduct, which is keeping a history of the compared files in terms of filenames, comparison results, and dates of comparison. The History tab of the application allows the retrieval of the comparisons based on the date chosen from the combobox. The Choose date from label instructs the user from where to select the date to filter on. The date combobox is populated with the dates during which there have been file comparisons. The user has the option to choose between a certain date and all dates. The manual steps of test case three are as follows:
- The precondition is that at least one comparison should be made
- Procedure:
- Click on the History tab.
- Choose the date 2/8/2012 from the combobox.
- The expected result is:
- The data grid displays three rows
- All the data grid entries have
2/8/2012in theirDatecolumn
- Executing this test case requires some implicit steps as follows:
- Click on the History tab.
- Select date value 2/8/2012 from the combobox.
- Store value 2/8/2012 for later use
- Store the number of rows in the grid.
- For every row inside the grid, verify that the
Datecolumn contains the stored value2/8/2012.
Test Studio has a built-in mechanism to save a UI element's property value, accessible throughout all the test steps. The feature was previously mentioned very briefly when listing the Quick Tasks section of the Element menu, and it's called Extract.
In step 4, we use this feature to temporarily save the value chosen from the combobox. This value is used for comparing the date column content of the data grid. In step 5, we also need to extract the number of rows that the data grid currently holds in order to specify the loop's upper bound for step 6.
The automation procedure goes as follows:
- Create a WPF test.
- Rename to
Func-4_History_SingleDate_Successful. - Click on the Record button.
- Execute steps 1 to 3 from the detailed procedure.
- For step 4, click on the hover over highlighting button and place the mouse on top of the date combobox.
- This time we will click on the translator with the ComboBox tool tip.
- In the Element menu, click on Quick Tasks and choose Extract- selected item has index '1'.
- Use the hover over highlighting feature to extract another value related to the data grid, so from Quick Tasks choose Extract-dataGrid row count equals '3'.
- Stop the recording.
Let us first expand the properties for step 4 as follows:
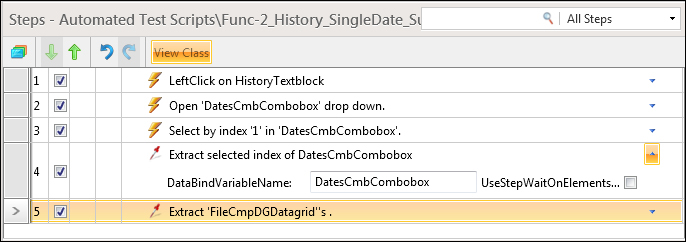
Steps of the Func-4_History_SingleDate_Successful test
DataBindVariableName contains the variable name where the selected value, 2/8/2012 is stored. Similarly, for step 5, Extract 'FileCmpDGDatagrid''s, the Value property holds the number of rows loaded inside the grid.
Until this point, we created the steps to interact with the UI in addition to those that will hold the necessary key values. It is time to implement the post condition verification. For this purpose, add a loop construct from the Logical button of the Add ribbon. Expand the added step and edit the value for the Count property to 3, since the expected result states that three data grid rows will appear. Add a script step with a target to validate a single value of the date column at a specific row. Drag the latter step and place it inside the loop block. Edit the underlying method for the script test:
 [CodedStep(@"Verify cell has date")]
public void Func4_History_SingleDate_Successful_VerifyDate()
{
int selectedIndex = Int32.Parse(GetExtractedValue("DatesCmbCombobox").ToString());

ArtOfTest.WebAii.Controls.Xaml.Wpf.ComboBoxItem cbItem =(Applications.File_Comparerexe.File_Comparer.DatesCmbCombobox.Items[selectedIndex]);

string rowContent = Applications.File_Comparerexe.File_Comparer.FileCmpDGDatagrid.GridData[gridIndex][0].ToString();

bool pass = rowContent.Contains(cbItem.Text);
gridIndex++;

Log.WriteLine("Selected text is : " + cbItem.Text);
Log.WriteLine("Data Grid row number is : " + GetExtractedValue("FileCmpDGDatagrid").ToString());
Log.WriteLine("Cell Verification result: " + pass );
}
The first instruction stores the selected value extracted from the combobox. The GetExtractedValue method takes as a parameter the name of the variable that was bound in the Extract selected index of DatesCmbCombobox step.
The second instruction creates an object to hold reference to the item of the date combobox. The text property of the combobox item represents the value of the selected date that will be used for comparison.
The third instruction reads the value of a data grid row, which is the index number that is going to be read from the variable called
gridIndex. This variable is instantiated at the beginning of the class as a global variable. Each time the condition of the loop is satisfied and the loop block is traversed, gridIndex is incremented by one.
The fourth instruction evaluates the row content against the selected value and saves the result in the pass Boolean variable.
Finally, the code calls the Writeline method. This method belongs to the BaseWebAiiTest class. We can call this method at any time to log information to Test Studio's executing logfile.
Initialize the gridIndex variable at the beginning of the class code as follows:
public int gridIndex;
Run this test and click on the View Log button from the steps toolbar. The following screenshot shows the content of the test case execution log:
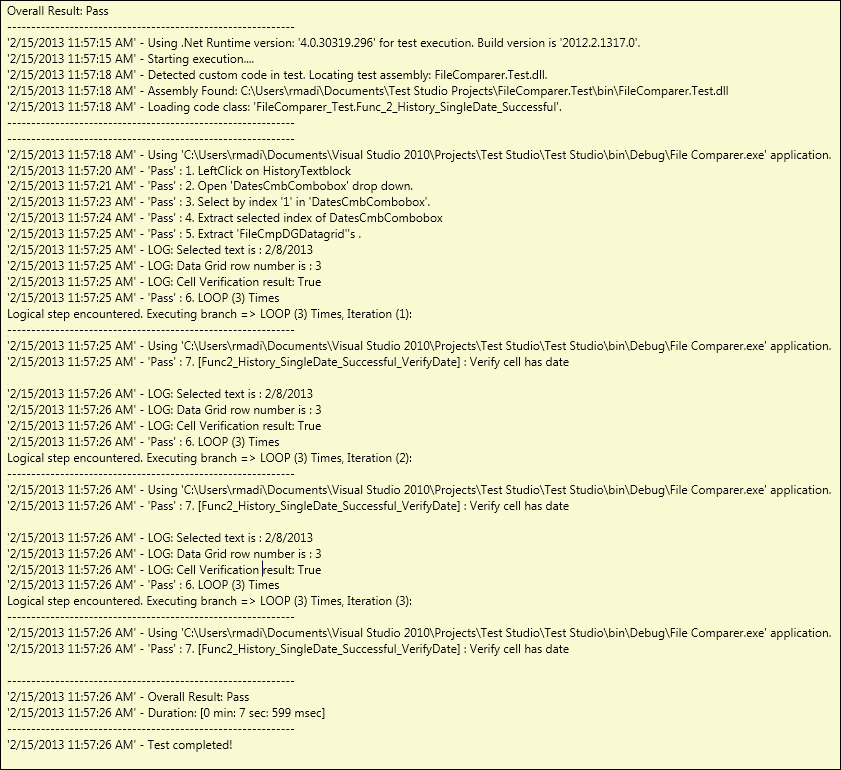
The Func-4_History_SingleDate_Successful log
What we have learned so far in this chapter is enough to get us started with automating any functional test case. We have seen how to analyze and breakdown a test case, how to start the process by recording a stepwise test, how to change the direct flow of execution by using logical branching constructs, and how to customize our steps in code where needed.
The following two paragraphs discuss some additional capabilities that we can implement in our test solution. These examples revolve around handy code tweaks that fit in the context of every automated test.
Normally, it is very useful to automatically add specific handling after executing the last step. The testing framework enables this flexibility by implementing the OnAfterTestCompleted method for the BaseWebAiiTest class.
Each test has an object of type TestResult, which holds the test execution's overall result in a property called Result. To dynamically log the value of this property, open the Func-1_FileCompare_Equal_Successful test and add the following code after clicking on the View Class button:
public override void OnAfterTestCompleted(TestResult result)
        {
if(result.Result ==
ArtOfTest.Common.Design.ResultType.Fail)
                Log.WriteLine("The overall result is fail.");
              else
                Log.WriteLine("The overall result is pass.");

              base.OnAfterTestCompleted(result);
        }
Run the test and notice how the built-in Test Studio log now contains our message describing the overall test result as follows: LOG: The overall result is pass.
This type of example is useful to be adopted in the overall automation strategy, since it is effortless and helpful in the test result analysis. It can also be applied for overriding the other built-in Test Studio framework methods such as OnBeforeTestStarted().
Another similar practical functionality is related to logging. The test case design model talks about the importance of logging custom messages at certain key points. More important is their availability after the test has been executed. Just think how convenient would it be if each time we make a call to the Writeline method, Test Studio is smart enough to replicate the message also in our logfile! In fact, this can be done if we subscribe to the log event.
Each test has a reference to a Manager instance responsible for managing the test execution. So, the Manager instance is the observer and actor that handles the main flow of the tests by being the intermediary between the framework and the application instance.
The Log class of the test Manager object has an event called LogWrite. We will subscribe to this event by attaching a custom method to the event handler of the LogWrite method. In order for this operation to precede any Writeline method call inside the automated test, insert a coded step at the very beginning of the test binding to the Log event:
[CodedStep(@"Attach To Log Event")]
public void AttachToLogEvent()
{
this.Manager.Log.LogWrite += new EventHandler<LogWriteEventArgs>(LogHandler);
}
Create a custom method called LogHandler, which will take care of calling the LogResult method and eventually log the messages to the physical logfile. Therefore, enable the class code by clicking on the View Class button and then add the following method:
public void LogHandler(object sender, LogWriteEventArgs e)
{
     LogResult("Text is: " + e.Message + Environment.NewLine);
}
The class does not compile until we add a reference to the event argument's namespaces inside the using block as follows:
using ArtOfTest.WebAii.EventsArgs;
Run the test again and then open our custom log and notice how an additional line is added to the log: Text is: [Trace] : The overall result is pass.