
Feedback and crash reports are two special features offered by Test Studio allowing the application's managers and developers to be continuously informed about users' opinions, suggested enhancements, and confronted problems. Using the deployed version of Test Studio on the simulator, we will see how to invoke these features on the Switchy application.
For this section, we will need to configure the default target e-mails for the described features. The steps are as follows:
- Run Switchy in XCode and open Test Studio.
- Choose Settings from the main menu.
- Scroll down until the Feedback section (as shown in following screenshot) appears:
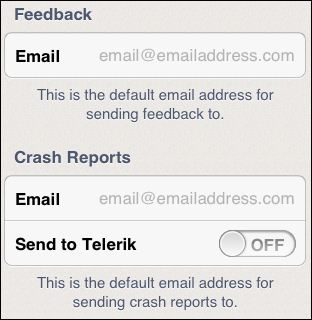
Feedback and crash reports configuration screen
- Enter the default e-mail address that is going to receive the e-mails containing the user's feedback in the Email field of the Feedback section.
- Enter a default e-mail address in the Email field of the Crash Reports section.
- Optionally, send a copy of the e-mail to the Telerik development team by toggling on the Send to Telerik option.
So what did you think of Switchy?
"The application code design is pretty neat! The UI displays nicely on my iPhone and the colors are cool, but I prefer to see the switches ordered by width!"
Hmmm, why not send that to the developer. On the Test Studio main menu, choose the Feedback option. The next view has three available options as shown in the following screenshot:
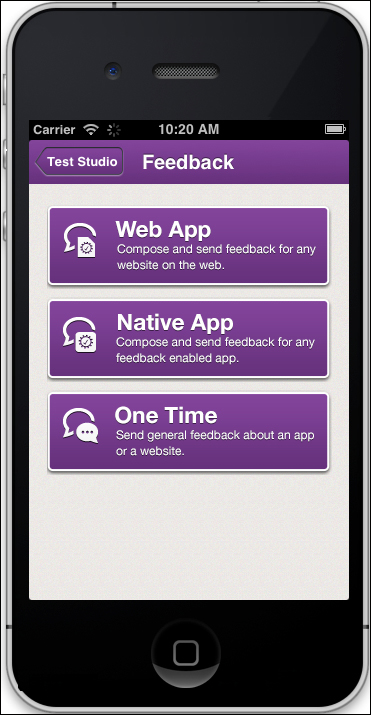
The Feedback screen
Switchy comes under the native iOS application, so choose Native App. Had it not been compiled with the Test Studio extension library, we would have chosen the One Time option, which allows sending a general feedback about a native or web application that was registered with the allow anonymous feedback option checked to true.
It is time to assign the target application, so choose Switchy. After that, the application launches where a feedback toolbar is appended at the bottom as shown in the following screenshot:
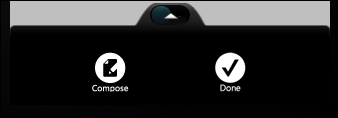
The Feedback toolbar
To create a message, follow these steps:
- Click on the Compose button.
- By default, a snapshot is taken for the application in its current state so click on it to zoom on a certain area.
- The view is reverted back to the application interface, so click on any point on the screen and then drag to draw an outline around the required region.
- Click on the Done button to finish your selection.
- In the textbox that appears, enter the feedback message text.
- Click on the Done button to save the text and then on the Save button.
- Finally, click on the Done button in the feedback toolbar.
Notice that the composed message did not leave your local machine yet. It is rather saved in your outbox along with other feedback messages that might have been created during the same session. This way you have the flexibility to delete some messages after clicking on the Edit button, or perhaps edit their content by clicking on the feedback message disclosure arrow. The following screenshot shows an example of two feedback messages:
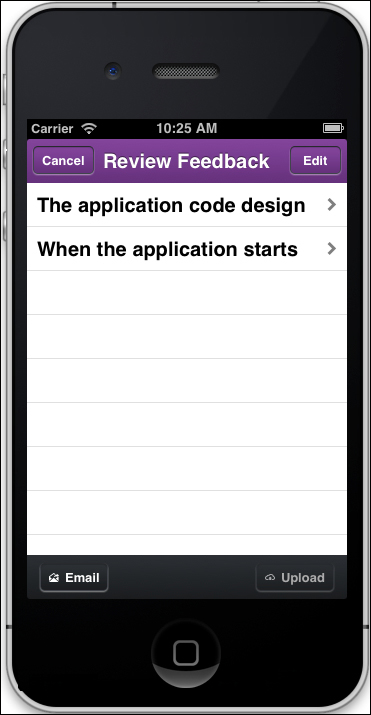
Queued feedback messages
There are two ways to inform the application developer with the messages and they are reflected in the two buttons Email and Upload.
The e-mailing option consists of combining all the current feedback messages and sending them to the e-mail address specified in the Test Studio's settings.
The uploading option actually pushes the feedback messages to the web portal. In order to be able to use this option, the Web Portal settings must be configured and Switchy must also be a registered application. Once completed, the uploaded feedback messages will appear in the web portal under the Feedback menu option.
Here, we are concerned with unhandled errors that occur while Test Studio is running your application. After a crash occurs, a pop-up window will prompt you, whether you want to send a report to the concerned parties as follows:
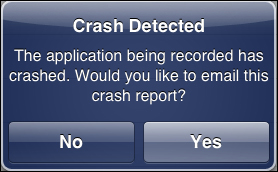
Sending the crash report dialog
If confirmed, an e-mail interface will be launched having the error details inside the message body. In addition, the To field will be automatically populated based on the options specified in Settings. Hence, if a default e-mail exists in the Crash Reports section, this e-mail address will be directly added. So is the case for the Telerik e-mail which is also configurable as we have seen.
Sending crash reports does not have to be left up to the user's decision. This information can be acquired implicitly from the crashed application without any user intervention. This is achieved by embedding calls to the TSReport iOS library found in the Test Studio file bundle, which hosts services for crashes and user feedback. In order to employ these services a few steps are required at three levels, which are as follows:
- Web portal configuration
- Application configuration
- Code implementation
The web portal configuration for the crash reports requires the application to be registered as a reporting application.
The application configuration requires two steps in addition to the deployment setup procedures carried out at the beginning of this chapter:
- From XCode, select Switchy from the list of Targets.
- Go to the Build Settings tab.
- Locate Header Search Paths under the Search Paths section, enter
$(SRCROOT)/TestStudioExtension/Headers, and make sure that theTestStudioExtensionfolder exists under the solution's root folder. - Go to the Build Phases tab and expand the Link Binary With Libraries section.
- Click on the plus button and add a reference to the
libTestStudioReporting.alibrary found under theiOSfolder of the Test Studio's extension file bundle folder downloaded earlier.
Finally, the code implementation consists of the following steps:
- Open the
AppDelegate.mfile from XCode and add this line of code in the Import section in order to add a reference to the Test Studio's reporting class:#import <TestStudioReporting/TestStudioReporting.h> - Locate the
application:didFinishLaunchingWithOptions:method. - Add the following line before the
returnstatement:[TSReport setupWithAPIKey:@"API_KEY" appId:@"APP_ID"];
- To get the API_Key and APP_ID parameters for the registered Switchy application, log in first to the web portal.
- Click on the Settings button.
- Click on the Reporting Applications tab.
- Click on the Edit button having the pen icon.
- A window similar to the one depicted in the following screenshot will open:
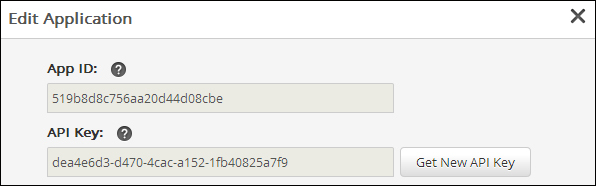
Register application information
- Copy the keys and substitute them with the corresponding parameters of the
setupWithAPIKeymethod. - Add these lines of code after the
setupWithAPIKeymethod:NSError *error = nil; If (![TSReport installCrashHandlerWithMode:TSCrashHandlerModeSilent error:&error]) { NSLog(@"This is an automatically sent error: %@", error.localizedDescription); }The first parameter for
installCrashHandlerWithModeis the method calledTSCrashHandlerModeSilent, which offers the capability of sending crash reports implicitly whenever they occur without the user's intervention. Instead, you can chooseTSCrashHandlerModePromptto imitate the regular behavior explained earlier, which consists of asking the user's consent to submit the crash report.