
Testing can be now conducted on Switchy without the need to do any modifications to the source code. The preceding deployment steps are all what is required to make the application UI open for Test Studio. This means that the iOS version will not rely on any positional information, such as screen coordinates to perform the UI actions, but rather it can recognize the various UI elements involved in the execution. Hence, Test Studio uses object base recording and execution, which makes test authoring richer and more comprehensive on one hand and the execution more reliable on the other.
This section creates a test project for Switchy and gradually takes you through the test steps of creation, verification, execution, analysis, and result debugging.
Test authoring can begin after we run the solution in the simulator. From there we can start the Test Studio app through which we will access Switchy and carry out our testing.
In XCode, choose iPhone 6.1 Simulator from the list of available target devices and then click on the Run button:
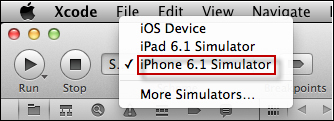
Choosing a simulator to run
This will cause an iPhone interface to be launched with a running instance of the Switchy application. Click on the iPhone home button to go back to the desktop and then start Test Studio. The following screenshot shows the first view corresponding to the Test Studio main menu:
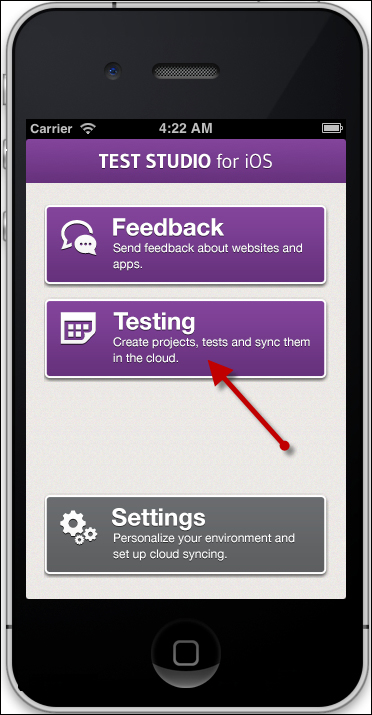
Test Studio running on a simulator
In this section we are going to tackle the Testing option, therefore, click on it to enter the test creation phase. At this stage there are no created projects, so the first step consists of clicking on the circular button shown in the following screenshot to create one:
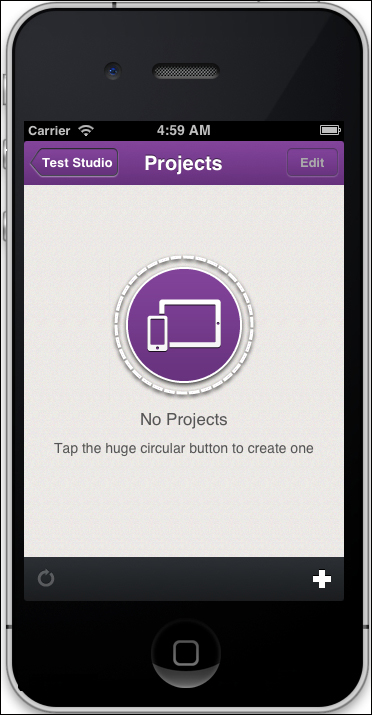
Creating test projects
In the Create Project view, perform the following steps:
- Name the project as
Switchy_Test. - Click on the Save button.
- Test Studio directly puts you on the tests view, which also does not contain any entry, so click on the circular button again to create a test.
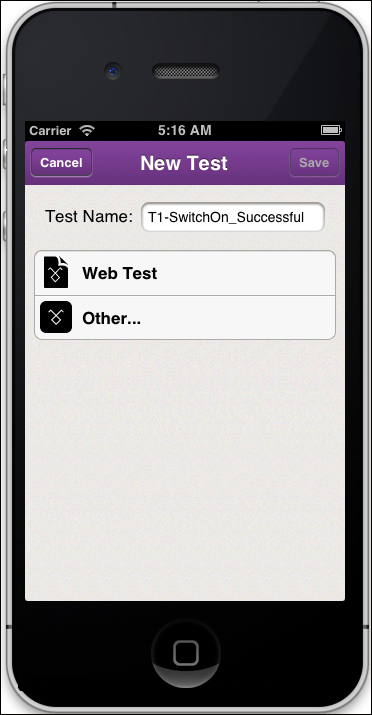
- In the New Test view, enter
T1-SwitchOn_Successfulin the Test Name field. - Click on the Choose Target App button.
Two options are listed as shown in the following screenshot. They consist of either starting a web-based recording session, in case the testing was intended against a mobile web application, or a native-based recording session, in case the testing is going to be made against a native application compiled with the Test Studio's extension libraries. In our example, we will go for the second option. So how do we assign Switchy as our target test application?
Upon pressing the Other… option, Test Studio begins a lookup for all local native iOS applications compiled with the Test Studio extensions. When the search is completed, Switchy will be present within the list. Click on it and then on the Save button. The next time you attempt to create a new test, the Switchy app will be directly loaded inside the list of options.
Choosing target application
The steps view is opened where nothing is currently displayed. The procedure for the test case that we want to automate is as follows:
- Drag the first switch to the right.
The expected result is that the On label should appear inside the switch.
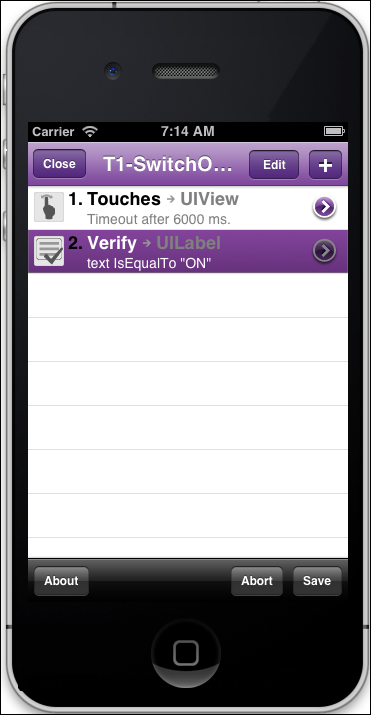
Again, click on the circular button located in the middle to start adding steps. This will cause Switchy to be launched in the recording mode. The recording mode is characterized by the Recording label at the top of the screen in addition to the red outline enclosing the whole application interface. Start executing the test by switching on the first control. As the UI actions are performed on the screen, Test Studio will be adding the corresponding steps. The next step consists of creating verification steps to assess whether the On label has appeared. In order to do so, we will retrieve the list of default verifications based on the element to be verified. For this purpose, pull up the collapsed toolbar at the bottom of the screen to show the recording toolbar menu illustrated in the following screenshot:
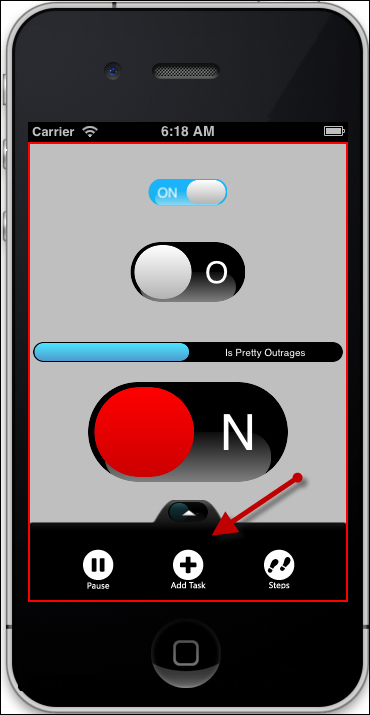
The recording toolbar
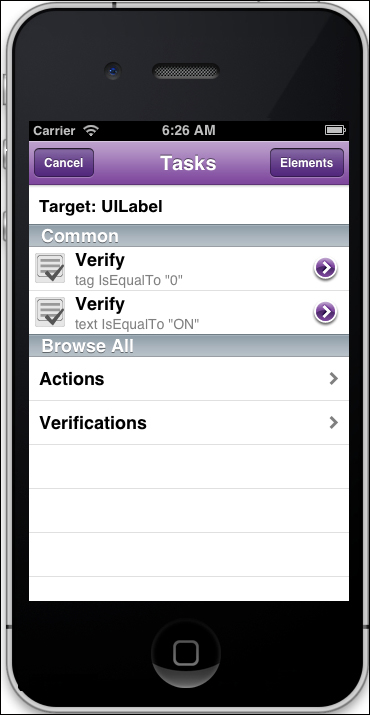
Click on the Pause button and then on the Add Task button. The toolbar collapses and Test Studio enters its wait for a screen input. This means that the element upon which the next click is applied is going to be used as the verification target. So click on the ON label. The Tasks view is enabled with a list of actions and verifications as depicted in the following screenshot:
Inserting verification steps
The upper section has a list of predefined verification steps related to the ON text label. The first expression is built using the switch statement, where ON is represented by 0. The second expression verifies the label text value.
The lower section, Browse All, has a complete list of available actions and verifications with respect to the object. Click on the corresponding disclosure arrow to bring the full list into view (for the Actions section) as follows:
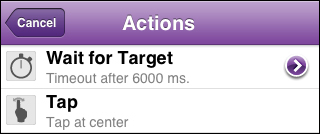
The available actions of UILabel
For the Verifications section, a rich list of the element display and other characterizing attributes contributes to the verification expressions:
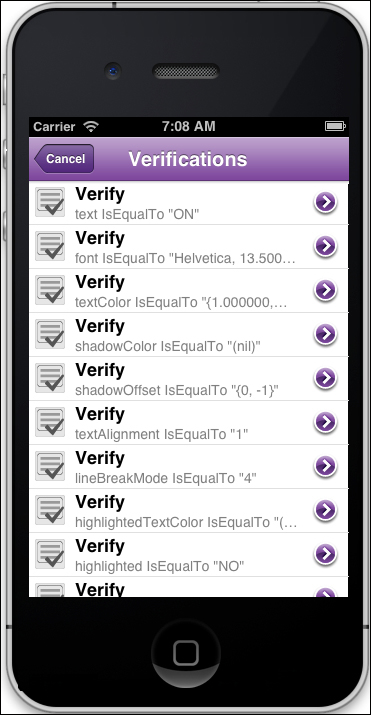
The available verifications of UILabel
In our example, we are limiting the verification to text isEqualTo "ON", so select it by clicking on it. With this action, Test Studio is going to take us back to the application screen, where if we wish to resume our recording we can by clicking on the Record button from the toolbar. Having no further steps to automate, click on the Steps button to finish the recording.
The recorded steps are illustrated in the following screenshot:
Saving test steps
The Abort button will stop the recording and cancel the added steps during this recording session (any previous steps will stay intact). Hence, click on the Save button to save the steps.
After completing and saving the recorded steps, we have the option to edit them. While on the test steps view, click on the Edit button located in the upper-left corner of the screen. Two buttons will bind to every step as follows:
Editing a test step
The first button to the left removes that particular step from the list of steps, whereas the button at the far right allows you to shuffle their order. The way to do it is to hold the button, drag it, and then release it at the end position.
At the moment, we do not need to make any changes, thus, click on the Done button and then on the play button of the test toolbar as shown in the following screenshot:
Running the recorded test
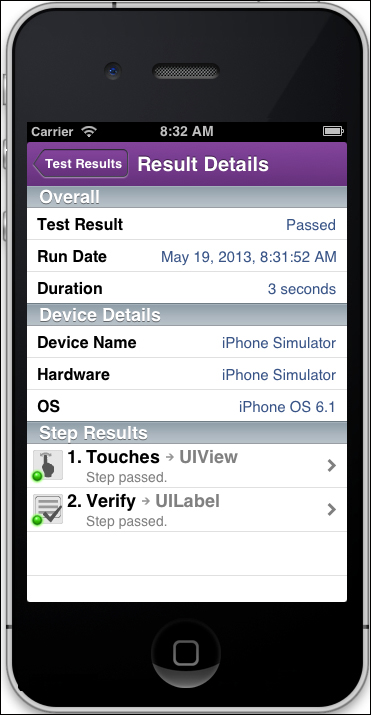
After the execution ends, the Result Details view is directly displayed as follows:
Test execution results
The Overall section has the execution summary describing the overall result state, duration, and time of execution. The Device Details section has the device summary (in our case, the simulator), and the Step Results section has the sequence of steps with the execution result for each. The first step which toggles the switch has passed, so has the verification.
Click on the Test Results button to go back to the list of results executed, and then click on Close to regain the steps view.
At any point, if we want to view the list of results for a specific test, the last button of the test toolbar will open the results list.
Early on, we have mentioned that authored tests can be executed on the device itself and this is in fact only two steps away, given that your device is already provisioned for development. The first step consists of connecting your iOS device to the machine. Once tethered up, the second step is to change the active scheme selection from the iPhone simulator to the connected device. Following this step, you will be able to resume creating, editing, and executing the tests on the device itself.
So far we have been receiving only passing results for the executions. However, what if a test fails? What does Test Studio have to offer with regard to troubleshooting the failures? This is what we will see in this section.
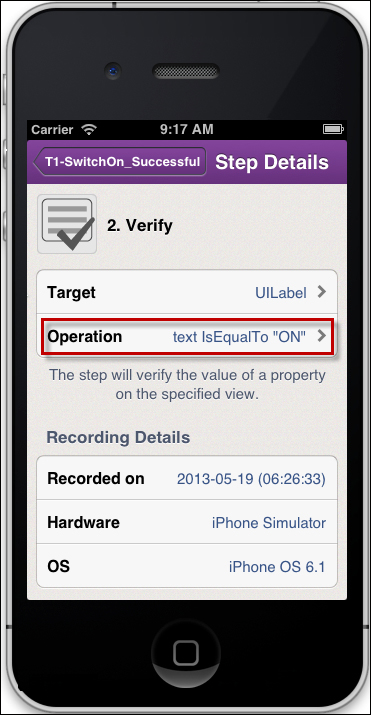
Firstly, we need to incur such failures. Therefore, go to the test again and click on the arrow for the verification step, text isEqualTo "ON". The following details are displayed:
Editing step settings
Click on the Operation option to edit the verification rule and change the Target text value to OFF. Click on the Save button and run the test again. This time we are expecting our test to be unsuccessful and the results come to confirm it.
As usual, Test Studio directly marks the failing step. Click on the disclosure arrow for the verification step to go into the error details. The following screenshot shows the information about the failure that has occurred and thus a hint on how to fix it.

Step failure details
Based on the Verification failed for comparison, 'ON' isEqualTo 'OFF' clue, we now know that we must go back and check why we were expecting an ON label to appear inside the switch while the actual label is OFF. Go back to the test steps and revert the verification value to ON.
Test Studio, here again, grants test execution a strong advantage, which is reliability. Implicitly, it drops the option of misidentifying any object from the list of root causes associated with a certain execution failure, because it does not rely on any positional or visual information. This means that replaying tests will never fail because an object was simply relocated or resized.
Knowing that Test Studio recognizes and understands the nature of UI elements, it spends a default period of time trying to relate an object's find expression to a UI element. Hence, if the expression involves tapping a switch, Test Studio will try to find the switch element within a period of 3 seconds after which it asserts that the element is missing.
Suppose that we want to test the Force On button's behavior for the Switchy application. The functionality for this button is to simply turn on all switches. However, with the new Switchy build a few code changes have been introduced, which have caused some background processing to take place while the switching action is running. These modifications have affected the speed of this feature. Subsequently, a label was added to describe the switching progress. Initially when we click on the Force On button, the label says Switching on in progress. When the processing finishes behind, the label reports back by displaying: Action has completed. In order not to keep the user idle, the added internal processing is made through an asynchronous call, which permits the user to carry on other operations through the interface.
So, we come up with the following test case in order to test the forcing switches on the Wait on elements feature:
Procedure:
- Click on the Force On button.
The expected results are:
- All switches are toggled on
- A label appears at the top of the screen: Action has completed
Let's make a few modifications to the application in order to simulate this situation:
- Open the application in XCode.
- Open the
ViewController.xibfile, and add a label and delete its text. - Open the
ViewController.hfile and add a definition for the label as follows:@interface ViewController : UIViewController { Switchy *sw1, *sw2, *sw3, *sw4, *sw5; IBOutlet UILabel *switchesState; } - Open the
ViewController.mfile and alter the definition of theturnOnmethod to add the code that will dispatch a new thread responsible for setting the end value of the label after spending5seconds of waiting time:switchesState.text = @"Switching on in progress"; [sw1 setState:YES]; [sw2 setState:YES]; [sw3 setState:YES]; [sw4 setState:YES]; [sw5 setState:YES]; dispatch_queue_t queue = dispatch_get_global_queue(DISPATCH_QUEUE_PRIORITY_LOW, NULL); dispatch_async(queue, ^{ [NSThread sleepForTimeInterval:5]; switchesState.text = @"Action has completed"; }); - From the
ViewController.xibfile, add a reference of the label to theswitchesStatestring.Launch Test Studio and then go to the project tests view and create a new test named
T2-ForceON_Successful. Select the target application to be Switchy, save your selection, and perform the following steps: - Click on the Force On button.
- Insert a text verification step on the switching on in progress label.
From the second step settings, accessible through the disclosure button, also change the Operation property's value to text isEqualTo "Action has completed", after clicking on this property's disclosure button. The final test will look as follows:
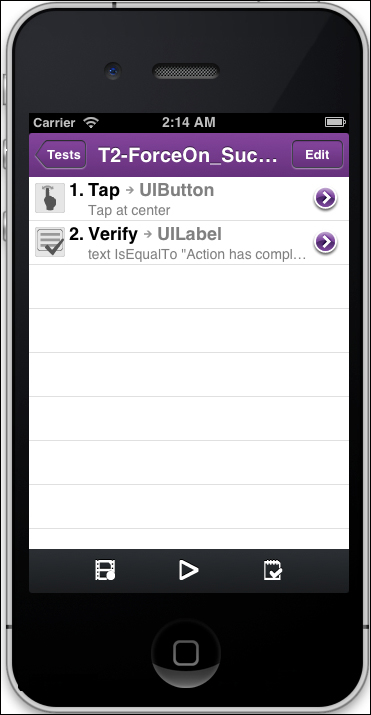
The steps of the T2-ForceON_Successful test
Unexpectedly, if you run the test as it is now it will fail on the second step. If we click on the disclosure button, we will notice that the cause of the error is as follows:
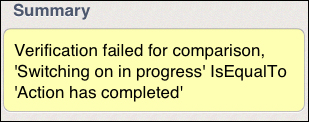
Summary of the verification step error
Unlike what the error says, the updated text label is in fact appearing on the screen, however, not before some delay. This delay is greater than the default wait on the verification, which means that Test Studio will execute the second step before the asynchronous processing behind the force on button command ends. Ideally, we would want to either instruct Test Studio to wait on the specific label for more than 5 seconds or introduce a wait before the verification step.
Let's first try to increase the wait on the verification steps label text. Therefore, open the test steps inside Test Studio by performing the following steps:
- Click on the disclosure arrow of the second step to drill down into its details.
- On the invoked settings, click on the Operations option.
- Set the wait setting to 6 seconds as shown in the following screenshot:
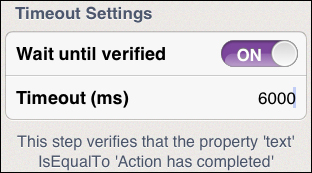
Changing wait time on step
- Click on the Save button.
- Run the test and notice how this step now passes.
Alternatively, as briefly mentioned previously, we can insert a standalone wait step as follows:
- Click on the record button, which corresponds to the first in the test toolbar.
- Choose the Just Launch the App option.
- Once the application is started, click on the Steps button after dragging the recording menu upward.
- In the Edit Steps view, click on the plus button in the upper-right corner.
- The Add Step view has the Wait option as shown in the following screenshot, which can be used to simulate the wait:
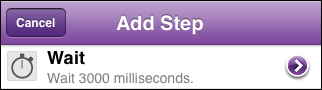
Adding the Wait step
- Click on the step disclosure arrow.
- Adjust the time to 6000.
- Click on the Add button.
- Click on the Edit button and drag this step to the second position.
- Click on the Done button.
- Click on the Save button.
- Run the test.
Notice how a delay is introduced before the first red outline appears around the string label. This behavior corresponds to the verification step and specifically to Test Studio's first attempt in verifying the text label.
Switchers have another way of communicating their state to the automated tests. The isOn property tells whether the switch is in the On or Off state. Therefore, we can rely on this property to verify the outcome of the automated tests. As usual, using the tasks feature we can highlight and add verification against whatever UI element we are seeking. Nevertheless, capturing the switcher object itself necessitates higher precision to be able to pinpoint it from within the pool of surrounding controls and containers. The subsequent example uses the Elements option accessible during recording in order to overcome this problem.
From the tests view, select the first test, T1_SwitchOn_Successful. Once you are on the steps screen, click on the record button and then choose Play and Continue. Following this command, Test Studio will run the test and will then pass the control to the user once completed:
- From the toolbar, click on the Add Task button.
- Click anywhere inside the grey area away from any apparent UI element.
- Click on the Elements button as shown in the following screenshot:
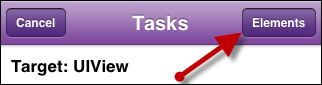
The Elements button
- The following screen appears:
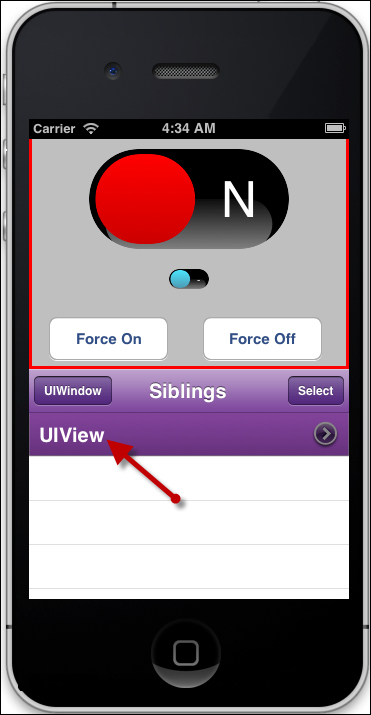
Selecting an element
The upper section has the UI element we are positioned on and is outlined in red. In our case, it is the UIView element selected in the Sibling section. In order to drill up to the UIView parent, click on the button having the
UIWindow label. This label changes dynamically depending on the item selected inside the siblings list.
Click on the UIView disclosure arrow. The list of the UIView children is retrieved with the first element selected and outlined in the upper section. Select the first available Switchy entry by performing a single click on it. Notice how the application view in the upper section is scrolled up to fit the corresponding Switchy object into the view.
This is exactly the object we want to build the verification against and which would have been barely possible without this feature. So to finish adding the verification step perform the following steps: