
Throughout this book, we have seen how data-driven design is highly efficient for adding dynamicity and multiplicity to test automation. Its usage was revealed in two contexts: when binding either a regular test step or a verification step to a data table column. Making use of the power of this feature in other contexts can also be useful.
Chapter 4, Maintaining Test Elements has focused on the default expression used by Test Studio to locate interface elements. It has elaborated on some strategies to add more robustness to these expressions by basing them to the known nonchanging attributes. Out of these strategies, we have seen a built-in Test Studio feature called chained expressions which was demonstrated through an example which attempts to locate a cell inside a data grid. The following screenshot previews this example and describes the solution which involves hardcoding values at the leaf level of the chained expression:
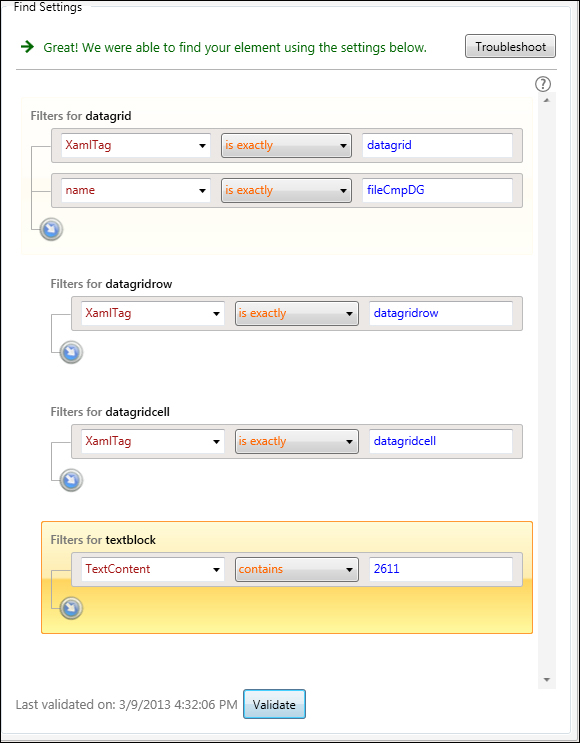
Chained expression in Find settings
Notice how the TextContent operand takes a text value equal to 2611. We will see how this restriction denies us the possibility of binding this test to a data source. So let's assume we have the following test case to automate, which eventually will be tied up to a data source, by performing the following steps:
- Go to the History tab.
- Choose the 4/29/2013 date from the combobox.
- Right-click on the
Func-1_FileCompare_Equal_Successful_In1.trxentry (which is contained under the first column). - Click on Display Details from the context menu
The expected result is that the Details window contains the text, In1.
In a data-driven context, the test case that follows will be tied to a data source by performing the following steps:
- Go to the History tab.
- Choose the 4/29/2013 date from the combobox.
- Right-click on the
Func-1_FileCompare_Equal_Successful_In2.trxentry (which is contained under the second column). - Click on Display Details from the context menu.
The expected result is that the Details window contains the text, In2
In the third step of the procedure, if we intend to follow the same strategy of chained expressions to implement the find expression of the cell to click, we will hardcode the last TextContent operand to the cell content. Therefore, we will lose the flexibility of varying the destination cell at runtime by varying the cell text value. In this section, we will see how to make data-driven chained expressions.
Inside Test Studio, add a WPF test under the Data-Driven Tests folder and name it Func-16_History_ContextMenu_Successful and then execute the following steps:
- Record the steps contained in the first test case.
- From the test editor panel, click on the Local Data button.
- Create the table shown in the following screenshot:

The Func-16_History_ContextMenu_Successful local data table
- Select the step corresponding to clicking the cell inside the data grid that should be similar to RightClick on CFileTextblock.
- Following this action, locate the highlighted element in the Elements pane and right-click on it, then choose Edit Element from the context menu.
- In the ensuing Find element window, click on the Find in the Live Version option and then on the Choose Test Step button in the Existing Test Step section.
- In the Test Step Selector window, choose the preceding designated step and then click on the Select button.
- Test Studio will run the test up to this step and enable the Find Settings window.
- Update the first two chained expression sets as follows:
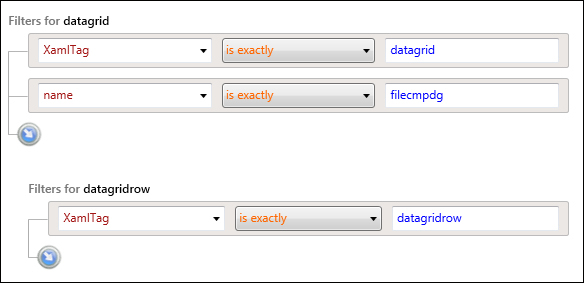
Updating chained expressions for a data grid cell text block
- Add another embedded level and change the operand to
TextContent. A combobox will be enabled for the value field. Expand it and choose File Name as shown in the following screenshot. The File Name option corresponds to one of the columns created earlier inside the local data table. For each iteration, theTextContentoperand will be assigned the value of the active row. During execution, Test Studio will try to locate this text inside any data grid row.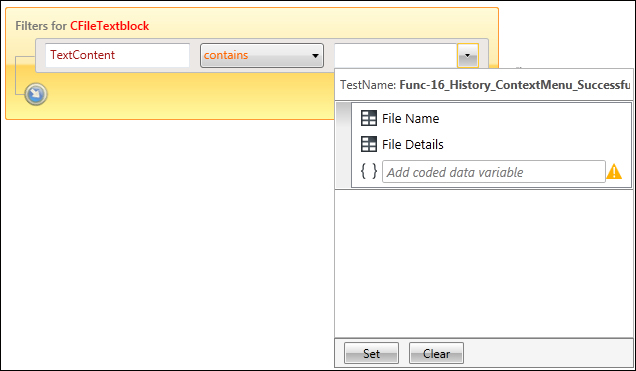
Binding text content property inside chained expressions
- A warning message pops up informing the user that the instant validation against the existence of the element can no longer be made since there has been a data binding, so click on Ok and then save the changes.
- Save your changes and close the File Comparer active window.
Now that we have transformed the process of finding a cell into a dynamic activity, one problem still hinders the successful execution of the test. The test verification step has a hardcoded value as well. Here comes the role of the File Details column. Therefore, to convert the data-driven step, perform the following steps:
- Select the verification step from the test editor workspace.
- In the Properties pane, locate the Data Driven section and expand the combobox for the Bindings property.
- Select File Details for the value property and click on the Set button.
Run the test and notice how the clicks on the data grid cells occur in different places during each run. The overall passing status of the tests also asserts that the verifications were successfully updated with the changing data.
Other than the regular usage of variables, Test Studio particularly allows them to be used as information carriers among the several test steps. On one hand, we have seen how to control them through the IDE using the binding property, and on the other hand through code by using the SetExtractedValue and GetExtractedValue methods. Are the variables only confined to the execution scope of a single test?
While creating most of the tests, we made use of the custom LogResult method showing its result after the log messages. While applying the reusability scheme, you notice that this method is replicated all over the tests and therefore constitutes a maintainability threat. So you start taking actions to abstract its definition away from all the tests. Theoretically, you would want to create a test A which is alone responsible for holding the definition of this method and hence receiving alone any future changes concerning its functionality. Afterwards, you want to replace all the internal coded steps currently implementing the LogResult method with a call to test A. However, how would you vary the string passed as a parameter to test A and thereafter to the LogResult method inside?
Test Studio offers flexibility in variables creation as we have seen in the first data-driven example of this chapter. During the compilation stage, it allows the usage of uninitialized variables either through test steps binding or code. So during test crafting, there is no validation with regards to the variable's existence. However exceptions will be thrown at runtime if the variable is not initialized by that time. This section makes use of this flexibility to solve the problem at hand.
For this example, we will need two WPF tests called Func-17_PrintSubmissionResult_Successful and Op-Common_Log respectively.
For the Func-17_PrintSubmissionResult_Successful test, perform the following steps:
- Start recording.
- Click on the Compare Files tab.
- Select the Default radio button.
- Click on the Compare button.
- Hover over the highlighted button and use it against the Result label.
- From Quick Tasks of the tab element menu, select Extract – verify text content matches 'The files resulted in equal comparison' by double-clicking on it.
- Stop recording.
- Expand the step properties and update the value for the
DataBindVariableNamefield fromCompareFilesTextblocktologString.
logString is the name of the variable to be used as the parameter to the embedded test. For Op-Common_Log, add the following coded step:
  var text = "String to print is: " + (string)GetExtractedValue("logString") + Environment.NewLine;

using (System.IO.FileStream fileStream = new System.IO.FileStream(@"C:File Comparer FilesLog.txt", System.IO.FileMode.OpenOrCreate, System.IO.FileAccess.ReadWrite, System.IO.FileShare.Read))
{
                fileStream.Seek(0, System.IO.SeekOrigin.End);
                byte[] buffer = new byte[text.Length];
                buffer = Encoding.UTF8.GetBytes(text);
                fileStream.Write(buffer, 0, buffer.Length);
                fileStream.Close();
}
The first statement in the preceding code uses the
getExtractedValue method to extract the value of the logString that is passed at runtime by the parent test. The remaining code in the method opens the logfile and writes the content of the variable to it.
Go back to the Func-17_PrintSubmissionResult_Successful test and using the Test as Step feature, add a call to the Op-Common_Log test. Make sure that the added step is the last.
Run the test and after it finishes execution, open the logfile referred to in the
Op-Common_Log test. Notice how the inner test successfully receives the tab name and prints it to the file as follows:
String to print is: The files resulted in equal comparison!