
In this section, we will explore through examples, how to redirect reading test input using various data sources. Five scenarios are going to be used to explore configuring datafiles and connections, assigning connections to automated tests, and binding test variables to data source columns. Each scenario is going to connect to one out of the four data source types which are: Excel file, XML file, built-in Test Studio table, and SQL database.
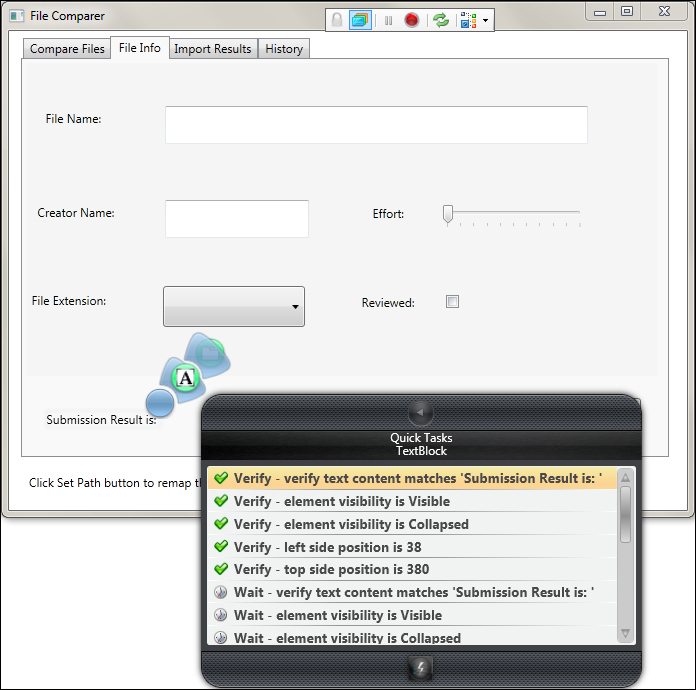
The File Comparer application has a tab called File Info, which we have not discovered yet. File Info is used to create application data. In our case, these are documents with their corresponding metadata. After opening the File Info tab of the File Comparer application, the user enters text in the two input fields which are File Name and Creator Name. In addition, there exists a checkbox called Reviewed, that explains about the readiness of the file to a concerned party, who also needs to be aware whether the file was examined previously. A combobox is also available to specify File Extension from a list of predefined extensions. Finally, a slider is used to determine the amount of Effort that was employed to finish the document. The Effort scale changes from one to 10. The following screenshot illustrates the aforementioned fields:
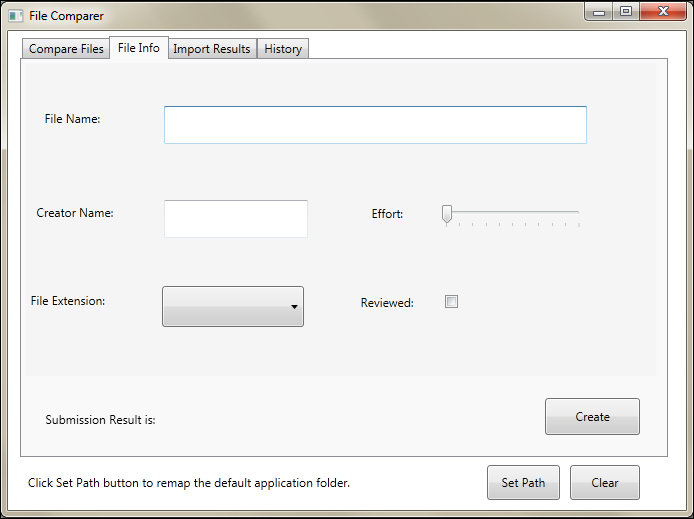
The File Info tab
As you can see there are a variety of UI elements, where each has its own specific set of UI actions. What is common between them is that these actions will not have their values hardcoded inside them, but rather they are going to be fed at runtime. The mechanism through which a UI element receives its data is by binding one of its properties to a column from a data source.
The following example demonstrates the usage of MS Excel sheets as data sources. In general, the following preparatory steps need to be performed before binding the UI element's properties to columns:
In this chapter, a folder called Data-Driven Tests contains all the data-driven examples. Hence, perform the following steps:
- From the Project tab, create a folder under the
Automated Test Scriptsfolder. - Rename it to
Data-Driven Tests. - From the context menu of the newly created folder, add a test based on the
WPF Testtemplate. - Rename the test to
Func-6_FileInfo_Create_Successful.
This test is supposed to enter values in various form fields to create a sample document and then submit it. Double-click on the Func-6_FileInfo_Create_Successful test and then perform the following steps:
- Configure it by clicking on the Configure button to connect to the
File Comparerexecutable file. - Clicking on the Recorder button, create test steps to simulate the creation of a file, with the following sample file metadata:
- File Name:
File Comparer Test Plan Document - Creator Name:
Mark Moore - File Extension: XML
- Effort:
3 - Reviewed:
true
- File Name:
- After completing the list and while the recording is still going on, click on the Create button.
- After the submission, the result appears.
- Click on OK.
Record the operations for the preceding sample file metadata, and then add a few verification steps on controls availability results in the final test, as shown in the following screenshot:
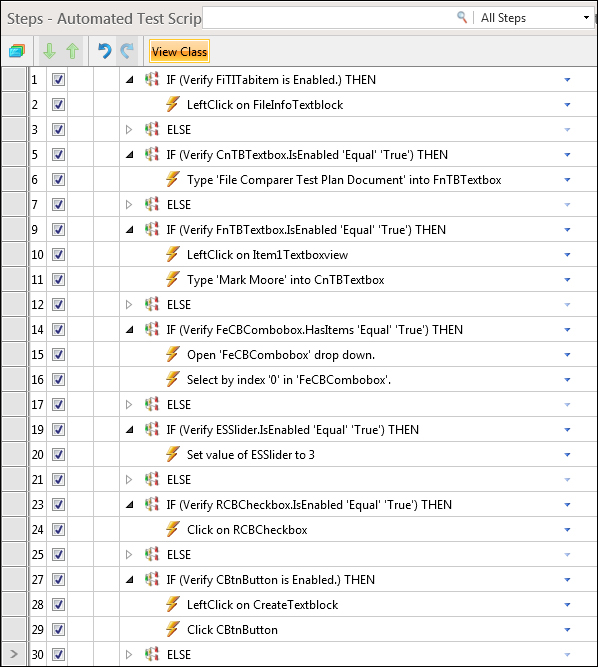
Steps of the Func-6_FileInfo_Create_Successful test
As we are done with step one, now step two is to decide on the design of an Excel table. The two restrictions to be kept in mind while designing Excel tables are that, firstly, a test can only be read from one Excel sheet, and secondly, the data-driven feature of Test Studio works by binding a UI element property to a single column inside the Excel table. The most straightforward design to adopt is to create a column for each UI control in the preceding test case, and name it after the control preceding the label present on the File Info tab in order to preserve test readability. The Excel workbook called FileInfo_DS is based on this design, which is depicted in the following screenshot:
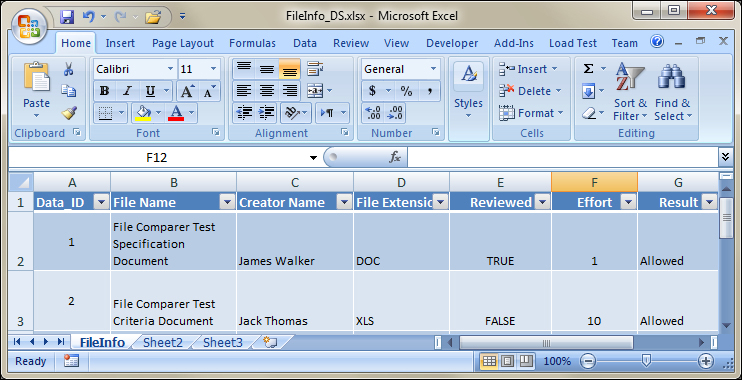
The Excel data source
If you look at the screenshot carefully, you will realize that in addition to the columns that are related to the controls, there exist two others called Data_ID and Result, which are located in the first and last positions respectively. The first column, Data_ID is solely there as test case metadata. This column holds an identifier denoting one row in the data-driven test, which means it references one test case data combination set. And in automation terms, it holds the input for one iteration. As for the second column, it holds the expected submission status with respect to input integrity and we will also see that it will be used to validate the execution status for each iteration. Once the test is bound to the data source, Test Studio is going to execute the recorded steps for the Func-6_FileInfo_Create_Successful test a fixed number of times (equal to the number of rows contained in the table) while running the test. Hence, the execution will stop only after covering all the rows of data inside the table.
It's time to transform this workbook into a test data source. Inside Test Studio, a data source is created at the project level, so it belongs to the same scope, and therefore any of the underlying tests can bind to it. Make sure that the FileInfo_DS workbook inside the File Comparer Files folder is present in your C:. Click on the Project tab outlined in red in the following screenshot, and from the Data Sources ribbon, click on Add and then select the Excel File option designated with an arrow:
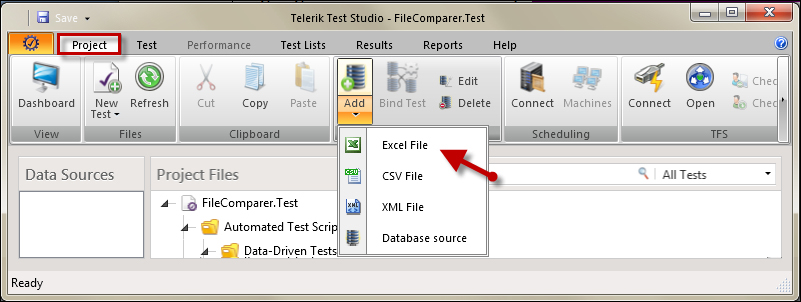
Importing the Excel data source
In the invoked Create new data source window:
- Click on the ellipsis button to browse for the
FileInfo_DSdirectory. - Select the workbook.
- Click on OK.
By default, after creation, the data source is named after the filename, and an entry for it is added to the Data Sources pane of the Project tab, which we are currently on.
This would be enough to import an Excel data source to Test Studio and with that we have completed the third step.
The fourth step requires binding the test to FileInfo_DS. From the Project Files pane, right-click on the Func-6_FileInfo_Create_Successful test and choose Data Bind, as shown in the following screenshot:
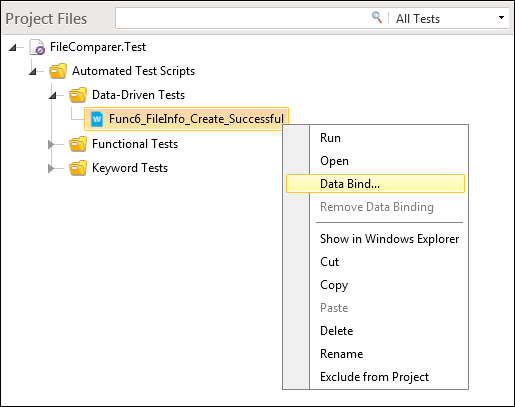
Binding a test data
In the Bind test to data source window that opens, choose FileInfo_DS – (excel) from the Data Selection combobox for the data source we have just created. On selecting this option, the Select Table combobox is populated with all the worksheets that the workbook currently holds. Each worksheet is equivalent to a data table, so select FileInfo$, which holds the data table for the File Info test.
The following screenshot shows the Preview Data grid, which is a snapshot of the content in the first sheet and encloses the data rows that the test will execute:
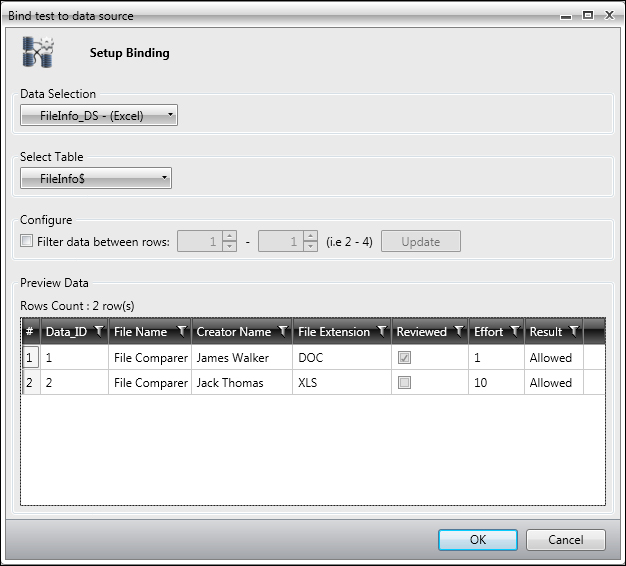
Choosing data table from the Excel data source
Binding to a data source also offers the option to filter out some rows based on ranges using the Configure section. By selecting the checkbox and specifying the numbers representing the start and end boundaries of the rows we want to include, we can instruct Test Studio to run the test only for the filtered rows. Since we want the test case to run for both the rows in the sheet, we will just click on OK.
Now double-click on the test to open it for editing. We are going to perform binding for the following UI elements:
- The File Name text field
- The Creator Name text field
- The Reviewed checkbox
- The File Extension combobox
- The Effort slider
Binding to controls is straightforward and simple. It only requires assigning the element property to a column contained inside the FileInfo_DS data source. Starting with the File Name text field, click on step with description Type 'File Comparer Test Plan Document' into FnTBTextbox to display its properties in the Properties pane. From the Data Driven section in the properties window, locate the Bindings property. This property is responsible for specifying the column header of the data for this step. As shown in the following screenshot, click on the arrow to open the binding window and select the File Name value from the TypedText property, and then click on the Set button:

Binding free input fields to data column
The DataDriven: [$(File Name)] text is appended to the step description as follows:
Step description for data bound columns
Repeat the same procedures to bind step with the Type 'Mark Moore' into CnTBTextbox - DataDriven: [$(Creator Name)] description to the Creator Name Excel column.
Binding the Reviewed checkbox consists of the same steps, however, the property name is IsChecked instead of TypedText. This is because the UI operation is different from that of text fields, where it consists of a select action rather than a typing action. So perform binding actions as shown in the following screenshot:
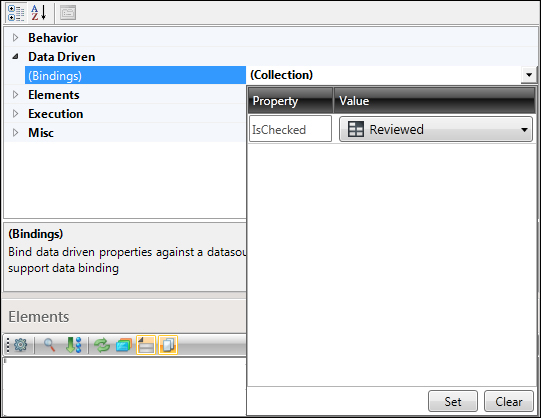
Binding checkboxes to data columns
So far, we have attached the data columns and the checkbox to the text fields, we are still left with the combobox and the slider.
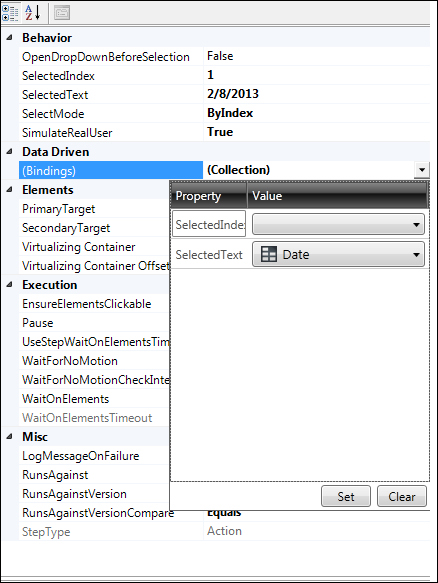
There are two ways to perform a selection from a combobox, either with the item index or with the item text. Hence, selecting the XML value for the file extension can be either instructed through the item index, 0, knowing that it's loaded as the first position in the drop-down list, or the item text XML of the combobox. The following screenshot shows two properties of the combobox, SelectedIndex and SelectedText, which respectively map to the aforementioned index and text values. During execution, only the bound property is going to be used to perform selection for the File Extension option.
From the Properties pane, locate the Bindings property for the 'Select by index '0' in 'FeCBCombobox'. step. As expected, when trying to bind the Excel column to the File Extension value, we have the choice between two values: SelectedIndex or SelectedText. Since the FileInfo_DS sheet has the values of the File Extension column filled with text, we will choose mapping the SelectedText property as shown in the following screenshot:
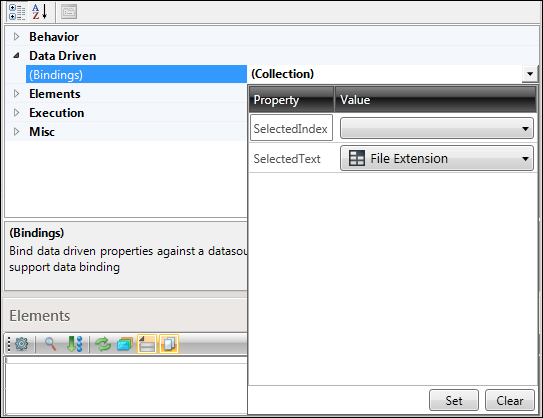
Binding a combobox to a data column
Expand properties for this step, by double-clicking on it. Notice that here selecting the value of the combobox can also be done either through the index or text. Change the SelectMode property to ByText as shown in the following screenshot:
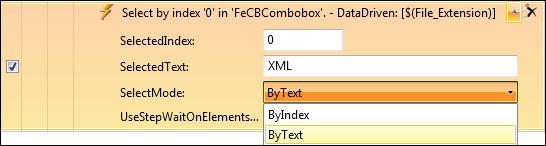
Changing the SelectMode combobox
Finally, for the slider control, map the
Effort Excel column to the slider's Value property.
With this, we would have finished binding all the UI operations to data input read from the Excel data source. Save your test and click on the Run button to start its execution. The test is going to iterate twice by invoking the UI actions with the two data rows.
The test case procedure automation and data are completed but not the output verification resulting from file creation. This is where the Result column from the Excel workbook comes into picture.
The file creation has two expected values based on the form input. After clicking on the Create button, the data on the form is validated, where none of the File Name, Creator Name, and File Extension field values are empty, the creation is allowed. In the Excel workbook, the value of the Result column for this scenario is allowed, signifying that we are expecting the notification message to contain this word. If one of the preceding condition is violated, an error will be displayed to the user mentioning that the creation was not successful with details on the offending UI element. Instead, the value of the Result column is going to hold the name of the UI control that has failed the submission.
As you might have guessed, after submission, we must add a step to compare the Result label against the current Result data row value. To implement it, perform the following steps:
- Click on the Record button and pause the recording from the recorder toolbar.
- Click on the File Info tab.
- Toggle the hover over the highlighted button to add the verification step as shown in the screenshot.
- Stop the recording.
- Change the verification step's position such that it executes before the last step which performs a single left-click on the OK button.
- Right-click this step and choose Customize step in code from the context menu.
Adding verification steps on submission of result
The method body contains a call to the ArtOfTest Assert method, which belongs to the UnitTesting namespace. This method is responsible for performing the following activities:
Hence, in the current verification example, if at runtime the displayed value for the submission result is equal to Submission result is:, the Assert method will evaluate to true, which means that the step has passed.
The String.Compare method in its turn takes three parameters:
- The string to be evaluated
- The expected string value
- The string to log in case if the verification fails
The string to be evaluated represents, in our case, the content of the result submission label in the File Info tab whose value is retrieved at runtime.
The second is the expected value for this label. Currently, it is the label that was present during recording, which is equal to Submission Result is:.
The third is the type of operator with which the String.Compare method is going to perform the comparison. It is still ArtOfTest.Common.StringCompareType.Same.
When the test executes in the data-driven mode, the combination of values passed in each row in the table is going to trigger different results. Hence, we want the verification to be performed against the value passed in the
Result column that we have previously added to the table. For example, if for the data row values we expect the submission to be allowed, the Result column is going to contain the word allowed and the verification should take place on the word allowed. Whereas if for the data row values we expect the submission to fail due to missing text in the Creator Name field, the Result column will contain the name of the creator and the verification should take place on the word Creator Name.
Ultimately, we are going to replace the parameter for the String.Compare method's expected result with the value extracted from the Result column's currently executing row. Also, we will update the search operator from Same to Contains since the comparison logic has been modified to look for the Result column keyword inside the submission result label.
For all the preceding reasons, update the code by making the following replacements:
- Occurrence of
ArtOfTest.Common.StringCompareType.SamewithArtOfTest.Common.StringCompareType.Contains - Occurrence of
"Submission Result is: "withthis.Data["Result"].ToString() - Occurrence of the word
Samewithcontainsin the third parameter of theAssertmethod to comply with the new comparison logic
The final method body will look like this:
Assert.IsFalse
    (
Assert.IsFalse
((ArtOfTest.Common.CompareUtils.StringCompare (Applications.
File_Comparerexe.File_Comparer.SubmissionTextblock.Text, this.
Data["Result"].ToString(), ArtOfTest.Common.StringCompareType.
Contains) == false),
string.Format("Verify 'SubmissionTextblock' text Contains '" +
this.Data["Result"].ToString() + "' failed. Actual v" +
"alue '{0}'", Applications.File_Comparerexe.
File_Comparer.SubmissionTextblock.Text));
Edit the verification step description to [Func6_FileInfo_Create_Successful_Verify] : Verify 'SubmissionTextblock' text by clicking on the icon [![]() ], enabled after hovering over the step.
], enabled after hovering over the step.
Before we run the test, notice how the code uses this.Data["Result"], a special Test Studio feature to access the data row at runtime through code. During execution, the test holds a Data object. This object represents the data table, which the test is bound to. In order to access a specific column in the table, the Data object takes the column name Result as the parameter. As for the row number, it corresponds to the iteration number of the executing step.
There still exists a problem in the test case. If the verification step does not logically pass, for example, if the submission should be allowed but the verification step yields to false, the click on the OK button step will not execute, and in this case the application will not enable the UI elements on the form. Therefore, when the next row executes, all the attempts to set the UI controls will fail and subsequently the remaining iterations of the test case. This behavior masks the actual results that should have resulted after executing the row with a proper initial state.
In real life, when this data-driven automated test executes overnight, we ought to gracefully handle logical errors by logging them and enabling the execution for the next row to resume. To cater for such handling, enable the Continue on Failure option for the verification step, as shown in the following screenshot:
Enable Continue on Failure on the test step
Click on the Run button to execute the test. The test execution log contains all test iterations appended to each other. The following screenshot shows the log snippet for the third iteration around the verification step for the last data row:

Execution log showing the verification step's result
The data binding feature in Test Studio does not stop at the steps that perform UI operations; this means that not only steps similar to setting text in free input fields can be bound to the data-driven output, but verification steps can also be bound. Func-6_FileInfo_Create_Successful is a suitable example that can be used to demonstrate the data-driven verification.
For this purpose, we will data bind the verification step for the submission result as follows:
- Disable the coded step added in the previous example by deselecting its corresponding checkbox.
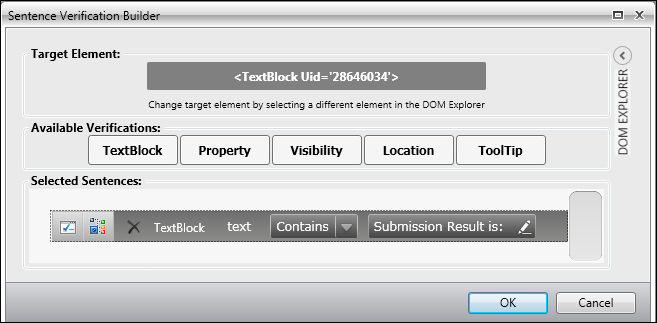
- Build a verification step using the advanced verification over the Submission Result is label, as shown in the following screenshot.
- Click on the step to enable its properties and then from the Binding property of the Data Driven section inside the Properties pane, specify Result from the Value combobox.
- Click on the Set button.
- Place the verification step under the disabled step.
- Run the test.
Verification result on the submission label
The passing status for all steps indicates that the Result column values were effectively changed with each iteration of the test.
CSV files can also be used inside Test Studio as a data-driven source. Using them necessitates the same procedure steps seen with Excel binding.
The data source does not contain data to test the application behavior upon an illegal input. For example, what happens if we set the slider to its lower boundary 0? Of course, since we only wish that any document would cost us zero effort, the system should reject such value. Consequently, if we were to insert an additional row inside the data table, changes on the Excel workbook from outside Test Studio are not going to be reflected during the test execution. Thus, to edit the data source, go to the Project tab, select the FileInfo_DS entry from the Data Sources panel, and click on Edit from the Data Sources ribbon. In the Excel sheet that opens, add an extra row with the following values and save it:
|
Parameters |
Attributes |
|---|---|
|
|
|
|
|
|
|
|
|
|
|
|
|
|
|
|
|
|
|
|
|
Click on the Run button again. The test iterates three times and the evaluation on the Result column's value should be successful for all.
Finally, suppose that you want to log to a physical file, a unique ID is generated upon entering each iteration of the test. In this case, the test name is not sufficient since it denotes no difference between the multiple iterations. An indicative iteration ID would be to append the data row ID found in the Data_ID column of the test name.
The test name can be attained from the Test property of the ExecutionContext class pertaining to the executing test. Whereas the data row ID of the Excel table can be accessed through the test Data property as we have seen with the Result column.
Click on the View Class button from the test toolbar and add the following code, which makes use of the LogResult method we saw in Chapter 1,
Introduction:
CodedStep(@"Logging Test Name")]
public void Func6_FileInfo_Create_Successful_LogName()
{
       LogResult(this.ExecutionContext.Test.Name.ToString() + "_"
       + this.Data["Data_ID"].ToString());
}

private void LogResult (string text)
{
      text = text + Environment.NewLine;
      using (System.IO.FileStream fileStream = new System.
      IO.FileStream(@"C:File Comparer FilesLog.txt", System.IO.FileMode.
      OpenOrCreate, System.IO.FileAccess.ReadWrite, System.IO.FileShare.
      Read))
      {
              fileStream.Seek(0, System.IO.SeekOrigin.End);
              byte[] buffer = new byte[text.Length];
              buffer = Encoding.UTF8.GetBytes(text);
              fileStream.Write(buffer, 0, buffer.Length);
              fileStream.Close();
        }
}
Click inside the test steps pane in order to force Test Studio to create an entry for the method added through code. Drag the newly added method to the very beginning of the test.
This function makes use of the System.Runtime.Serialization library. In order to add a library reference to the project, execute the following steps:
- Go to the Project tab.
- Click on the Show button in the Settings ribbon.
- In the Project Settings invoked window, click on Script Options.
- Using the Add Reference button, browse for the
System.Runtime.Serializationlibrary in the .NET framework. - Click on OK.
- Run the test again.
The log file found in the File Comparer folder of the C: contains entries for each iteration as follows:
Func-6_FileInfo_Create_Successful_1Func-6_FileInfo_Create_Successful_2Func-6_FileInfo_Create_Successful_3
The integer suffix stands for the Data_ID value, whereas Func-6_FileInfo_Create_Successful is the test name.
The test that we are going to create in this section demonstrates binding an automated test to an XML data source. It extends the capabilities of one of the tests created in Chapter 1 by attaching its input and output verification to a datafile. Func-4_History_SingleDate_Successful in the Functional Tests folder tests the selection of a date from the combobox and verifies that the selected value appears in every row of the data grid.
The XML file design must consist of the XML child elements, where each element is going to cause an additional iteration during execution. The XML attributes for the elements represent the value to which the UI control's properties bind to. The following XML code represents sample data for the test case based on the History tab:
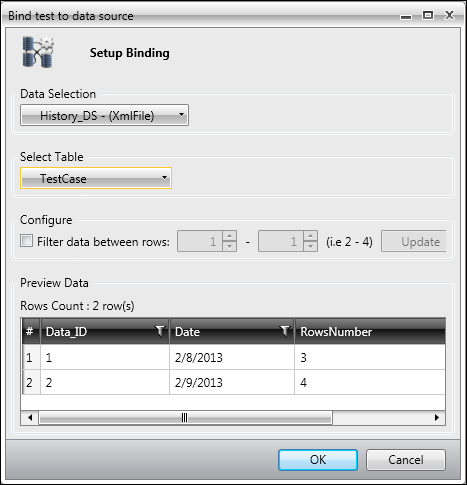
<TestCases>
        <TestCase Data_ID="1" Date="2/8/2013" RowsNumber="3"/>
        <TestCase Data_ID="2" Date="2/9/2013" RowsNumber="4"/>
</TestCases>
The first attribute, called Data_ID, stands for test metadata similar to the example we have seen before. The second attribute, called Date, provides the date value for the combobox selection at the Select by index '1' in 'DatesCmbCombobox step. The third attribute, called RowsNumber, represents the number of expected rows after the filtering occurs.
To import an XML file to Test Studio, execute the following steps:
Since the test is identical to Func-4_History_SingleDate_Successful, copy the file present under Functional Tests and paste it under the Data-Driven Tests folder. Rename it to Func-4_History_SingleDate_Successful_DDT to differentiate it from the old test.
The automated test and the data source configuration are ready. Next, we need to reference the attributes from the test. Firstly, start binding the test to the XML file by right-clicking on the test and choosing Data Bind from the context menu. Set the values inside the Bind test to date source window, as shown in the following screenshot, and click on OK:
Binding to an XML source
Open the test and select the Select by index '1' in 'DatesCmbCombobox step to preview its properties in the Properties pane. Click on the Bindings variable arrow from the Data Driven section and bind the SelectedText property to Date, as shown in the following screenshot:
Binding the dates combo box
Expand the properties for this step and change the value of the SelectMode combobox to ByText.
In order to verify the data grid rows based on to the RowsNumber attribute, a verification step needs to be inserted. So execute the following steps:
- Click on the Record button
- Click on the Pause button from the recording toolbar
- Go to the History tab
- Choose 2/8/2013 for the date
- Insert the verification step shown in the following screenshot:
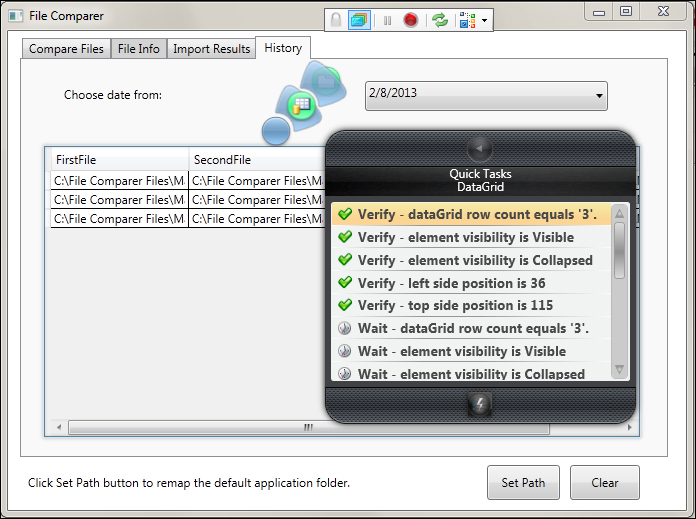
Adding verification on the data grid row number
- Select the added verification, click on the Bindings property from the Properties pane and set the value of the verification step to
RowsNumber. - The last step would be to disable the checkbox for the Loop (3) times and its child step to avoid executing them.
- Click on the Run button.
Having both iterations passing and knowing that the number of loaded rows differs with each iteration, this means that the RowsNumber XML values were changed when passed at runtime.