
Recorded test steps are composed from two parts: elements and actions. The UI elements constitute the skeleton whereas the UI actions constitute the engine. So the actions are driven against the elements.
As we have seen in the previous chapters, a typical test step looks like: LeftClick on HistoryTextblock. The element is
HistoryTextblock whereas the UI action is
LeftClick. In the application under test, the way a UI element is identified by Test Studio is through its find expression found in a property called FindLogic. This
is a property present on the element and it holds the keys for Test Studio to uniquely find its way through the application object hierarchy to identify that element. At runtime, Test Studio evaluates the
FindLogic expression and executes the UI actions on the yielded element. This expression could enclose evaluation conditions either around element properties such as Name or element path in the object hierarchy, for example, XamlPath. This is all what is needed by Test Studio to recognize an element and it does not use any outside criteria such as parent element or container. In the preceding test step, the HistoryTextblock FindLogic expression is [TextContent 'Exact' History] AND [XamlTag 'Exact' textblock], which means that the target element's apparent text is History and is of type TextBlock.
Element existence is either tied to a recorded step or to a test by external reference. The LeftClick on HistoryTextblock step is an example of an element linked to a recorded step where the
HistoryTextblock is linked to the mentioned step. When a recorded step is converted to code, the comprised element is said to now exist by external reference. Similarly, the elements used in script steps belong to the external reference element set. The last way to store elements is by adding them manually through DOM explorer or during recording from outside any test step scope. In this case, the element is also said to exist by external reference to the active test.
The element repository contains the elements existing in recorded steps or by external reference after being manually added. It does not have a physical existence on your machine's hard disk, on the contrary, it is assembled when Test Studio launches, and it ceases to exist when Test Studio shuts down. In other words the UI elements neither have a persisted definition in a physical file nor do they get loaded from that file at startup, rather, they are consolidated from all test steps when Test Studio starts.
During the element repository consolidation process, which consists of creating an entry inside the element repository for each UI element partaking in the definition of a test step, any other element that is evaluated and found to already have an existing definition is disregarded. Thus, only one entry will exist for any element appearing more than once in the test steps and this is due to the find expression which is used at startup to filter out duplicate elements. The consolidation covers test steps for all the tests residing under a project and does not limit its scope per test. Thus, the element repository is centralized where at runtime Test Studio will have one place to fetch the elements from.
Test repository elements have a certain life span. As long as a recorded test step carries a certain element in its definition, that element will have to exist in the element repository when Test Studio is running. When the last test step is removed the last definition having reference to that element is also removed, so the element dies and is deleted from the element repository. The manually added elements will always appear in the element repository whether or not it is used by any test step.
The subsequent examples will demonstrate how to tune some options related to consolidating elements inside the element repository. This along with understanding Test Studio's strategies for finding elements covers the automatic building of the element repository where manually adding elements is going to be addressed as well. The examples also demonstrate how to build the logic of the find expression around the test elements through recorded and coded steps. In conclusion, this chapter lets you discover how Test Studio deals with elements and finds them to make an optimal decision when defining your next element's Find logic.
Building the element repository for your project does not confine to the automatic recording process of Test Studio. You can contribute to this task by firstly intercepting the element either through the application UI during recording or through the DOM explorer. The DOM explorer, a language-neutral interface, displays a tree formed of all elements in a page in case of a web application, or in a window in case of a WPF application. This explorer uses the DOM (Document Object Model) language in order to translate the content and structure of application elements. After intercepting the element and depending on the means of interception, some operations can be reachable through its element menu or context menu out of which we list adding the element to the element repository.
The element repository is displayed inside the Elements pane whenever you are on the Test tab, as follows:

The Elements pane
After the initial elements consolidation at Test Studio startup, the repository is augmented as you are crafting your tests during recording, when Test Studio adds new test steps for the UI interactions that you are making on the screen. By default, Test Studio creates names for these elements. This name is called FriendlyName and is shown in the Properties pane when selecting an element inside the element repository. The following screenshot shows the friendly name for the Dates combobox in the History tab of the File Comparer application:
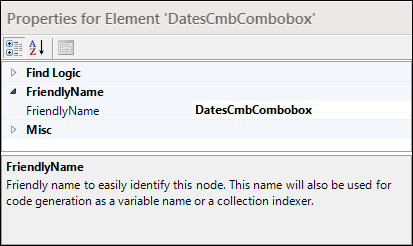
Element friendly name
Generally, the WPF UI element friendly name generated by Test Studio is a concatenation of the element's Name property value and Type. This strategy is applicable whenever Test Studio uses the predefined UI element, Name, to locate that element in the application under test. In some situations, static names cannot be assigned to UI elements, for example, with dynamic rows in data grids. In this case, Test Studio will not use the Name property but rather the hierarchy path.
The Dates combobox of the History tab is named DatesCmb and is of type Combobox. The concatenation of the aforementioned values results in Test Studio's naming convention and therefore the friendly name is DatesCmbCombobox.
As mentioned, it is not always the case that developers assign names to UI elements during design phase especially to containers such as frames and grids, which are given random names at runtime. Therefore, handing over the complete responsibility to Test Studio to create friendly names for your application elements will not always end up very friendly. Luckily, you can make interventions to rename elements or add them with customized names from outside the recording scope.
In this example, we are going see how to save and name application elements but firstly we start by enabling this option from the project configuration:
- Go to the Project tab.
- Click on the Show button from the Settings tab.
- In the ensuing dialog, choose the General accordion tab.
- Make sure the Prompt for element name before adding checkbox of the Element repository section is selected.
- Click on OK.
The File Info tab of the
File Comparer application gives the option to export the file's metadata in case if the submission is not going to be made on the spot. This feature is achievable by clicking on the Export button of that tab. So we will first automate the test procedures by recording the steps and then before performing any action on the Export button, we will add it to the element repository with our own custom friendly name using the DOM Explorer.
From the Project tab, create a test based on the WPF template under the Functional Tests folder and rename it to Func-8_FileInfo_Export_Successful. Record the following steps for the created test:
- Click on the File Info tab.
- Enter
Project Risk Documentinside the File Name field. - Enter
Pamela Clarkinside the Creator Name field. - Choose DOC from the File Extension combobox.
- Set Effort slider to 9.
- Select Reviewed.
- Click on the Pause button from the recorder toolbar to temporarily stop the recording and let's access the DOM hierarchy of the application by clicking on the DOM Explorer button highlighted in the following screenshot:

The DOM explorer button
The DOM Explorer window is invoked and the controls currently displayed on the screen are resolved in a tree. Our aim now is to locate the Export button tag inside the hierarchy and add it to the repository and then perform the following steps:
- Enable the surface highlighting button.
- Hover over the Export button.
- Open the button's element menu.
- Click on Locate in DOM, which corresponds to the second button.
Notice how in the DOM explorer window, the tree is expanded and the target element's tag is highlighted.
There exists another way to locate an object in a tree using the DOM Explorer window's powerful search feature. Firstly, click on the Hierarchical DOM View icon outlined in the following screenshot in order to fold the tree and then on the Search Tree icon also outlined:
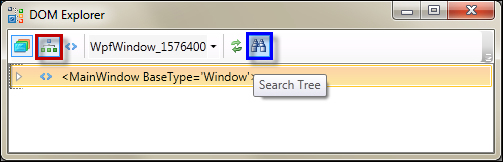
The DOM Explorer tree toolbar
This will enable a Search text field to receive the text criteria we want to search against. As simple as it may look, this feature is very powerful in helping us to find our way through a complex DOM tree. This field accepts either keywords or rich expressions that are understood by the Test Studio search engine. On the left side of the expression comes the attribute, where the search value will occupy the right side separated by a comparison operator.
On the DOM Explorer window, enable the advanced search using find expressions by clicking on the outlined button preceding the Search label, as shown in the following screenshot:
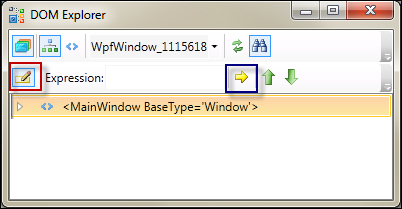
The DOM Explorer search toolbar
Our knowledge of the Export button is limited to the apparent text on the screen and in such cases we need to query the TextContext attribute to find the element by this criterion.The Export label is found on a button and since the WPF Button class inherits from the ContentControl class, it has a property called Content to which a string parameter can be passed to display on the UI as <Button Content="Export"/>. The Content property can be queried with the TextContent operator. ComboBoxItem and Label are also examples of classes that inherit from the ContentControl class.
Therefore, type TextContent=Export inside the field and execute the search by clicking on the yellow arrow outlined in the preceding screenshot. The DOM tree will be expanded to show the occurrence of the clicked result entry. Nevertheless, we are aware of the fact that we want to add the button itself and not the button label, so this is why we want to drill up in the hierarchy to find the targeted button.
In order to track our navigation in the object hierarchy tree, Test Studio has the highlighting feature embedded in the DOM explorer window as well. In this case, this feature will box the UI element with a red rectangle as we dwell on its corresponding tag in the hierarchy. So make sure to activate the highlighting feature by toggling on the Enable highlighting on recording surface button in the DOM explorer window. From the DOM explorer window, click on the first Button tag shown above the currently selected tag and notice how the Export button is highlighted on the screen, as shown in the following screenshot:
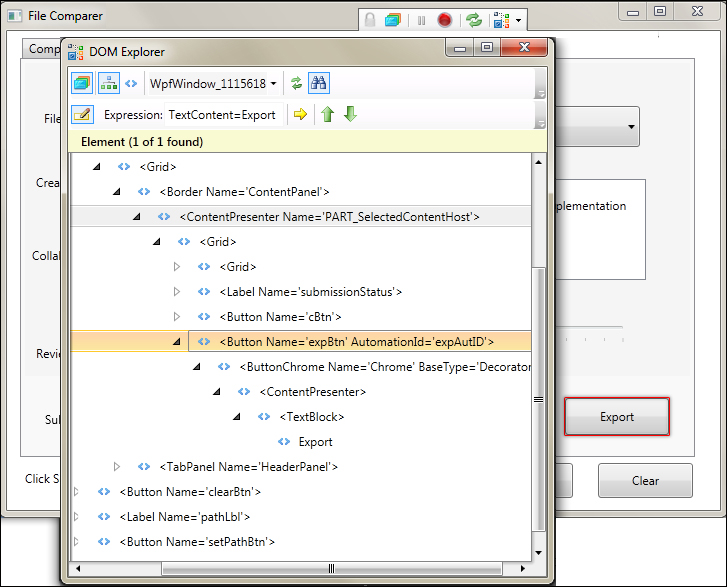
Highlighting surface feature inside DOM explorer
Right-click on the Button tag and choose Add to Project Elements from the context menu, as shown in the following screenshot:
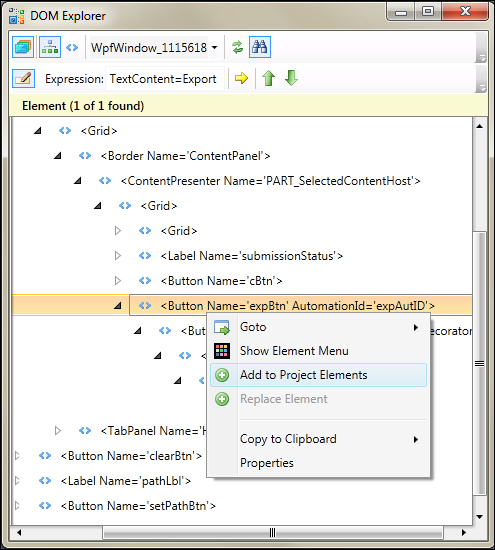
Adding elements to project elements from DOM Explorer
Now, Test Studio prompts you with the custom name while still displaying its suggested friendly name in the Element Friendly Name dialog. Enter Export Button
in the text field and click on Add Element as shown in the following screenshot:
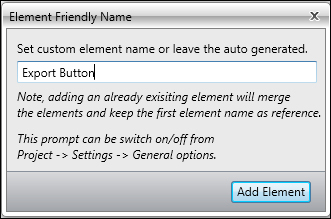
Editing friendly names
In order to finish the test recording, perform the following steps:
- Click on the Record button from the recorder toolbar.
- Click on the Export button.
- In Export Dialog, enter
Exported File Metadatainside the File Name field. - Click on OK.
- Close the application.
Notice how the added step responsible for clicking on the Export button now holds the friendly name which was manually added: Click Export Button.
The search expressions in WPF applications can also be based on other element properties. WPF supports the
AutomationProperties class, which is dedicated for the UI accessibility support. The values for the AutomationProperties class' attached properties can be set in the XAML markup in the corresponding element declaration. These properties are powerful because they preserve their values when other properties of the same element change during the development of the application. Hence, during automation, the first property that should be sought is AutomationProperties.AutomationId. For example, based on the following Export button XAML declaration, you can locate the Export button by its automation ID property: AutomationID=expAutID:
<Button Content="Export" Height="37" HorizontalAlignment="Right" Margin="0,167,21,0" Name="expBtn" VerticalAlignment="Top" Width="104" Click="expBtn_Click" AutomationProperties.AutomationId="expAutID" Grid.Row="1" />
Furthermore, we can also use other search attributes such as the type of the UI element to search for it inside the DOM Explorer. For example, the search expression involving the XamlTag type of the Export button is XamlTag=Button. However, other buttons are also present in this window, so performing the search on this criterion would result in all the button tags being displayed in the interface. Therefore, we can add further criteria as the value of the Name attribute of the element to narrow down the search. In complex expressions, the search criteria are appended with a comma as: XamlTag=Button,Name=expBtn.
Test Studio structures the WPF application's element repository at Applications | Windows | Elements
This hierarchy can be viewed in the screenshot provided in the The recorder toolbar DOM Explorer section. The element repository flattens the hierarchical nature of the WPF elements found in the XAML design. Although any tab item declaration encloses those of the UI elements appearing inside it, this is not the case in the element repository. The tab item node and the elements underneath it are contained in one level.
In the Elements pane, the entire hierarchy under the File Comparer.exe element, which represents the executable file of the application is organized under three nodes. These subtree root nodes stand for the three windows that we have seen while using the application: File Comparer, Set Application Path, and Export Dialog. The underlying list of elements, under each of these nodes corresponds to the UI elements found in each window when the application runs. Despite this visual categorization of the element repository, Test Studio does not need parent elements to locate UI objects at runtime.
The following exercise will explain how this translates in reality when Test Studio consolidates the element repository and runs the tests.
We will again add an element by external reference, which is the Cancel button of the Export Dialog window by performing the following steps:
- Click on the Record button.
- Pause the execution to navigate to the Export Dialog window without actually recording the actions.
- Click on the File Info tab.
- Click on the Export button.
- Again stop the recording on the invoked dialog by clicking on the Pause button from the attached recorder toolbar.
- Toggle the hover over highlighting feature button.
- Point the mouse over the target button until the blue nub appears and click inside it.
- Select the first button in the element menu to add the element to the repository, as shown in the following screenshot:
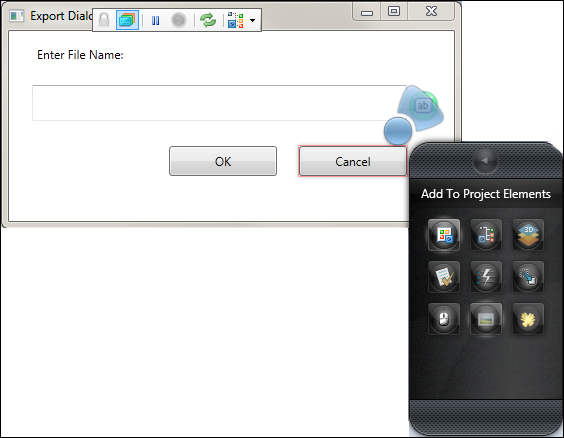
Adding elements to element repository from the element menu
- Rename the button to
CancelButtonand then click on the Add Element button. Close both the application windows to exit the recording mode.
In the Elements pane, the Export Dialog node now has two children: OKBtnButton and CancelButton, which correspond to the OK and Cancel buttons of the Export Dialog window respectively.
Let's adjust a bit. How does Test Studio evaluate elements when constructing the element repository and precisely how it clears the duplicates:
- Go to the Project tab.
- Click on the Show button from the Settings ribbon
- In the Project Settings window, choose the Recording Options from the left accordion.
- Then choose Title from the combobox corresponding to the Elements Page Compare Mode settings.
- Click on OK.
Following this step, any two project elements sharing the same captions will be considered identical, therefore, one of them will have to be omitted from the element repository. Go back to the Test tab, and click on the Export Dialog node from the Elements pane to view its properties. In the Properties pane edit the Caption element's property to File Comparer, as shown in the following screenshot:
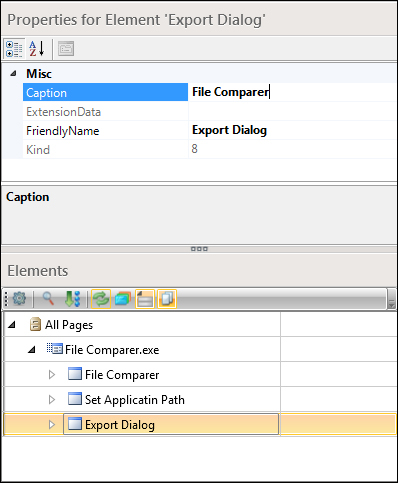
Renaming elements from the Properties pane
Click on the Refresh button of the Elements pane in order to force Test Studio to regenerate the element repository. Notice how the two buttons that belong to the Export Dialog window UI are now appended to the element list under the File Comparer node whereas the former Export Dialog node is removed. What happened is that Test Studio got rid of the second entry having a caption already present in the project element's list.
How do you think this has affected the recognition of the OK button of the export dialog? As you have perhaps expected the execution should be successful. Why is that? Because Test Studio's recognition is only dependent on the find expression for the element!
Click on the OkBtnButton project element and locate its FindLogic property from the Properties pane. The Find logic underlying this button is [Name 'Exact' okBtn] AND [XamlTag 'Exact' button]. These conditions are solely evaluated to retrieve the element during test execution.
UI object containers such as grids, frames, or panels are hard to be manually intercepted on the screen using the Test Studio highlighting feature, especially when they have transparent borders. As an example, the File Info tab contains a label that conveys the file submission result to the user. The border of this label is transparent and does not appear to the eye. So to enable the TextBlock element menu, you would have to hover the mouse over the area surrounding the label and play around with the highlighting surface feature to access the targeted element menu. In fact this control was already utilized in one of the previous tests that we have recorded. Func-6_FileInfo_Create_Successful builds a verification expression around the content of this label. Now suppose that you want to make sure that the text block exists before you actually verify its content; in that case, you will have to map the label border by performing the following steps:
- Open the test.
- Click on the Record button.
- Pause the execution.
- Click on the File Info tab.
- Click on the hover over highlighting button and hover over the Result Submission Label until you get the blue nub.
- Click on it.
- In the element menu, click on the View 3D button (which is the third button).
A 3D Viewer window opens displaying the visual representation of the target element and its parents in the upper section of the window, where the lower section has the element tags as shown in the following screenshot:

3D Viewer
Currently the text label occupies the window. To bring any of the parent elements to the front, either click on the background elements of the visual part or use the slider, or you can just click on the tag that starts with Label Name='submissionStatus' to directly navigate to the element in question. The text block is now accessible for us to operate on via the 3D Viewer window or the element menu. The latter is displayed by clicking on the Lock on Surface button at the top of the window, which highlights the button on the screen and opens its automation menu. However, it is not necessary to go through the element menu since some operations are already within our reach:
- Click on the Available Verifications button to, for example, add verifications we have seen in the previous chapters.
- From the list, select Visibility element is Visible.
- Click on the Add to Project button.
- Close the window and then the application's instance.
An entry for the text block label is added to the project's element as submissionStatusLabel along with the corresponding test step.
In conclusion, if you want to manually add an element to the repository you can do so using the DOM Explorer window, which is accessible through the toolbar recorder or the Build Verification window of any element. If any of the element properties is in your disposition, for example, the content label, you can input this criterion into the DOM Explorer's search field to narrow down your search. In addition, if the element is visible on the screen, you can open its element menu and use the first three available buttons to directly add the element to the repository, locate in DOM Explorer, and view in 3D.