
As in the case of friendly names, Test Studio also has a default way of finding the application elements, which, as we have seen so far, is saved in the FindLogic property. In the case of WPF elements with static names, it consists of the concatenation of the Name and Type properties. In the HTML case, the priority in which Test Studio uses element properties to build the find expressions is determined from the project settings. To arrange the order of the element properties perform the following actions:
- Go to the Project tab.
- Click on the Show button in the Settings ribbon.
- Click on the Identification Logic tab in the Project Settings window.
The following screenshot shows the area in the Project Settings window, which allows the shuffling of priorities of the element's properties. Also, the screenshot shows the Add Tag to list free input field, which can be used to input a preferable property to be used in the element's recognition:

Prioritizing element properties for Find logic
After the element is added to the repository, the Find logic can be edited manually and the neater you define the element's locators the less fragile the tests will turn out to be and the scripts would require less maintenance.
Before mapping any element or changing its find strategy, you would require a few minutes to really isolate the inherent fact of the element, which does not change. If the element is declared with the AutomationId property, this is the first strategy you want to use to store the element irrelevant of its position or any other property susceptible to change over time. Relying on other properties, especially if they are not declared statically is very risky, because the test will likely fail in the future when changes that affect the interface elements occur.
Firstly, we will see how you can change the Find logic of an element inside Test Studio and secondly we will apply the various locator strategies on the elements.
So let us say we want to edit the locator logic for the slider element on the File Info tab. We know that the slider contributes to the definition of the step that sets the effort value inside the Func-8_FileInfo_Export_Successful test. Open the test and click on this step to let Test Studio guide you to the element in the repository by drawing a yellow arrow before the element name. Right-click on that element and choose Edit Element from the context menu. The Find Element window opens up and presents the user with three ways to locate the element, as shown in the following screenshot:
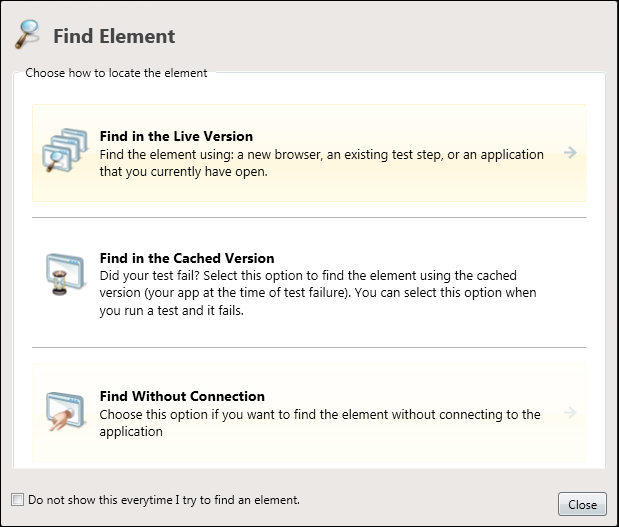
The Find Element window
Choose the first option to edit the find expression of the element and validate it on the spot against a running instance of the application. On the next page, choose the Existing Test Step option since New Browser can only be launched for web applications, and the last option, which is Current Page, requires an instance of the File Comparer application to be already running. The second option will open the Test Step Selector dialog having all the steps that have the UI operations tied to the slider. Scroll down to this test entry and choose the listed step underneath, and then click on the Select button. This will cause Test Studio to run the test up to the slider step and hand over control to the user to operate on the Find Element window shown in the following screenshot:
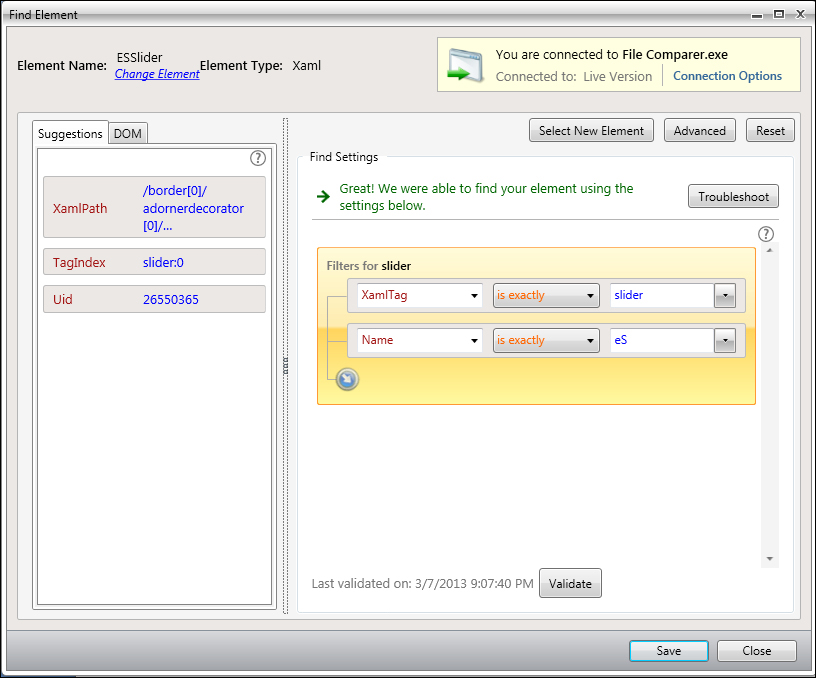
The Find element window
Initially, this window displays the current values to the right based on which the element is located on the screen. Had the element name not been static, the operators would have been changed to evaluate only a substring of the automatically generated element's subname, if applicable. For example, we would have needed to compare the prefix only by using the starts with operator from the combobox or suffix only by using the ends with operator.
The path of the element in the DOM tree can also be used in the element locator strategy along with some other attributes. This is achievable through the element XamlPath attribute. Hover over the find expressions in the Filters for slider section of the Find Element window until the Delete button appears, and then remove both expressions. From the suggestions panel to the left, click on the XamlPath box to add it as a criterion in the Find Settings section. The XamlPath value currently suggested by Test Studio starts with the path from the DOM root as follows:
/border[0]/adornerdecorator[0]/contentpresenter[0]/grid[0]/tabcontrol[name=tabControl1]/grid[0]/border[name=ContentPanel]/contentpresenter[name=PART_SelectedContentHost]/grid[0]/grid[0]/slider[name=eS]
This is not safe with regards to the changes that could affect the application since you don't want to hardwire all parent element tags in the XAML path of any element. For example, the removal or addition of any element that would impact the XAML path such as grids or panels will preclude Test Studio from locating the slider.
So instead, you can remove all the elements for the XamlPath value leaving the slider only as /slider[name=eS]. Following this, the operator should be set to ends with instead of equal.
Click on the Validate button to verify whether the locator passes or fails with respect to the slider. As you can see, Test Studio has successfully managed to locate the element, so for now, click on the Cancel button.
We have seen so far how the element locators can be built on top of attributes or XamlPath. There exists a third way to locate an element and this way is especially used when dealing with table like data, for instance, when trying to locate a cell amongst a pool of cells inside a data grid. If you attempt to translate the actions you take into a step-by-step procedure in order to locate a cell you would find yourself first looking for the data grid, then looping over each row, where for each cell inside that row you would compare its content to the value you are looking for. The locator's chained expressions allow you to build such flexible complex expressions to find the element.
Inside the File Comparer application's History tab, let us say that after choosing a date value from the combo box we want to check the details for the row by doing a right-click on the first cell. Firstly, let us record these steps under a test called Func-9_History_Details_Successful based on a WPF template. Create this test under the Functional Tests folder. The test procedure is as follows:
- Start File Comparer application.
- Click on the History tab.
- Choose 2/26/2013 from the combobox.
- Right-click on the first cell of the first row.
- Click on Details from the context menu.
- Click on OK from Details Dialog.
- Close the File Comparer window.
Select the step that does the right-click on the data grid row cell. The underlying element entry for this test step called CFileTextblock is marked with a yellow arrow inside the element repository. Click on that entry to explore its Find logic, which is as follows:
[name 'Exact' PART_RowsPresenter] AND [XamlTag 'Exact' datagridrowspresenter][XamlPath 'Exact' /datagridrow[0]/border[name=DGR_Border]/selectivescrollinggrid[0]/datagridcellspresenter[0]/itemspresenter[0]/datagridcellspanel[0]/datagridcell[0]/border[0]/contentpresenter[0]/textblock[0]]Notice how redundant elements of the hierarchy are hardcoded into the XamlPath expression, where the position of the row inside the data grid is also included. This means that if you sort on any column inside the data grid, regardless of where this row might end up, Test Studio would still perform a right-click on the first row because it is not made aware of the cell content. To make the element finding more flexible we will edit the find locators of that element as follows:
- Right-click on the CFileTextBlock element.
- Choose Edit Element from the context menu.
- In the Find Element window, choose Find in the Live Version, then choose Existing Test Step on the second page by clicking on the Choose Test Step button.
- In the Test Step Selector, choose RightClick on CFileTextBlock, which is the test step responsible for clicking on the data grid cell.
- Click on the Select button and wait until Test Studio executes the test right until the chosen step.
The Find element window currently reflects the FindLogic content, as shown in the following screenshot:
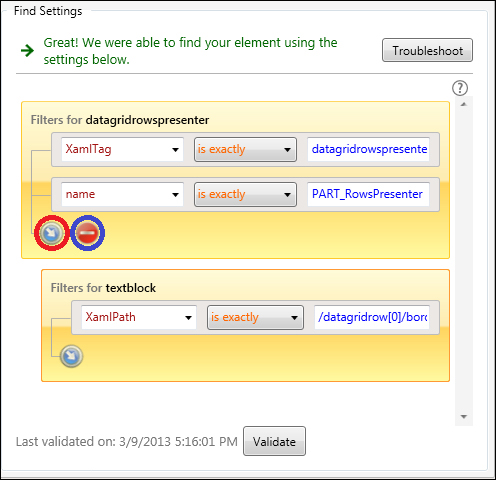
Data grid cell Find settings
The search expression on the textblock is embedded under those of datagridrowspresenter. This means that at runtime, Test Studio will first execute the filters on the datagridrowspresenter; once an object satisfies these criteria, Test Studio will then execute the filters on the collection of its children textblock. This is how the chained expressions work.
Update the filters as shown in the following screenshot. To add or delete any embedded expression click on the buttons highlighted in the previous screenshot.
After editing the expressions or adding a child level, click on the Validate button in order to force the Find Settings window to update the current object based on the constituting expressions.
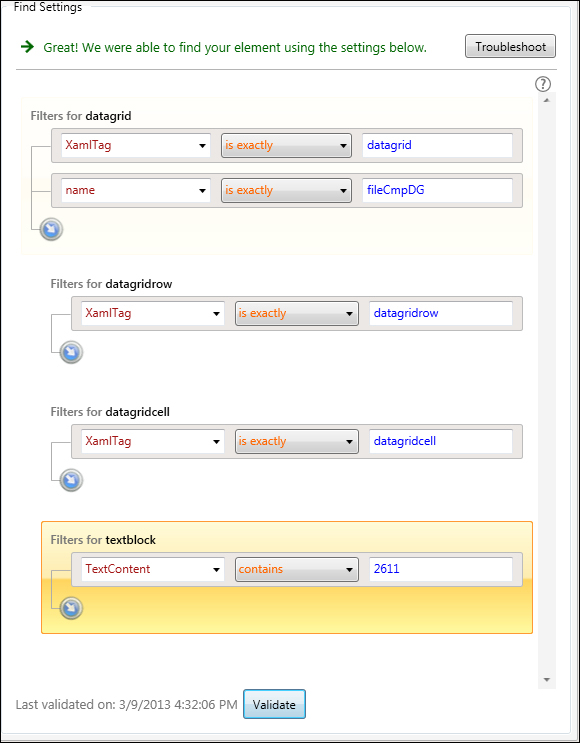
Chained expressions for data grid cells based on the content
Finding the cell in question requires a four-level search. Firstly, it starts by locating the data grid object using its tag type and name attribute. Once located, the second-level search would be to find any child object with a tag equal to DataGridRow. By default, if we stop here, the first row inside the data grid is returned; this is why we need to provide further attributes for evaluation in order for Test studio to uniquely identify an element mapping to our criteria. This can be understood in depth by clicking on the
Validate button at this stage. The following diagram shows the object that Test Studio has identified after adding the first two chained expressions only:

Chained expressions behavior
The third level looks for any data grid cell inside a datagridrow. Again if we stop adding filters, the first data grid cell of the first data grid row is returned. The last level queries apparent screen text content of the data grid cells. Hence, we are looking for a cell that contains the value 2611. By doing that we would have concluded the crafting of a chained find expression yielding to the same cell independent of its position inside the data grid.
Had the content been irrelevant to the test case context, the Find logic of the following screenshot would result in the first cell of the first row inside the file comparison data grid, without having to resort to hard-wiring hierarchy objects in the XamlPath attribute of the cell.

Chained expressions for data grid cells based on position
Lastly, click on the Save button to finalize the editing of the locator. You can rename the element-friendly name to File2611 to make it more informative. Run your test to verify that the updates did not interfere with the test execution.